How to Make Toilet Paper Roll Animal Puppets — Easy Step-by-Step Guide
Transform empty toilet paper rolls into a menagerie of charming animal puppets! This simple craft is perfect for sparking imagination and encouraging storytelling. It's a fantastic way to repurpose household items into engaging toys that children can create and play with.

Quick answer
To make toilet paper roll animal puppets, you need toilet paper rolls, construction paper, glue, scissors, and markers, taking about 30 minutes. Start by covering the roll with paper, then add features like ears and faces. This beginner-friendly activity has 10 steps and is perfect for 5-year-olds, offering a fun and creative way to play with recycled materials.
What you need
Shop on Amazon · As an Amazon Associate we earn from qualifying purchases. Links above are affiliate links — we may earn a commission at no extra cost to you.
Dive into a world of imaginative play with our delightful Toilet Paper Roll Animal Puppets craft! This project is more than just a fun activity; it's a gateway to storytelling and creativity, transforming everyday recyclables into beloved characters. Perfect for rainy days, classroom activities, or simply a way to keep little hands busy, this craft is incredibly accessible for young children, fostering their fine motor skills and artistic expression. Get ready to create a whole cast of characters that will bring hours of joy and adventure!
On this page
Step-by-Step Instructions
- 1
Prepare your workspace by laying down newspaper or a plastic tablecloth to protect surfaces from glue and marker. Gather all your materials so they are easily accessible.
- 2
Select one toilet paper roll and begin covering it entirely with blue construction paper. Measure the paper to ensure it wraps around the roll with a slight overlap, then cut it to size. Apply a thin, even layer of white craft glue along the edge of the paper that will overlap, and press it firmly onto the roll to secure. Smooth out any wrinkles or air bubbles for a neat finish. This will serve as your sky background, setting the scene for your animal adventures.
- 3
Take another toilet paper roll and cover it completely with brown construction paper. Similar to the blue roll, measure and cut the brown paper to fit snugly around the cardboard tube, allowing for a small overlap. Apply glue to the overlapping edge and press it down securely, ensuring the paper is smooth and adhered all the way around. This roll will be transformed into your friendly bear.
- 4
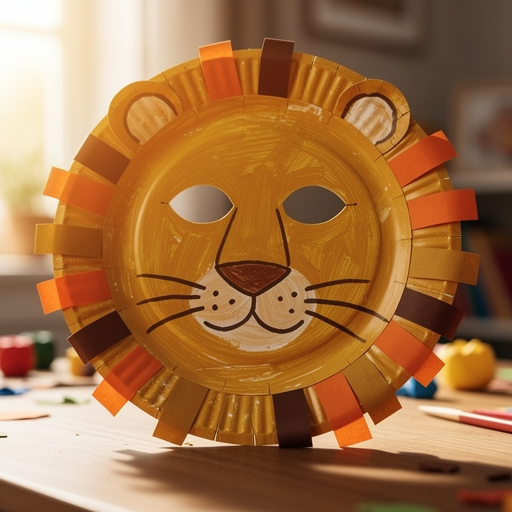
Choose a third toilet paper roll and cover it with yellow construction paper. Again, measure and cut the yellow paper to wrap around the roll, leaving a slight overlap for gluing. Apply glue to the overlapping section and press it firmly, smoothing out any creases. This vibrant yellow roll will become your majestic lion.
- 5
For the final toilet paper roll, cover it with pink construction paper. Measure and cut the pink paper to fit the roll, ensuring a neat overlap. Apply glue to the overlapping edge and press it down securely, making sure the paper is smooth and well-attached. This cheerful pink roll will be the base for your adorable pig.
- 6
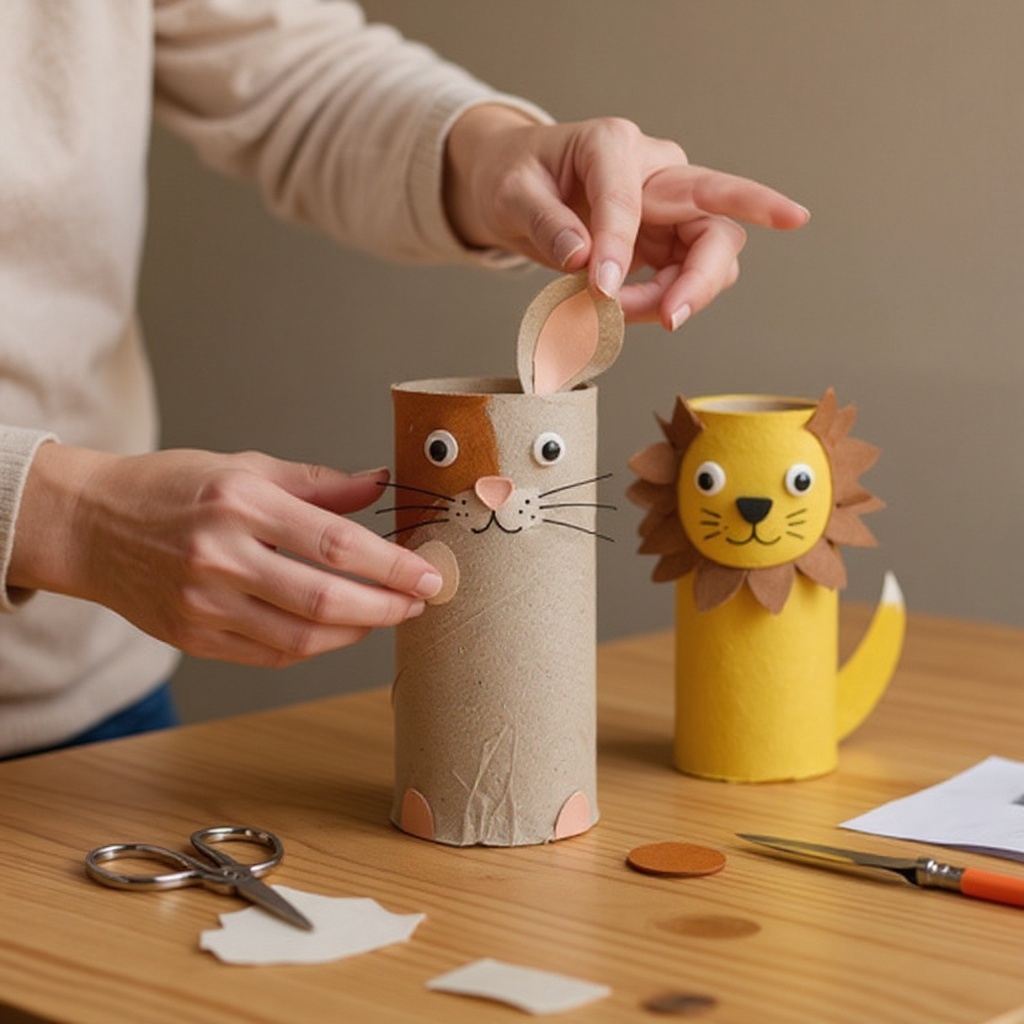
Now, let's give our bear some personality! From a scrap of brown construction paper, cut out two small, rounded ear shapes. These don't need to be perfectly identical; a little asymmetry can add character. Apply a small amount of glue to the flat edge of each ear and carefully attach them to the top of the brown toilet paper roll, positioning them slightly apart to resemble natural ears.
- 7
Transform the yellow roll into a magnificent lion by creating a wild mane. Cut a jagged, circular shape from the yellow construction paper, making sure it's wide enough to encircle the top of the toilet paper roll. You can make the edges wavy or spiky to mimic a lion's mane. Once you're happy with the shape, apply glue around the top edge of the yellow roll and carefully press the mane onto it, ensuring it's evenly distributed.
- 8
It's time to add ears to our pig! Using a piece of pink construction paper, cut out two small, rounded ear shapes, similar to those you made for the bear, but perhaps a bit smaller or more pointed depending on your desired pig look. Apply a small dab of glue to the bottom edge of each ear and attach them to the top of the pink toilet paper roll, positioning them to give your pig a cute and attentive expression.
- 9
With your black marker, it's time to bring your animals to life by drawing their faces. For the bear, draw two simple circles for eyes, a small oval for a nose, and a curved line for a mouth. For the lion, you might draw almond-shaped eyes, a triangular nose, and a friendly smile. For the pig, draw small, round eyes, a heart-shaped or round nose, and a simple mouth. Experiment with different expressions to give each animal a unique personality.
- 10
If you've chosen to use googly eyes, now is the perfect time to attach them. Apply a small dot of glue to the back of each googly eye and place them on the animal's face where you envision their eyes to be. Once the googly eyes are in place, allow them to dry for a minute before proceeding with drawing the rest of the facial features with your black marker. This ensures the eyes stay put and don't smudge the marker ink.
- 11
For the bear, you can add a darker brown circle or oval in the center of its nose to give it more definition. You can also add small lines to suggest fur texture around its face or paws if you wish. Consider adding small black dots for pupils within the googly eyes if you want a more cartoonish look.
- 12
To enhance the lion's mane, you can use your black marker to draw some darker lines within the yellow paper mane, suggesting individual strands of fur. You could also draw a small black nose and whiskers extending from its muzzle, adding to its regal appearance.
- 13
For the pig, you might want to draw a small snout detail on the pink nose shape you created earlier. You can also add small eyelashes above the eyes or a little curly tail on the back of the roll if you have enough space and want to add extra detail. Consider drawing rosy cheeks with a pink marker or crayon for a cheerful touch.
- 14
If you have extra construction paper, you can cut out small shapes to add extra details. For example, you could cut out white ovals for the bear's muzzle, or small black circles for the lion's pupils if you're not using googly eyes. These small additions can make a big difference in the final look of your puppets.
- 15
Allow all the glue to dry completely before moving on to play. This is a crucial step to ensure that all the paper elements and any added embellishments are securely attached and won't detach during enthusiastic play. Patience here will pay off in the longevity of your puppets.
- 16
Once the glue is thoroughly dry, your toilet paper roll animal puppets are ready for their grand debut! You can hold them from the bottom and make them talk, move, and interact with each other, creating imaginative stories and scenarios.
- 17
For the blue 'sky' roll, you can add some white fluffy cloud shapes cut from white construction paper. Glue these onto the blue background to create a more dynamic scene for your animal puppets to inhabit. This adds an extra layer of creativity to the puppet's environment.
- 18
Consider adding small feet to your animals by cutting out small rectangles or ovals from construction paper and gluing them to the bottom of the rolls. This can give your puppets a more complete and stable appearance when standing.
- 19
If you want to create more animals, don't be afraid to experiment with different colors and shapes of construction paper. You can make a green frog, a purple elephant, or a striped tiger by simply changing the base color and adding appropriate details. The possibilities are endless!
- 20
For a more textured effect, you could glue small pieces of yarn onto the rolls to represent fur or hair. For example, brown yarn could be glued around the top of the bear's head for a furry effect, or yellow yarn could be added to the lion's mane for extra volume.
Tips & Troubleshooting
- 1If the construction paper is too large to fit neatly around the toilet paper roll, don't hesitate to trim it down to size before you start gluing. This will help you achieve a cleaner, more professional-looking finish and prevent excess paper from bunching up.
- 2Encourage your child to explore their creativity by mixing and matching colors and shapes. For instance, they could give the bear blue ears or the pig a yellow mane! This fosters independent thinking and allows them to develop their own unique animal designs.
- 3It is essential to let the glue dry completely before allowing children to play with their finished puppets. This ensures that all the attached pieces, such as ears and manes, remain firmly in place and prevents the paper from peeling off during play.
- 4To keep your finished puppets in good condition and prevent them from getting squashed, store them upright in a sturdy box or a dedicated container. You can even decorate the storage box to make it a fun part of their display.
- 5For younger children who may struggle with cutting, consider pre-cutting some of the shapes like circles for ears or mane strips. This allows them to focus on the gluing and decorating aspects of the craft, building their confidence and enjoyment.
- 6If you're looking for a less messy alternative to liquid glue, consider using glue sticks. They are easier for little hands to manage, dry relatively quickly, and significantly reduce the risk of sticky fingers and accidental spills.
- 7Don't be afraid to deviate from the suggested animals! Encourage your child to invent their own creatures or to create animals based on their favorite storybook characters. The goal is to spark imagination, so let them lead the way with their ideas.
- 8To add extra durability and a smoother finish, you can apply a thin layer of Mod Podge over the construction paper once it's dry. This will seal the paper and make the puppets more resistant to wear and tear, especially if they will be handled frequently.
Related Activities You Might Enjoy
Frequently Asked Questions
What are some easy toilet paper roll crafts for 5-year-olds?
Toilet paper roll animal puppets are a fantastic option for 5-year-olds due to their simplicity and engaging nature. Other excellent choices include rockets, where children can decorate the rolls with foil and paper fins, or binoculars, by taping two rolls together and adding a string. Simple characters like robots or monsters are also great, allowing for lots of creative freedom with markers, paint, and glued-on embellishments. These crafts are ideal for developing fine motor skills and encouraging imaginative play, making them a perfect fit for this age group.
How can I make toilet paper roll crafts less messy?
To minimize mess during toilet paper roll crafts, consider using glue sticks instead of liquid glue whenever possible, as they are less prone to dripping and easier for children to control. Pre-cutting shapes for younger children can also reduce the need for them to handle scissors extensively. Covering your workspace with newspaper or a plastic tablecloth is essential for catching stray glue and marker marks. Having wet wipes readily available for sticky fingers is also a lifesaver. For painting projects, consider using washable paints and smocks to protect clothing.
What materials are needed for toilet paper roll crafts?
The core materials for toilet paper roll crafts are, of course, empty toilet paper rolls. Beyond that, common supplies include construction paper in various colors, child-safe scissors, white craft glue or glue sticks, and markers for drawing details. Googly eyes are a popular addition for adding personality to characters. For more elaborate projects, you might also want to have paint and brushes, yarn for texture, pipe cleaners for limbs or antennae, and fabric scraps for unique embellishments. The beauty of these crafts is their versatility, allowing you to use a wide range of household items.
Are toilet paper roll crafts good for fine motor skills?
Absolutely! Toilet paper roll crafts are excellent for developing fine motor skills in children. Activities such as cutting construction paper into shapes, carefully applying glue to small areas, drawing intricate details with markers, and manipulating small pieces of paper or embellishments all contribute to strengthening hand muscles and improving dexterity. These repetitive actions help children develop better hand-eye coordination, which is crucial for tasks like writing, buttoning clothes, and other everyday activities. The process of transforming a simple roll into a recognizable object is highly rewarding and encourages continued engagement with these skill-building tasks.
How can I adapt this craft for different age groups?
This craft is wonderfully adaptable. For younger toddlers (2-3 years old), focus on the gluing and sticking aspect. You can pre-cut all shapes and let them practice applying glue and pressing the pieces onto the roll. For preschoolers (3-4 years old), they can help with some of the simpler cutting and drawing. For older children (6+ years old), encourage more complex designs, perhaps by adding multiple layers, creating more detailed features, or even designing their own unique animal species. You can also introduce paint, glitter, or other decorative elements to increase the challenge and creative possibilities for older kids.
Can I make other types of puppets besides animals?
Certainly! Toilet paper rolls are incredibly versatile and can be transformed into a wide array of puppets. Beyond animals, you can create rockets by covering them in foil and adding paper fins, robots with bottle cap buttons and pipe cleaner arms, or even characters from favorite books or movies. Simple human figures, monsters with exaggerated features, or even food items like cupcakes can be made. The key is to think about the basic shape of the roll and how you can add elements to suggest different forms and characters. This opens up a whole universe of puppet possibilities!
What Next?
Congratulations on creating your very own menagerie of toilet paper roll animal puppets! These charming creations are ready for endless storytelling adventures. For variations, consider adding pipe cleaner legs, yarn for hair, or even small fabric scraps for texture. You can also paint the rolls instead of covering them with paper for a different look. Once your puppet show is over, store your creations upright in a decorated box or a designated shelf to keep them safe and ready for their next performance. This project is a fantastic springboard for further crafting adventures, like making a puppet theater or creating more complex characters!
Free: 10 Paper Crafts Anyone Can Make in 5 Minutes
Get our beginner guide + new craft ideas weekly.
No spam. Unsubscribe anytime.
Did you complete this activity?