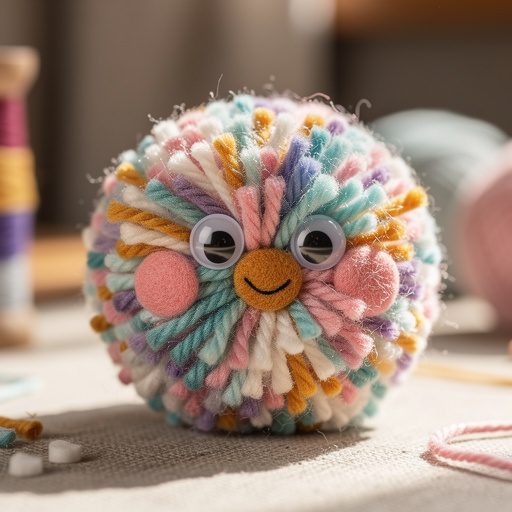
How to Make Fluffy Pom Pom Creatures — Easy Step-by-Step Guide
Transform simple yarn into charming pom pom creatures! This easy craft is perfect for little hands and sparks big imaginations.
Quick answer
To make fluffy pom pom creatures, you need yarn, scissors, and glue, taking about 30 minutes. Start by wrapping yarn around your fingers. This beginner-friendly activity has 10 steps and is perfect for families and kids aged 5+.
What you need
Shop on Amazon · As an Amazon Associate we earn from qualifying purchases. Links above are affiliate links — we may earn a commission at no extra cost to you.
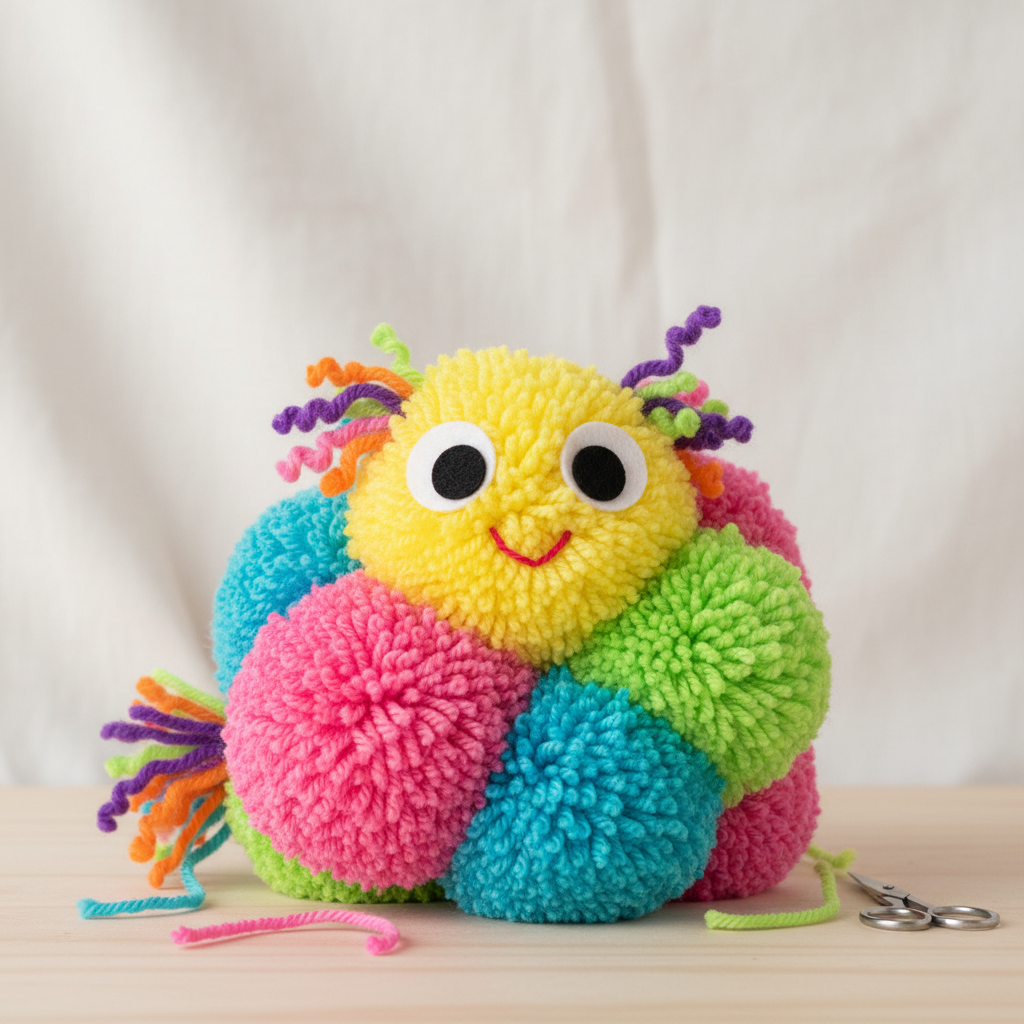
Unleash your creativity and dive into the delightful world of pom pom crafting! Transforming humble strands of yarn into whimsical, fluffy creatures is an incredibly rewarding and accessible project. This craft is a fantastic way to engage young minds, encouraging imaginative play and fine motor skill development. Whether you're looking for a fun family activity, a classroom project, or just a relaxing way to unwind, these pom pom pals are sure to bring smiles and a touch of handmade charm to your home. Get ready to craft some seriously cute companions!
On this page
Step-by-Step Instructions
- 1
Begin by selecting your yarn and deciding on the size of your first pom pom. For a standard pom pom, wrap the yarn around two fingers, keeping them slightly apart. Aim to wrap the yarn approximately 80-100 times, depending on the desired fluffiness and thickness of your pom pom; more wraps will result in a denser, fuller pom pom.
- 2
Once you've completed the wrapping, carefully slide the bundle of yarn off your fingers while ensuring the loops remain intact and together. It's crucial to keep the yarn bundle organized at this stage to prevent tangles and ensure a neat pom pom.
- 3
Take a separate piece of yarn, about 6 inches long, and thread it through the center of the yarn loops you just slid off. Tie this separate piece of yarn as tightly as possible around the middle of the bundle, creating a secure knot that will form the core of your pom pom. This knot is essential for holding the pom pom together.
- 4
Now, using your sharp scissors, carefully cut through all the loops on both sides of the tightly tied knot. Make sure to cut through every single loop to open up the yarn and begin shaping your pom pom. This step will reveal the fluffy texture of the yarn.
- 5
With all the loops cut, you'll have a somewhat messy, shaggy ball of yarn. Begin to trim and shape the yarn by carefully snipping away any uneven strands or excess fluff. Rotate the pom pom as you trim, aiming for a perfectly round and dense sphere. This shaping process is key to achieving a professional-looking pom pom.
- 6
If you're creating a creature with a distinct head and body, repeat steps 1-5 to create a second pom pom. This second pom pom should ideally be slightly smaller than the first one to represent the head, ensuring a proportional look for your creature.
- 7
Once you have your two pom poms (or more, depending on your creature design), it's time to assemble the basic structure. Apply a generous amount of craft glue or hot glue to one side of the smaller pom pom (the head) and firmly press it onto the center of the larger pom pom (the body). Hold in place until the glue begins to set.
- 8
Now, bring your creature to life by adding its eyes. Apply a small dot of glue to the back of each googly eye and carefully place them onto the head pom pom. You can position them close together for a cute look or further apart for a more surprised expression. Ensure they are securely attached.
- 9
Next, get creative with felt scraps to add facial features and other details. Cut out small shapes for ears, a nose, a mouth, or even tiny wings from your felt. Use a pencil to sketch your desired shapes before cutting for precision, and then attach these felt pieces to the head and body using craft glue.
- 10
For added personality and dimension, consider incorporating pipe cleaners. You can bend and shape pipe cleaners into antennae, legs, tails, or even arms. Securely insert one end of the pipe cleaner into the pom pom and add a dab of glue for extra hold, or glue them directly onto the surface of the pom pom.
- 11
Allow all the glue to dry completely before handling your pom pom creatures extensively. This drying time is crucial for ensuring all the attached elements, especially the googly eyes and felt pieces, are firmly secured and won't detach during play or display.
- 12
Once dry, gently fluff up any areas that might have become compressed during the gluing process. You can use your fingers or a soft brush to tease the yarn fibers and restore the pom pom's full, fluffy appearance. This final touch ensures your creature looks its best.
Tips & Troubleshooting
- 1If your pom pom ends up a little uneven or lopsided after trimming, don't worry! You can always go back in with your sharp scissors and carefully trim away any stray or protruding yarn fibers until it achieves a perfectly round and symmetrical shape. Patience during this trimming phase is key to a polished finish.
- 2For a wonderfully dense and luxurious pom pom, simply increase the number of yarn wraps around your fingers or pom pom maker. Wrapping the yarn 120-150 times will create a much fuller and more substantial pom pom, perfect for creatures that need a bit more heft.
- 3Don't be afraid to experiment with different yarn textures and colors to create truly unique and eye-catching creatures. Consider using variegated yarns for a multi-tonal effect, fuzzy yarns for a softer look, or even metallic threads for a touch of sparkle. Mixing and matching different types can lead to delightful surprises.
- 4Ensure that the central knot tying your pom pom together is exceptionally tight. A loose knot is the most common reason for a pom pom to unravel, so double-check its security before you start cutting the loops. You can even add a small dab of glue to the knot for extra reinforcement.
- 5When cutting the loops, use the sharpest scissors you have. Dull scissors can snag and pull the yarn, resulting in a messy and uneven cut. Take your time and make clean, decisive cuts through all the loops for a smooth and professional-looking pom pom.
- 6If you're making multiple pom poms for a single creature, try to keep the number of yarn wraps consistent for each pom pom that is meant to be the same size. This consistency will ensure your creature has a balanced and well-proportioned appearance.
- 7For attaching smaller felt pieces or googly eyes, using a toothpick or a small craft stick to apply the glue can offer more precision. This helps prevent excess glue from squeezing out and making the pom pom look messy, especially on delicate features.
- 8When using a hot glue gun, always have adult supervision readily available, especially if children are involved. Hot glue can cause burns, so ensure safe handling practices are followed, and have a bowl of cool water nearby for immediate first aid if needed.
Related Activities You Might Enjoy
Frequently Asked Questions
What is the easiest way to make a pom pom?
The simplest and most accessible method for creating a pom pom involves using your own fingers or a common household item like a fork. To start, wrap your chosen yarn around two fingers (or the tines of a fork) about 80-100 times, depending on how fluffy you want the pom pom to be. Once you've wrapped enough yarn, carefully slide the bundle off your fingers while keeping the loops intact. Then, take another piece of yarn, about six inches long, and thread it through the center of the loops, tying it as tightly as possible to create a secure knot. Finally, use sharp scissors to cut through all the loops on both sides of the knot, and then trim the yarn into a round shape. This technique requires no special tools and is perfect for beginners.
How do you make pom poms without a pom pom maker?
You can easily create charming pom poms without a dedicated pom pom maker by utilizing readily available items. Your fingers are a fantastic tool; simply wrap yarn around two or three fingers to create the base. Another excellent option is a fork – wrap the yarn around the tines, tie it securely in the middle, and then cut the loops. For a more consistent size, you can cut a U-shaped piece of sturdy cardboard and wrap the yarn around the arms of the 'U'. Regardless of the method, the core principle remains the same: wrap yarn, tie it tightly in the center to create a secure core, and then cut all the surrounding loops to reveal the fluffy pom pom. Trimming is essential to achieve a perfectly round shape.
What kind of yarn is best for pom poms?
For most pom pom crafts, especially those intended for creatures and general crafting, worsted weight yarn is the ideal choice. This weight of yarn is easy to handle, readily available in a vast array of colors, and creates a nice, full, and fluffy pom pom without being too difficult to cut. Softer yarns, such as chenille or acrylic blends, can also work wonderfully, particularly if you're aiming for a cuddly and huggable creature. Avoid very thin yarns, as they may require an excessive number of wraps to achieve a decent thickness, and overly fuzzy or novelty yarns can sometimes be challenging to cut evenly. Ultimately, the best yarn will depend on the desired texture and appearance of your finished pom pom creature.
How do you attach pom poms together?
Attaching pom poms together to form creatures is straightforward and can be achieved with common craft adhesives. The most popular methods include using craft glue or a hot glue gun. Apply a generous amount of glue to the surface of one pom pom where you want to attach it to another, and then firmly press the two together, holding them in place until the glue begins to set. For a more robust and permanent attachment, especially if the creatures will be handled frequently, you can also use a needle and thread. Thread a yarn needle with a strong piece of yarn, and stitch the pom poms together by passing the needle through the core knot of each pom pom multiple times. This method provides excellent durability and can be done before adding decorative elements.
Can I make pom pom creatures in different sizes?
Absolutely! The beauty of making pom pom creatures is their versatility in size. The size of your pom pom is directly determined by the width of the object you wrap the yarn around. For larger pom poms, you can use a wider piece of cardboard, a thicker book, or even your own two hands spread wider apart. For smaller pom poms, you can use fewer fingers, a thinner fork, or a smaller piece of cardboard. Experimenting with different wrapping widths will allow you to create creatures of all scales, from tiny, pocket-sized pals to larger, huggable companions. This flexibility makes the project adaptable to various creative visions and material availability.
How do I make my pom pom creatures more durable for play?
To enhance the durability of your pom pom creatures for active play, focus on secure attachments and reinforced construction. When tying the central knot of your pom poms, ensure it is exceptionally tight and consider adding a small dab of strong craft glue or fabric glue directly onto the knot itself before it's fully enclosed by the yarn. For attaching pom poms together and adding decorative elements like felt ears or pipe cleaner legs, a hot glue gun generally provides a stronger bond than standard craft glue, but always use it with adult supervision. If stitching is an option, using a needle and yarn to sew pom poms together and attach features will offer the most robust construction, making them less likely to fall apart during enthusiastic play.
What Next?
Congratulations on creating your very own collection of fluffy pom pom creatures! These adorable creations are perfect for decorating shelves, backpacks, or even as unique handmade gifts. Don't stop at just a few; experiment with different yarn types, sizes, and color combinations to build an entire menagerie of fantastical beasts. For next steps, consider creating larger pom poms to make cuddly companions or smaller ones for intricate details on other crafts. Display your finished creatures proudly, and remember to store them gently to maintain their fluffy allure.
Free: 10 Paper Crafts Anyone Can Make in 5 Minutes
Get our beginner guide + new craft ideas weekly.
No spam. Unsubscribe anytime.
Did you complete this activity?