Egg Carton Caterpillar Critters Made Simple — Quick Start Guide for Beginners
Transform simple egg cartons into charming caterpillar critters! This easy craft is perfect for little hands and sparks imagination. A fantastic way to recycle and create colorful friends.
Quick answer
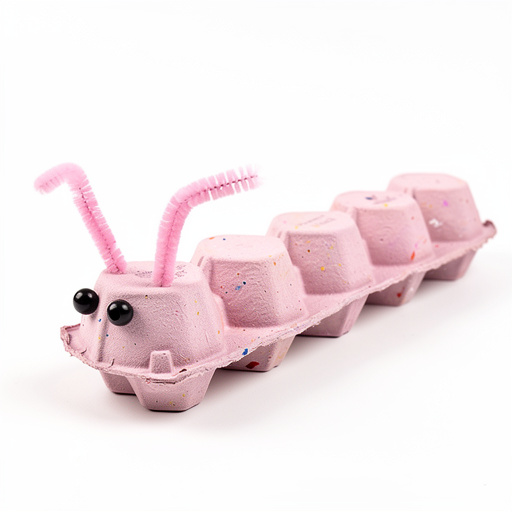
To make Egg Carton Caterpillar Critters, you need a cardboard egg carton, washable tempera paints, paintbrushes, googly eyes, pipe cleaners, and craft glue. This takes about 30 minutes of active crafting time, plus drying time for paint and glue.
What you need
Shop on Amazon · As an Amazon Associate we earn from qualifying purchases. Links above are affiliate links — we may earn a commission at no extra cost to you.
Welcome to the wonderfully whimsical world of Egg Carton Caterpillar Critters! This delightful DIY project is more than just a craft; it's an adventure in recycling and creativity for your little ones. Using everyday materials, you'll transform humble egg cartons into a vibrant parade of friendly caterpillars. It's an ideal activity for toddlers and preschoolers, fostering fine motor skills, color recognition, and imaginative play, all while promoting eco-conscious habits. Get ready for giggles and colorful creations!
On this page
Step-by-Step Instructions
- 1
Step 1: Prepare the Egg Carton. Carefully cut the egg carton into individual cups or sections of 2-3 cups each. For a 2-year-old, using just one or two cups per caterpillar is ideal to keep it manageable and prevent overwhelming them. Ensure the edges are smooth and free of sharp points after cutting, as little hands will be handling them.
- 2
Step 2: Paint the Caterpillar Body. Let your little one explore the colors! Provide chunky paintbrushes and let them paint the egg carton sections. Encourage them to cover the entire surface, inside and out, with their chosen colors, explaining that this forms the caterpillar's body segments. This is a great sensory experience and a chance to discuss color mixing.
- 3
Step 3: Allow for Initial Drying. Set the painted egg carton sections aside to dry. This might take 15-20 minutes, or you can speed up the process slightly with a hairdryer on a cool setting, which is especially helpful for impatient toddlers. Ensure the paint is dry to the touch before moving on to prevent smudging.
- 4
Step 4: Add the Eyes. Once the paint is dry, it's time for the eyes! Help your child apply small dots of white craft glue to the front of the egg carton section, where the caterpillar's head will be, and press on the googly eyes. Let them choose where the eyes go and how many eyes they want – this is a fantastic opportunity for them to express their creativity and develop their fine motor skills.
- 5
Step 5: Prepare the Antennae. Take a pipe cleaner and twist it in the middle to create two equal lengths, forming a V-shape. Then, bend each length slightly to form antennae. For younger toddlers who might struggle with twisting, an adult can pre-bend the pipe cleaners into the desired shape. You can also twist a small pom-pom onto the end of each antenna for a fun, tactile touch.
- 6
Step 6: Attach the Antennae. Apply a small amount of glue to the bottom of the bent pipe cleaner antennae. Carefully press them onto the top of the egg carton caterpillar's head section, ensuring they are positioned where you envision the caterpillar's head to be. Hold them in place for a few seconds to ensure they adhere well before letting go.
- 7
Step 7: Add a Nose or Mouth (Optional). If you're using pom-poms, glue one onto the front of the caterpillar's head, just below the eyes, for a cute nose. Alternatively, use a washable marker to draw a simple smile, a funny mouth, or even add some rosy cheeks. This step allows for more personalization and encourages further creative expression.
- 8
Step 8: Decorate with Stripes or Patterns (Optional). Encourage your child to add more details to their caterpillar's body. They can use markers to draw stripes, dots, or other fun patterns on the painted segments. This is another opportunity for them to express their artistic flair and practice fine motor control as they draw on the textured surface.
- 9
Step 9: Add Texture or Sparkle (Optional). For an extra touch of fun, you can add other decorative elements. Glue on small pieces of yarn for a fuzzy texture, or sprinkle glitter onto wet glue for a sparkly effect. Small felt shapes can also be glued on for added visual interest. Ensure any added elements are securely attached.
- 10
Step 10: Connect Multiple Sections (Optional for Older Toddlers/Preschoolers). If you've cut your egg carton into multiple sections for one longer caterpillar, you can glue them together end-to-end to create a more substantial creature. Apply a generous amount of glue to the connecting edges and press them firmly together, letting the glue dry thoroughly between sections before proceeding to the next connection.
- 11
Step 11: Add Legs (Optional). For a more realistic touch or just for added fun, you can cut small slits on the sides of the egg carton cups and gently insert short pieces of pipe cleaner or even small craft sticks as legs. This adds another dimension to the craft and can be a fun challenge for older children to help with.
- 12
Step 12: Let it Dry Completely. Before your child can proudly play with their finished caterpillars, ensure all the glue and paint are completely dry. This might take an hour or more depending on humidity and how much paint or glue was used. This prevents smudging, ensures the decorations stay put, and makes the craft more durable for playtime.
- 13
Step 13: Name Your Critter. Once the caterpillar is fully dry and all decorations are secure, encourage your child to give their creation a unique name. This adds a personal touch, fosters a sense of ownership, and encourages imaginative play with their new, colorful friend.
- 14
Step 14: Playtime! Your Egg Carton Caterpillar Critters are now ready for imaginative adventures. They can be used for storytelling, as characters in a puppet show, or simply as colorful decorations around the house. Encourage your child to create stories about where their caterpillars are going and what they like to do.
- 15
Step 15: Clean Up. Gather all the paintbrushes, leftover paint, glue bottles, and any scraps. Wipe down the crafting area thoroughly to ensure it's clean for your next creative session. Proper cleanup is an important part of the crafting process and teaches children responsibility.
Tips & Troubleshooting
- 1Embrace the Mess: Toddlers learn through sensory exploration, and painting can be messy! Cover your work surface with newspaper or a plastic tablecloth and dress your child in old clothes or an apron. This makes cleanup much easier and allows for more freedom during the painting process, letting them truly enjoy the tactile experience.
- 2Focus on Process, Not Product: For 2-year-olds, the joy is in the doing, not necessarily the perfect outcome. Celebrate their efforts and creativity, no matter how the caterpillar turns out. Their engagement, the experience of creating, and the time spent together are the most valuable parts of this craft.
- 3Pre-Cut Materials for Ease: While toddlers can help with painting and gluing, cutting the egg carton can be tricky and potentially unsafe. An adult should handle all the cutting to ensure safety and create manageable pieces for little hands to work with, allowing the child to focus on the decorating aspects.
- 4Drying Time Management: To keep a 2-year-old engaged, try to minimize waiting times between steps. If possible, use a hairdryer on a cool setting to speed up paint drying between steps. This keeps the momentum going and prevents frustration from long periods of inactivity.
- 5Color Mixing Exploration: Encourage your child to mix colors directly on their egg carton. Talk about what happens when they mix blue and yellow to make green, or red and white to make pink. This adds an educational element to the creative process and helps them understand basic color theory.
- 6Sensory Additions: Once the paint is dry, consider adding other sensory elements to enhance the tactile experience. Glue on small pieces of yarn for fuzzy texture, or sprinkle glitter onto wet glue for sparkle. Just be mindful of the mess level with these additions and have extra cleanup supplies ready.
- 7Storytelling Prompts: After the caterpillars are made, use them as prompts for storytelling to encourage language development and imaginative play. Ask your child questions like, 'Where is your caterpillar going on its adventure today?' or 'What does your caterpillar like to eat in the garden?'
- 8Varied Egg Carton Types: Don't be afraid to experiment with different types of cardboard egg cartons. Some have more distinct cups, which can lead to more segmented-looking caterpillars. You can also use the lid of the egg carton as a base for a small scene or to attach multiple caterpillars together.
Related Activities You Might Enjoy
Frequently Asked Questions
What are the best types of paint to use for egg carton crafts with 2-year-olds?
For 2-year-olds, washable tempera paints are the absolute best choice for this egg carton caterpillar craft. They are specifically formulated to be non-toxic, making them safe for young children, and are incredibly easy to clean up from skin, clothes, and surfaces, which is a huge plus for parents. These paints come in vibrant, appealing colors that are perfect for capturing the imagination of little artists. Avoid permanent markers or paints that are difficult to remove, as spills and accidental marks are common at this age. Ensuring the paint is also quick-drying can help keep the crafting session moving smoothly and prevent smudging, making the entire experience more enjoyable for both child and caregiver.
How can I make this craft less messy for my 2-year-old?
Minimizing mess is key when crafting with toddlers! Start by covering your entire workspace with a large plastic tablecloth or old newspapers to protect surfaces from paint and glue. Dress your child in an old t-shirt or a dedicated smock that you don't mind getting a little colorful. Using chunky, easy-to-grip paintbrushes that hold less paint can also help control the amount of paint applied. You can pre-fill small paint pots or palettes with just a small amount of paint to prevent spills and make dipping easier. Consider using paint sticks or crayons as an alternative to liquid paint if you're particularly concerned about mess, though liquid paint offers a more traditional painting experience.
What are some other simple decorations I can add to the egg carton caterpillars?
Beyond googly eyes and pipe cleaners, you can add a variety of fun and simple decorations to make your egg carton caterpillars unique! Small pom-poms make excellent noses or can be glued to the ends of antennae for a playful touch. Yarn scraps can be glued on for a fuzzy texture, or you can use glitter glue for a sparkly effect that adds a touch of magic. Small buttons can also be glued on for extra detail, but ensure they are securely attached and supervise closely if your child is still mouthing objects. Washable markers are excellent for drawing stripes, spots, or happy faces, adding personality to each critter.
How long does this craft typically take with a 2-year-old?
The active crafting time for Egg Carton Caterpillar Critters with a 2-year-old is usually around 20-30 minutes. This includes the time spent painting, gluing on eyes, and attaching antennae. However, you absolutely need to factor in drying time, which can add another 30-60 minutes or more, depending on how much paint is used and the ambient humidity. It's often best to break this craft into two sessions: one for the painting and initial decorating, and another for adding the final touches once everything is dry. This approach keeps the child engaged without long, frustrating waits.
Can I use Styrofoam egg cartons for this craft?
While you can technically use Styrofoam egg cartons for this craft, cardboard is highly recommended, especially when working with 2-year-olds. Cardboard egg cartons are much easier for young children to paint and glue onto; the paint adheres better and is less likely to peel off. Styrofoam can be slippery, and glue might not hold as securely. Furthermore, cardboard is more environmentally friendly and significantly easier for an adult to cut into smaller, manageable pieces suitable for little hands. Sticking with cardboard will provide a better crafting experience and more durable results for your adorable caterpillars.
What age group is this craft best suited for?
This Egg Carton Caterpillar Critter craft is ideally suited for toddlers and preschoolers, typically ranging from ages 2 to 5 years old. Younger toddlers (around 2 years old) will benefit most from adult assistance with cutting and gluing, focusing primarily on the painting and eye placement. As children get older, around 3-5 years old, they can become more independent, helping with more steps like twisting pipe cleaners, drawing details, and even connecting multiple sections. The simplicity of the materials and the forgiving nature of the craft make it adaptable to various skill levels within this age range, ensuring everyone can participate and have fun.
What Next?
Once your delightful egg carton caterpillars are complete and fully dry, they are ready to embark on countless imaginative journeys! Consider creating a miniature habitat for them using a shoebox diorama, complete with painted leaves and flowers. For variations, try using different types of egg cartons, like those with more cups, to create longer caterpillars, or experiment with different decorative elements like glitter glue or small fabric scraps. These charming critters also make wonderful handmade gifts or can be displayed proudly on a shelf. For your next project, explore other recycled material crafts like cardboard tube binoculars or plastic bottle planters!
Free: 10 Paper Crafts Anyone Can Make in 5 Minutes
Get our beginner guide + new craft ideas weekly.
No spam. Unsubscribe anytime.
Did you complete this activity?
Related