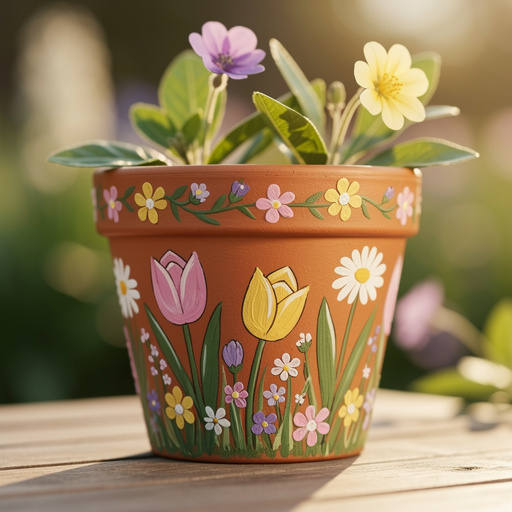
How to Paint Spring Flower Pots — Easy Step-by-Step Guide
Transform plain terracotta pots into vibrant spring masterpieces with this fun and easy painting craft for preschoolers. Perfect for adding a pop of color to your home or garden!
Quick answer
To make spring flower pots, you need terracotta pots, acrylic paints, brushes, and about 45 minutes. Start by cleaning the pots. This beginner-friendly activity has 7 steps and is perfect for preschoolers aged 3-6.
What you need
Shop on Amazon · As an Amazon Associate we earn from qualifying purchases. Links above are affiliate links — we may earn a commission at no extra cost to you.
As the chill of winter recedes and the world bursts into bloom, it's the perfect time to inject some vibrant color into your home and garden. This spring flower pot painting project is an incredibly rewarding and accessible craft, ideal for little hands eager to create. It’s a fantastic way to engage preschoolers in a hands-on activity that fosters creativity, fine motor skills, and a love for nature. The simple act of transforming a humble terracotta pot into a personalized work of art is a joy for both children and adults, making it a cherished springtime tradition.
On this page
Step-by-Step Instructions
- 1
Cover your workspace thoroughly with newspaper or a drop cloth. This is crucial to prevent accidental paint spills and stains on your table or floor, especially when working with enthusiastic young artists.
- 2
Ensure the terracotta pot is clean and completely dry before you begin painting. Wipe it down with a damp cloth to remove any dust or debris, and allow it to air dry fully; painting on a damp surface will cause the paint to peel.
- 3
Prepare your paint palette by squeezing a small amount of each acrylic paint color onto a palette or a disposable plate. This makes it easy to access colors and encourages thoughtful color selection, rather than overwhelming the workspace with open paint pots.
- 4
Begin by applying a base coat of paint to the outside of the terracotta pot. You can choose a single solid color, or let children experiment with applying multiple colors in stripes or abstract patterns to create a unique foundation for their design.
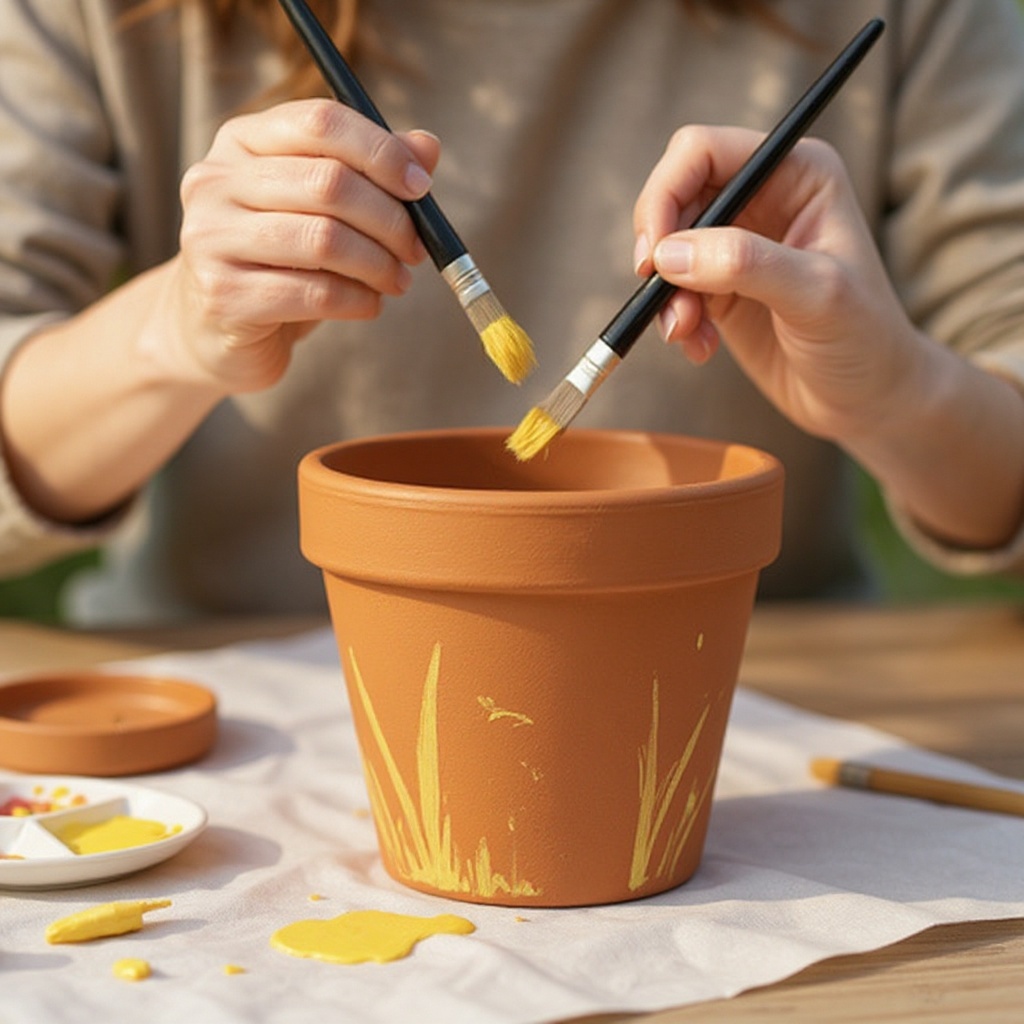
- 5
If you're aiming for a smooth, even base coat, use a medium-sized brush and apply the paint in long, even strokes. For a more textured look, you can dab the paint on with a sponge or use a larger brush with less paint for a lighter coverage.
- 6
Allow the first layer of paint to dry completely before proceeding. This typically takes about 10-15 minutes, depending on the thickness of the paint and the humidity. Touching the paint too soon can smudge your hard work.
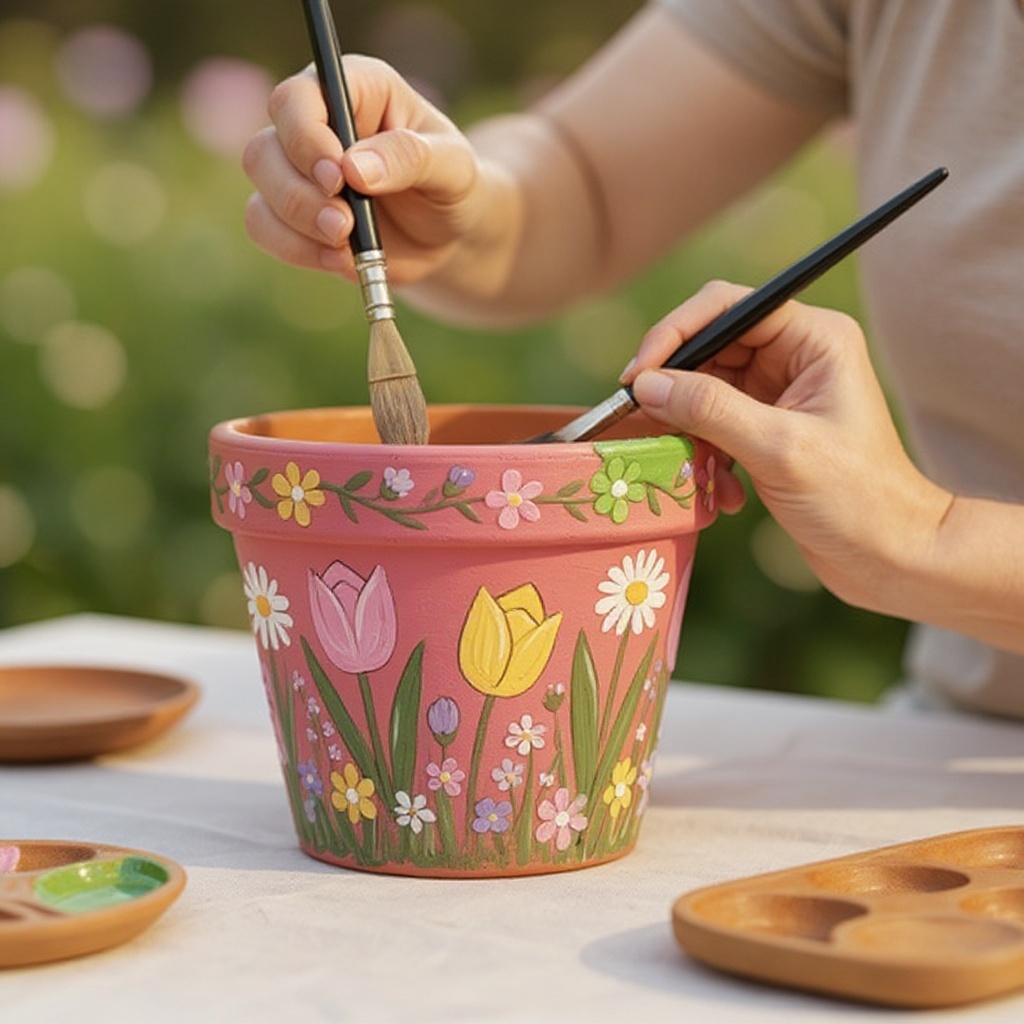
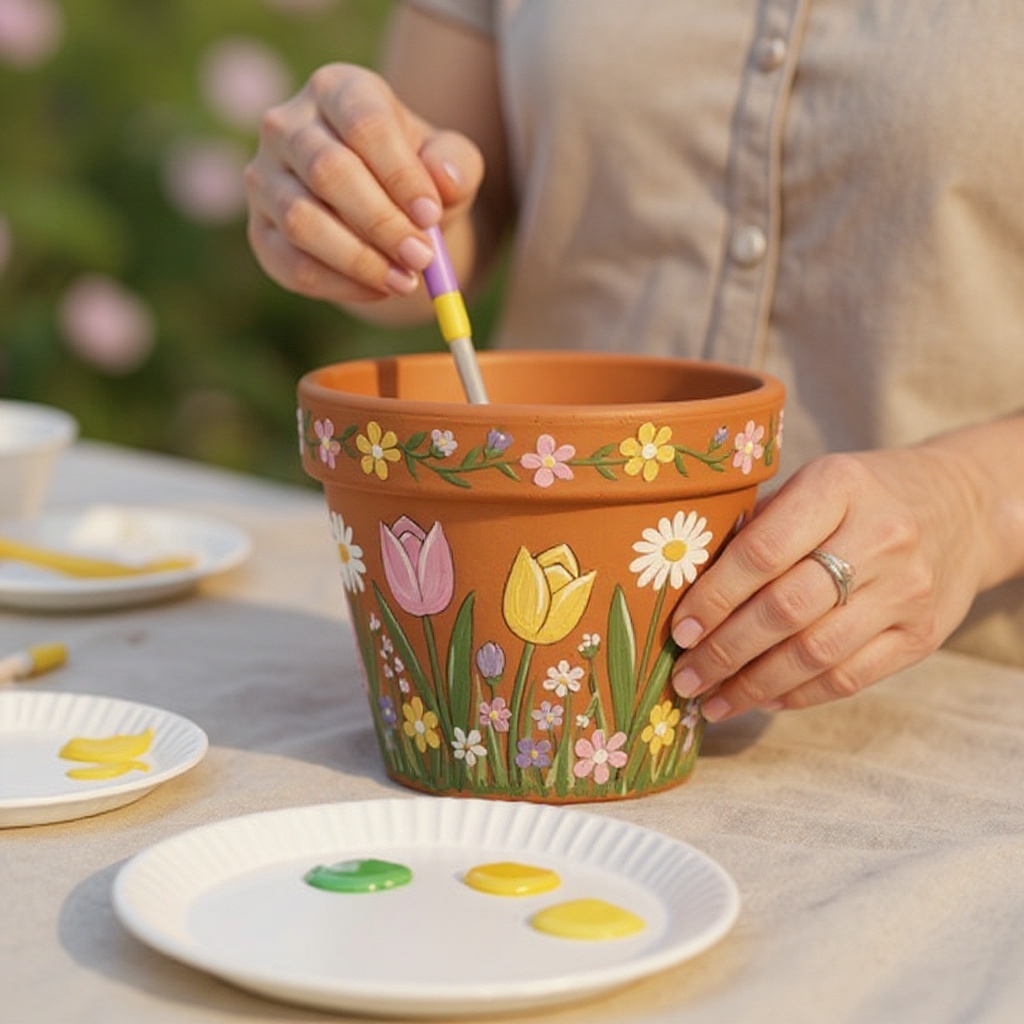
- 7
Once the base coat is dry, you can begin adding details and designs. Dip a smaller paintbrush into your chosen color and carefully paint on patterns like dots, stripes, squiggles, or simple flower shapes.
- 8
For a more intricate look, consider using painter's tape to create sharp lines or geometric sections. Apply the tape firmly to the dry base coat, paint over it, and then carefully peel the tape away while the paint is still slightly wet for the cleanest edges.
- 9
If using stencils, carefully position them on the pot and secure them with a bit of painter's tape if needed. Gently dab or brush paint around the edges of the stencil, being careful not to let paint seep underneath.
- 10
Remove the stencil slowly and carefully before the paint dries completely. This will ensure a crisp, clean image without any smudged lines or torn paint edges.
- 11
Allow the first layer of detailed painting to dry for about 10-15 minutes. This drying time is essential before applying a second coat or adding more layers of paint.
- 12
Apply a second coat of paint if desired for brighter, more opaque colors or to ensure better coverage over any lighter base colors. This step is especially helpful for vibrant spring hues that might appear muted after a single coat.
- 13
Encourage children to experiment with color mixing on their palette to create unique shades and personalize their designs further. Mixing yellow and blue, for instance, can create a lovely spring green.
- 14
If the paint seems too thick to apply smoothly, add a tiny drop of water directly to your brush, not to the main paint pot. This helps to thin the paint just enough for easier application without compromising the paint's integrity.
- 15
Once all the paint is completely dry to the touch, your spring flower pot is ready for its final touches or to be filled with soil and a plant. Ensure there are no tacky spots before moving to the next stage.
- 16
For added durability, especially if the pots will be placed outdoors, consider applying a clear acrylic sealant spray. This step requires adult supervision and should be done in a well-ventilated area, following the product's instructions carefully.
- 17
Allow the sealant to cure completely according to the manufacturer's instructions, which can take several hours or even a full day. This ensures the painted design is protected from moisture and UV rays.
- 18
Your beautifully decorated spring flower pot is now ready to be filled with soil and your favorite spring plants or flowers!
Tips & Troubleshooting
- 1If paint is too thick, add a tiny drop of water to your brush, not directly to the paint pot. Adding water directly to the paint pot can alter the consistency of the entire batch, making it too thin for future use.
- 2Encourage children to experiment with color mixing to create unique shades. This not only fosters creativity but also teaches basic color theory in a fun, hands-on way, leading to personalized and unexpected color combinations.
- 3For a more durable finish, consider using outdoor-specific acrylic paints or applying a clear sealant once the paint is fully dry. Adult supervision is required for sealant application, as it often involves spray cans and ventilation needs.
- 4Let children choose their favorite spring colors and patterns to personalize their pots. Giving them agency in the creative process boosts their confidence and ensures they create a pot they truly love and feel proud of.
- 5This craft can be adapted for older children by introducing more detailed painting techniques or using finer brushes. They might enjoy creating intricate floral patterns, landscapes, or even abstract art with more complex brushwork.
- 6Don't be afraid of imperfections! Wobbly lines and slightly smudged paint can add to the charm and handmade quality of the pot, especially when created by young children. Embrace the unique character of each piece.
- 7Consider using sponges cut into shapes like leaves or flowers for easy stamping techniques. This can be a great way for younger children to add patterns without the need for precise brush control.
- 8If you're painting multiple pots, consider a theme for a cohesive look. For example, all pots could feature different types of spring flowers, or a collection of pots could be painted in a rainbow of colors.
Related Activities You Might Enjoy
Frequently Asked Questions
What kind of paint should I use for terracotta pots?
Acrylic paints are the best choice for decorating terracotta pots because they adhere well to the porous surface and are available in a vast array of vibrant colors suitable for spring themes. Water-based acrylics are generally safe and easy to work with, especially for children. Ensure the paint is fully dry before handling or planting, as wet acrylic paint can be sticky and may smudge. For outdoor use, consider using acrylic paints specifically formulated for outdoor durability or applying a clear sealant over the dried paint to protect the design from the elements and prolong its vibrancy.
How do I make the painted flower pots last longer outdoors?
To ensure your beautifully painted flower pots withstand the rigors of outdoor weather, it's highly recommended to use outdoor-specific acrylic paints, which are formulated to be more resistant to UV rays and moisture. Alternatively, once your acrylic paint design is completely dry, you can apply a clear, waterproof sealant spray or brush-on varnish. Look for products labeled as 'outdoor,' 'waterproof,' or 'UV resistant.' Apply the sealant in a well-ventilated area, following the product's instructions carefully, and allow it to cure fully before exposing the pot to the elements. This protective layer will shield the paint from rain, sun, and temperature fluctuations, keeping your designs looking fresh for longer.
Can preschoolers paint on the inside of the flower pot?
While preschoolers can certainly paint on the inside of a flower pot, it's generally recommended to only paint the outside. This is primarily because some paints, even acrylics, might not be formulated for direct, prolonged contact with soil and plant roots. Certain chemicals or pigments could potentially leach into the soil and affect plant health. If you do choose to paint the inside, opt for non-toxic, water-based paints and consider leaving a border unpainted at the top rim where the soil will meet the pot. Always prioritize the health of your plants and choose paints that are safe for such applications.
What are some easy spring designs for preschoolers to paint?
Preschoolers can create a variety of delightful spring designs on their flower pots with simple techniques. Dots are a fantastic starting point; they can be made with the tip of a brush or even the end of a paintbrush handle dipped in paint. Stripes are another easy option, achieved by painting lines vertically, horizontally, or diagonally. Squiggles and wavy lines add a playful touch. Basic flower shapes, like simple circles with petals, are also achievable. For even easier decoration, stencils of butterflies, ladybugs, suns, or simple flower outlines can be used, allowing children to fill in the shapes with color.
How long does this project typically take?
The actual painting time for this project is quite quick, usually around 30-45 minutes, depending on the complexity of the designs and the number of children involved. However, you need to factor in drying time between coats of paint, which can add an additional 30-60 minutes spread throughout the process. If you choose to apply a sealant for outdoor durability, that will add another layer of drying and curing time, potentially extending the project over a couple of days. Overall, you can complete the painting and have a ready-to-plant pot within a few hours, spread out with drying periods.
What are the benefits of this craft for young children?
This spring flower pot painting project offers numerous developmental benefits for young children. It significantly enhances fine motor skills as they grip brushes, control paint application, and create detailed designs. Color recognition and mixing are naturally explored, fostering early understanding of color theory. The activity also boosts creativity and self-expression, allowing children to translate their ideas and preferences onto the pot. Following instructions and completing a project from start to finish builds a sense of accomplishment and boosts self-esteem. Furthermore, it provides a wonderful opportunity for sensory exploration and can be a calming, focused activity.
What Next?
Once your spring flower pots are dry and ready, the real fun begins: planting! Choose colorful spring blooms like pansies, petunias, or even a small herb garden to bring your creations to life. Display them proudly on a windowsill, patio, or garden path to brighten any space. For a fun variation, consider using sponges to create polka dots or dipping the pots for a tie-dye effect. You can also explore different themes, like ladybugs, bees, or rainbow designs. This project is a wonderful stepping stone to other garden crafts, like decorating stepping stones or building fairy houses.
Free: 10 Paper Crafts Anyone Can Make in 5 Minutes
Get our beginner guide + new craft ideas weekly.
No spam. Unsubscribe anytime.
Did you complete this activity?
Related