How to Make Paper Plate Sun Catchers — Easy Step-by-Step Guide
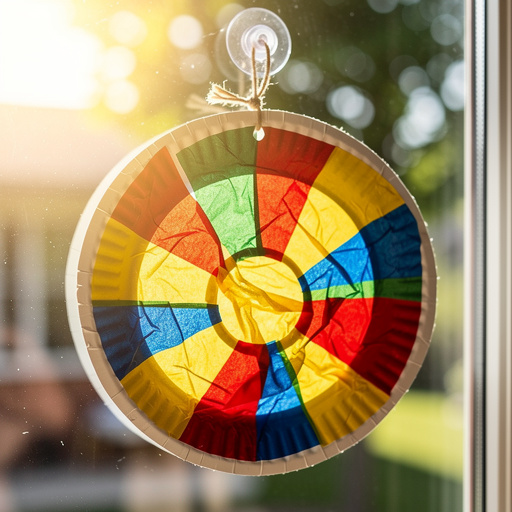
Transform simple paper plates into vibrant sun catchers that dance with light. A delightful screen-free activity for creative minds. This project is perfect for sparking imagination and bringing a touch of handmade beauty to any window.
Quick answer
To make paper plate sun catchers, you need paper plates, tissue paper, scissors, and glue, taking about 30 minutes. Start by cutting out the center of the paper plate. This beginner-friendly activity has 7 steps and is perfect for kids aged 4+.
What you need
Shop on Amazon · As an Amazon Associate we earn from qualifying purchases. Links above are affiliate links — we may earn a commission at no extra cost to you.
Looking for a wonderfully engaging and visually rewarding craft that will brighten up your home? Our Paper Plate Sun Catchers project is the perfect answer! This delightful activity transforms everyday materials into shimmering works of art that capture and play with sunlight. It’s an ideal screen-free adventure for children, fostering creativity, fine motor skills, and an appreciation for color and light. Gather your supplies and prepare to create a dazzling display that will bring smiles to faces of all ages.
On this page
Step-by-Step Instructions
- 1
Gather all your materials and prepare your workspace. Lay down some newspaper or a protective mat if you're concerned about glue spills, especially if you're using a paintbrush for application. Ensure you have enough space to comfortably work with the paper plates and tissue paper.
- 2
Take one paper plate and, using a pencil or marker, draw a circle about 1 inch from the outer edge. This line will guide your cutting. Carefully cut out the center circle along the drawn line, leaving about a 1-inch rim. This rim will serve as the frame for your beautiful sun catcher. If you have a craft knife, you can achieve a very clean cut, but scissors are perfectly adequate. Ensure the cut is as smooth as possible to create a neat frame.
- 3
Now, it's time to prepare your colorful tissue paper. Tear or cut the assorted tissue paper into small pieces. Aim for pieces that are roughly 1-2 inches in size, but don't worry about perfection; a variety of shapes and sizes will add visual interest. You can also experiment with different cutting techniques, like making strips or small squares, to create unique textures.
- 4
Apply a thin, even layer of white craft glue to the rim of the paper plate frame. You can use a paintbrush for this step to ensure an even coating, or simply spread the glue with the tip of the glue bottle. Avoid applying too much glue, as it can make the tissue paper soggy and difficult to work with.
- 5
Begin sticking the tissue paper pieces onto the glued rim. Overlap the pieces slightly to ensure there are no gaps and that the entire surface of the rim is covered. You can layer different colors on top of each other for a richer, more vibrant effect. Press each piece down gently to ensure it adheres well to the glue.
- 6
Continue adding tissue paper until the entire rim is covered to your satisfaction. Don't be afraid to experiment with color combinations and layering. You can create gradients, patterns, or a random mosaic of colors. Once you're happy with the coverage and the aesthetic, set the decorated frame aside to dry slightly.
- 7
If you've chosen to use contact paper for extra durability, now is the time to prepare it. Cut two pieces of clear contact paper that are slightly larger than your paper plate frame. This extra size will allow you to seal the edges effectively.
- 8
Carefully peel the backing off one piece of contact paper. Gently lay it over the tissue paper side of the frame, starting from the center and smoothing outwards to avoid air bubbles. Press down firmly to adhere the contact paper to the tissue paper and the paper plate rim.
- 9
Peel the backing off the second piece of contact paper. Align it carefully with the first piece and lay it over the other side of the frame, ensuring it covers the raw edges of the tissue paper and adheres to the first piece of contact paper. Press firmly all around the edges to create a good seal and ensure the tissue paper is completely encased.
- 10
Once the glue is dry (or if you skipped the contact paper step and the glue is dry), take your second, intact paper plate. Apply a generous amount of white craft glue around the rim of your decorated frame, on the side where the tissue paper is exposed.
- 11
Carefully position the second, intact paper plate onto the glued rim of your decorated frame. Press down firmly to ensure a strong bond, sandwiching the tissue paper and its edges between the two paper plates. This step hides the raw edges of the tissue paper and gives your sun catcher a clean, finished look.
- 12
Allow the glue to dry completely. This is a crucial step to ensure your sun catcher is sturdy and won't fall apart when handled or hung. Depending on the amount of glue used and the humidity, this could take a few hours.
- 13
Once the glue is thoroughly dry, use the hole punch to make two holes on opposite sides of the top rim of the sun catcher. Make sure these holes are sturdy enough to support the weight of the sun catcher and the hanging material.
- 14
Thread a piece of ribbon, string, or yarn through the two holes you just punched. Tie the ends together securely to create a loop for hanging. Ensure the knot is tight so it doesn't come undone. You can adjust the length of the ribbon to your preference.
- 15
Your paper plate sun catcher is now complete and ready to be hung! Find a sunny spot in your home, like a window or a doorway, and enjoy the beautiful play of light and color it brings.
- 16
For a more vibrant effect, layer different colors of tissue paper on top of each other. This technique builds depth and intensity, allowing the light to filter through multiple shades for a richer visual experience. Experiment with contrasting colors or harmonious blends to achieve your desired look.
- 17
If you don't have contact paper, you can also use clear packing tape to seal the tissue paper. While it might be a bit trickier to get perfectly smooth, carefully applying strips of packing tape over the tissue paper can offer a similar protective layer. Overlap the tape slightly to ensure full coverage and a good seal.
- 18
Experiment with different cutting techniques for the tissue paper – strips, squares, or even crumpled pieces can create unique textures. Crumpled tissue paper, for instance, can add a dimensional, almost mosaic-like quality to your sun catcher, catching the light in interesting ways.
- 19
Ensure the glue is completely dry before attempting to hang the sun catcher to prevent it from falling apart. Rushing this step can lead to the tissue paper detaching or the entire sun catcher collapsing, so patience is key for a lasting craft.
- 20
Consider adding glitter to the glue for an extra sparkly effect, but be prepared for a bit more mess! A light dusting of fine glitter mixed into the glue or sprinkled on top before it dries can add a magical shimmer. Consider using a glitter glue for easier application.
- 21
For a stained-glass effect, try using only shades of blue and purple tissue paper, or a fiery mix of reds, oranges, and yellows. Think about the mood you want to create with your sun catcher and choose your colors accordingly.
- 22
If you want a more opaque look in certain areas, you can double up on the tissue paper layers. This will allow less light to pass through, creating interesting contrasts within your design.
- 23
Before gluing the second paper plate on, you can trim any excess tissue paper that might be sticking out too far from the rim. This will help create a cleaner edge and a more professional finish.
- 24
If your tissue paper is very thin, you might find that the glue shows through slightly. Applying a second layer of tissue paper or using slightly thicker tissue paper can help mitigate this.
- 25
For a more intricate design, you can cut small shapes out of the tissue paper before gluing them down, such as stars, hearts, or even letters.
- 26
If you're using a lot of glue, especially if you're not using contact paper, you might want to let the tissue paper side dry completely before attaching the second paper plate. This prevents the tissue paper from becoming too saturated and tearing.
- 27
When punching holes for hanging, ensure they are not too close to the edge of the rim, as this could cause the rim to tear. Punching through both layers of the paper plate will make the holes more secure.
- 28
Consider using different types of string or ribbon for hanging. A thin, sparkly ribbon can add an extra touch of elegance, while a thicker yarn might give a more rustic feel.
Tips & Troubleshooting
- 1For a more vibrant effect, layer different colors of tissue paper on top of each other. This technique builds depth and intensity, allowing the light to filter through multiple shades for a richer visual experience. Experiment with contrasting colors or harmonious blends to achieve your desired look.
- 2If you don't have contact paper, you can also use clear packing tape to seal the tissue paper. While it might be a bit trickier to get perfectly smooth, carefully applying strips of packing tape over the tissue paper can offer a similar protective layer. Overlap the tape slightly to ensure full coverage and a good seal.
- 3Experiment with different cutting techniques for the tissue paper – strips, squares, or even crumpled pieces can create unique textures. Crumpled tissue paper, for instance, can add a dimensional, almost mosaic-like quality to your sun catcher, catching the light in interesting ways.
- 4Ensure the glue is completely dry before attempting to hang the sun catcher to prevent it from falling apart. Rushing this step can lead to the tissue paper detaching or the entire sun catcher collapsing, so patience is key for a lasting craft.
- 5Consider adding glitter to the glue for an extra sparkly effect, but be prepared for a bit more mess! A light dusting of fine glitter mixed into the glue or sprinkled on top before it dries can add a magical shimmer. Consider using a glitter glue for easier application.
- 6For a stained-glass effect, try using only shades of blue and purple tissue paper, or a fiery mix of reds, oranges, and yellows. Think about the mood you want to create with your sun catcher and choose your colors accordingly.
- 7If you want a more opaque look in certain areas, you can double up on the tissue paper layers. This will allow less light to pass through, creating interesting contrasts within your design.
- 8Before gluing the second paper plate on, you can trim any excess tissue paper that might be sticking out too far from the rim. This will help create a cleaner edge and a more professional finish.
Related Activities You Might Enjoy
Frequently Asked Questions
What are screen-free activities for kids?
Screen-free activities are engaging, hands-on projects that don't involve digital devices like tablets, phones, or televisions. They are crucial for a child's development as they encourage creativity, problem-solving skills, and physical interaction with the world around them. Activities like making paper plate sun catchers promote fine motor skills through cutting and gluing, foster imagination through color choices and design, and provide a sense of accomplishment. These types of activities are vital for building concentration, reducing screen time dependency, and nurturing a child's natural curiosity and ability to explore without digital distractions.
How can I make paper plate sun catchers more durable?
To make paper plate sun catchers more durable and long-lasting, you can seal the tissue paper with clear contact paper on both sides of the paper plate frame before attaching the second paper plate. This creates a protective barrier that prevents the tissue paper from tearing or becoming damaged over time. Ensure you smooth out any air bubbles when applying the contact paper for a clean finish. Another method for added durability, especially if you're not using contact paper, is to ensure a very thorough drying time for the glue, and consider using a slightly thicker paper plate for the frame.
What age is appropriate for making paper plate sun catchers?
Paper plate sun catchers are a fantastic craft activity for children aged 4 and up. Younger children, around 4-5 years old, will likely need assistance with the cutting steps, as scissors can be challenging for their developing fine motor skills. They can, however, participate enthusiastically in tearing and gluing the tissue paper. As children get older, around 6-8 years old, they can typically handle most of the steps independently, including cutting the paper plate center with supervision. Older children and even adults can enjoy this project, experimenting with more complex designs and techniques.
Can I use other materials besides tissue paper?
Yes, you can absolutely experiment with other translucent materials besides tissue paper to create unique and beautiful sun catchers. Cellophane sheets, especially colored ones, work wonderfully and offer a different kind of light diffusion. Thin fabric scraps, like organza or sheer polyester, can also be used, though they might require a stronger adhesive. Even colored cupcake liners, when flattened and cut, can add an interesting texture. However, tissue paper remains an ideal choice for its affordability, ease of use, and its ability to let light through beautifully, creating that classic stained-glass effect.
How do I get a smooth, even finish on my sun catcher?
Achieving a smooth, even finish on your paper plate sun catcher involves a few key techniques. Firstly, when applying the glue to the paper plate rim, use a thin, even layer, preferably with a paintbrush, to avoid clumps. When sticking the tissue paper, overlap the pieces slightly and press them down gently but firmly to ensure good adhesion and minimize wrinkles. If you're using contact paper, take your time smoothing it out from the center outwards to prevent air bubbles. Finally, ensuring the second paper plate is aligned and pressed firmly against the glued rim will create a clean, finished edge.
What kind of glue is best for this project?
White craft glue, also known as PVA glue, is the best choice for making paper plate sun catchers. It's readily available, non-toxic, and dries clear, which is essential for allowing light to pass through. It adheres well to both paper and tissue paper. For applying the glue to the paper plate rim, using a paintbrush can help you spread it thinly and evenly, preventing the tissue paper from becoming too saturated and tearing. If you find your tissue paper is showing through too much, a second thin layer of glue can sometimes help to make it more opaque once dry.
What Next?
Once your paper plate sun catchers are complete and dry, they are ready to bring a burst of color and light into your home. Hang them in windows where they can catch the sun's rays, creating beautiful patterns on your walls and floors. For a more elaborate display, consider making a collection of them in various colors and sizes to create a vibrant window gallery. You can also explore variations by using different types of translucent paper, adding glitter for extra sparkle, or even incorporating small embellishments like sequins. When not in use, store them flat in a box to prevent damage, ready to be enjoyed again.
Free: 10 Paper Crafts Anyone Can Make in 5 Minutes
Get our beginner guide + new craft ideas weekly.
No spam. Unsubscribe anytime.
Did you complete this activity?