DIY Rainbow Walking Water Experiment
Explore the fascinating science behind capillary action with this vibrant and engaging DIY Rainbow Walking Water experiment. It's a fantastic way to teach children about color mixing and the properties of water using everyday materials. This project is perfect for curious minds of all ages, offering a hands-on learning experience that's both educational and visually stunning.

Quick answer
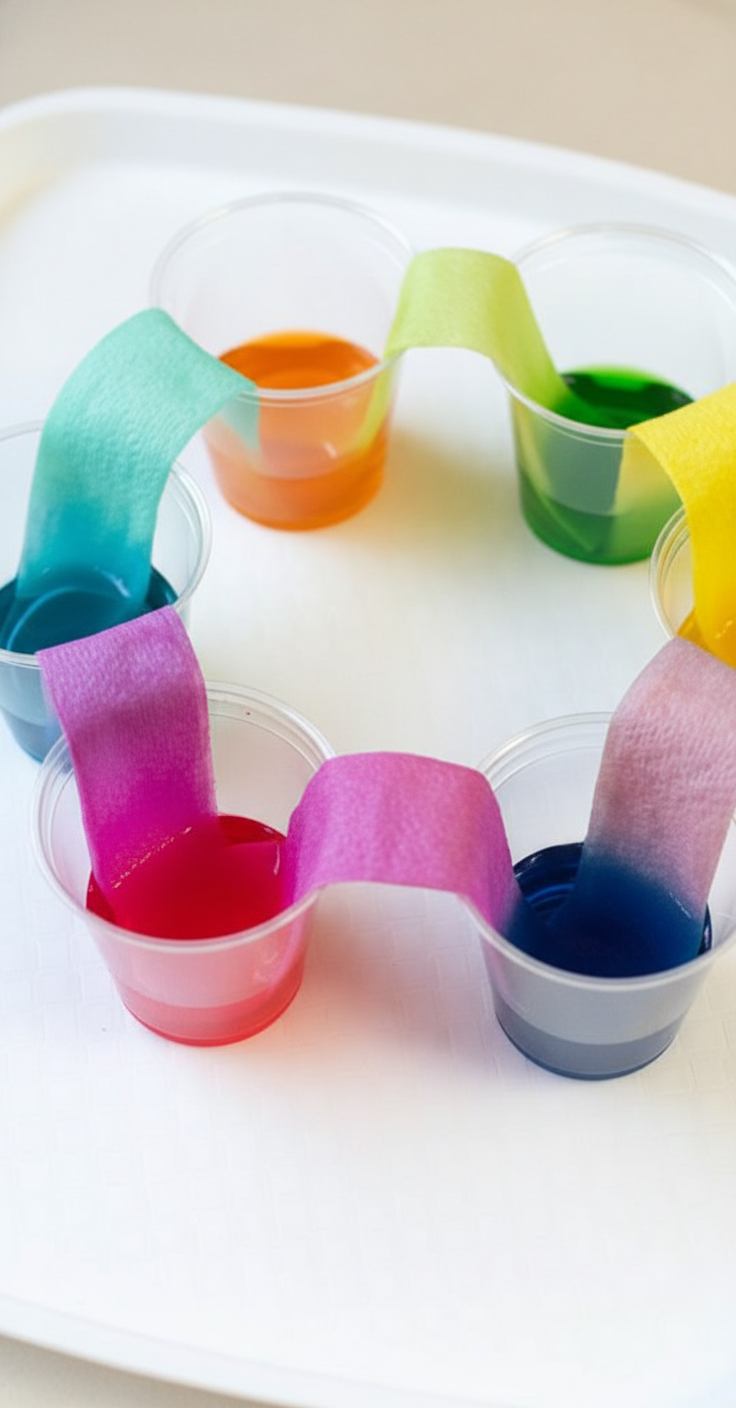
This experiment demonstrates capillary action and color mixing by using paper towels to 'walk' colored water between cups, creating a rainbow effect. It's a simple, fun, and educational science project for kids.
What you need
Shop on Amazon · As an Amazon Associate we earn from qualifying purchases. Links above are affiliate links — we may earn a commission at no extra cost to you.
Unleash a spectrum of wonder with the DIY Rainbow Walking Water Experiment! This captivating project is a delightful fusion of art and science, transforming ordinary household items into a mesmerizing display of color. It's an ideal activity for young learners, sparking curiosity about how liquids behave and how colors blend. The magic of watching water defy gravity and create new hues makes this experiment an unforgettable experience, perfect for rainy days, classroom demonstrations, or simply a fun afternoon of discovery. Get ready to be amazed as a rainbow unfolds before your eyes!
On this page
Step-by-Step Instructions
- 1
Begin by arranging your six clear cups in a straight line, ensuring they are evenly spaced. This linear arrangement is crucial for the water to 'walk' effectively from one cup to the next.
- 2
Carefully fill cups 1, 3, and 5 with tap water, filling them about halfway. It's important not to overfill them, as this can lead to spills and make the paper towel bridges unstable.
- 3
Leave cups 2, 4, and 6 completely empty. These will serve as the destinations for the colored water as it travels through the paper towel bridges.
- 4
Take one sheet of paper towel and fold it lengthwise. Continue folding it multiple times, pressing firmly with each fold, until you have created a sturdy, thick strip. The goal is to make it robust enough to hold its shape and absorb water effectively.
- 5
Gently place one end of a folded paper towel strip into the water-filled cup 1. Ensure the end is submerged sufficiently to absorb the water but not so deep that it touches the bottom of the cup.
- 6
Carefully place the other end of the same paper towel strip into the adjacent empty cup 2. The paper towel should arch slightly between the two cups, creating a bridge for the water to travel.
- 7
Repeat the process of creating paper towel bridges between all adjacent cups. This means connecting cup 1 to cup 2, cup 3 to cup 4, and cup 5 to cup 6. You will use a total of three paper towel strips for this setup.
- 8
Now, it's time to add the color! Carefully add several drops of red food coloring to the water in cup 1. The more drops you add, the more vibrant your red will be, but start with about 5-10 drops.
- 9
Thoroughly mix the red food coloring into the water in cup 1. You can use a spoon or gently swirl the cup to ensure the color is evenly distributed. A consistent color is key for observing the mixing later.
- 10
Next, add several drops of yellow food coloring to the water in cup 3. Again, adjust the number of drops based on your desired vibrancy, aiming for a rich yellow hue.
- 11
Thoroughly mix the yellow food coloring into the water in cup 3. Ensure the color is uniform throughout the water before proceeding to the next step.
- 12
Finally, add several drops of blue food coloring to the water in cup 5. Aim for a deep, consistent blue that will create interesting secondary colors when mixed.
- 13
Thoroughly mix the blue food coloring into the water in cup 5. Make sure there are no streaks of unmixed color, as this will affect the final rainbow effect.
- 14
Now comes the exciting part: observation! Watch closely as the colored water begins to travel up the paper towel strips, defying gravity through a process called capillary action.
- 15
Observe as the water slowly but surely moves from the colored cups into the empty cups. You'll notice the water level in the colored cups decreasing and the water level in the empty cups gradually increasing.
- 16
Continue to observe the experiment over the next few hours. You will see the colors from adjacent cups begin to meet and mix in the empty cups, creating new colors like green (from blue and yellow) and orange (from red and yellow).
- 17
The final empty cup (cup 6) will eventually receive a mixture of colors from cups 5 and potentially from cup 4 if the water has traveled that far. This creates the beautiful rainbow effect across your line of cups.
- 18
Allow the experiment to continue until the water levels stabilize or the colors have fully mixed. This can take several hours, so patience is key to witnessing the full transformation.
- 19
Once the experiment has concluded and the colors have fully mixed, you will have a stunning display of a rainbow gradient across your cups. Take a moment to appreciate the science behind the magic!
- 20
Carefully dispose of the colored water and paper towels. You can rinse the cups thoroughly for reuse. Consider taking photos of your rainbow at different stages to document the process.
Tips & Troubleshooting
- 1Use sturdy paper towels that are known for their absorbency. Thin or flimsy paper towels may not hold enough water or might tear, disrupting the flow of the experiment.
- 2Ensure your cups are all the same height. If the cups are different heights, the water may not travel as effectively due to gravitational differences, impacting the capillary action.
- 3Don't be afraid to experiment with the amount of food coloring. More coloring will result in more vibrant colors, but too much can sometimes make it harder to see the mixing process clearly.
- 4Patience is a virtue with this experiment! The 'walking water' effect takes time to develop. Check back every 30 minutes to an hour to observe the progress and the gradual mixing of colors.
- 5Consider using a tray or baking sheet underneath your cups to catch any potential spills. This will make cleanup much easier, especially if you're doing this with younger children.
- 6For a more dramatic effect, you can use slightly warmer water. Warmer water tends to move more quickly through the paper towel due to increased molecular motion, though room temperature water works perfectly well.
- 7If you find the water isn't moving as quickly as you'd like, you can try adding a bit more water to the colored cups, but be cautious not to overfill them. You can also try refolding the paper towel strips to ensure they are tightly packed.
- 8Encourage children to predict what colors will form in the empty cups before the experiment begins. This promotes critical thinking and engagement with the scientific process.
Related Activities You Might Enjoy
Frequently Asked Questions
What is the science behind the 'walking water' experiment?
The 'walking water' experiment is a fantastic demonstration of capillary action, a phenomenon where liquids, like water, move upwards against gravity through a narrow space. This happens because of the adhesive forces between the water molecules and the surface of the paper towel, as well as the cohesive forces between the water molecules themselves. The water molecules are attracted to the fibers of the paper towel (adhesion) and also stick to each other (cohesion), pulling each other along as they climb. This process is similar to how plants draw water up from their roots to their leaves, or how a sponge soaks up spills.
Why are specific colors (red, yellow, blue) used in this experiment?
The choice of red, yellow, and blue food coloring is deliberate and rooted in the principles of color theory. These three colors are known as primary colors. When mixed in the correct proportions, primary colors can create all other colors. In this experiment, red and yellow combine to form orange, yellow and blue combine to form green, and if you were to add red and blue, you would get purple. By using these primary colors, the experiment not only showcases capillary action but also provides a visual lesson in how secondary colors are created through the mixing of primary ones.
How long does the 'walking water' experiment typically take to show results?
The timeline for the 'walking water' experiment can vary depending on several factors, including the absorbency of the paper towels, the humidity of the environment, and the temperature of the water. Generally, you will start to see noticeable movement of water within 30 minutes to an hour. The full effect, where the colors have significantly traveled and begun to mix, can take anywhere from 2 to 6 hours, and sometimes even longer for the colors to fully blend and create a complete rainbow gradient. Patience is key to observing the entire process.
Can I use different colors or more colors in the experiment?
Absolutely! While red, yellow, and blue are classic for demonstrating primary color mixing, you can certainly experiment with other colors. If you use orange and blue, you'll see brown or a muddy color form. If you use purple and yellow, you'll also likely get brown. You can also expand the experiment by using more cups and more colors. For instance, you could add green to cup 2 and orange to cup 4, and then observe how those colors interact with the colors from the primary cups. This allows for further exploration of color mixing and its outcomes.
What are some common mistakes to avoid when setting up the experiment?
A few common pitfalls can hinder the success of the 'walking water' experiment. Firstly, ensure your paper towel strips are folded tightly and are sturdy enough to hold their shape; flimsy strips can collapse and prevent water flow. Secondly, make sure the ends of the paper towels are adequately submerged in the water but not touching the bottom of the cups, as this can impede capillary action. Thirdly, avoid overfilling the initial cups with water, as this can lead to spills and make the setup messy. Finally, ensure your cups are all at the same height to maintain consistent gravitational pull across the setup.
Can this experiment be done with gel food coloring instead of liquid?
Yes, gel food coloring can be used, but it might require a slight adjustment. Gel colors are more concentrated than liquid ones, so you'll likely need fewer drops to achieve a vibrant hue. It's also important to ensure the gel color is thoroughly dissolved in the water before you set up the paper towel bridges. Stir the colored water well to avoid clumps of gel, which could clog the paper towel fibers and slow down the water's movement. Once fully mixed, the gel coloring will work just as effectively as liquid coloring in demonstrating capillary action and color mixing.
What is the best way to clean up after the experiment?
Cleanup is generally straightforward. The colored water can be poured down the drain, and the paper towels can be discarded in the trash. The cups can be washed with regular dish soap and water. If there are any stubborn color stains on the cups, a paste made of baking soda and water can be effective for scrubbing them clean. Using a tray or baking sheet underneath the cups during the experiment can significantly minimize spills, making the cleanup process even quicker and easier.
What Next?
The DIY Rainbow Walking Water Experiment is more than just a colorful spectacle; it's a gateway to understanding fundamental scientific principles. Once your rainbow has reached its full potential, consider displaying your creation for a few days to observe the gradual evaporation and color concentration. For variations, try using different numbers of cups, exploring different color combinations, or even experimenting with different absorbent materials like sponges or cotton balls. This project can easily lead to further explorations into surface tension and absorption, making it a springboard for even more exciting science adventures.
Free: 10 Paper Crafts Anyone Can Make in 5 Minutes
Get our beginner guide + new craft ideas weekly.
No spam. Unsubscribe anytime.
Did you complete this activity?
Related
You might also like
Balloon Inflating Science Fun
Cornstarch Cloud Dough
National Geographic Crystal Garden
Floating Egg Density Challenge
Grape to Raisin Density Change