Shrink Plastic Plant Markers
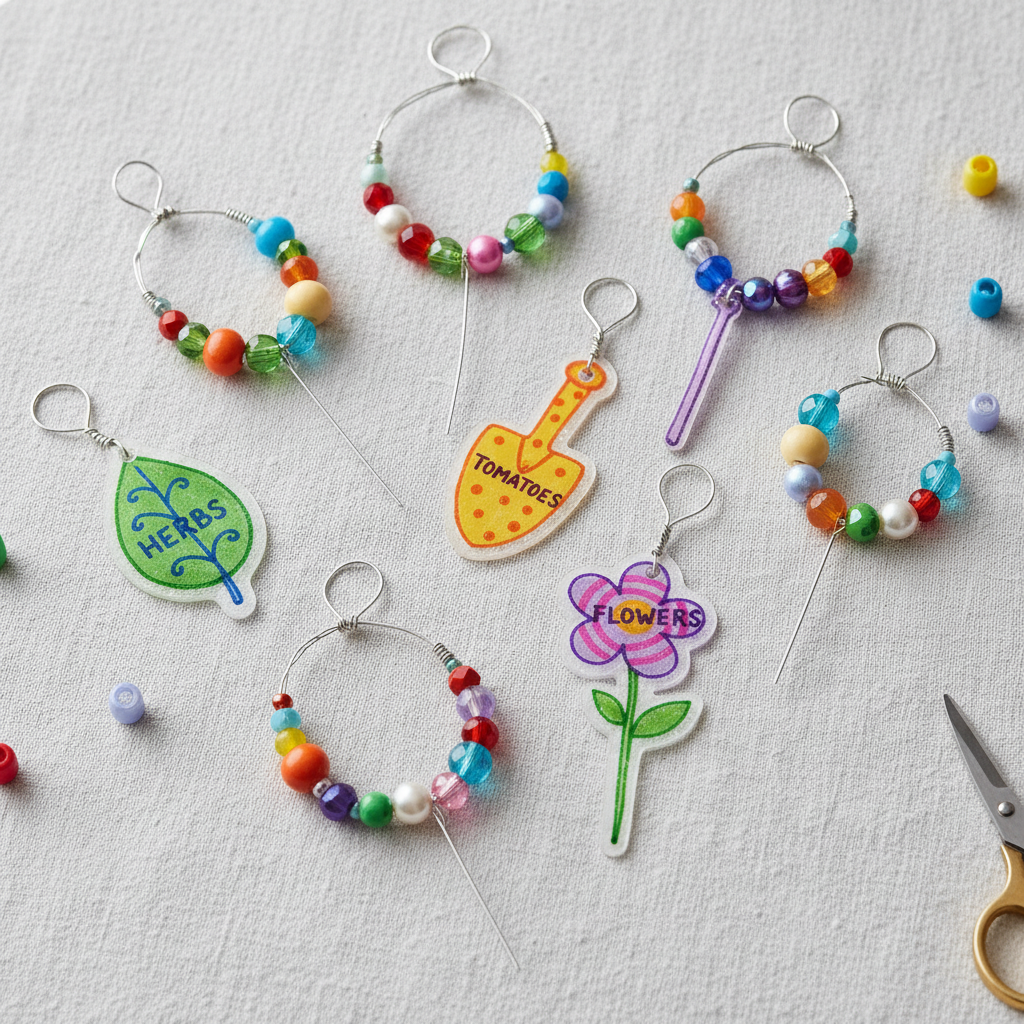
Transform ordinary shrink plastic into charming and long-lasting plant markers. This DIY project is a fun and creative way to identify your herbs, vegetables, and flowers, adding a personalized flair to your garden. Easy enough for beginners, yet satisfying for experienced crafters, these markers are a must-have for any plant enthusiast.
Quick answer
Cut and color designs onto shrink plastic sheets, bake them until they shrink and flatten, and then use them to label your plants.
What you need
Shop on Amazon · As an Amazon Associate we earn from qualifying purchases. Links above are affiliate links — we may earn a commission at no extra cost to you.
Elevate your gardening game with these delightful shrink plastic plant markers! This project is a fantastic way to inject personality and practicality into your plant collection, whether you're tending to a sprawling outdoor garden or a cozy indoor jungle. It's incredibly beginner-friendly, making it perfect for kids and adults alike who want a quick, rewarding craft. The magic of shrink plastic lies in its transformation – watching your colorful creations magically shrink down to a durable, permanent size is incredibly satisfying. Get ready to give your plants the stylish identification they deserve!
On this page
Step-by-Step Instructions
- 1
Gather your materials: Ensure you have your shrink plastic sheets, a variety of permanent markers in colors that will pop, sharp scissors for clean cuts, your oven preheated to the correct temperature, parchment paper to protect your baking sheet, and a sturdy baking sheet.
- 2
Prepare your workspace: Lay out your shrink plastic sheet on a clean, flat surface. If you're sketching your designs first, have a pencil handy, but remember to draw on the rougher side of the plastic if using frosted sheets, as permanent markers adhere best there.
- 3
Design your plant markers: Draw or write the names of your plants directly onto the shrink plastic using permanent markers. You can create simple shapes, draw little plant illustrations, or write out the plant names in a fun font. For best results, keep designs relatively simple and avoid overly detailed areas that might become too small after shrinking.
- 4
Color your designs: Fill in your drawn designs with permanent markers, ensuring the colors are vibrant and opaque. Be mindful that the colors will deepen and become more concentrated as the plastic shrinks, so don't be afraid to go bold. Avoid waxy markers or crayons, as they may not adhere well or could melt unevenly in the oven.
- 5
Cut out your designs: Carefully cut out your colored designs from the shrink plastic sheet using sharp scissors. Aim for clean, smooth edges, as any rough or jagged cuts will remain after shrinking. If you've drawn intricate shapes, a craft knife can be useful for precision, but always use it on a protected surface.
- 6
Add a hole punch (optional): If you plan to attach your plant markers to stakes or hang them, use a hole punch to create a hole near the top of each design before baking. This hole will shrink significantly, so make it larger than you think you'll need.
- 7
Preheat your oven: Set your oven to 325°F (160°C). It's crucial to have the oven at the correct temperature before placing your plastic inside to ensure even shrinking and prevent scorching.
- 8
Prepare the baking sheet: Line a standard baking sheet with a sheet of parchment paper. This prevents the shrink plastic from sticking to the metal and makes for easy cleanup.
- 9
Arrange the plastic on the baking sheet: Place your cut-out shrink plastic designs onto the parchment-lined baking sheet, ensuring they are not touching each other. Leave a little space between each piece to allow for even heat distribution and to prevent them from fusing together as they shrink.
- 10
Bake the plastic: Carefully place the baking sheet into the preheated oven. Bake for approximately 1-2 minutes, but watch them closely through the oven door.
- 11
Observe the shrinking process: As the plastic heats up, you'll notice it begin to curl and warp. This is completely normal and part of the shrinking process. Continue to watch as the pieces start to flatten out on their own.
- 12
Remove from oven when flat: Once the plastic pieces have finished curling and are mostly flat, it's time to remove them from the oven. They will still be hot and slightly pliable at this stage.
- 13
Flatten any curled edges: While the shrink plastic is still hot and pliable, if any pieces have slightly curled edges, immediately and carefully press them flat using a heavy, heat-resistant object. A metal ruler, a smooth stone, or a cutting board works well. Apply gentle, even pressure to achieve a perfectly flat marker.
- 14
Allow to cool completely: Let the flattened shrink plastic markers cool completely on the baking sheet. As they cool, they will become rigid and durable, ready for use in your garden.
- 15
Attach to stakes (optional): If you've punched holes or want to secure your markers more firmly, you can now attach them to wooden skewers or craft sticks. Thread a piece of twine or wire through the hole and tie it securely to the stake, or use a strong adhesive if preferred.
- 16
Test durability: Once cooled, gently bend your plant markers to ensure they are sturdy and won't easily break. The permanent marker ink should be well-adhered to the plastic.
- 17
Final inspection: Give your finished plant markers a final look-over to ensure they are exactly as you intended and are ready to withstand the elements in your garden.
- 18
Insert into soil: Carefully place your new, personalized plant markers into the soil next to your plants. Ensure they are positioned so the plant name is easily visible.
- 19
Admire your work: Take a moment to appreciate your handmade, custom plant markers and the unique touch they add to your green space.
- 20
Clean up: Once everything is cooled and stored, clean your baking sheet and any tools used. Parchment paper can usually be discarded, and the shrink plastic itself is recyclable if you have any scraps left over.
Tips & Troubleshooting
- 1Use fine-tip permanent markers for more detailed designs and clearer lettering. This will prevent your writing or drawings from becoming too blobby after shrinking.
- 2Experiment with different types of shrink plastic, such as frosted or clear, to see which best suits your aesthetic. Frosted plastic offers a matte finish, while clear plastic allows the color of your pot or soil to show through.
- 3Don't overcrowd your baking sheet; give each piece enough space to shrink and flatten without touching other pieces. Overcrowding can lead to pieces sticking together or shrinking unevenly.
- 4If you're new to shrink plastic, it's a good idea to do a test piece first. This will help you get a feel for how quickly it shrinks and how the colors appear after baking.
- 5For a more professional look, consider using stencils or rubber stamps with permanent ink on your shrink plastic before cutting. Ensure the ink is fully dry before cutting and baking.
- 6If you want to create a more durable marker, you can seal your colored designs with a clear acrylic sealant spray after they have cooled completely. This adds an extra layer of protection against moisture and UV rays.
- 7When flattening hot shrink plastic, use a smooth, flat object and apply even pressure. Avoid pressing too hard or unevenly, as this can distort the shape of your marker.
- 8Store your finished plant markers in a dry place when not in use to prolong their lifespan. Avoid leaving them exposed to extreme weather conditions for extended periods.
Related Activities You Might Enjoy
Frequently Asked Questions
What kind of plastic is best for shrink plastic plant markers?
The most common and effective type of plastic for this project is #6 plastic, often identified by the recycling symbol with a '6' inside. This type of plastic is readily available in craft stores as 'shrink plastic' or 'shrink film' sheets, which are specifically designed for this purpose. You can also find it in some disposable food packaging, like certain clear containers or lids, but it's essential to ensure it's indeed #6 plastic and that it's clean and free of food residue before use. The key characteristic of this plastic is its ability to shrink significantly and become rigid when exposed to heat, making it ideal for creating durable, miniaturized crafts.
Can I use any kind of marker on shrink plastic?
For the best and most permanent results, you should exclusively use permanent markers, such as Sharpies or other alcohol-based permanent markers. These markers are formulated to adhere well to the plastic surface and their colors will intensify and become more vibrant as the plastic shrinks. Avoid using water-based markers, crayons, or colored pencils, as they may not adhere properly, could smudge easily, or might not withstand the heat of the oven without melting or becoming waxy. The permanence of the marker is crucial for ensuring your plant labels remain legible even when exposed to the elements.
Why do my shrink plastic plant markers curl up and not flatten?
It's completely normal for shrink plastic to curl up significantly during the baking process; this is a natural part of how the material reacts to heat. The key is to watch it closely. The curling is temporary, and as the baking continues for the full 1-2 minutes, the plastic will begin to flatten out on its own. If, after removing it from the oven, a piece is still slightly curled, you must act quickly while it's hot and pliable. Use a heavy, heat-resistant object like a metal ruler or a smooth stone to gently press it flat. Ensure you're using heat-resistant gloves and working on a safe surface to avoid burns.
How do I make sure my plant markers are durable enough for outdoor use?
To ensure your shrink plastic plant markers are durable for outdoor use, start with good quality shrink plastic sheets and use permanent markers that are known for their fade resistance. After baking and cooling, you can add an extra layer of protection by applying a clear acrylic sealant spray. Choose a sealant that is designed for outdoor use and is resistant to UV rays and moisture. Apply 2-3 thin coats, allowing each coat to dry completely before applying the next. This will help prevent the colors from fading in the sun and protect the ink from rain and humidity, significantly extending the lifespan of your markers.
Can I create intricate designs or detailed lettering on my plant markers?
Yes, you can create intricate designs and detailed lettering, but it requires a bit more care and attention. Use fine-tip permanent markers for precise lines and lettering. When drawing, remember that the plastic will shrink to about 40-50% of its original size, so your details will become much smaller and more concentrated. It's often helpful to sketch your design lightly with a pencil on the rougher side of frosted shrink plastic first, then trace over it with the permanent marker. For very fine details, consider using a craft knife to carefully cut away excess plastic after coloring, but be cautious as these delicate parts will shrink significantly.
What are some other creative uses for shrink plastic besides plant markers?
Shrink plastic is incredibly versatile and opens up a world of creative possibilities beyond plant markers! You can create custom jewelry components like earrings, pendants, and charms by cutting out shapes, coloring them, and baking. It's also fantastic for making personalized keychains, zipper pulls, and even small decorative ornaments. Kids love using it to make miniature figurines, bookmarks, or even custom game pieces. You can also create unique embellishments for scrapbooking or card making, or even design custom buttons for clothing or bags. The possibilities are truly endless, limited only by your imagination and the size of your oven!
What Next?
Once your shrink plastic plant markers are cooled and ready, you can insert them directly into the soil of your potted plants or garden beds. For a more permanent solution or to add a decorative element, consider attaching them to small wooden stakes or wire loops. Store any unused markers in a cool, dry place, perhaps in a small craft box or jar. This project is a gateway to endless possibilities; try creating themed markers for holidays, personalized gifts for fellow plant lovers, or even miniature art pieces for your desk!
Free: 10 Paper Crafts Anyone Can Make in 5 Minutes
Get our beginner guide + new craft ideas weekly.
No spam. Unsubscribe anytime.
Did you complete this activity?
Related