How to Decorate Rocks with Sharpie Markers — Easy Step-by-Step Guide
Transform ordinary rocks into vibrant works of art using Sharpie permanent markers. This fun and easy craft is perfect for all ages and creates beautiful decorations.
Quick answer
To decorate rocks with Sharpie permanent markers, you need smooth rocks, Sharpie markers, and about 30 minutes. Start by cleaning your rocks. This beginner-friendly activity has 7 steps and is perfect for families and kids aged 6+.
What you need
Shop on Amazon · As an Amazon Associate we earn from qualifying purchases. Links above are affiliate links — we may earn a commission at no extra cost to you.
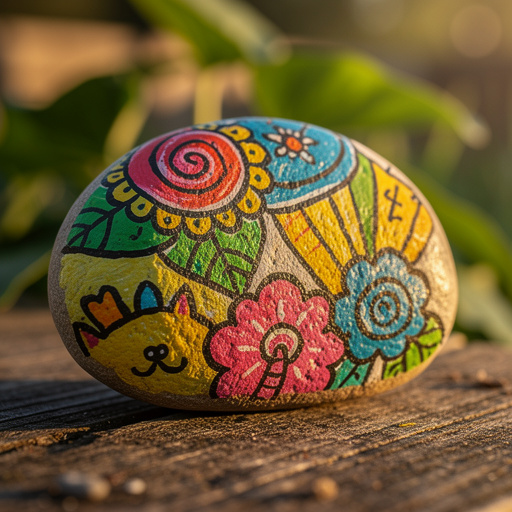
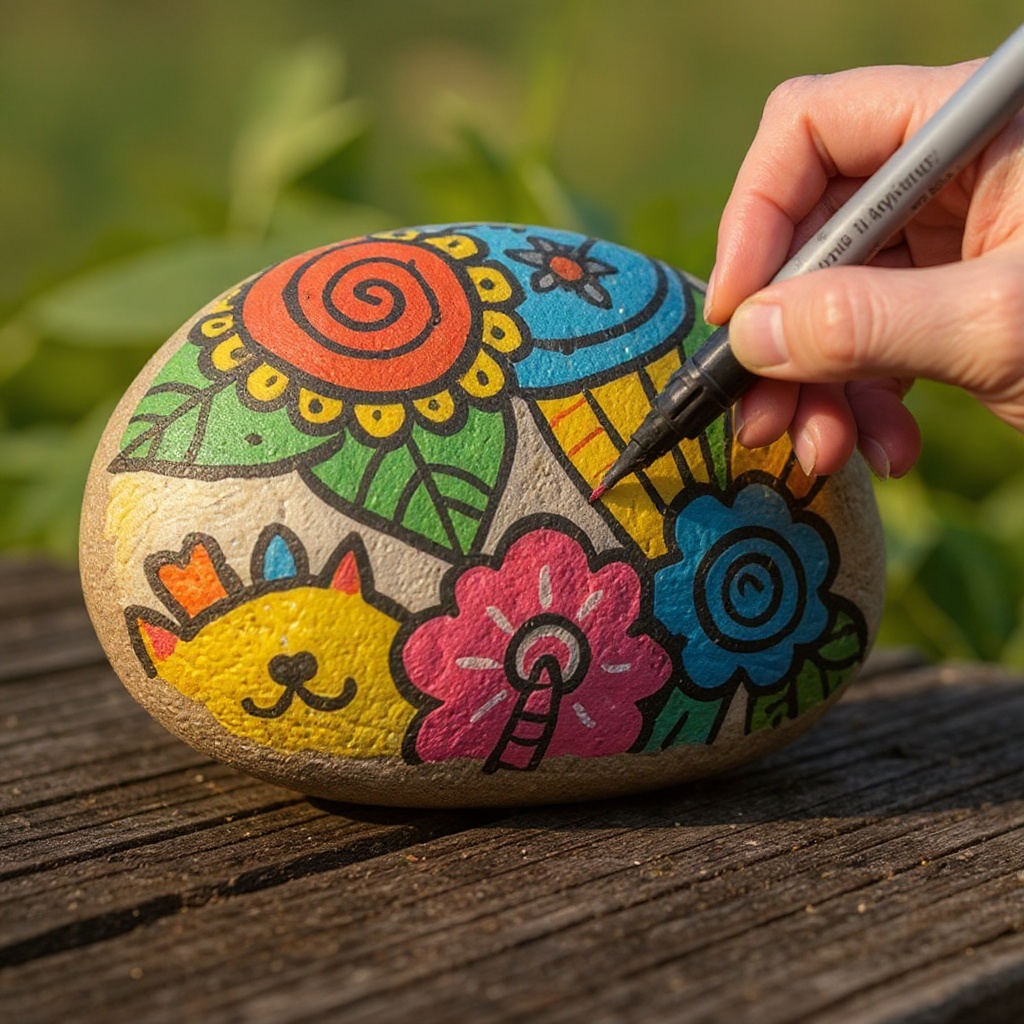
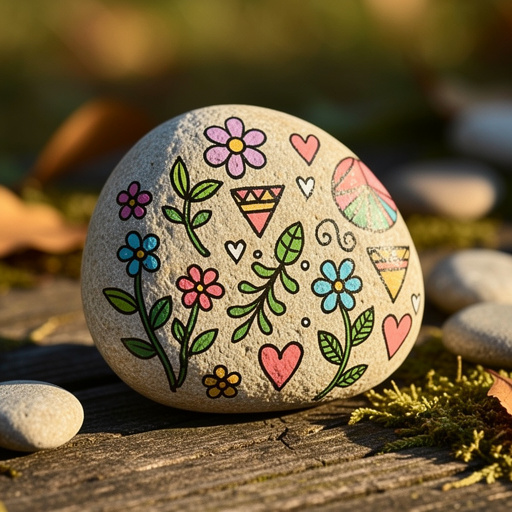
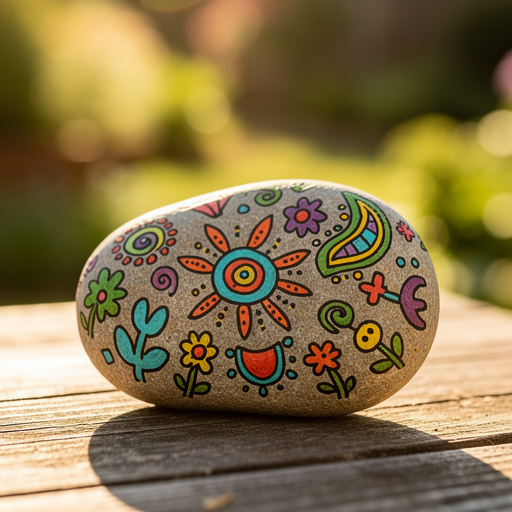
Unleash your inner artist and discover the simple joy of transforming ordinary stones into captivating works of art with Sharpie permanent markers. This project is a fantastic way to connect with nature, express creativity, and create unique decorative pieces or thoughtful gifts. It's incredibly accessible, requiring minimal supplies and offering endless possibilities for personalization, making it an ideal activity for family fun, classroom projects, or a relaxing solo endeavor. Get ready to add a splash of color to your world, one rock at a time!
On this page
Step-by-Step Instructions
- 1
Gather your smooth, clean rocks. Select rocks that have a relatively flat surface for easier drawing, and ensure they are free from loose dirt or debris. If your rocks are visibly dirty, give them a thorough wash with soap and water, scrubbing gently to remove any grime, and then allow them to air dry completely for several hours or overnight. Alternatively, for a quicker clean, wipe each rock down with rubbing alcohol and a paper towel to remove surface oils and dust, which also helps the marker ink adhere better.
- 2
Prepare your workspace. Lay down some old newspaper or a drop cloth to protect your table or floor from any stray marker ink, as Sharpies are permanent and can stain. Ensure you have good lighting and ample space to spread out your rocks and markers.
- 3
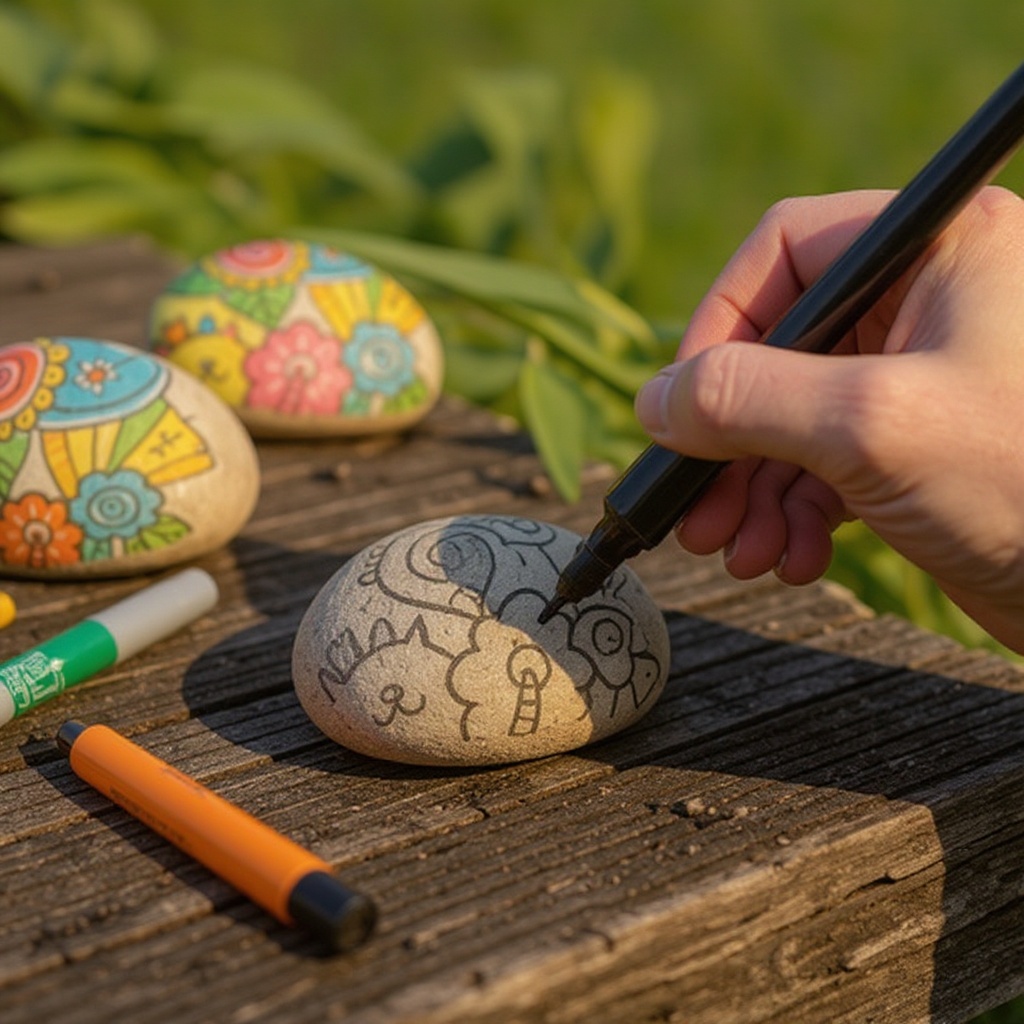
Decide on your design. This is where your creativity can truly shine! You can sketch out your ideas on a piece of paper first to plan your layout and color scheme, or you can go freehand directly onto the rock, letting inspiration guide you. Consider the shape and size of the rock when planning your design; a round rock might be perfect for a ladybug, while a flatter, larger rock could accommodate a landscape or intricate pattern.
- 4
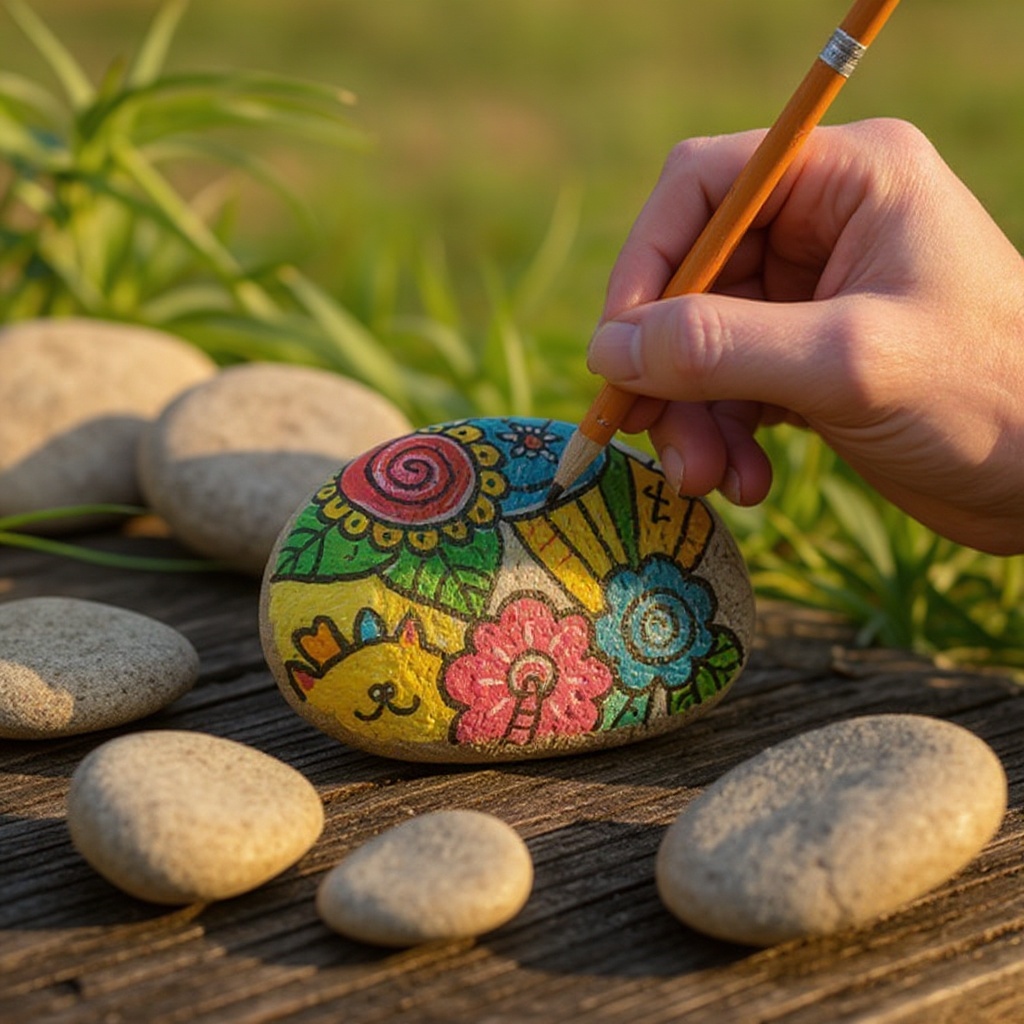
Begin drawing your base design on the rock with your Sharpie permanent markers. Start with lighter colors or the main elements of your design, applying the ink with steady, even strokes. For larger areas, the chisel tip can be very effective, while the fine or ultra-fine points are ideal for outlines and intricate details. Avoid pressing too hard, which can cause the marker to skip or bleed on some rock surfaces.
- 5
Add details and outlines to your design. Once the base colors are laid down, use your fine-point or ultra-fine Sharpies to add outlines, facial features, patterns, or any other finer details that will bring your design to life. Outlines can help define shapes and make your artwork pop, especially on darker backgrounds. Take your time with this step to ensure precision.
- 6
Fill in larger areas with color, layering if desired. If you are using multiple colors in one area or want to create depth, allow each layer of ink to dry slightly before adding more to prevent smudging. This is particularly important when working with darker colors over lighter ones, or when blending colors. You can achieve subtle gradients by lightly overlapping colors while they are still slightly wet.
- 7
Continue adding elements and colors until your design is complete. Don't be afraid to experiment with different color combinations and techniques. You can add shading by using a darker marker sparingly in certain areas, or create texture by using small dots or dashes. Step back occasionally to assess your progress and make any adjustments needed.
- 8
Allow your finished rock art to dry completely. This is a crucial step for ensuring the longevity of your design. Let your decorated rocks sit undisturbed for at least 15-20 minutes, but for best results and to prevent smudging, it's recommended to let them dry for a full hour or even longer, especially if you've applied multiple layers of ink.
- 9
Optional: Apply a clear acrylic spray sealant. For added durability, especially if your rocks will be displayed outdoors or handled frequently, consider sealing them. In a well-ventilated area (preferably outdoors), hold the can about 8-12 inches away from the rock and apply a light, even coat of sealant. Allow the first coat to dry completely according to the product's instructions before applying a second coat for maximum protection. Ensure you have adult supervision for this step.
- 10
Inspect your work. Once dry, examine your rock art for any areas that might need a touch-up or additional detail. You can use a fine-point Sharpie to refine lines or add small highlights.
- 11
Clean up your workspace. Properly cap all your Sharpie markers to prevent them from drying out, and dispose of any used paper towels or cloths. If you used rubbing alcohol, ensure the area is well-ventilated.
- 12
Store your completed rocks in a safe place until they are ready to be displayed or gifted. Avoid stacking them directly on top of each other if they are not sealed, as the ink could still transfer.
Tips & Troubleshooting
- 1For a more permanent finish, especially if the rocks will be outdoors, consider sealing them with a clear acrylic spray sealant. This protective layer will help shield the Sharpie ink from moisture, UV rays, and general wear and tear, significantly extending the life of your artwork. Always apply sealant in a well-ventilated area and follow the manufacturer's instructions carefully, ensuring adult supervision.
- 2Experiment with different types of Sharpie markers, such as fine point for details or chisel tip for broader strokes. The variety of tips available allows for a wide range of artistic expression, from delicate linework to bold fills. Mixing and matching tip types within a single design can add visual interest and depth to your rock art.
- 3If you make a mistake, you can sometimes carefully wipe away the Sharpie ink with rubbing alcohol before it dries completely. Dab a small amount of rubbing alcohol onto a cotton swab or the corner of a paper towel and gently rub the erroneous mark. This method works best on smoother rock surfaces and when the ink is still fresh; it may not be effective on heavily porous rocks or dried ink.
- 4Create themed rock collections, like garden markers, kindness rocks to leave for others, or characters from your favorite stories. Themed collections can be a fun way to organize your creations and give them a specific purpose. Kindness rocks, for instance, are a wonderful way to spread joy and positivity in your community, encouraging others to find and re-hide them.
- 5Ensure your rocks are completely dry before you start drawing to prevent the ink from bleeding. Any residual moisture on the rock's surface can cause the Sharpie ink to spread and feather, resulting in blurry lines and a less defined design. Patience during the drying process is key to achieving crisp, clean artwork.
- 6Layering colors can create unique effects and add depth to your designs. For example, you can start with a light color and then add darker shades over it to create shadows or blend colors together. Allow each layer to dry slightly before applying the next to avoid muddying the colors and to maintain crisp edges.
- 7Consider the texture of your rocks. While smooth rocks are generally preferred, some artists enjoy the challenge of working with slightly textured surfaces. The texture can sometimes add an interesting visual element to the final piece, but it may require a firmer hand with the marker to ensure good ink coverage.
- 8If you're aiming for a very vibrant look, consider using a white or light-colored base coat of acrylic paint on your rocks first, and then decorating with Sharpies once the paint is dry. This can help your Sharpie colors pop, especially on darker rocks, and provides a uniform surface for drawing.
Related Activities You Might Enjoy
Frequently Asked Questions
Will Sharpie markers work on rocks?
Yes, Sharpie permanent markers work exceptionally well on smooth rocks, making them an ideal medium for rock art. The porous nature of the rock surface allows the ink to adhere effectively, creating vibrant and lasting designs that can withstand some handling and outdoor exposure. For the best results and optimal ink adhesion, it is crucial to ensure that your rocks are thoroughly cleaned and completely dry before you begin drawing. Any dirt, dust, or moisture can interfere with the ink's ability to bond with the rock, potentially leading to smudging or premature fading. By preparing your rocks properly, you'll achieve sharper lines and more durable artwork.
How do I make Sharpie designs on rocks permanent?
While Sharpie permanent markers are designed for durability, for extra longevity, especially if your decorated rocks will be placed outdoors or handled frequently, you can enhance their permanence by applying a clear acrylic spray sealant. This protective coating acts as a barrier against moisture, UV rays, and abrasion, helping to preserve the vibrant colors of your Sharpie artwork. It's essential to allow the Sharpie ink to dry completely on the rock for at least an hour, or preferably longer, before applying the sealant. Spray the sealant in a well-ventilated area, holding the can about 8-12 inches away from the rock, and apply in light, even coats, allowing each coat to dry before applying the next for maximum protection and a smooth finish.
Can kids use Sharpie markers on rocks?
Absolutely! Decorating rocks with Sharpie markers is a fantastic and engaging craft activity for children of all ages. It’s a wonderful way for them to express their creativity, develop fine motor skills, and create personalized treasures. However, due to the permanent nature of Sharpie markers, adult supervision is highly recommended, especially for younger children. This ensures they use the markers safely, avoid accidental marks on clothing or furniture, and can provide assistance with any intricate design elements or the optional sealing process. With a little guidance, kids can create beautiful and unique rock art.
What kind of rocks are best for Sharpie art?
The ideal rocks for Sharpie art are those that are smooth, flat, and have a relatively non-porous surface. River rocks, beach stones, or stones collected from gardens that have been naturally smoothed by water and time are excellent choices. These types of rocks offer a clean canvas for your marker designs, allowing the ink to lay down smoothly and crisply. Avoid rocks that are excessively rough, crumbly, or highly porous, as these surfaces can cause the Sharpie ink to bleed, feather, or not adhere properly, leading to a less defined and less durable artwork. The smoother the surface, the better your Sharpie designs will look.
How do I clean rocks before decorating them?
Properly cleaning your rocks is a crucial first step to ensure your Sharpie designs adhere well and look their best. Begin by rinsing the rocks under running water to remove any loose dirt or debris. For more stubborn grime, use a soft brush and a mild soap solution to gently scrub the surface of the rocks, paying attention to any crevices. After washing, rinse them thoroughly to remove all soap residue. It is absolutely essential that the rocks are completely dry before you start drawing on them; allow them to air dry for several hours or overnight, or speed up the process by wiping them down with rubbing alcohol and a clean paper towel, which also helps to remove any oils that might prevent ink adhesion.
Can I blend Sharpie colors on rocks?
Yes, you can achieve some blending effects with Sharpie markers on rocks, though it requires a slightly different approach than with traditional art mediums. For a subtle blend, try applying two colors next to each other while the ink is still slightly wet and then gently feathering the edges where they meet with a third marker or even a damp cotton swab (use sparingly). Another technique is layering: apply a base color, let it dry slightly, and then apply a second color over a portion of the first. For more distinct color blocking, simply allow each color to dry completely before applying the next. Experimentation is key to discovering what works best for your desired effect on different rock surfaces.
What if I make a mistake on the rock?
Don't worry if you make a mistake! Sharpie ink can often be corrected if you act quickly. If the ink is still wet, you can try to carefully wipe it away using a cotton swab or the corner of a paper towel lightly dampened with rubbing alcohol. Gently dab or rub the erroneous mark. This method is most effective on smoother rock surfaces and when the ink is fresh. For dried ink, it can be more challenging to remove completely without affecting the rock's surface, but sometimes a bit of rubbing alcohol can lighten it. Alternatively, you can try to incorporate the 'mistake' into your design or cover it with another color or element.
What Next?
Once your Sharpie-painted rocks are completely dry and sealed (if desired), they are ready to be displayed or shared! Arrange them in your garden beds, use them as unique paperweights on your desk, or become a part of the global kindness rock movement by leaving them in public places for others to find. For variations, consider using metallic Sharpies for a touch of shimmer, or try layering colors for a watercolor effect. Next, you might explore painting larger stones with acrylic paints for more intricate murals, or even try decoupage with patterned paper. Store your creations indoors in a dry place to preserve their vibrancy.
Free: 10 Paper Crafts Anyone Can Make in 5 Minutes
Get our beginner guide + new craft ideas weekly.
No spam. Unsubscribe anytime.
Did you complete this activity?
Related
You might also like
Shrink Plastic Pet Portraits
Permanent Marker Painted Rocks
Permanent Marker Art Stones
Shrink Plastic Pet Charms
Bar Soap Sculpted Critters