How to Create Abstract Ink Wash Landscapes — Easy Step-by-Step Guide
Discover the meditative art of creating abstract ink wash landscapes. This screen-free activity allows for spontaneous expression and beautiful, unique results. Perfect for beginners and experienced artists alike, this guide breaks down the process into simple, manageable steps, encouraging creativity and mindfulness. Dive into a world of flowing ink and subtle gradients to craft your own serene, abstract vistas.
Quick answer
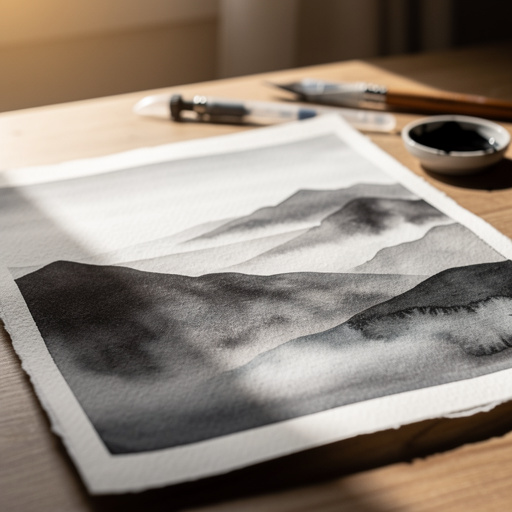
To create abstract ink wash landscapes, you need 100% cotton cold press watercolor paper (9x12 inches), black India ink or calligraphy ink, a small container for water, two round paintbrushes (one larger, one smaller), paper towels, and a palette or small dish for ink dilution. This screen-free activity takes about 30 minutes to complete. Start by preparing your workspace, diluting ink with water to create various shades of grey, and then applying these washes to the paper using your brushes to simulate sky, mountains, and atmospheric elements. This beginner-friendly activity has 10 core steps and is perfect for adults seeking creative, screen-free expression.
What you need
Shop on Amazon · As an Amazon Associate we earn from qualifying purchases. Links above are affiliate links — we may earn a commission at no extra cost to you.
Embark on a journey of creative discovery with abstract ink wash landscapes. This engaging and screen-free activity offers a wonderfully meditative experience, allowing you to tap into your intuition and create art that is both personal and profoundly beautiful. Unlike traditional landscape painting, abstract ink wash embraces spontaneity, letting the ink and water guide your hand. It's an ideal project for anyone looking to unwind, de-stress, and explore their artistic side without the pressure of perfect representation. Whether you're a seasoned artist or a complete beginner, this technique promises unique and captivating results.
On this page
Step-by-Step Instructions
- 1
Prepare your workspace by covering it with newspaper or a drop cloth to protect surfaces from ink spills and water. Ensure good lighting and ventilation, and have all your materials within easy reach.
- 2
Pour a small amount of black ink into your palette or small dish. Start with a modest amount, as you can always add more; this prevents waste and makes managing the ink easier.
- 3
Fill your water container with clean water. Having a dedicated water source is crucial for diluting your ink and rinsing your brushes effectively.
- 4
In the palette, mix the black ink with water to create various shades of grey. Start by adding a significant amount of water to a tiny drop of ink for a very light grey, then progressively add less water to create darker, richer tones. Aim for at least three distinct shades: very light, medium, and dark.
- 5
Dip your larger brush into the lightest grey wash and apply broad, sweeping strokes to the top section of your paper, simulating the expansive sky. Allow the ink to flow freely, letting the paper's texture influence the spread.
- 6
Using the same larger brush and a slightly darker grey wash, add some texture or movement to the 'sky' area. You can create wispy cloud-like forms or subtle variations in tone by varying your brush pressure and direction.
- 7
Switch to your smaller brush and a medium grey wash. Apply this to the middle section of your paper, creating abstract shapes that suggest mountains, hills, or rolling terrain. Don't aim for realism; focus on evocative forms and silhouettes.
- 8
Use the smaller brush and a darker ink wash to add more defined shapes or shadows to your landscape elements. This step helps to create depth and contrast, giving your abstract forms a sense of presence and form.
- 9
With the larger brush and a very diluted wash (almost clear water with a hint of ink), add a subtle layer to the lower part of your paper, representing mist, fog, or the ground. This wash should be very light and ethereal, blending softly with the existing elements.
- 10
Allow the ink to dry completely. You can gently tilt the paper to encourage interesting drips or flows as it dries, or use a spray bottle to lightly mist areas and watch the ink bloom and blend.
- 11
Optional: Once the initial washes are dry, you can use your smaller brush with a very dark, concentrated ink to add fine details or sharp accents. Think of abstract branches, distant structures, or subtle textural elements that add intrigue.
- 12
Optional: If you desire a sense of atmosphere or a hint of distant light, you can use your larger brush with an extremely diluted wash of a complementary color (if you chose to add color in the tips) or even just water to create soft, blended areas that interact with the dried ink.
Tips & Troubleshooting
- 1Don't be afraid to experiment with ink-to-water ratios. The beauty of abstract art is in the unexpected results; a slightly unpredictable blend can often be the most captivating element of your piece.
- 2Try using different brushstrokes and pressures to create varied textures. Light, feathery strokes can suggest mist or soft clouds, while firmer, more deliberate strokes can create solid forms or sharp edges for mountains.
- 3If you want to add a touch of color, you can use diluted colored inks or even watercolor paints after the black ink has dried. Apply them sparingly to complement the monochrome landscape, perhaps as a subtle sunset glow or a hint of distant foliage.
- 4Clean your brushes thoroughly between washes to prevent muddying your colors. A quick rinse in your water container and a gentle blot on a paper towel will ensure your greys remain distinct and vibrant.
- 5Embrace the 'happy accidents.' Ink wash painting is known for its organic flow and unpredictable nature. Drips, blooms, and unexpected blends are often what give these pieces their unique charm and character.
- 6Work from light to dark. This is a fundamental principle in ink wash painting, allowing you to build up layers and control the intensity of your tones effectively. It's much easier to darken an area than to lighten it.
- 7Consider the composition as you work. Even though it's abstract, think about balance, focal points, and the overall mood you want to convey. The placement of your darker tones can help guide the viewer's eye.
- 8Don't overwork your piece. Sometimes, stepping away and letting the ink do its magic is the best approach. Resist the urge to constantly add or alter, allowing the natural drying process to contribute to the final outcome.
Related Activities You Might Enjoy
Frequently Asked Questions
What kind of paper is best for ink wash painting?
100% cotton cold press watercolor paper is ideal for ink wash painting. Its superior absorbency allows the ink to spread beautifully and creates those characteristic soft edges and gradients that are the hallmark of this technique. The cold press texture also provides a lovely surface for the ink to interact with, preventing it from simply sitting on top. Furthermore, its weight (typically 140lb or higher) ensures that the paper can handle a significant amount of water without buckling or tearing, maintaining the integrity and smoothness of your artwork throughout the process.
How do I create different shades of grey for ink wash?
You create different shades of grey by diluting black ink with water. The key is to experiment with the ratio of ink to water. For very light greys, use a significant amount of water with just a tiny drop of ink. As you want darker tones, gradually decrease the amount of water while keeping the ink concentration the same or slightly increasing it. It's highly recommended to test your dilutions on a scrap piece of paper first to find your preferred shades and ensure consistency before applying them to your main artwork. This practice helps you achieve a range of subtle to bold greys.
Can I use regular drawing paper for ink wash?
While you can technically try to use regular drawing paper, it is generally not ideal for ink wash painting. Regular drawing paper is typically less absorbent than watercolor paper and is not designed to handle large amounts of liquid. When wet, it tends to buckle, warp, or even tear easily, leading to less desirable results and a less smooth finish. The ink may also spread unevenly or bleed in uncontrolled ways. For the best experience and most beautiful outcomes with ink wash, investing in watercolor paper is highly recommended.
What if I don't have India ink?
If you don't have India ink, you can use other black drawing inks or even diluted black watercolor paint. The most important characteristic is that the ink or paint should be able to be thinned with water to create washes of varying opacity and tone. Calligraphy ink is often a good substitute. If using watercolor, ensure it's a good quality black pigment that can be applied in thin, translucent layers. The goal is to achieve a fluid medium that allows for the creation of subtle gradients and expressive marks, which most black inks and watercolors can facilitate.
How long does it typically take to create an abstract ink wash landscape?
The actual painting process for an abstract ink wash landscape is quite quick, often taking around 30 minutes to an hour, depending on your pace and the complexity of the washes you choose to apply. However, it's crucial to factor in drying time, which can vary significantly based on the humidity, the amount of water used, and whether you use any drying aids. Allowing the ink to dry completely can take anywhere from an hour to several hours, or even overnight if a lot of water was used. So, while the active creation is fast, the overall project duration includes patience for drying.
What are some common mistakes to avoid when starting with ink wash?
A common mistake for beginners is using too much ink and not enough water, resulting in harsh, dark lines rather than soft washes. Another is not cleaning brushes thoroughly between color changes, leading to muddy, undefined tones. Overworking the paper by applying too many layers of wet ink without allowing drying time can also cause buckling and loss of control. Finally, being too rigid and trying to force a specific image instead of embracing the fluid, abstract nature of the medium can hinder the spontaneous beauty of ink wash. Remember to work from light to dark and allow the ink to guide you.
What Next?
Congratulations on creating your own abstract ink wash landscape! This process is as much about the journey as the destination, offering a moment of calm and creative flow. To explore further, consider experimenting with different ink colors, adding subtle textures with salt before the ink dries, or even incorporating a touch of watercolor for highlights. Your finished piece can be framed as is, or mounted on a mat for a more polished presentation. Store your artwork flat in a protective sleeve to prevent damage and enjoy your unique creation.
Free: 10 Paper Crafts Anyone Can Make in 5 Minutes
Get our beginner guide + new craft ideas weekly.
No spam. Unsubscribe anytime.
Did you complete this activity?