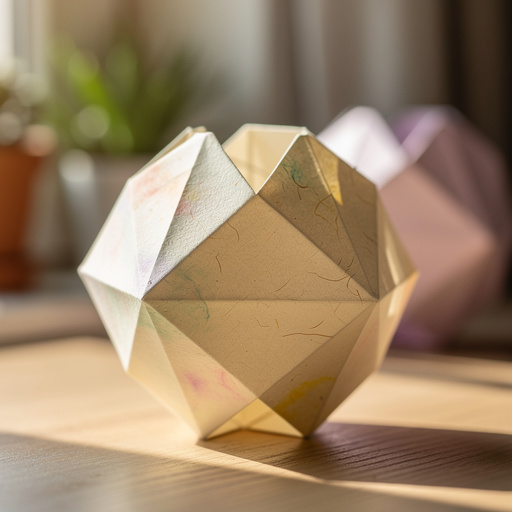
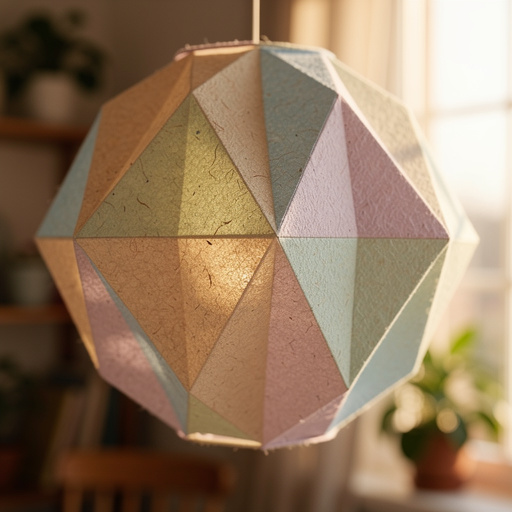
How to Create Geometric Paper Lanterns — Easy Step-by-Step Guide
Elevate your home decor with these stunning, handcrafted geometric paper lanterns. A satisfying screen-free project for adults. This guide provides detailed instructions to create beautiful, illuminated geometric structures perfect for any occasion or everyday ambiance.
Quick answer
To make geometric paper lanterns, you need cardstock, scissors, glue, and a ruler, taking about 60 minutes per lantern. Start by scoring and folding your cardstock into precise squares. This intermediate activity has 12 detailed steps and is perfect for adults seeking elegant, customizable home decor.
What you need
Shop on Amazon · As an Amazon Associate we earn from qualifying purchases. Links above are affiliate links — we may earn a commission at no extra cost to you.
Transform your living space with the captivating beauty of handcrafted geometric paper lanterns. This project offers a delightful escape from digital screens, allowing you to engage your creativity and produce something truly special. The intricate yet achievable design makes it an ideal activity for adults seeking a rewarding DIY experience. Whether you're looking to add a touch of modern elegance to your home, create unique party decorations, or simply enjoy the meditative process of crafting, these geometric lanterns are a perfect choice. Their customizable nature means you can tailor them to any color scheme or aesthetic, making them a versatile addition to your decor repertoire.
On this page
Step-by-Step Instructions
- 1
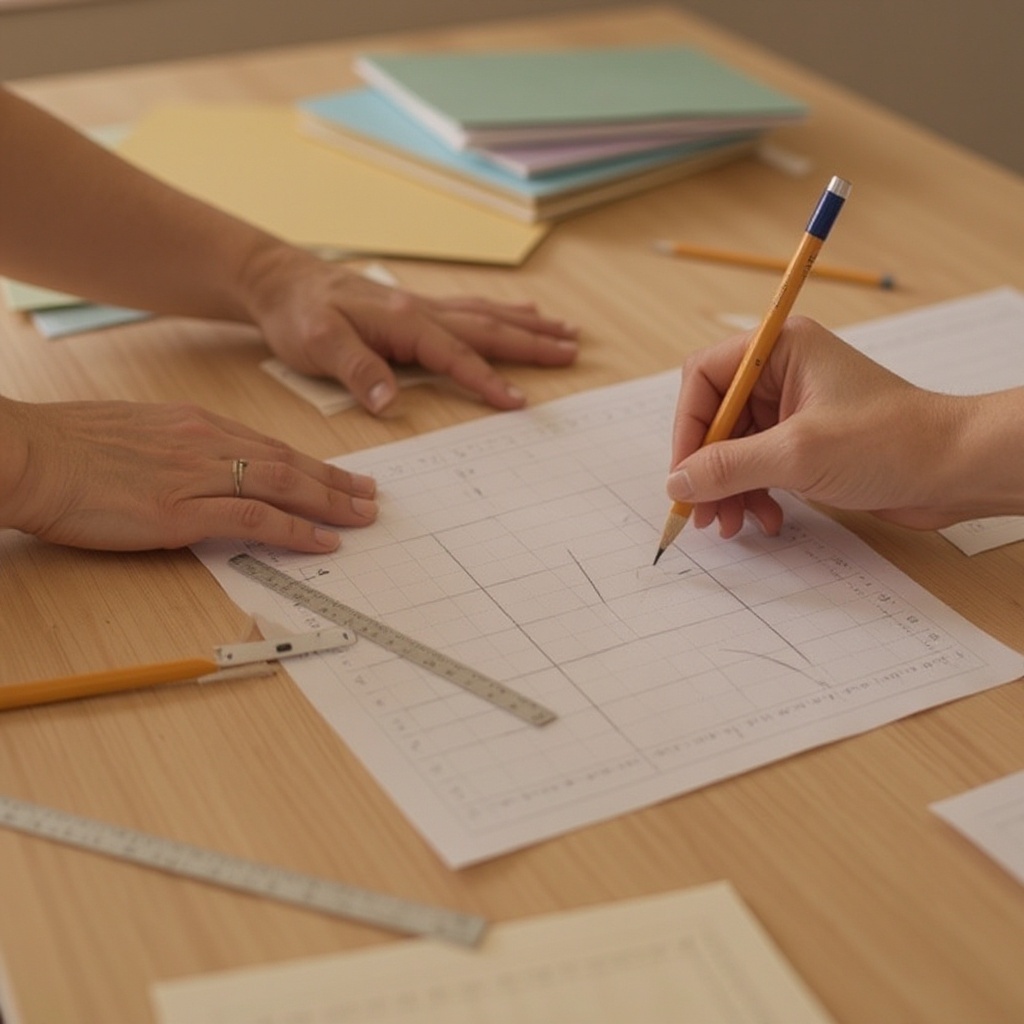
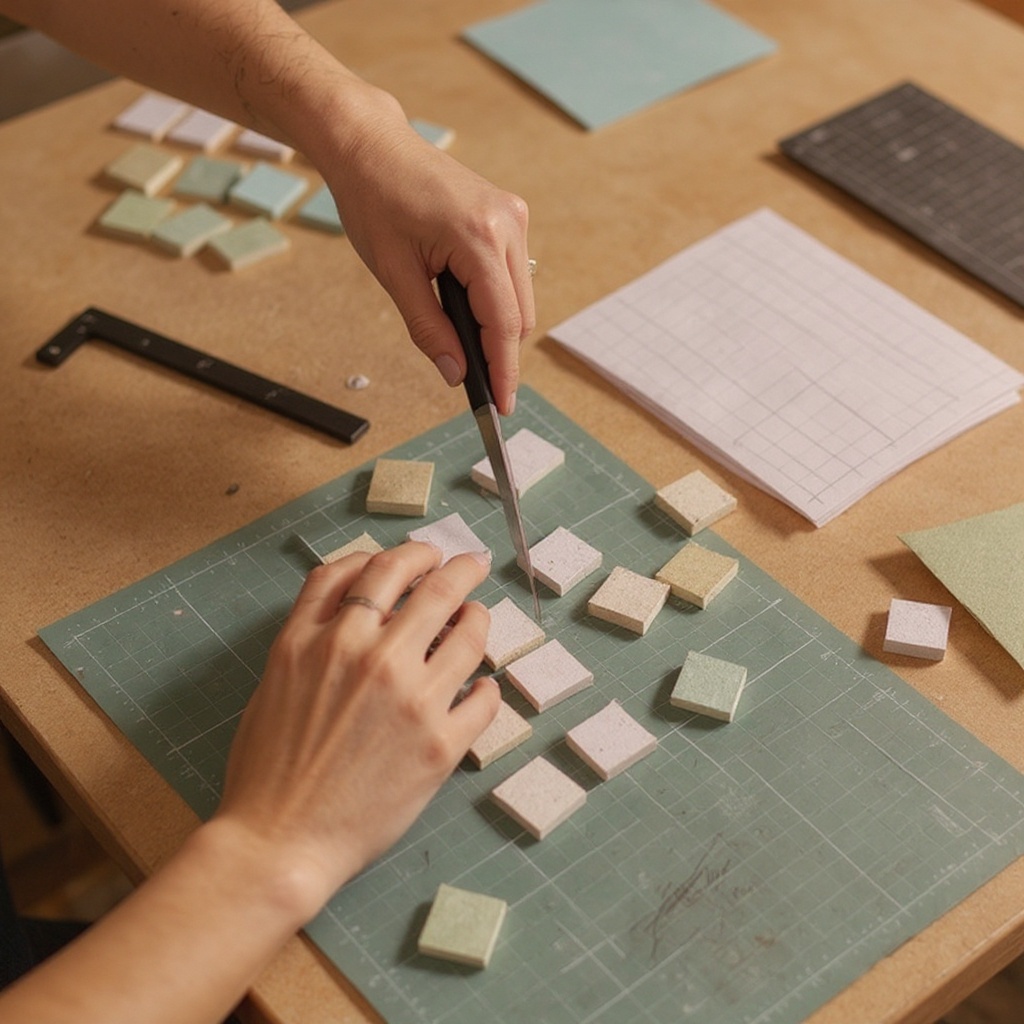
Prepare your workspace by laying down a cutting mat on a flat, stable surface. This protects your table and ensures clean cuts, especially when using a craft knife.
- 2
Using a ruler and pencil, lightly mark a grid of 1-inch squares on the back of each cardstock sheet. You should aim for 8 squares across and 11 squares down, ensuring your lines are straight and measurements are accurate for a uniform result.
- 3
With a scoring tool or the back of a craft knife (held at a very shallow angle) and ruler, score along all the horizontal and vertical lines you've marked. This creates precise fold lines without cutting through the paper, which is crucial for clean, crisp edges.
- 4
Carefully cut out each 1-inch square from the cardstock using a craft knife and ruler. Work slowly and deliberately, following the marked lines precisely. You will have 88 squares per sheet, totaling 1056 squares for a standard 12-sheet project.
- 5
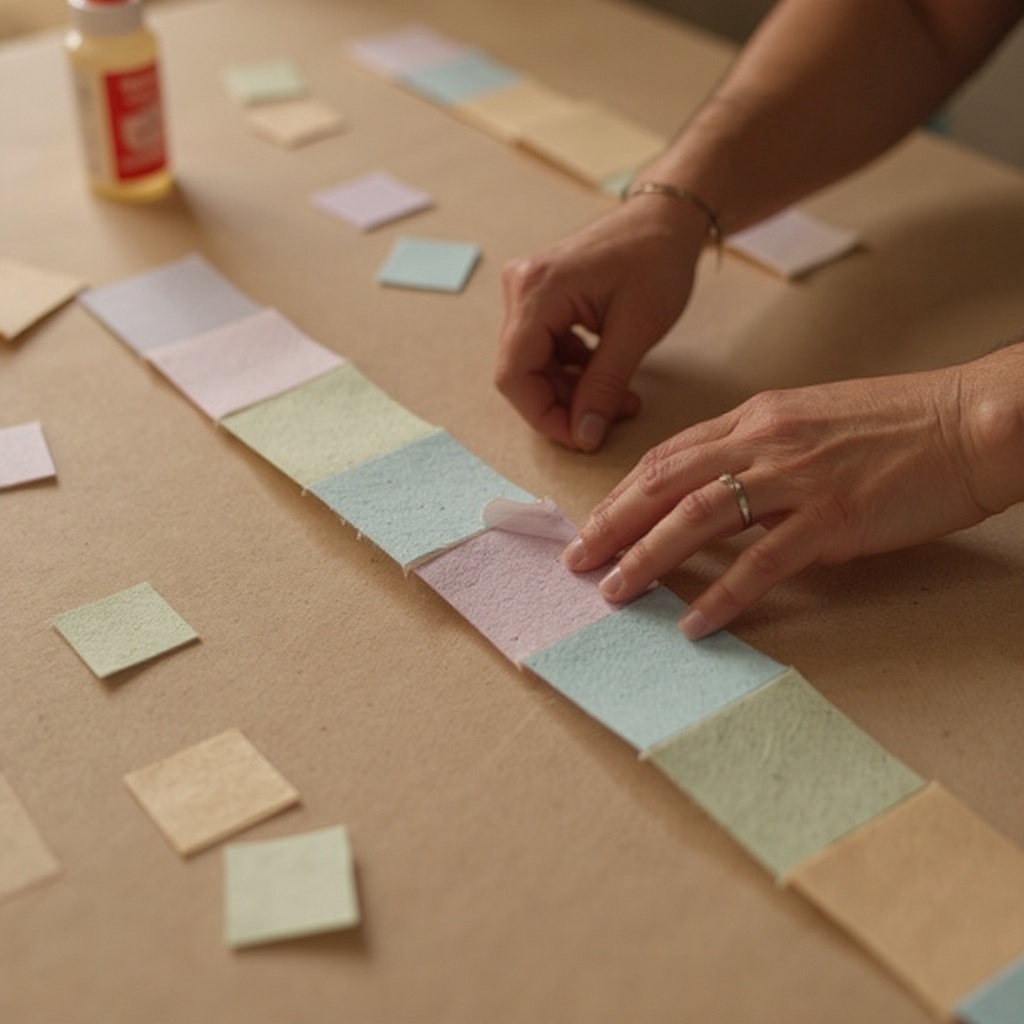
Select your first square and apply a thin, even line of glue along one of its edges. Ensure the glue is applied close to the edge but not so close that it will squeeze out excessively when pressed.
- 6
Take a second square and carefully press it onto the glued edge of the first square, aligning them perfectly to form a 1x2 rectangle. Hold them together firmly for a few moments until the glue begins to set, ensuring a strong bond.
- 7
Continue this process, adding squares one by one, to create a long strip of connected squares. Aim for a strip of 12 squares in total, ensuring each connection is secure and the strip remains straight.
- 8
Once you have a complete strip of 12 squares, apply glue to the outer edge of the very first square and the outer edge of the very last square in the strip. This prepares the strip to be formed into a ring.
- 9
Carefully join these two ends together, bringing the first and last squares to meet. Press the glued edges firmly and hold until the glue sets slightly, forming a stable ring of 12 squares. This ring will serve as the base or top of your lantern.
- 10
Repeat steps 5 through 9 to create a second identical ring of 12 squares. Having two identical rings is essential for constructing the stable, geometric structure of the lantern.
- 11
Now, begin connecting the two rings by applying glue to the edges of adjacent squares between the rings. Work your way around, attaching one square from the top ring to its corresponding square on the bottom ring, ensuring a stable and symmetrical structure.
- 12
Continue gluing the edges of adjacent squares between the two rings, working methodically around the entire structure. Ensure each connection is secure and that the lantern maintains its geometric integrity as you build upwards.
- 13
Once all connections between the rings are glued, allow the entire structure to dry completely. This is a critical step to ensure the lantern is sturdy and won't collapse when handled or illuminated.
- 14
After the glue is completely dry, gently shape the lantern. You can carefully press the sides to ensure all angles are sharp and defined. This is also the time to check for any loose seams and reinforce them if necessary.
- 15
Finally, insert an LED tea light or battery-operated fairy lights inside for illumination. Ensure the lights are cool to the touch and do not generate excessive heat, as paper is flammable.
Tips & Troubleshooting
- 1For cleaner lines and easier folding, use a scoring tool instead of a craft knife for scoring the fold lines. This prevents paper tears and creates sharper creases, resulting in a more professional finish.
- 2Experiment with different colors and textures of cardstock for a unique look. Metallic, pearlescent, or patterned cardstock can add a luxurious feel and create truly eye-catching lanterns that suit various decor styles.
- 3If using liquid glue, apply it sparingly with a fine-tip applicator or a small paintbrush to avoid warping the cardstock. Strong double-sided tape or a glue runner can be a faster, less messy alternative, especially for beginners.
- 4Ensure all glued edges are pressed firmly and allowed to dry completely before handling the lantern extensively. This is crucial for preventing the structure from falling apart and ensuring its longevity.
- 5You can create larger or smaller lanterns by adjusting the size of the grid squares and the number of squares used in the rings. For example, using 1.5-inch squares and 16 squares per ring will result in a larger lantern.
- 6Consider using a ruler and pencil to lightly mark the center of each square before scoring. This can help ensure your folds are perfectly aligned, leading to a more symmetrical and aesthetically pleasing lantern.
- 7When cutting out the squares, ensure your craft knife is sharp for clean cuts. A dull blade can snag the paper and create ragged edges, detracting from the overall appearance of your lantern.
- 8If you plan to hang your lantern, consider reinforcing the top ring with an extra layer of glue or a small piece of cardstock before attaching any hanging mechanism. This will add extra support and prevent the ring from tearing.
Related Activities You Might Enjoy
Frequently Asked Questions
Can I use regular printer paper for these lanterns?
While you can technically use regular printer paper, it is strongly not recommended for this project. Printer paper is too thin and lacks the necessary rigidity to hold the intricate geometric shape of the lantern. It will likely bend, crease unevenly, and the lantern could collapse easily, especially once assembled. Heavy cardstock provides the structural integrity needed to maintain the sharp angles and overall form, ensuring your finished lantern is both beautiful and durable. If you're concerned about the cost of cardstock, consider purchasing it in bulk or looking for sales at your local craft store.
How do I make the lantern stronger and more durable?
To ensure your geometric paper lantern is as strong and durable as possible, several factors come into play. Firstly, using a good quality, heavy cardstock is paramount; thicker paper will naturally provide more structural support. Secondly, the adhesive you choose is critical. Opt for a strong craft glue or a high-quality double-sided tape that creates a permanent bond. When applying glue, ensure you use enough to create a secure seam but not so much that it saturates the paper and causes warping. Pressing each glued seam firmly for a sufficient amount of time to allow it to set properly is also vital. Finally, allowing the entire lantern to dry completely before handling or illuminating it will prevent any stress on the joints.
What kind of lights are safe to use inside the paper lanterns?
For safety reasons, it is absolutely essential to use only LED tea lights or battery-operated fairy lights inside your paper lanterns. These types of lights generate very little heat and are not a fire hazard, making them ideal for use with paper crafts. Never use traditional candles with real flames, as paper is highly flammable and could easily ignite, posing a significant fire risk. Always ensure the LED lights you choose are cool to the touch and do not overheat, even after extended use. This will provide a beautiful glow without compromising the safety of your home.
Can I hang these lanterns, and if so, how?
Yes, you can definitely hang these geometric paper lanterns to create a stunning decorative effect! To do so, you'll want to reinforce the top ring of the lantern. You can achieve this by adding an extra layer of strong glue along the top edge or by attaching a small, sturdy piece of cardstock to the inside of the top ring. For hanging, you can create a small loop using strong thread, fishing line, or ribbon, and securely glue or tape it to the reinforced top ring. Ensure the hanging material is strong enough to support the weight of the lantern. Test the strength of your hanging point before fully suspending the lantern.
What are some creative ways to customize the appearance of these lanterns?
The beauty of these geometric paper lanterns lies in their customizability. Beyond simply choosing different colors of cardstock, you can explore various creative avenues. Consider using metallic or glitter cardstock for a glamorous touch, or opt for patterned papers for a more eclectic look. You could also try layering different colored squares to create unique visual effects within the geometric grid. Another idea is to use a fine-tip marker to draw subtle designs or patterns on the individual squares before assembly. For a softer, diffused light, try using translucent vellum instead of cardstock for some or all of the squares, though this will require a more delicate assembly process.
How long does it typically take to make one lantern, and what makes it a good screen-free activity?
The time it takes to create one geometric paper lantern can vary depending on your crafting speed and familiarity with the steps, but generally, you can expect it to take around 60 minutes per lantern. This project is an excellent screen-free activity because it requires focused attention and manual dexterity, providing a welcome break from digital devices. The repetitive yet precise nature of cutting, scoring, and gluing can be very meditative and calming. It engages your spatial reasoning and fine motor skills, offering a tangible sense of accomplishment as you build a beautiful object with your own hands. It's a perfect way to unwind and create something lovely for your home.
What Next?
Congratulations on creating your beautiful geometric paper lanterns! These versatile decorations can be displayed in numerous ways, from adorning shelves and mantels to hanging gracefully from ceilings or branches. For a truly magical effect, consider creating a set in varying sizes and colors to form a stunning visual display. When not in use, store them carefully in a dry place to maintain their shape and integrity. As a next step, explore different geometric patterns or experiment with translucent vellum for a softer glow. You might also consider incorporating them into larger installations, like a festive garland or a dramatic centerpiece for your next gathering.
Free: 10 Paper Crafts Anyone Can Make in 5 Minutes
Get our beginner guide + new craft ideas weekly.
No spam. Unsubscribe anytime.
Did you complete this activity?