How to Create a Paper Plate Marble Maze — Easy Step-by-Step Guide
Challenge your 7-year-old's problem-solving skills with this fun and engaging paper plate marble maze. A fantastic screen-free activity that's easy to make!
Quick answer
To make a paper plate marble maze, you need a paper plate, craft sticks, glue, and a marble. Start by gluing craft sticks to create pathways. This beginner-friendly activity has 10 steps and is perfect for 7-year-olds seeking screen-free fun.
What you need
Shop on Amazon · As an Amazon Associate we earn from qualifying purchases. Links above are affiliate links — we may earn a commission at no extra cost to you.
Looking for an engaging and educational activity that will captivate young minds and keep them away from screens? This paper plate marble maze project is the perfect solution! It’s a wonderfully hands-on craft that transforms a simple paper plate into a captivating challenge. Ideal for children aged 7 and up, this project not only sparks creativity but also hones crucial problem-solving abilities and fine motor skills. Gather your supplies and prepare for an afternoon of creative construction and playful competition!
On this page
Step-by-Step Instructions
- 1
Gather all your materials on a protected work surface. Ensure you have everything laid out before you begin, including your paper plate, craft sticks, glue, marble, scissors, pencil, and any optional decorating supplies. Protecting your work area with newspaper or a craft mat will prevent any accidental glue or marker stains.
- 2
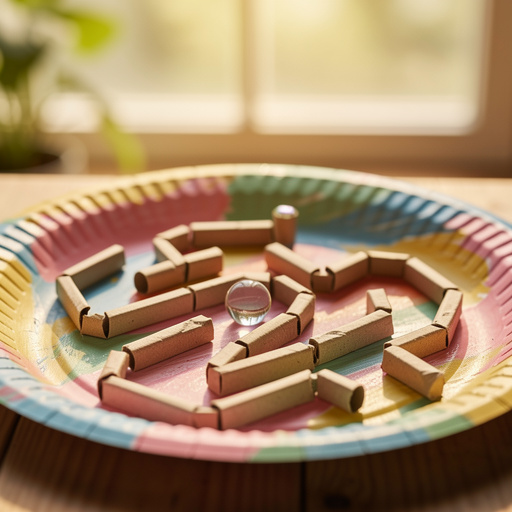
Place the paper plate upside down on your work surface. This orientation provides a flat, stable base for building your maze. Make sure the rim of the plate is facing upwards, creating a natural boundary for your maze.
- 3
Using a pencil, lightly sketch a simple maze path from one edge of the plate to the center. Start by drawing a clear starting point on the outer rim and a designated finish line in the center of the plate. Connect these points with a single, winding line, ensuring it's not too complex for a first attempt. This sketch will serve as your guide for placing the craft stick walls.
- 4
Cut 5-7 craft sticks in half using scissors. Be cautious when cutting, and ensure the cuts are as straight as possible. If the cut edges are rough, you can lightly sand them with sandpaper for a smoother finish, which is especially helpful if children are handling the pieces.
- 5
Begin gluing the full-sized craft sticks along the pencil lines to create the outer walls of your maze. Apply a thin, even line of glue along the pencil line and press a full craft stick firmly onto it. Work your way around the plate, following your sketched path to establish the main structure of your maze. Ensure the sticks are placed directly on the lines for a neat and functional maze.
- 6
Use the cut half-sticks to create smaller dividers and turns within the maze. These shorter pieces are perfect for navigating corners and creating narrower passages. Position them strategically to guide the marble along your intended path, adding complexity and interest to the design. Don't be afraid to experiment with angles and lengths to create unique turns.
- 7
Continue adding craft stick pieces, both full and halved, to build out the entire maze structure. Refer back to your pencil sketch, but feel free to adapt and add your own creative twists. Think about creating dead ends or multiple paths to make the maze more challenging and engaging for the player. Ensure there are no gaps large enough for the marble to escape the maze.
- 8
Ensure there are no gaps large enough for the marble to escape the maze. Carefully inspect all the glued sections, looking for any openings between the craft sticks or between the sticks and the paper plate. If you find any gaps, add a small piece of a craft stick or a dab of glue to seal them securely, preventing the marble from rolling out prematurely.
- 9
Leave a small opening at the start of the maze where the marble can be placed. This opening should be wide enough to easily drop the marble in but not so large that it allows the marble to roll out on its own. This designated starting point is crucial for initiating the game.
- 10
Allow the glue to dry completely. If using white craft glue, this may take a few hours, so patience is key. For faster results, a hot glue gun can be used, but remember that adult supervision is absolutely necessary due to the high temperature. Ensure all pieces are firmly adhered before proceeding to the next step.
- 11
Once the glue is completely dry and the maze structure is secure, test the maze with your marble. Gently tilt the plate to see if the marble rolls smoothly through the pathways you've created. Make any necessary adjustments by adding small pieces of craft sticks or reinforcing glued areas if the marble gets stuck or rolls out unexpectedly.
- 12
Decorate the back of the paper plate with markers, crayons, or paint for an extra touch of personalization. You can draw patterns, add colors, or even create a theme for your maze. This step is optional but adds a fun, artistic element to the project, making it even more special.
- 13
Once dry, place the marble at the starting point and tilt the plate to guide it through the maze to the center. Encourage players to use gentle, controlled movements to navigate the marble. The goal is to reach the center without the marble falling out of the maze or getting stuck in a dead end.
- 14
Experiment with different maze designs! You can make it as simple or as complex as you like. For younger children, a straightforward path with fewer turns is ideal. For older children or adults, you can create intricate labyrinths with multiple branching paths and challenging obstacles. The beauty of this craft is its adaptability to various skill levels.
- 15
If using craft glue, place heavy books on top of the craft sticks while drying to ensure they adhere firmly to the plate. This extra weight helps to press the sticks down, creating a strong bond and preventing them from lifting as the glue dries. Ensure the books are placed evenly to avoid shifting the sticks.
- 16
For a more challenging maze, use smaller marbles or add extra turns and dead ends. Smaller marbles require more precise control and can navigate tighter spaces. Adding dead ends forces players to backtrack, increasing the difficulty and the need for careful planning. Consider incorporating elements like small bridges or tunnels using additional craft stick pieces for added complexity.
- 17
Consider adding a small ramp or a series of small bumps using extra craft stick pieces to make the marble's journey more dynamic. These additions can introduce an element of unpredictability and require different tilting techniques to overcome, adding another layer of fun and challenge to the maze.
- 18
If you're aiming for a particularly durable maze, consider using a stronger adhesive like wood glue or a hot glue gun. While hot glue offers speed, wood glue provides a very strong bond that can withstand more vigorous play. Always ensure proper ventilation and adult supervision when working with strong adhesives.
- 19
Encourage players to time themselves navigating the maze or to compete against each other to see who can complete it the fastest. This adds a competitive element and encourages repeated play, further developing their spatial reasoning and dexterity.
- 20
Once your maze is complete and thoroughly dry, you can even consider adding a clear coat of sealant or varnish to protect the decorations and the craft sticks, making it more durable for long-term play.
- 21
If you're using a hot glue gun, ensure you have a heat-resistant mat or surface to place the gun on when not in use. Also, have a bowl of cold water nearby in case of accidental burns, and always supervise children closely when a hot glue gun is in use.
- 22
For a truly unique maze, try cutting the paper plate into different shapes before you start building, or use multiple paper plates to create a larger, more elaborate maze. You could even cut out sections of the plate to create openings or different levels within the maze.
- 23
If you find the craft sticks are not adhering well to the paper plate, you can lightly sand the surface of the paper plate where you intend to glue the sticks. This creates a slightly rougher texture, giving the glue more surface area to grip onto for a stronger bond.
- 24
Consider making a series of paper plate mazes with varying difficulty levels. This allows children to progress from simpler designs to more complex ones as their skills develop, providing continuous engagement and learning opportunities.
- 25
If you want to make the maze more visually appealing, you can paint the inside of the paper plate a solid color before you start gluing the craft sticks. This will create a vibrant backdrop for your maze and make the craft stick pathways stand out.
- 26
To ensure the marble doesn't roll too fast and become unmanageable, you can create small 'speed bumps' by gluing tiny pieces of craft sticks strategically within the pathways. This will slow the marble down and require more careful manipulation.
- 27
If you're planning on storing the maze for later use, ensure all glue is completely dry and that no small pieces are loose. You can store it flat or even hang it on a wall as a piece of interactive art.
Tips & Troubleshooting
- 1If using craft glue, place heavy books on top of the craft sticks while drying to ensure they adhere firmly to the plate. This gentle pressure helps to create a strong bond between the craft sticks and the paper plate, preventing any lifting or detachment as the glue cures. Make sure the books are distributed evenly to avoid shifting the sticks.
- 2Experiment with different maze designs! You can make it as simple or as complex as you like. For younger children, a straightforward path with fewer turns is ideal. For older children or adults, you can create intricate labyrinths with multiple branching paths and challenging obstacles. The beauty of this craft is its adaptability to various skill levels.
- 3Decorate the back of the paper plate with markers or paint before you start building the maze for an extra touch. This allows for a personalized and visually appealing base for your maze. You can create patterns, draw scenes, or even write your name on the back, making each maze uniquely yours.
- 4For a more challenging maze, use smaller marbles or add extra turns and dead ends. Smaller marbles require more precise control and can navigate tighter spaces. Adding dead ends forces players to backtrack, increasing the difficulty and the need for careful planning. Consider incorporating elements like small ramps or tunnels using additional craft stick pieces for added complexity.
- 5If you find the craft sticks are not adhering well to the paper plate, you can lightly sand the surface of the paper plate where you intend to glue the sticks. This creates a slightly rougher texture, giving the glue more surface area to grip onto for a stronger bond and a more durable maze.
- 6Consider adding small obstacles within the maze, such as tiny bridges made from craft stick pieces or small bumps. These elements can introduce an element of unpredictability and require different tilting techniques to overcome, adding another layer of fun and challenge to the maze.
- 7To make the maze more durable for repeated play, consider using a stronger adhesive like wood glue or a hot glue gun. While hot glue offers speed, wood glue provides a very strong bond that can withstand more vigorous play. Always ensure proper ventilation and adult supervision when working with strong adhesives.
- 8Encourage players to time themselves navigating the maze or to compete against each other to see who can complete it the fastest. This adds a competitive element and encourages repeated play, further developing their spatial reasoning and dexterity. You can even create a leaderboard for added fun.
Related Activities You Might Enjoy
Frequently Asked Questions
What are some good screen-free activities for 7-year-olds?
Screen-free activities for 7-year-olds are abundant and crucial for their development. Crafts like this paper plate marble maze are fantastic because they engage creativity and problem-solving. Other excellent options include building with blocks or LEGOs, which foster spatial reasoning and fine motor skills. Outdoor play, such as riding bikes, playing tag, or exploring nature, is vital for physical health and sensory development. Reading books together or independently sparks imagination and language skills. Board games and card games promote strategic thinking, turn-taking, and social interaction. Imaginative play, where children create their own scenarios and characters, is fundamental for emotional and cognitive growth. The key is to offer a variety of engaging experiences that encourage active participation and exploration.
How can I make a marble maze more challenging?
To elevate the challenge of your marble maze, focus on intricate pathway design. Create more complex routes with tighter turns and sharper angles that require precise control. Incorporate dead ends that lead players astray, forcing them to backtrack and rethink their strategy. You can also add physical obstacles like small ramps or tunnels constructed from additional craft stick pieces or other small materials. Using a smaller marble will also increase the difficulty, as it can fit into tighter spaces and requires finer motor skills to maneuver. Consider adding elements that require a specific sequence of tilts or movements to overcome, transforming it into a true test of dexterity and logic.
What other materials can I use to build a marble maze?
The beauty of DIY crafts lies in their adaptability, and marble mazes are no exception! Besides standard craft sticks, you can use a variety of materials to construct the walls. Sturdy cardboard strips cut from old boxes, popsicle sticks (which are essentially larger craft sticks), or even colorful pipe cleaners can be bent and shaped to form pathways. For a more robust maze, consider using small LEGO bricks or Duplo blocks, which offer endless possibilities for modular designs. The base doesn't have to be a paper plate; a sturdy cardboard box lid, a thick piece of cardstock, or even a shallow plastic container can serve as an excellent foundation for your maze creation.
Is this a good activity for developing fine motor skills?
Absolutely! This paper plate marble maze is an excellent activity for honing fine motor skills in children. The process of carefully gluing the craft sticks requires precision and control, strengthening the small muscles in their hands and fingers. Holding and manipulating the craft sticks, especially the smaller halved pieces, enhances dexterity. Furthermore, guiding the marble through the intricate pathways of the maze demands excellent hand-eye coordination and controlled movements. This combination of tasks provides a comprehensive workout for the fine motor skills essential for tasks like writing, drawing, and buttoning clothes.
How long does it take to make a paper plate marble maze?
The time it takes to create a paper plate marble maze can vary depending on the complexity of the design and the type of glue used. If you opt for a hot glue gun, which dries almost instantly, you could potentially complete the construction phase in about 30-45 minutes. However, you'll need to factor in drying time for any decorative elements. If you're using white craft glue, which is safer for younger children to handle independently but takes longer to dry, the construction might take around 30-60 minutes, but you'll need to allow several hours, or even overnight, for the glue to dry completely before playing. The decoration phase can add an extra 15-30 minutes, depending on the level of detail.
Can this activity be adapted for different age groups?
Yes, this paper plate marble maze is highly adaptable for various age groups. For younger children, around 4-6 years old, simplify the maze design by creating a more direct path with fewer turns and no dead ends. Focus on the tactile experience of gluing and guiding a larger marble. For 7-year-olds, as suggested, a moderate level of complexity is ideal, encouraging problem-solving. For older children or even adults, you can introduce advanced challenges by creating intricate labyrinths, incorporating multiple levels, adding ramps, or using smaller marbles. The core concept remains engaging, but the execution can be tailored to suit different developmental stages and skill sets.
What are the educational benefits of building a marble maze?
Building a marble maze offers a wealth of educational benefits that extend far beyond simple entertainment. It significantly enhances problem-solving skills as children strategize the best pathways and overcome obstacles. Spatial reasoning is developed as they visualize the maze's layout and how the marble will move through it. Fine motor skills and hand-eye coordination are crucial for precise placement of craft sticks and controlled manipulation of the marble. The activity also fosters creativity and design thinking as children conceptualize and construct their unique maze. Furthermore, it promotes patience and perseverance, especially when dealing with drying times or redesigning tricky sections. It's a fantastic screen-free way to engage critical thinking and practical application of concepts.
What Next?
Congratulations on creating your very own paper plate marble maze! This versatile craft offers endless possibilities for customization and replayability. Consider adding decorative elements like painted backgrounds or themed pathways to make each maze unique. For future projects, explore creating more complex mazes with multiple levels or incorporating small ramps and tunnels. Once completed, your marble maze can be a cherished toy, a fun game to share with friends, or even a decorative piece. Store it carefully to preserve its intricate design for many play sessions to come.
Free: 10 Paper Crafts Anyone Can Make in 5 Minutes
Get our beginner guide + new craft ideas weekly.
No spam. Unsubscribe anytime.
Did you complete this activity?