How to Build a Cardboard Box Puppet Theater — Easy Step-by-Step Guide
Transform a simple cardboard box into a captivating puppet theater for endless pretend play adventures. This screen-free activity sparks creativity and storytelling. Easy DIY guide for families.

Quick answer
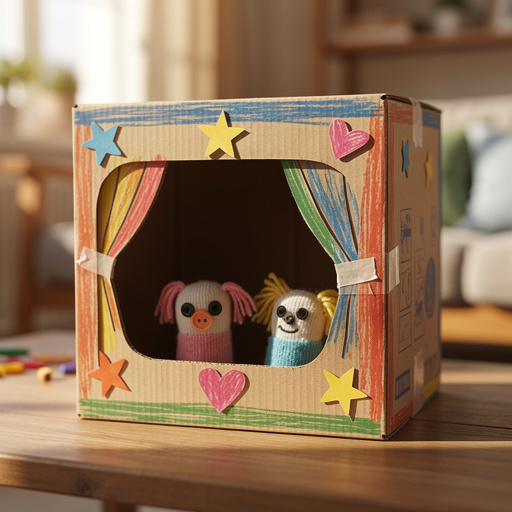
To make a cardboard box puppet theater, you need a large cardboard box, scissors, craft knife, paint, and decorations, taking about 90 minutes. Start by cutting a stage opening. This beginner-friendly activity has 10 steps and is perfect for families with children aged 4+.
What you need
Shop on Amazon · As an Amazon Associate we earn from qualifying purchases. Links above are affiliate links — we may earn a commission at no extra cost to you.
Unleash your child's imagination with this delightful cardboard box puppet theater project! In a world increasingly dominated by screens, this hands-on activity offers a refreshing opportunity for creative expression and collaborative storytelling. It’s a fantastic way to transform everyday recycling into a magical stage for fantastical adventures. Perfect for rainy days, playdates, or simply sparking a love for performance, this DIY theater is a rewarding project for both kids and adults, fostering essential developmental skills in a fun and engaging way.
On this page
Step-by-Step Instructions
- 1
Select a large cardboard box that is tall enough for a child to comfortably stand behind and operate puppets. If you're using two medium boxes, ensure they are the same height and securely tape them together along the seams to form a single, sturdy structure, reinforcing both the inside and outside for maximum stability.
- 2
On one of the wider sides of the box, which will serve as the front of your theater, use a metal ruler and pencil to carefully draw a rectangular opening for the stage. Aim for an opening that is at least 18 inches wide and 12 inches tall, ensuring it's large enough for your puppets to perform comfortably without being cramped.
- 3
Using a box cutter or sturdy scissors, carefully cut out the stage opening you've drawn. For the cleanest and most precise edges, it's highly recommended that an adult uses a craft knife, following the drawn lines with the ruler as a guide to prevent any slips or uneven cuts.
- 4
On the opposite side of the box from the stage opening, which will be the back of your theater, draw and cut out a smaller rectangular door. This door is crucial for puppet access, allowing your puppeteers to easily enter and exit the stage area without disrupting the show.
- 5
Prepare your paints and brushes, and begin painting the exterior of the box with your chosen base colors. This painted exterior will serve as the main backdrop and facade of your puppet theater, so consider vibrant colors or a classic theater look. Allow the paint to dry completely before moving on to the next step.
- 6
Once the base paint is thoroughly dry, it's time to add the theatrical flair! You can paint detailed curtains around the stage opening, create a charming marquee above the stage, or even glue on fabric scraps for a more realistic curtain effect. Let your creativity guide you here.
- 7
Utilize markers, construction paper, or even stickers to add intricate details that bring your theater to life. Consider designing and drawing posters for the 'upcoming shows,' creating a small 'ticket booth' area on the side, or adding decorative borders around the stage and puppet access door for a polished look.
- 8
If you'd like to give the puppeteer a way to peek out or interact directly with the audience, carefully cut out a small window on one of the side panels of the box. This window can be positioned at a height suitable for an adult or older child to look through.
- 9
For an extra touch of theatricality, you can create actual curtains for your stage. Cut two pieces of fabric slightly wider than your stage opening and hem the sides. Attach them to a dowel rod or sturdy cardboard tube using a hot glue gun or by sewing loops, then mount this rod above the stage opening using strong tape or small brackets.
- 10
If you're adding fabric curtains, you might want to create a way to tie them back. Cut two small strips of fabric and attach them to the sides of the stage opening with glue or staples, allowing them to be used to hold the curtains open when not in use.
- 11
Allow all paint, glue, and any attached decorative elements to dry thoroughly before proceeding to the next stage. This ensures everything is securely in place and prevents smudging or accidental damage.
- 12
Test the puppet access door to ensure it opens and closes smoothly, and that your puppets can easily pass through it. Make any necessary adjustments to the size or fit of the door for optimal puppet operation.
- 13
Reinforce any areas that seem weak, particularly the corners and seams where boxes might have been joined or where the stage opening was cut. Use extra layers of strong tape to ensure the theater remains sturdy during enthusiastic puppet shows.
- 14
Consider adding a small ledge or shelf just below the stage opening. This can be made from a piece of sturdy cardboard or a thin piece of wood, providing a stable platform for puppets to stand on during their performances.
- 15
If you're using two boxes, ensure the seam where they are joined is completely covered and reinforced with tape, both inside and out, to prevent any structural weaknesses.
- 16
Before painting, you can lightly sand any rough edges on the cardboard to create a smoother surface for paint application, though this is optional.
- 17
Test the stability of the entire structure by gently pushing on different sides. If any areas feel wobbly, add more tape or cardboard reinforcements.
- 18
Your cardboard box puppet theater is now ready for its grand opening! Gather your collection of puppets, encourage your children to create their own, and let the imaginative storytelling and pretend play adventures begin.
Tips & Troubleshooting
- 1For a more stable and durable theater, reinforce all the corners and seams with extra layers of strong packing tape or duct tape before you begin decorating. This will prevent the box from collapsing during enthusiastic performances and will extend the lifespan of your creation.
- 2Consider adding a small ledge or shelf just below the stage opening using a sturdy piece of cardboard or a thin strip of wood. This provides a stable platform for puppets to stand on, making it easier for them to interact with the audience and preventing them from falling through the opening.
- 3Experiment with using different sized boxes to create more elaborate structures. You could attach smaller boxes to the sides to act as 'wings' for the stage, or even stack boxes to create a multi-level theater for more complex productions.
- 4Encourage children to be actively involved in designing and creating their own puppets to use with the theater. This could involve using socks, paper bags, or even felt scraps, fostering their creativity and making the puppet show even more personal.
- 5Safety is paramount when working with sharp tools. Always supervise children closely when they are using or are near sharp tools like box cutters or craft knives. Ensure they understand the importance of keeping their fingers away from the blades.
- 6To create a more immersive experience, consider painting the inside of the theater black or a dark color to make the stage area stand out. You could also add a simple backdrop made from fabric or painted cardboard that can be easily swapped out for different shows.
- 7Washi tape can be a fantastic and easy way to add decorative borders and details without the mess of paint. It comes in a wide variety of colors and patterns, making it perfect for adding a professional and polished look to your puppet theater.
- 8If you're aiming for a more professional look, consider using spray paint for a smooth, even finish on the exterior of the box. Ensure you do this in a well-ventilated area and protect the surrounding surfaces with newspaper or a drop cloth.
Related Activities You Might Enjoy
Frequently Asked Questions
What is the easiest way to make a puppet theater?
The most straightforward and accessible method for creating a puppet theater is by repurposing a large cardboard box. Begin by selecting a box that's tall enough for a puppeteer to stand behind comfortably. Next, carefully cut out a rectangular opening on one side to serve as the stage. On the opposite side, create a smaller door for puppets to enter and exit. Once the structural cuts are made, the fun part begins: decorating! Use paints, markers, fabric scraps, and other craft supplies to transform the plain box into a vibrant and engaging theatrical space. This simple process requires minimal materials and can be completed in a relatively short amount of time, making it an ideal beginner project for families.
How do you make a stage for a puppet show?
The stage for a cardboard box puppet theater is essentially the main opening you cut into the front of the box. To enhance this stage area, you can get creative with decorations. Painting a border around the opening can mimic grand theater curtains, or you can even glue real fabric scraps to create a more realistic curtain effect. Consider adding a small ledge or shelf just below the opening to give your puppets a stable platform to stand on. Some crafters even attach a dowel rod above the opening to hang actual fabric curtains, which can be drawn open and closed for added theatrical flair. The key is to make the opening visually distinct and inviting for the audience.
What materials are needed for a cardboard puppet theater?
To construct a basic yet charming cardboard box puppet theater, you'll primarily need a large cardboard box, such as one from an appliance or a large delivery. Essential tools include a box cutter or sturdy scissors for cutting, and a craft knife for more precise work (always with adult supervision). A metal ruler and pencil are crucial for drawing straight lines for your cuts. For decoration, you'll want acrylic paints or craft paints in various colors, along with a set of paintbrushes. Additionally, gather decorative materials like fabric scraps for curtains, glitter glue, permanent markers, construction paper, and stickers to personalize your theater. Strong tape, like packing tape or duct tape, is also vital for assembly and reinforcement.
How can I make my puppet theater more interactive?
There are several ways to elevate your cardboard puppet theater from a simple stage to a more interactive experience. Consider cutting a small window on the side of the box, allowing the puppeteer to peek out and engage directly with the audience, perhaps asking questions or reacting to their cheers. You could also design and build a small 'ticket booth' area attached to the side of the theater, where children can pretend to sell tickets before the show. For a sensory element, think about incorporating simple sound effects; perhaps a small bell that can be rung for an intermission, or even attaching a small, safe noisemaker that can be activated during the performance. Adding interchangeable backdrops made of painted cardboard or fabric can also change the scene and keep shows fresh.
What age is this project suitable for?
This cardboard box puppet theater project is wonderfully adaptable and can be enjoyed by a wide range of ages, with varying levels of involvement. Children as young as 4 years old can participate enthusiastically in the decorating stages, using paints, markers, and stickers to bring their creative visions to life. They can also be the primary puppeteers once the theater is complete. For younger children, adult supervision is essential during the cutting phases. Older children, perhaps 8 and up, can take on more responsibility in the construction, including drawing the cut lines and even assisting with the cutting under strict adult supervision. The entire family can collaborate, making it a fantastic bonding activity for preschoolers through to pre-teens.
How long does it typically take to build a cardboard box puppet theater?
The time required to build a cardboard box puppet theater can vary depending on the complexity of the design and the age and involvement of the crafters. For a straightforward build, focusing on cutting the openings and applying a base coat of paint, you can expect it to take approximately 90 minutes to 2 hours. This timeframe includes drying time for the paint. However, if you plan to add intricate details like painted curtains, a marquee, fabric embellishments, a ticket booth, or even actual fabric curtains, the project could extend to 3-4 hours or even be spread over a couple of sessions to allow for thorough drying and detailed work. The most time-consuming part is often the decorating and drying process, so planning accordingly is key.
What Next?
Once your magnificent cardboard puppet theater is complete, the real magic begins! Encourage your little ones to brainstorm show ideas, design their own unique puppets, and even create ticket stubs for an authentic theatrical experience. For storage, consider a dry, flat space or even a decorative cover to keep it looking its best. You can also extend the fun by adding a simple backdrop that can be swapped out for different shows, or even incorporating battery-operated fairy lights for a dazzling evening performance. This project is just the beginning of a world of creative play!
Free: 10 Paper Crafts Anyone Can Make in 5 Minutes
Get our beginner guide + new craft ideas weekly.
No spam. Unsubscribe anytime.
Did you complete this activity?
Related