Salt Dough 'Dinosaur Fossil' Dig Excavation
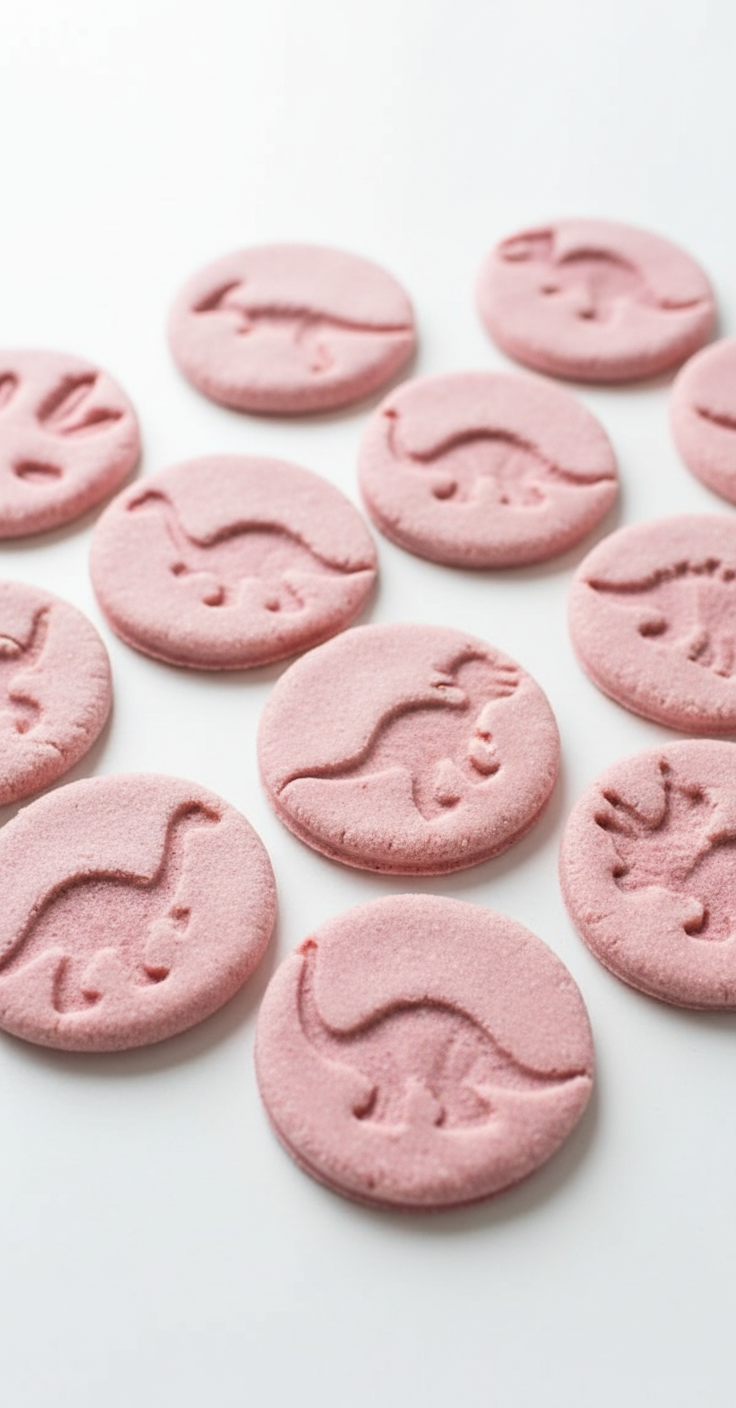
Unearth ancient wonders with this engaging salt dough 'dinosaur fossil' dig excavation project. This hands-on activity allows children to become paleontologists, creating their own dinosaur fossils and then excavating them from a sandy dig site. It's a fantastic way to spark curiosity about dinosaurs, geology, and the scientific process of discovery, all while enjoying a creative and rewarding craft.
Quick answer
This project involves making salt dough, pressing toy dinosaurs or bones into it to create imprints, baking the dough until hard, and then burying the 'fossils' in sand for a fun excavation activity.
What you need
Shop on Amazon · As an Amazon Associate we earn from qualifying purchases. Links above are affiliate links — we may earn a commission at no extra cost to you.
Embark on a prehistoric adventure right in your own home with the Salt Dough 'Dinosaur Fossil' Dig Excavation! This captivating craft project is perfect for budding paleontologists, curious kids, and anyone fascinated by the ancient world of dinosaurs. It's a multi-faceted activity that blends the tactile joy of sculpting with the thrill of discovery, offering an engaging and educational experience. Imagine the excitement as little hands mold dough, create lasting imprints of mighty creatures, and then carefully unearth their own 'fossils' – it's a recipe for unforgettable fun and learning.
On this page
Step-by-Step Instructions
- 1
**Step 1: Gather Your Prehistoric Supplies.** Before you begin, ensure you have all your materials laid out and ready. This includes your flour, salt, water, mixing bowl, toy dinosaurs or bones, baking sheets, and your chosen excavation materials like sand or dirt.
- 2
**Step 2: Prepare the Salt Dough Base.** In your large mixing bowl, combine the 2 cups of all-purpose flour and 1 cup of salt. Whisk them together briefly to ensure the salt is evenly distributed throughout the flour, creating a consistent base for your dough.
- 3
**Step 3: Gradually Add Water.** Begin adding the 3/4 cup of water to the dry ingredients. It's best to add the water gradually, stirring with a spoon or your hands as you go. You're aiming for a stiff, cohesive dough that doesn't stick excessively to your fingers.
- 4
**Step 4: Achieve the Perfect Dough Consistency.** Continue mixing and kneading the dough in the bowl until it starts to come together. If the dough feels too dry and crumbly, add a teaspoon of water at a time until it forms a workable mass. Conversely, if it feels too sticky, add a tablespoon of flour.
- 5
**Step 5: Knead for Smoothness and Elasticity.** Transfer the dough to a clean, lightly floured work surface. Knead the dough vigorously for about 5-7 minutes. This process develops the gluten in the flour, making the dough smooth, pliable, and elastic, which is crucial for creating clear imprints.
- 6
**Step 6: Check for Proper Texture.** As you knead, the dough should transform from a shaggy mass into a smooth, firm ball. It should feel firm to the touch but still be pliable enough to shape without cracking. This ensures your fossils will be durable.
- 7
**Step 7: Divide the Dough for Fossil Creation.** Once your dough is perfectly kneaded, divide it into several portions. The size of each portion will depend on the size of your toy dinosaurs or bones; aim for pieces large enough to accommodate the imprint without the edges becoming too thin.
- 8
**Step 8: Shape the Fossil Discs.** Take each portion of dough and flatten it into a disc shape. Aim for a thickness of approximately 1/2 inch for each disc. Using a rolling pin can help achieve a more uniform thickness, which leads to more consistent baking.
- 9
**Step 9: Prepare for Imprinting.** Ensure the surface of each dough disc is relatively smooth. If you notice any cracks or rough patches, gently press them together to create a clean surface for your dinosaur imprint. This will make the fossil details stand out more clearly.
- 10
**Step 10: Create the Dinosaur Fossil Imprints.** This is where the magic happens! Gently but firmly press a toy dinosaur or plastic bone into the center of each flattened dough disc. Apply enough pressure to create a clear, deep impression of the dinosaur's shape, scales, or bones, but be careful not to press all the way through the dough.
- 11
**Step 11: Carefully Remove the Imprinting Toy.** Once you have a satisfactory imprint, carefully lift the toy dinosaur or bone straight up from the dough. Take your time to avoid distorting the impression. You should be left with a beautiful, raised outline of your prehistoric creature.
- 12
**Step 12: Refine the Fossil Edges (Optional).** If desired, you can gently smooth the edges of your salt dough fossils with your fingers or a damp cloth to give them a more finished look. This step is purely aesthetic and doesn't affect the fossilization process.
- 13
**Step 13: Prepare for Baking.** Arrange the newly created salt dough 'fossils' on a baking sheet. For easier cleanup and to prevent sticking, you can line the baking sheet with parchment paper or a silicone baking mat.
- 14
**Step 14: Preheat Your Oven.** Preheat your oven to a low temperature of 250°F (120°C). A low and slow baking process is essential for drying out the salt dough thoroughly without burning it, ensuring your fossils are hard and durable.
- 15
**Step 15: Bake the Fossils Until Hard.** Place the baking sheet with the salt dough fossils into the preheated oven. Bake for 2 to 3 hours, or until the fossils are completely dry and hard to the touch. The exact time will depend on the thickness of your fossils and your oven's calibration.
- 16
**Step 16: Check for Doneness.** To check if your fossils are ready, gently tap them. They should sound hard and solid. If they still feel soft or have any give, continue baking for another 30 minutes to an hour, checking periodically.
- 17
**Step 17: Cool the Fossils Completely.** Once baked, carefully remove the baking sheet from the oven. Allow the salt dough fossils to cool completely on the baking sheet or transfer them to a wire cooling rack. This cooling process is vital; warm fossils are more fragile and can break easily.
- 18
**Step 18: Prepare the Excavation Site.** While your fossils are cooling, prepare your dig site. Fill your chosen bin or tray with play sand or clean, dry dirt. Ensure there's enough material to completely bury your salt dough fossils, creating a realistic excavation environment.
- 19
**Step 19: Bury Your Dinosaur Fossils.** Once the salt dough fossils are completely cool and hardened, gently bury them within the sand or dirt. You can place them strategically, perhaps partially exposed, to make the excavation more challenging and exciting.
- 20
**Step 20: Equip Your Little Paleontologists.** Provide children with a selection of excavation tools. Offer a variety of brushes (for gentle dusting), small chisels (like popsicle sticks or plastic tools), old toothbrushes, and perhaps small spoons or trowels. These tools will allow them to carefully uncover the fossils without damaging them.
- 21
**Step 21: Begin the Fossil Excavation!** Encourage children to use their tools to gently brush away the sand or dirt, revealing the hidden dinosaur fossil imprints. This is the most exciting part, where they get to discover the treasures they created.
- 22
**Step 22: Document and Collect.** As fossils are unearthed, children can use small containers or bags to collect their findings. This is a great opportunity to talk about what they are discovering and how real paleontologists work.
- 23
**Step 23: Clean Up and Store.** Once the excavation is complete, help children clean their tools and the dig site. The salt dough fossils can be stored as they are, or you can move on to decorating them for a more permanent display.
Tips & Troubleshooting
- 1**Vary Dinosaur and Bone Sizes:** Use a variety of toy dinosaurs and plastic bones, from small to large, to create a diverse collection of fossil imprints. This adds an element of surprise and allows for different excavation challenges.
- 2**Experiment with Dough Thickness:** While 1/2 inch is a good starting point, you can experiment with slightly thicker or thinner dough. Thicker dough will result in deeper imprints but will require longer baking times. Thinner dough bakes faster but may be more fragile.
- 3**Ensure Clear Imprints:** When pressing the toys into the dough, make sure to apply even pressure. If the toy has very fine details, you might need to gently wiggle it slightly to ensure a clear impression is made before lifting it away.
- 4**Prevent Dough Sticking:** If your dough is sticking to your work surface or hands, lightly dust with a bit more flour. However, avoid adding too much flour, as this can make the dough tough and harder to imprint.
- 5**Low and Slow Baking is Key:** Resist the urge to increase the oven temperature to speed up baking. A low temperature ensures the salt dough dries out completely from the inside out, preventing a soft or hollow center that could break easily during excavation.
- 6**Cooling is Crucial:** Allow the salt dough fossils to cool completely before attempting to move them or bury them. Warm salt dough is much more brittle and prone to cracking or breaking, which would be disappointing after all your hard work.
- 7**Sand vs. Dirt:** Play sand is often cleaner and easier to work with for excavation. However, using clean, dry garden dirt can add a more authentic 'dig site' feel. Ensure the dirt is free of debris and has been dried thoroughly.
- 8**Tool Variety for Different Skills:** Offer a range of tools to cater to different fine motor skills. Smaller brushes and popsicle sticks are great for precision, while larger brushes can cover more area. This allows younger children to participate alongside older ones.
Related Activities You Might Enjoy
Frequently Asked Questions
How do I make sure my salt dough fossils are strong enough for excavation?
The key to strong salt dough fossils lies in the preparation and baking process. Ensure you knead the dough thoroughly until it's smooth and elastic, as this develops the gluten structure. When creating the imprints, aim for a consistent thickness of about 1/2 inch. Most importantly, bake the fossils at a low temperature (250°F or 120°C) for an extended period, typically 2-3 hours, until they are completely dry and hard. You can test for doneness by tapping the fossil; it should sound solid. Allowing them to cool completely before excavation also prevents breakage.
What kind of toy dinosaurs or bones work best for creating imprints?
For the clearest and most detailed 'fossil' imprints, choose toy dinosaurs or plastic bones that have well-defined textures and shapes. Dinosaurs with prominent scales, ridges, or distinct bone structures will transfer beautifully into the salt dough. Avoid toys that are too smooth or have very rounded, indistinct features, as these will result in less recognizable imprints. Consider using a variety of sizes and types of dinosaurs to create a diverse collection of fossils for your dig.
Can I paint my salt dough fossils after they are baked?
Absolutely! Painting your salt dough fossils is a fantastic way to enhance their appearance and make them look even more like real fossils. Once the fossils are completely baked and cooled, you can use acrylic paints to add color. Earthy tones like browns, grays, and tans are excellent choices for a realistic look. You can also highlight specific details or create a weathered effect. For added durability and a matte finish, consider sealing the painted fossils with a clear acrylic sealant like Mod Podge after the paint has dried.
What are the best tools for excavating the salt dough fossils?
The best excavation tools are those that allow for gentle and precise removal of sand or dirt without damaging the salt dough fossils. A variety of paintbrushes, from soft-bristled to slightly stiffer ones, are excellent for dusting away material. Popsicle sticks, plastic chisels (like those found in children's craft kits or toy excavation sets), and old toothbrushes are also great for carefully scraping and loosening the sand. Small plastic trowels or spoons can be useful for larger areas, but always encourage gentle digging to preserve the 'fossils'.
How long does the salt dough last, and how should I store the fossils?
Salt dough itself is a temporary material and is not waterproof. Once baked and fully dried, the salt dough fossils are quite durable for dry play. Store them in a dry place, away from moisture, as humidity can cause them to soften over time. If you plan to keep them for an extended period or if they have been painted, sealing them with a clear acrylic sealant will offer some protection against moisture and wear. Avoid storing them in damp environments or directly exposed to the elements.
Can I make larger or smaller fossils?
Yes, you can absolutely adjust the size of your salt dough fossils. For larger fossils, you'll need to increase the amount of salt dough proportionally. When creating larger imprints, ensure the dough is thick enough (at least 1/2 inch, perhaps slightly more) to support the weight and detail of the toy. Be aware that larger fossils will require significantly longer baking times to ensure they dry out completely. For smaller fossils, use smaller toy dinosaurs or bones and adjust the dough portions accordingly. Smaller fossils will bake faster.
What Next?
Once your dinosaur dig is complete, the fun doesn't have to end! You can extend the play by painting the salt dough fossils to make them look even more authentic, perhaps adding earthy tones or highlighting the bone structures. Consider creating a 'museum' display for your excavated treasures, or even incorporating them into a larger diorama. For future adventures, try using different types of toy creatures or even natural objects like leaves and shells to create a variety of imprints. This project is a fantastic springboard for learning more about paleontology, different dinosaur species, and the process of fossilization, making it a truly enriching experience.
Free: 10 Paper Crafts Anyone Can Make in 5 Minutes
Get our beginner guide + new craft ideas weekly.
No spam. Unsubscribe anytime.
Did you complete this activity?
Related
You might also like
Salt Dough Handprint Keepsake Ornament
Salt Dough Scented Holiday Ornaments
Playdough Nature Sculptures
Easy Salt Dough Creations
Salt Dough Sculptures