Salt Dough Handprint Keepsake Ornament
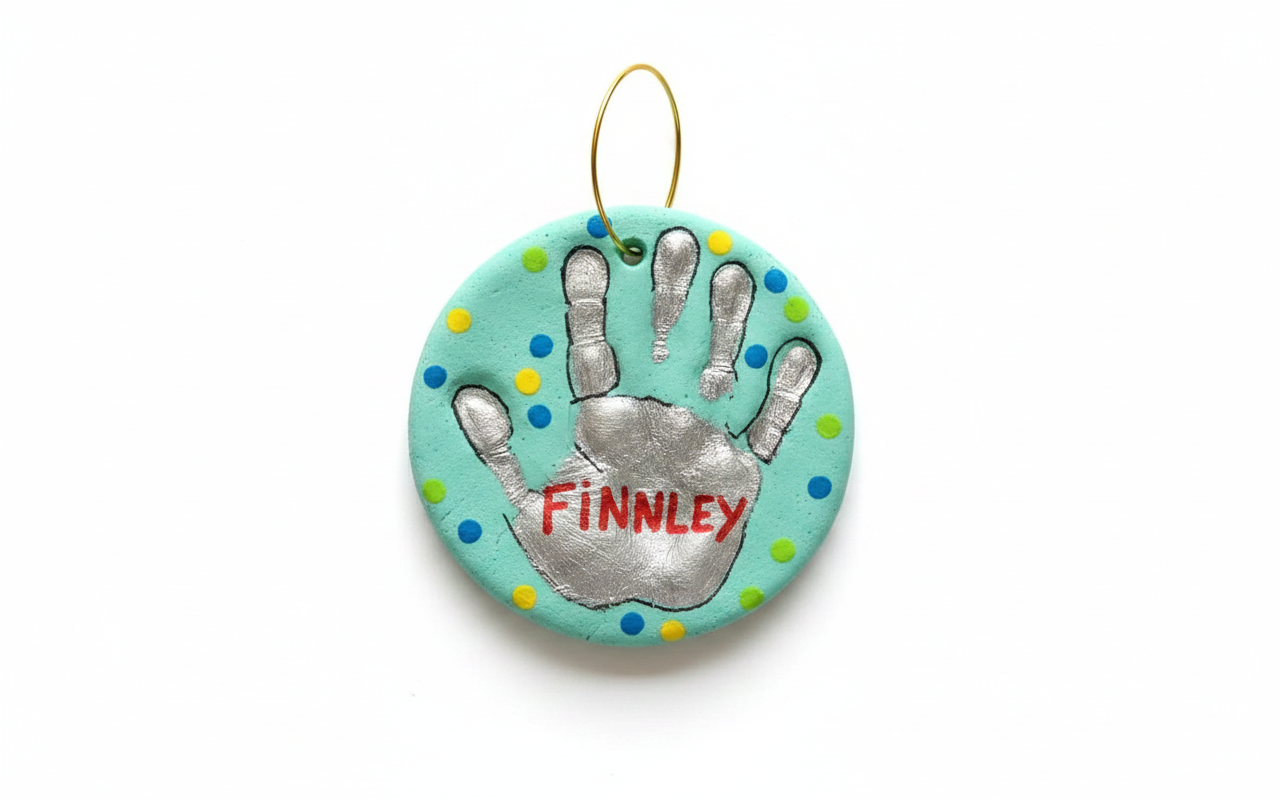
Capture a moment in time with a beautiful, handmade salt dough handprint ornament. This classic craft is a wonderful way to preserve your child's tiny handprint as a cherished keepsake that can be displayed year after year. It's a simple, budget-friendly project that yields incredibly meaningful results.
Quick answer
Mix 1 cup flour, ½ cup salt, and ¼ cup water to form a dough. Knead until smooth, roll to ½-inch thickness, and press a handprint. Poke a hole for hanging, bake at 200°F (95°C) for 3+ hours until dry, cool, and decorate.
What you need
Shop on Amazon · As an Amazon Associate we earn from qualifying purchases. Links above are affiliate links — we may earn a commission at no extra cost to you.
There's something incredibly special about capturing a child's fleeting moments, and a salt dough handprint ornament does just that. This timeless craft allows you to freeze a tiny hand in time, creating a tangible reminder of how much they've grown. It’s a wonderfully accessible project for crafters of all skill levels, especially perfect for parents, grandparents, and anyone looking to create a heartfelt, personalized gift or a treasured family heirloom. The simplicity of the ingredients and the joy of the process make it an ideal activity for a rainy afternoon or a festive holiday crafting session.
On this page
Step-by-Step Instructions
- 1
In a large mixing bowl, combine 2 cups of all-purpose flour and 1 cup of fine sea salt. Whisk these dry ingredients together thoroughly to ensure an even distribution of salt, which helps with preservation and drying.
- 2
Gradually add ¾ cup of lukewarm water to the dry ingredients, mixing with a spoon or your hands until a shaggy dough begins to form. You may need to add a tablespoon of water at a time if the dough seems too dry, or a sprinkle of flour if it's too sticky.
- 3
Turn the dough out onto a lightly floured surface, such as a clean countertop or a large cutting board. Begin kneading the dough, folding and pressing it with the heels of your hands, for about 5-7 minutes until it becomes smooth, elastic, and pliable, with no dry pockets remaining.
- 4
Once the dough is smooth and easy to handle, it's time to roll it out. Place the dough onto a sheet of parchment paper, which will make it easier to transfer later and prevent sticking. Use a rolling pin to evenly roll out the dough to a consistent thickness of approximately ½ inch.
- 5
If you desire a specific shape for your ornament, now is the time to use cookie cutters. Gently press your chosen cookie cutters into the rolled-out dough, cutting out your desired shapes like circles, stars, or hearts. Carefully remove the excess dough from around the cutouts, re-rolling it if necessary.
- 6
Prepare your child's hand or foot for the imprint. Ensure their hand or foot is clean and dry. For very young babies, you might want to gently warm their hands or feet if they are cold, as this can help them relax and keep their fingers from curling.
- 7
Gently and carefully press your child's hand or foot into the rolled-out dough to create a clear and defined imprint. Apply even pressure, ensuring all fingers and the palm are well-defined. Avoid pressing too hard, which can distort the imprint, or too lightly, which may result in a faint impression.
- 8
Once the handprint is successfully made, carefully lift your child's hand or foot. Inspect the imprint for any smudges or areas that need slight touching up. You can use a damp fingertip or a small tool to gently smooth out any imperfections or deepen lines if needed.
- 9
Before the dough dries out, it's crucial to create a hole for hanging. Using a drinking straw or a skewer, carefully poke a hole near the top edge of the ornament, ensuring it's large enough to accommodate your chosen ribbon or twine. Make sure the hole is not too close to the edge, as it could break off during baking or hanging.
- 10
If you used cookie cutters, carefully lift the parchment paper with the cutouts and place it onto a baking sheet. If you created freeform shapes or imprints directly on the rolled dough, carefully transfer the entire sheet of parchment paper with the dough onto a baking sheet.
- 11
Preheat your oven to 200°F (95°C). This low temperature is essential for drying the salt dough thoroughly without causing it to puff up or burn.
- 12
Place the baking sheet with the salt dough ornaments into the preheated oven. Bake the ornaments for at least 3 hours, and potentially up to 4-5 hours, depending on the thickness of your dough and the humidity in your environment. The goal is for them to be completely dry and hardened all the way through.
- 13
Periodically check on the ornaments during the baking process. If you notice any areas browning too quickly, you can loosely tent them with aluminum foil. The ornaments should feel hard and sound hollow when tapped gently once they are fully baked.
- 14
Once the ornaments are completely dry and hardened, carefully remove the baking sheet from the oven. Allow the ornaments to cool on the baking sheet for about 30 minutes before transferring them to a wire rack to cool completely. This cooling process can take several hours, or even overnight.
- 15
After the ornaments have cooled entirely, you can begin the decorating phase. Ensure they are completely cool to the touch before painting, as warmth can cause paint to smudge or not adhere properly.
- 16
Using acrylic paints and your chosen paintbrushes, decorate your salt dough ornaments as desired. You can paint them in solid colors, create intricate designs, or even write the child's name and the year on the back.
- 17
Once your paint is completely dry, it's highly recommended to apply a sealant or varnish. This step protects the paint, adds durability, and helps prevent the salt dough from absorbing moisture, which can lead to deterioration over time. Apply a thin, even coat and allow it to dry thoroughly according to the product's instructions.
- 18
Finally, thread a ribbon, twine, or yarn through the pre-made hole at the top of the ornament. Tie the ends securely to create a hanging loop, making your beautiful salt dough handprint keepsake ornament ready to be displayed or gifted.
Tips & Troubleshooting
- 1For a smoother dough, sift your flour before measuring it. This removes any lumps and ensures a more consistent texture, which will make kneading easier and result in a finer finish for your ornament.
- 2If your dough feels too sticky while kneading, resist the urge to add too much extra flour. Instead, continue kneading for a few more minutes; the dough will often become less sticky as you work it. If it remains unmanageably sticky, add flour a teaspoon at a time.
- 3When making the handprint, ensure the child's hand is relaxed. If they are tense, their fingers might curl, making the imprint less clear. Gently massaging their hand can help them relax before pressing it into the dough.
- 4To prevent the dough from puffing up during baking, you can gently prick the entire surface of the ornament with a fork before baking. This allows steam to escape, resulting in a flatter, more stable keepsake.
- 5If you want to add writing, such as the child's name and the year, it's best to do this after the ornament has been baked and cooled, but before you apply any sealant. This ensures the writing is clear and doesn't smudge.
- 6For a more rustic look, you can leave the salt dough unpainted and simply seal it. The natural color of the baked salt dough has a charming, earthy appeal that can be quite beautiful on its own.
- 7If you are making multiple ornaments, ensure they are all the same thickness to ensure even baking times. Uneven thickness can lead to some ornaments being overbaked while others are still soft.
- 8Store your finished salt dough ornaments in a dry place, away from humidity, to prevent them from becoming soft or deteriorating over time. A sealed container or a well-ventilated box is ideal.
Related Activities You Might Enjoy
Frequently Asked Questions
How do I ensure my salt dough ornament dries completely without cracking?
Achieving a completely dry and crack-free salt dough ornament relies on a few key factors. Firstly, the low and slow baking method at 200°F (95°C) for an extended period (3-5 hours) is crucial. This gentle heat allows moisture to evaporate gradually, minimizing stress on the dough. Secondly, ensure your dough is mixed to the correct consistency – not too wet, not too dry. Overly wet dough will take much longer to dry and is more prone to cracking. Finally, avoid sudden temperature changes after baking. Allow the ornaments to cool gradually at room temperature before handling or decorating. If you notice any small cracks forming during baking, you can often fill them with a bit of glue or a touch of paint once cooled.
Can I use different types of flour or salt for this recipe?
While all-purpose flour and fine sea salt are recommended for their reliable results, you can experiment with other types, though it might affect the outcome. Using whole wheat flour will result in a denser, darker ornament and may require slightly more water. For salt, fine-grain salt dissolves better into the dough, creating a smoother texture. Coarser salts might leave a slightly gritty feel. If you use kosher salt, ensure it's finely ground. Avoid iodized salt, as the iodine can sometimes affect the dough's texture and drying process. Always aim for fine-grain salt for the best consistency and a smooth finish.
How long will my salt dough ornament last?
With proper care and sealing, your salt dough ornament can last for many years, even decades. The salt acts as a natural preservative, and the thorough drying process removes most of the moisture that could lead to spoilage. Applying a good quality sealant or varnish is the most critical step for longevity. This protective layer shields the ornament from humidity, dust, and minor abrasions, preventing it from becoming brittle or deteriorating. Store your ornaments in a cool, dry place, away from direct sunlight and extreme temperature fluctuations, to maximize their lifespan and keep them looking beautiful for generations.
What is the best way to get a clear handprint impression?
To achieve a crisp and clear handprint impression, several techniques can help. Ensure the child's hand is clean and dry, and that they are relaxed. Gently massage their hand to encourage relaxation and prevent fingers from curling. Apply a light dusting of flour to the dough where you intend to make the imprint, and also lightly dust the child's hand. This prevents sticking and helps the dough release cleanly. Press their hand firmly and evenly into the dough, ensuring all fingers and the palm are well-defined. Avoid wiggling their hand once it's pressed in. After lifting their hand, you can use a damp fingertip or a small tool to gently smooth out any minor imperfections or deepen lines if needed.
Can I make these ornaments without baking them?
While it's possible to air-dry salt dough ornaments, it's generally not recommended for handprint keepsakes. Air-drying takes a very long time (several days to over a week, depending on humidity and thickness) and the ornaments are much more fragile and prone to cracking during this extended drying period. Baking at a low temperature provides a much more stable and durable result, ensuring the handprint remains intact and the ornament is sturdy enough for hanging and handling. For a keepsake that you want to last and display, baking is the superior method for achieving a solid, long-lasting ornament.
My ornament looks a bit lumpy or uneven. How can I fix this?
Don't worry if your ornament isn't perfectly smooth; a handmade charm is part of its appeal! However, if you're aiming for a smoother finish, you can address imperfections before baking. For minor bumps or unevenness in the rolled dough, you can gently sand them down with fine-grit sandpaper once the dough is completely dry and before painting. For the handprint itself, if there are slight smudges, you can carefully use a damp fingertip or a small, blunt tool to gently smooth them out before baking. After baking and cooling, you can also use a fine-grit sandpaper to gently smooth any rough edges or minor imperfections before you begin painting.
What Next?
Once your salt dough handprint ornament is complete, the possibilities for personalization are endless! Consider adding glitter for sparkle, decoupage with festive paper, or even paint a small scene around the handprint. These ornaments make incredibly thoughtful gifts for grandparents, godparents, or any loved one who cherishes childhood memories. For storage, keep them in a cool, dry place, perhaps wrapped in tissue paper in a keepsake box, to ensure they last for generations. You might also consider creating a series of these ornaments each year to track your child's growth, creating a beautiful timeline of their little hands.
Free: 10 Paper Crafts Anyone Can Make in 5 Minutes
Get our beginner guide + new craft ideas weekly.
No spam. Unsubscribe anytime.
Did you complete this activity?
Related
You might also like
Easy Salt Dough Creations

Salt Dough Scented Holiday Ornaments
Salt Dough 'Dinosaur Fossil' Dig Excavation
Air Dry Clay Trinket Dishes

Polymer Clay Jewelry Dishes