How to Make the Best Salt Dough — Easy Step-by-Step Guide
Discover the best salt dough recipe for endless creative fun! This simple, 3-ingredient dough is perfect for making ornaments, figures, and more. It's a classic craft that sparks imagination and provides hours of entertainment for families and individuals alike. From festive holiday decorations to personalized gifts, the possibilities are truly limitless with this versatile dough.


Quick answer
To make the best salt dough, you need flour, salt, and water, taking about 15 minutes to prepare. Start by mixing the dry ingredients, then gradually add water. This beginner-friendly activity has 10 steps and is perfect for families with young children, offering a tactile and rewarding crafting experience that results in durable, decorative pieces.
What you need
Shop on Amazon · As an Amazon Associate we earn from qualifying purchases. Links above are affiliate links — we may earn a commission at no extra cost to you.
Embark on a journey of creative expression with the timeless art of salt dough! This incredibly simple, three-ingredient recipe is a gateway to a world of crafting possibilities, making it an ideal activity for families, classrooms, or anyone seeking a hands-on, rewarding project. Its affordability, ease of preparation, and the sheer joy of transforming basic pantry staples into charming keepsakes make salt dough a truly special craft that fosters imagination and creates lasting memories.
On this page
Step-by-Step Instructions
- 1
In a large mixing bowl, combine 2 cups of all-purpose flour and 1 cup of fine table salt. The fine salt dissolves more easily and creates a smoother dough compared to coarser varieties.
- 2
Stir the dry ingredients together thoroughly with a spoon or spatula until they are completely uniform. Ensuring an even distribution of salt is crucial for consistent dough texture and preventing pockets of saltiness.
- 3
Gradually add 3/4 cup of water to the flour and salt mixture. It's important to add the water slowly, a little at a time, to avoid making the dough too wet initially.
- 4
Begin mixing with your spoon or spatula until a shaggy, crumbly dough starts to form. At this stage, the mixture will look like it's not coming together, which is perfectly normal.
- 5
Once the mixture becomes too stiff to stir effectively with the spoon or spatula, it's time to switch to your hands. Gently bring the shaggy bits together in the bowl.
- 6
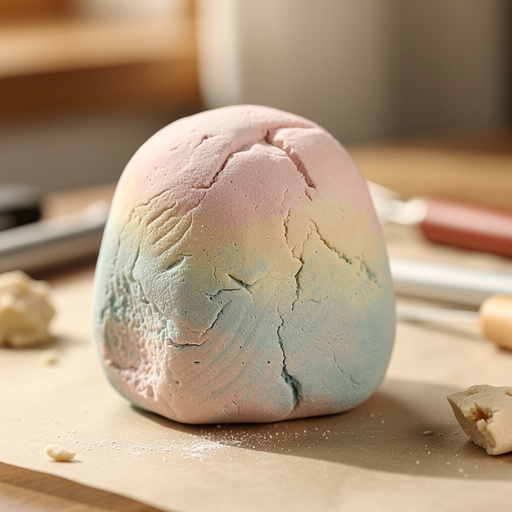
Turn the dough out onto a clean, lightly floured work surface. Begin to knead the dough by pushing it away from you with the heels of your hands, then folding it back towards you. Continue this motion for 5-7 minutes until the dough transforms into a smooth, pliable, and elastic ball.
- 7
Assess the dough's consistency during kneading. If it feels too dry and crumbly, add more water, a teaspoon at a time, and continue kneading until it reaches the desired texture. Conversely, if the dough feels too sticky and adheres excessively to your hands, add a tablespoon of flour and knead it in until it's no longer unmanageable.
- 8
If you desire colored dough, this is the ideal time to incorporate food coloring. Make a well in the center of your kneaded dough, add a few drops of your chosen food coloring, and then knead it in thoroughly until the color is evenly distributed throughout the dough. Be prepared for your hands to get a little stained!
- 9
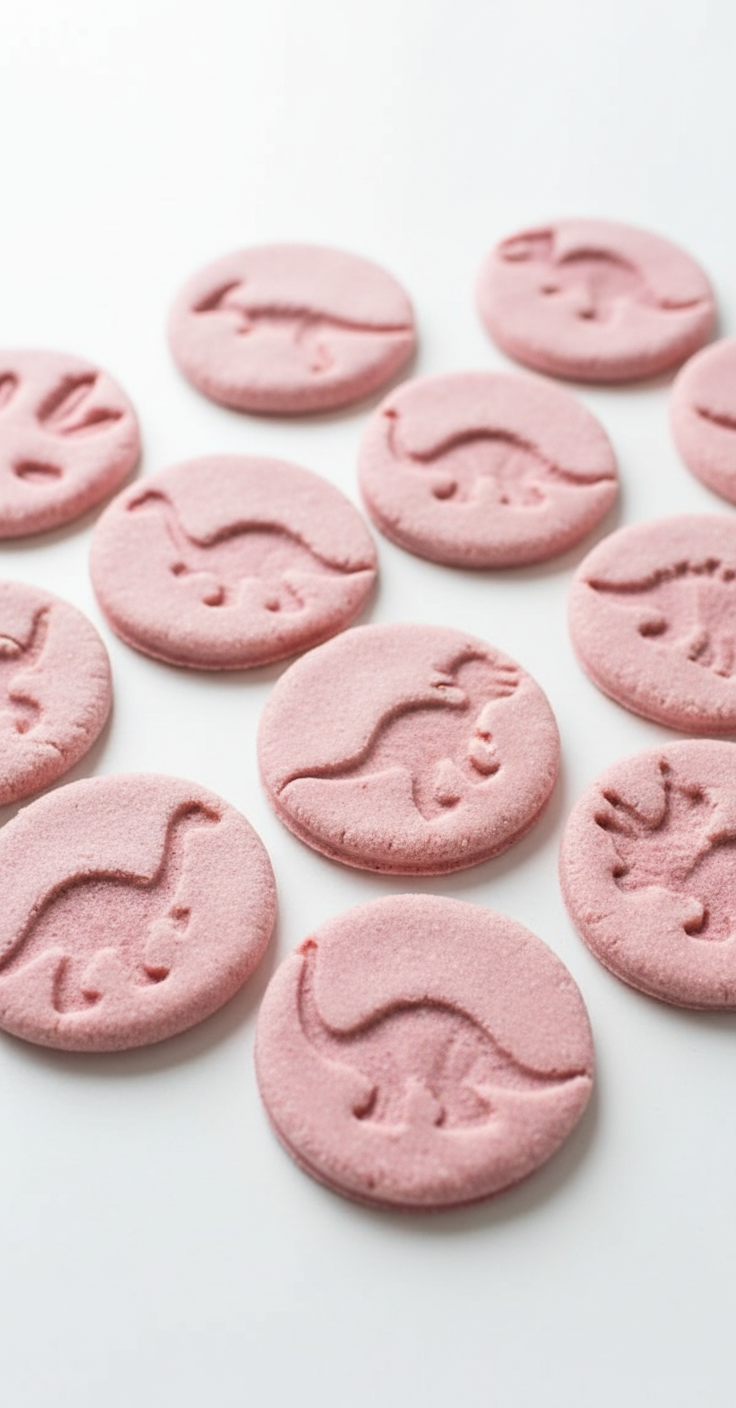
Once your salt dough is perfectly smooth and elastic, it's ready to be shaped. Lightly dust your work surface and rolling pin with flour to prevent sticking. Roll out the dough to your desired thickness, aiming for approximately 1/4 inch for most projects, as this thickness provides good durability without being too heavy.
- 10
Using cookie cutters, cut out your desired shapes from the rolled-out dough. For freehand sculpting, use your hands or a craft knife to create figures, ornaments, or decorative elements. Ensure that if you are making ornaments intended for hanging, you use a toothpick or skewer to carefully poke a hole near the top of each piece before it dries.
- 11
Carefully transfer your cut or sculpted salt dough creations to a baking sheet lined with parchment paper. This prevents them from sticking to the baking sheet and makes for easier cleanup. If you are making very thin or delicate pieces, consider placing them on a wire rack for air drying to minimize the risk of breakage.
- 12
For baking, preheat your oven to 250°F (120°C). Place the baking sheets with your salt dough creations into the preheated oven. The baking time will vary significantly depending on the thickness and size of your pieces, typically ranging from 1 to 3 hours, or even longer for very thick items.
- 13
Halfway through the baking process, carefully flip each salt dough piece to ensure even drying and hardening on all sides. This step is crucial for preventing the bottoms from becoming overly browned or unevenly cooked. Use a spatula or tongs to gently turn them over.
- 14
Once the salt dough creations are completely hard and feel dry to the touch, remove them from the oven. Allow them to cool completely on a wire rack before proceeding to the decoration stage. This cooling period is essential to prevent any potential cracking or warping that can occur if decorated while still warm.
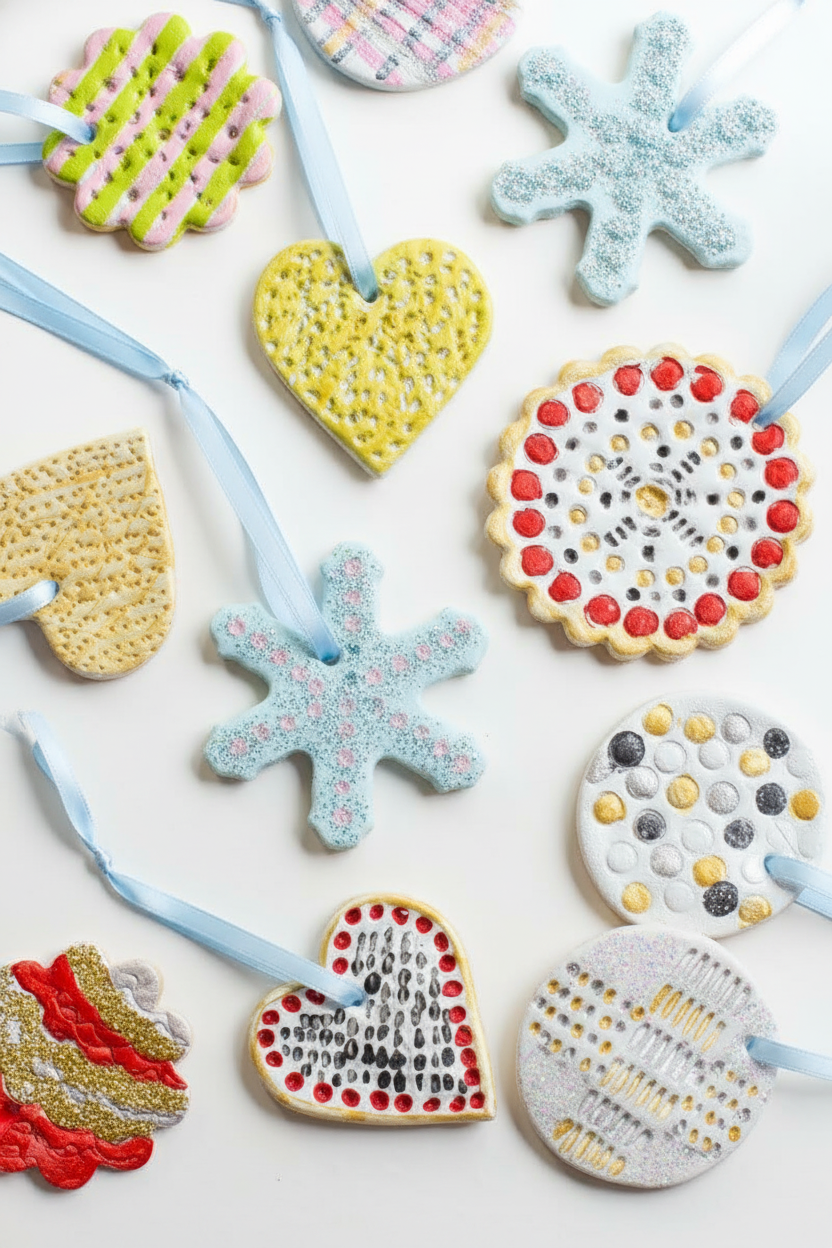
- 15
After your salt dough pieces have fully cooled, it's time for the fun part: decorating! Use acrylic paints to bring your creations to life with vibrant colors and intricate details. Let your imagination run wild with patterns, designs, and characters.
- 16
Once the paint is completely dry, apply a clear acrylic sealant or varnish to protect your finished salt dough artwork. This step not only enhances the colors and provides a beautiful finish (matte or gloss, your choice!) but also protects the piece from moisture and wear, ensuring its longevity.
- 17
Allow the sealant to dry thoroughly according to the product's instructions before handling or displaying your beautiful, durable salt dough creations. This final step ensures your artwork is ready to be admired for years to come.
Tips & Troubleshooting
- 1For the smoothest possible salt dough, sift your all-purpose flour before measuring it into the bowl. This removes any lumps and ensures a finer texture in your final dough, leading to more refined creations.
- 2If your salt dough feels uncomfortably sticky during the kneading process, resist the urge to add too much extra flour immediately. Instead, try chilling the dough in the refrigerator for 15-20 minutes; the cold will firm it up, making it much easier to handle without altering the ingredient ratios.
- 3To significantly prevent cracking in your salt dough creations, ensure that the dough has adequate moisture before baking or air drying. Also, aim for even thickness in your pieces, as thin areas are more prone to drying out too quickly and developing fissures.
- 4Bake your salt dough at a low temperature of 250°F (120°C) for an extended period, typically 1-3 hours, depending on the thickness of your pieces, until they are completely hard and dry. Remember to flip them halfway through the baking time for even drying.
- 5Once your salt dough creations have cooled completely after baking, decorate them with acrylic paints. For a professional and long-lasting finish, seal your painted pieces with a clear acrylic varnish or sealant, which will protect the paint and the dough itself from moisture and damage.
- 6If you plan to make scented salt dough, add a teaspoon or two of ground cinnamon, nutmeg, or cloves to the dry ingredients before adding the water. This will infuse your creations with a warm, inviting aroma as they bake and dry.
- 7When cutting out shapes, work relatively quickly once the dough is rolled out. Salt dough can start to dry out on the surface if left exposed for too long, which can make it more difficult to cut clean shapes and can lead to cracking later.
- 8For intricate details or to create texture, consider using a fork to press patterns into the dough before baking, or use a toothpick to etch designs. These small additions can elevate your salt dough creations from simple shapes to unique works of art.
Related Activities You Might Enjoy
Frequently Asked Questions
What is the best ratio for salt dough?
The most widely recommended and effective ratio for classic salt dough is 2 parts all-purpose flour to 1 part fine table salt, combined with approximately 3/4 part water. This ratio creates a dough that is firm enough to hold its shape well during sculpting and baking, yet pliable enough to be easily worked with. While 3/4 cup of water is a good starting point, you may need to adjust slightly based on humidity and the type of flour used. The goal is a smooth, elastic dough that is not too sticky nor too dry, ensuring it bakes up hard and durable without excessive cracking.
How do you make salt dough without baking?
To make salt dough without baking, you can air dry your creations. Find a warm, dry, and well-ventilated spot in your home, such as near a sunny window or a gentle heat source (but not direct heat). Lay your salt dough pieces on a wire rack to allow air circulation around them. This process can take anywhere from 2 to 3 days, or even longer for thicker pieces. It's important to flip them occasionally to ensure even drying and to prevent warping. While air drying is a viable option, it results in a less dense and potentially more fragile finished product compared to baking, which hardens the dough significantly.
Why is my salt dough cracking?
Salt dough cracking is a common issue that can stem from several factors. One primary cause is a dough that is too dry; insufficient moisture during the mixing stage means the dough is already stressed. Another reason is drying too quickly, especially if placed in direct heat or a very dry environment without proper ventilation. Thin areas of a creation are also more susceptible to cracking as they dry out faster than thicker parts. To minimize cracking, ensure your dough is well-moistened, aim for consistent thickness in your pieces, and allow them to dry slowly and evenly, ideally on a rack.
How long does salt dough last?
Once your salt dough creations are properly baked until completely hard and then sealed with a clear acrylic varnish or sealant, they can last for many years, often becoming cherished keepsakes. The sealant protects the dough from moisture and prevents degradation. Unbaked salt dough, however, is perishable. It should be stored in an airtight container in the refrigerator and used within 1 to 2 days. Beyond that, it can start to develop mold or become too dry to work with effectively. Therefore, it's best to bake or air dry your creations as soon as possible after making them.
Can I add other ingredients to salt dough?
Absolutely! While the classic recipe relies on just flour, salt, and water, you can certainly enhance your salt dough. For a pleasant aroma, consider adding spices like cinnamon, nutmeg, or cloves directly to the dry ingredients. For a smoother finish, you can substitute some of the water with milk, though this may slightly alter the drying time and hardness. Some crafters also experiment with adding a tablespoon of vegetable oil for a slightly more pliable dough, but this can sometimes affect how well paint adheres. Always test any additions on a small batch first to see how they affect the dough's consistency and baking properties.
What is the best way to store unbaked salt dough?
If you find yourself with leftover unbaked salt dough, proper storage is key to preserving its usability. The best method is to wrap the dough tightly in plastic wrap, ensuring there are no air pockets, and then place it inside an airtight container or a resealable plastic bag. Store this container in the refrigerator. This will keep the dough fresh and pliable for up to 2 days. If you need to store it for longer, it's generally advisable to make a fresh batch, as the salt content can eventually lead to a less desirable texture over extended refrigeration periods.
What Next?
Once your salt dough creations are baked, cooled, and decorated, they become cherished keepsakes or thoughtful gifts. Consider variations like adding spices to the dough for a subtle scent, or experimenting with different drying and baking times to achieve unique textures. For future projects, explore themed collections, such as seasonal ornaments, animal figures, or even miniature fairy garden accessories. Display your finished pieces on shelves, hang them as ornaments, or incorporate them into larger decorative arrangements to showcase your artistic flair.
Free: 10 Paper Crafts Anyone Can Make in 5 Minutes
Get our beginner guide + new craft ideas weekly.
No spam. Unsubscribe anytime.
Did you complete this activity?
Related
You might also like
Salt Dough Scented Holiday Ornaments

Salt Dough Handprint Keepsake Ornament
Salt Dough Sculptures
Salt Dough 'Dinosaur Fossil' Dig Excavation

Polymer Clay Tiny Trinket Boxes