DIY Rainbow Layered Slime Jar: A Mesmerizing Science Craft
Craft a vibrant rainbow layered slime jar that's as fun to make as it is to play with. This science-based DIY project is perfect for all ages, offering a delightful sensory experience and a beautiful display piece.

Quick answer
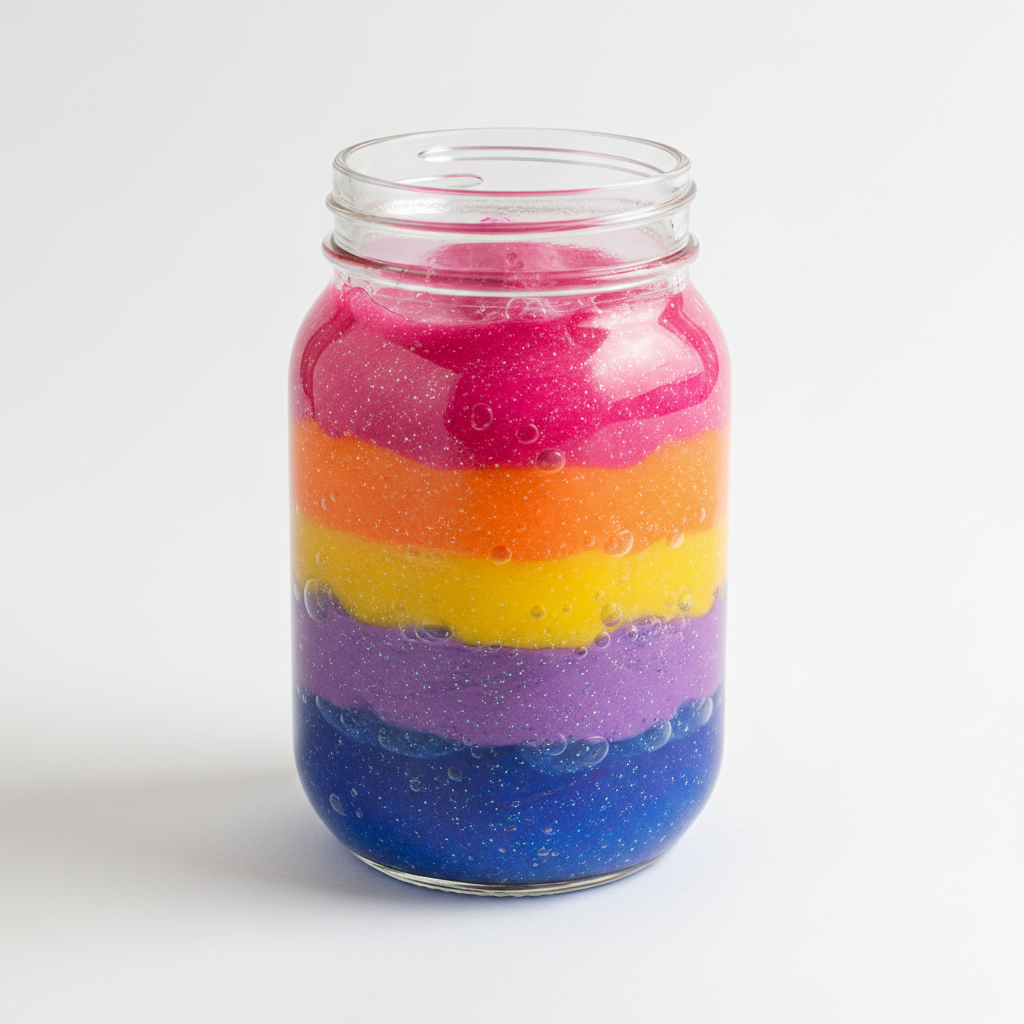
Create a rainbow layered slime jar by making individual batches of colored slime using glue, borax, and water, then carefully layering them into a clear jar for a visually stunning effect.
What you need
Shop on Amazon · As an Amazon Associate we earn from qualifying purchases. Links above are affiliate links — we may earn a commission at no extra cost to you.
Dive into the wonderfully gooey world of slime with this captivating Rainbow Layered Slime Jar project! It’s more than just a craft; it’s a hands-on exploration of basic chemistry that results in a visually stunning creation. Perfect for budding scientists, creative kids, or anyone looking for a relaxing and engaging activity, this project transforms simple household ingredients into a mesmerizing, colorful masterpiece. The process of making and layering the slime is incredibly satisfying, and the final jar becomes a beautiful, tactile decoration that’s sure to impress.
On this page
Step-by-Step Instructions
- 1
**Prepare the Slime Activator:** In a small mixing bowl, combine 1/2 cup of warm water with 1 teaspoon of borax powder. Stir diligently with a spoon or craft stick until the borax is mostly dissolved; a few undissolved crystals are acceptable. This mixture is your slime activator, the key ingredient that transforms glue into slime. Set this bowl aside to allow any remaining borax to dissolve fully.
- 2
**Prepare the First Slime Batch:** In a separate, clean mixing bowl, pour 1/2 cup of white school glue. Ensure you are using a PVA-based glue, as this is essential for the slime-making reaction to occur effectively.
- 3
**Mix Glue and Water:** Add 1/2 cup of warm water to the glue in the mixing bowl. Stir this mixture thoroughly with a spoon or craft stick until the glue and water are completely combined and you have a smooth, uniform liquid.
- 4
**Add Color:** Now it's time to bring your first color to life! Add a few drops of your chosen food coloring to the glue and water mixture. Start with a small amount and add more gradually until you achieve your desired shade; remember that the color will slightly lighten when the activator is added.
- 5
**Incorporate Optional Embellishments (First Batch):** If you wish to add glitter or other small embellishments to this specific slime color, now is the time to gently stir them into the colored glue mixture. Ensure they are evenly distributed for a consistent look.
- 6
**Activate the Slime:** Begin the magical transformation! Slowly add about 1 tablespoon of your prepared slime activator (the borax and water solution) to the colored glue mixture while stirring continuously. You will immediately notice the mixture starting to thicken and clump together.
- 7
**Form the Slime:** Continue stirring vigorously as you add the activator. The slime will begin to pull away from the sides of the bowl, forming a cohesive blob. Add more activator, a teaspoon at a time, if the slime is still too sticky, but be careful not to add too much, as this can make the slime stiff and rubbery.
- 8
**Knead the Slime:** Once the slime has mostly formed and is pulling away from the bowl, it's time to get your hands in there! Take the slime out of the bowl and knead it with your hands until it is no longer sticky and has a smooth, stretchy texture. If it remains too sticky, dip your fingers lightly in the activator and continue kneading.
- 9
**Check Slime Consistency:** After kneading, the slime should be pliable and stretchy, not break apart easily. If it feels too stiff, you can try kneading in a tiny bit of warm water or a drop of lotion. If it's still too sticky after thorough kneading, a few more drops of activator can be worked in.
- 10
**Clean Up for the Next Batch:** Before starting your next color, thoroughly wash out the mixing bowl and spoon you just used, or grab a fresh one. This prevents colors from mixing prematurely and ensures each layer in your jar will be distinct and vibrant.
- 11
**Repeat for Additional Colors:** Repeat steps 2 through 8 for each additional color you want to add to your rainbow. Use a clean mixing bowl and spoon for each new color, ensuring you make each color of slime separately to maintain their individual vibrancy and integrity.
- 12
**Prepare the First Layer:** Once you have successfully created all of your desired colored slime batches, it's time to assemble your masterpiece. Take a small piece of your first colored slime (e.g., the bottom color of your rainbow) and gently roll it into a log shape, similar to a thick snake.
- 13
**Start Layering:** Carefully place the first slime log at the very bottom of your clean, clear jar. Press it down gently to create a stable base for the subsequent layers.
- 14
**Add Subsequent Layers:** Take a piece of your second colored slime, roll it into a log of a similar thickness to the first, and carefully place it directly on top of the first slime log in the jar. Try to keep the logs relatively even in thickness for a neat appearance.
- 15
**Continue Layering:** Continue this process, taking pieces of each colored slime, rolling them into logs, and layering them on top of each other in the jar. You can arrange the colors in any order you like, but a traditional rainbow (ROYGBIV) is a popular choice.
- 16
**Fill the Jar:** Keep layering the different colored slime logs on top of each other until the jar is full to your desired level, or until you have used up all of your prepared slime batches. Aim for relatively uniform log sizes for the best visual effect.
- 17
**Tidy the Top Layer:** Once the jar is filled, gently press down on the top layer of slime to ensure it's snug against the sides of the jar and creates a neat finish. You can also use a clean craft stick to smooth the top if needed.
- 18
**Seal the Jar:** Once all the slime is layered and the jar is filled, securely put the lid on the clear jar. Ensure it is tightly sealed to prevent the slime from drying out and to keep your beautiful layers intact.
- 19
**Admire Your Creation:** Gently tilt the jar from side to side and observe the mesmerizing rainbow layers you've created! The distinct colors should be clearly visible, showcasing your hard work and creativity.
- 20
**Optional: Add a Final Touch:** If you have any leftover slime or want to add a decorative element, you can place a small amount of a contrasting color on top of the last layer before sealing, or even embed a small, waterproof toy within the layers as you build them.
Tips & Troubleshooting
- 1**Activator Consistency is Key:** The amount of borax activator needed can vary slightly depending on the brand of glue and the humidity in your environment. Always add it slowly and stir continuously to avoid over-activating, which can lead to stiff slime.
- 2**Achieving Vibrant Colors:** For the most brilliant rainbow effect, use a good quality food coloring and don't be afraid to add a few extra drops to achieve deep, saturated hues. Remember that the color will appear slightly lighter in the final slime than it does in the liquid glue mixture.
- 3**Smooth Layering Techniques:** To ensure your layers are distinct and don't bleed into each other too much, roll your slime into logs that are slightly wider than the opening of your jar. Gently press each log into place, ensuring it makes contact with the sides of the jar to create a seal.
- 4**Preventing Stickiness:** If your slime is consistently too sticky even after kneading, it likely needs a tiny bit more activator. Dip your fingers in the activator solution and knead it into the slime, or add activator to the bowl and knead it in. Conversely, if it's too stiff, try kneading in a small amount of warm water or lotion.
- 5**Storage for Longevity:** To keep your rainbow slime jar looking its best, always ensure the lid is tightly sealed when not in use. Store the jar in a cool, dry place away from direct sunlight, which can cause the colors to fade or the slime to degrade over time.
- 6**Experiment with Textures:** While this recipe focuses on basic slime, feel free to experiment with adding glitter, foam beads, or even a touch of shaving cream to some of your slime batches for added texture and visual interest within the layers.
- 7**Jar Selection Matters:** Choose a clear jar with a smooth interior and a lid that seals well. The smoother the inside of the jar, the easier it will be to see the distinct layers. A wider-mouthed jar can also make layering slightly easier.
Related Activities You Might Enjoy
Frequently Asked Questions
Why is my slime too sticky or too stiff?
The most common issue with slime is its consistency, which is directly related to the activator. If your slime is too sticky, it means you haven't added enough activator. Gradually add more borax solution, about a teaspoon at a time, while kneading. Be patient and work it in thoroughly. On the other hand, if your slime is too stiff and breaks easily, you've likely added too much activator. You can try to fix this by kneading in a small amount of warm water or a bit of lotion. Sometimes, a tiny bit of extra glue can also help reintroduce elasticity to overly stiff slime.
Can I use a different type of glue for this project?
For this specific slime recipe, white school glue (PVA-based) is highly recommended and is the most reliable for achieving the desired slime consistency. Other types of glue, like clear glue, can also work, but they might require slightly different activator ratios. Glues that do not contain PVA, such as wood glue or rubber cement, will not form slime with a borax activator. Always check the label to ensure your glue is PVA-based for the best results in slime making.
How long will the rainbow layered slime jar last?
When stored properly in a tightly sealed jar in a cool, dry place, your rainbow layered slime can last for several weeks, and sometimes even months. The key to longevity is preventing it from drying out. Avoid leaving the lid off for extended periods and keep it away from direct sunlight or heat sources, as these can accelerate the degradation process. If the slime starts to feel a bit dry or less stretchy over time, you can try kneading in a tiny bit of warm water or lotion to revive it.
Can I make slime without borax?
Yes, there are alternative slime activators you can use if you prefer not to use borax. Common alternatives include contact lens solution (containing boric acid and sodium borate) or liquid starch. When using contact lens solution, you'll typically need to add baking soda along with it to help the slime form. Liquid starch is another effective activator that can be used similarly to the borax solution. These alternatives can produce slime with slightly different textures and properties, so experimentation might be needed to find your preferred method.
What is the science behind slime making?
Slime making is a fascinating demonstration of polymer chemistry. White school glue is made of long, chain-like molecules called polymers. When you add a borax solution (which contains borate ions), these ions act as cross-linkers. They connect the polymer chains together, forming a more complex, three-dimensional network. This network traps water within it, giving slime its unique stretchy, gooey, and non-Newtonian fluid properties. It's a simple yet effective way to visualize how chemical reactions can alter the physical state of matter.
Can I make the slime layers more distinct and less blended?
To achieve more distinct layers, ensure that each slime batch is fully formed and not overly sticky before you start layering. When rolling the slime into logs, make them slightly wider than the jar's opening and press them firmly against the sides of the jar as you place them. This creates a better seal between layers, minimizing color bleeding. Also, allow each layer to settle for a minute or two before adding the next, giving the slime a chance to adhere without too much immediate mixing.
What Next?
Your Rainbow Layered Slime Jar is complete and ready to be admired! For endless fun, gently squish and swirl the layers, or carefully extract the slime for individual play. To keep your slime fresh and prevent it from drying out, ensure the jar is tightly sealed. Consider experimenting with different color combinations, glitter additions, or even glow-in-the-dark elements for future slime jars. This project is a fantastic gateway to further slime adventures, perhaps leading to fluffy slime, clear slime, or even slime-based science experiments. Display your creation proudly on a shelf or use it as a unique desk accessory!
Free: 10 Paper Crafts Anyone Can Make in 5 Minutes
Get our beginner guide + new craft ideas weekly.
No spam. Unsubscribe anytime.
Did you complete this activity?
Related