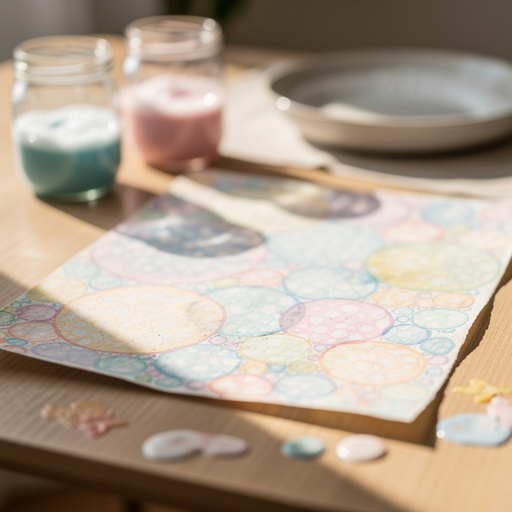
How to Create Beautiful Puzzle Painting Art — Easy Step-by-Step Guide
Transform old puzzles into vibrant works of art with these easy puzzle painting ideas. A fun, screen-free activity for the whole family!

Quick answer
To make puzzle painting art, you need an old puzzle, acrylic paints, brushes, and about 30-60 minutes. Start by cleaning the puzzle pieces. This beginner-friendly activity has 8 steps and is perfect for families and kids aged 6+.
What you need
Shop on Amazon · As an Amazon Associate we earn from qualifying purchases. Links above are affiliate links — we may earn a commission at no extra cost to you.
Unleash your inner artist and give old puzzles a vibrant new life with this incredibly rewarding puzzle painting project. It's a fantastic way to engage in a creative, screen-free activity that the whole family can enjoy together, fostering imagination and fine motor skills. Whether you're looking for a unique way to upcycle forgotten toys or simply seeking a fun afternoon craft, this guide will walk you through transforming simple puzzle pieces into stunning works of art. Get ready to discover the joy of turning discarded games into cherished keepsakes!
On this page
Step-by-Step Instructions
- 1
Gather all your materials and protect your workspace with newspaper or a drop cloth. This is crucial to prevent accidental paint splatters on your furniture or floor, ensuring a stress-free crafting experience.
- 2
Ensure your puzzle pieces are clean and dry before you begin painting. Gently wipe them down with a slightly damp cloth to remove any dust or grime, and allow them to air dry completely to prevent paint from peeling or not adhering properly.
- 3
Carefully separate all the puzzle pieces and spread them out onto your protected surface or into a shallow tray. This organization step makes it easier to access each piece and visualize your design as you work.
- 4
Choose your first color of acrylic paint and begin painting a section of a puzzle piece. Start with a small area to get a feel for how the paint covers the puzzle's surface.
- 5
Experiment with different painting techniques like dabbing with a sponge brush for texture, using the edge of a flat brush for clean lines, or creating smooth gradients by blending colors directly on the piece. Don't be afraid to explore and find what works best for your desired effect.
- 6
Paint each piece individually, allowing for creative freedom and unique designs. Think of each piece as a tiny canvas, and let your imagination run wild with patterns, colors, and themes.
- 7
Allow the painted puzzle pieces to dry completely. This may take 15-30 minutes depending on the thickness of the paint application and the humidity in your environment; ensure they are fully dry before handling or stacking.
- 8
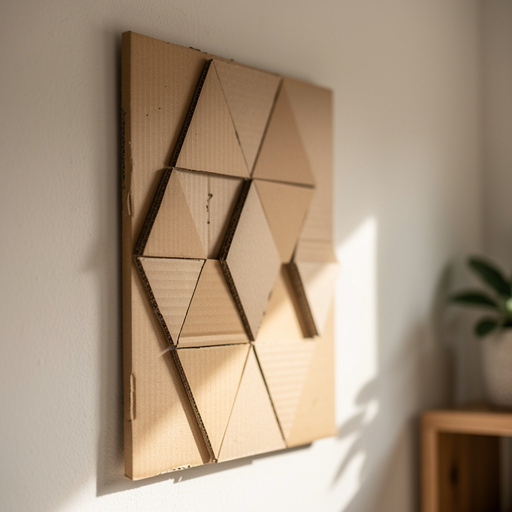
Once all the painted puzzle pieces are completely dry, you have two main options for displaying your artwork. You can carefully reassemble the puzzle to reveal your painted masterpiece as a cohesive whole, or you can arrange the individual painted pieces in a mosaic style on a separate surface.
- 9
Optional: For a more durable and polished finish, apply a thin layer of Mod Podge or a clear acrylic sealant over the painted pieces. This will protect the artwork from scratches, enhance the colors, and give your creation a professional, finished look.
- 10
If you notice any rough edges on your puzzle pieces after painting, you can gently sand them down with fine-grit sandpaper. This is an optional step that can create a smoother surface, especially if you plan to reassemble the puzzle tightly.
- 11
Consider painting the edges of the puzzle pieces, especially if you plan to reassemble the puzzle. This technique can create a subtle framed effect around each piece, adding depth and visual interest when the puzzle is completed.
- 12
If you're working with younger children, consider pre-drawing simple shapes or outlines on the puzzle pieces with a pencil to guide their painting. This can help them feel more confident and achieve a satisfying result.
- 13
When painting, work in a well-lit area to ensure you can see the colors accurately and apply paint evenly. Good lighting also helps prevent eye strain during longer painting sessions.
- 14
If you're aiming for a specific image or scene, it can be helpful to sketch out your design on paper first. This planning stage allows you to map out which colors and elements will go on which puzzle pieces.
- 15
For a more cohesive look, try painting a single theme or color palette across all your puzzle pieces. This could be a gradient of colors, a specific animal, or a repeating pattern that ties all the pieces together.
- 16
Don't be afraid to mix colors directly on the puzzle piece or create gradients by blending wet paints together. This technique can add a professional touch and create beautiful, seamless transitions.
- 17
If you're painting a picture, consider painting the edges of the puzzle pieces to create a framed effect when reassembled. This adds an extra layer of detail and sophistication to your finished piece.
- 18
Older kids can try painting intricate patterns, small illustrations, or even abstract designs on each piece. Encourage them to experiment with different brushstrokes and color combinations.
- 19
Store your painted puzzle pieces in a box or bag to keep them safe and organized until you're ready to display them. This prevents them from getting lost or damaged before their grand reveal.
- 20
If you're creating a mosaic, plan your arrangement before gluing. Lay out the pieces on your backing material to ensure you're happy with the composition before committing with adhesive.
Tips & Troubleshooting
- 1For a more cohesive look, try painting a single theme or color palette across all your puzzle pieces. This could involve using a limited range of colors, such as blues and greens for a nature theme, or a rainbow gradient that flows across multiple pieces, creating a unified visual experience.
- 2Don't be afraid to mix colors directly on the puzzle piece or create gradients by blending wet paints together. This technique can add a professional touch and create beautiful, seamless transitions, making your artwork look more sophisticated and less like individual painted pieces.
- 3If you're painting a picture, consider painting the edges of the puzzle pieces to create a framed effect when reassembled. This adds an extra layer of detail and sophistication to your finished piece, making it look more like a traditional framed artwork.
- 4Older kids can try painting intricate patterns, small illustrations, or even abstract designs on each piece. Encourage them to experiment with different brushstrokes and color combinations, perhaps even incorporating glitter or metallic paints for added flair.
- 5Store your painted puzzle pieces in a box or bag to keep them safe and organized until you're ready to display them. This prevents them from getting lost or damaged before their grand reveal, and you can even decorate the storage box to match your artwork.
- 6Consider using a stencil for intricate patterns or repeating designs on multiple puzzle pieces. This can help achieve a clean, professional look, especially for those who may not feel confident freehand drawing complex motifs.
- 7If you're working with a very large puzzle, you might want to break it down into smaller sections or batches to paint. This makes the project feel less overwhelming and allows you to focus on completing manageable chunks of artwork.
- 8For a textured effect, try dabbing paint on with a sponge or even using a toothbrush to flick paint for a splatter effect. These simple techniques can add a lot of visual interest and dimension to your puzzle art without requiring advanced skills.
Related Activities You Might Enjoy
Frequently Asked Questions
What kind of paint should I use for puzzle painting?
Acrylic paints are ideal for puzzle painting as they adhere well to cardboard and offer vibrant colors that dry relatively quickly. Their versatility allows for a wide range of techniques, from smooth washes to thick impasto. Once dry, acrylics are water-resistant, which is beneficial if you plan to seal your artwork. Avoid using watercolors, as they can cause the cardboard to warp and may not provide enough opacity. Tempera paints can also work, especially for younger children, but they are less durable and may require sealing for longevity. Ensure the puzzle pieces are completely dry before applying acrylics to prevent the paint from peeling or the cardboard from becoming soggy.
Can I use a puzzle that's already been put together?
Yes, you can paint a puzzle that's already assembled, but it's often easier and yields better results to paint individual pieces. When painting an assembled puzzle, you risk paint seeping into the cracks between the pieces, which can make them difficult to separate later or create an uneven painted surface. If you choose to paint an assembled puzzle, you'll need to be very careful with your brushstrokes, using a fine-tipped brush to stay within the lines of each piece. It's also crucial to allow ample drying time between coats and to ensure the paint doesn't create a thick layer that fuses the pieces together. Painting individual pieces offers more control over detail and allows for a cleaner, more professional finish.
How do I prevent paint from getting on the back of the puzzle pieces?
Preventing paint from getting on the back of puzzle pieces is essential for a clean finish. The easiest method is to paint one side at a time, allowing it to dry completely before carefully flipping the pieces over to paint the other side. To avoid smudging the painted side when flipping, you can place the wet pieces on a raised surface like small blocks, bottle caps, or even upturned cups. This allows air to circulate underneath and prevents the paint from sticking to your work surface. Another technique is to use painter's tape to mask off the edges or the back of the pieces if you're particularly concerned about accidental drips, though this can be time-consuming for many pieces.
What are some fun puzzle painting ideas for kids?
Kids can have a blast with puzzle painting! Encourage them to paint individual letters to spell out their names or favorite words, creating a personalized word puzzle. They can design a vibrant rainbow that spans across multiple pieces, or paint different animals on each piece to create a zoo collection. Abstract patterns using bright, contrasting colors are always a hit and allow for maximum creative freedom. Another fun idea is to have each child paint a piece of a larger collaborative picture, like a landscape or a birthday scene. The possibilities are endless and encourage imaginative play, storytelling, and a sense of accomplishment as they see their individual contributions come together.
How can I display my finished puzzle painting?
There are several creative ways to display your finished puzzle painting. The most straightforward method is to reassemble the puzzle and frame it like a traditional piece of art. This preserves the image and makes it ready for hanging. Alternatively, you can arrange the painted pieces into a unique mosaic on a piece of sturdy cardboard, a canvas panel, or even directly onto a prepared wall. For a mosaic, use craft glue to adhere the pieces, leaving small gaps between them for a visually interesting effect. Sealing the entire mosaic with Mod Podge or a clear sealant will help protect your artwork and give it a unified, finished look, ensuring your creation lasts for years to come.
Can I use a puzzle with a glossy finish?
Puzzles with a glossy finish can be painted, but they may require a little extra preparation to ensure the paint adheres properly. The slick surface of a glossy puzzle can sometimes cause acrylic paints to bead up or peel off once dry. To combat this, you can lightly scuff the surface of each puzzle piece with fine-grit sandpaper before painting. This creates a slightly rougher texture that the paint can grip onto. Alternatively, you can apply a thin layer of an acrylic primer or gesso to the puzzle pieces first. Once the primer is dry, the acrylic paints will adhere much better, providing a durable and vibrant finish to your puzzle art.
What Next?
Once your puzzle art is complete, the display possibilities are as creative as the painting itself! Consider framing the reassembled puzzle for a classic look, or arrange the pieces in a captivating mosaic on a sturdy backing like canvas or thick cardstock. For a truly unique wall art piece, you can even adhere them directly to a prepared wall surface. If you enjoyed this project, explore other upcycling crafts like painting on old CDs or decorating tin cans. Remember to store any unused or extra painted pieces in a decorative box or fabric bag to keep them safe and ready for future creative endeavors.
Free: 10 Paper Crafts Anyone Can Make in 5 Minutes
Get our beginner guide + new craft ideas weekly.
No spam. Unsubscribe anytime.
Did you complete this activity?
Related