How to Make Adorable Easter Egg Carton Critters — Easy Step-by-Step Guide
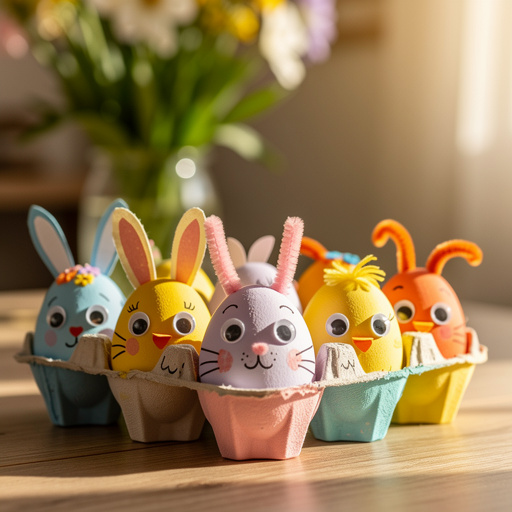
Transform ordinary egg cartons into a menagerie of charming Easter critters! This simple craft is perfect for little hands and big imaginations, turning everyday recycling into delightful decorations or playful toys. Get ready for some Easter crafting fun!
Quick answer
To make Easter egg carton critters, you need empty cardboard egg cartons (about 2-3), washable craft paint in various colors (e.g., yellow, pink, blue, green), 1 small paintbrush, 1 pair of child-safe scissors, 1 sheet of construction paper (any color), 1 small tube of craft glue or glue sticks, 10-15 googly eyes, and 5-10 pipe cleaners in assorted colors. This project takes about 30-45 minutes to complete, not including drying time. Start by cutting the egg carton into individual cups or sections. This beginner-friendly activity has 10 core steps and is perfect for preschoolers and early elementary-aged children.
What you need
Shop on Amazon · As an Amazon Associate we earn from qualifying purchases. Links above are affiliate links — we may earn a commission at no extra cost to you.
This Easter, give your recycling bin a second life by transforming humble egg cartons into a delightful parade of whimsical critters! This craft project is more than just a way to pass the time; it's an opportunity to foster creativity, fine motor skills, and a love for upcycling in children. It’s incredibly accessible, requiring common household items and minimal artistic skill, making it an ideal activity for preschoolers, kindergarteners, and even older siblings who can add more intricate details. Prepare for giggles and a burst of colorful characters to brighten your Easter celebrations!
On this page
Step-by-Step Instructions
- 1
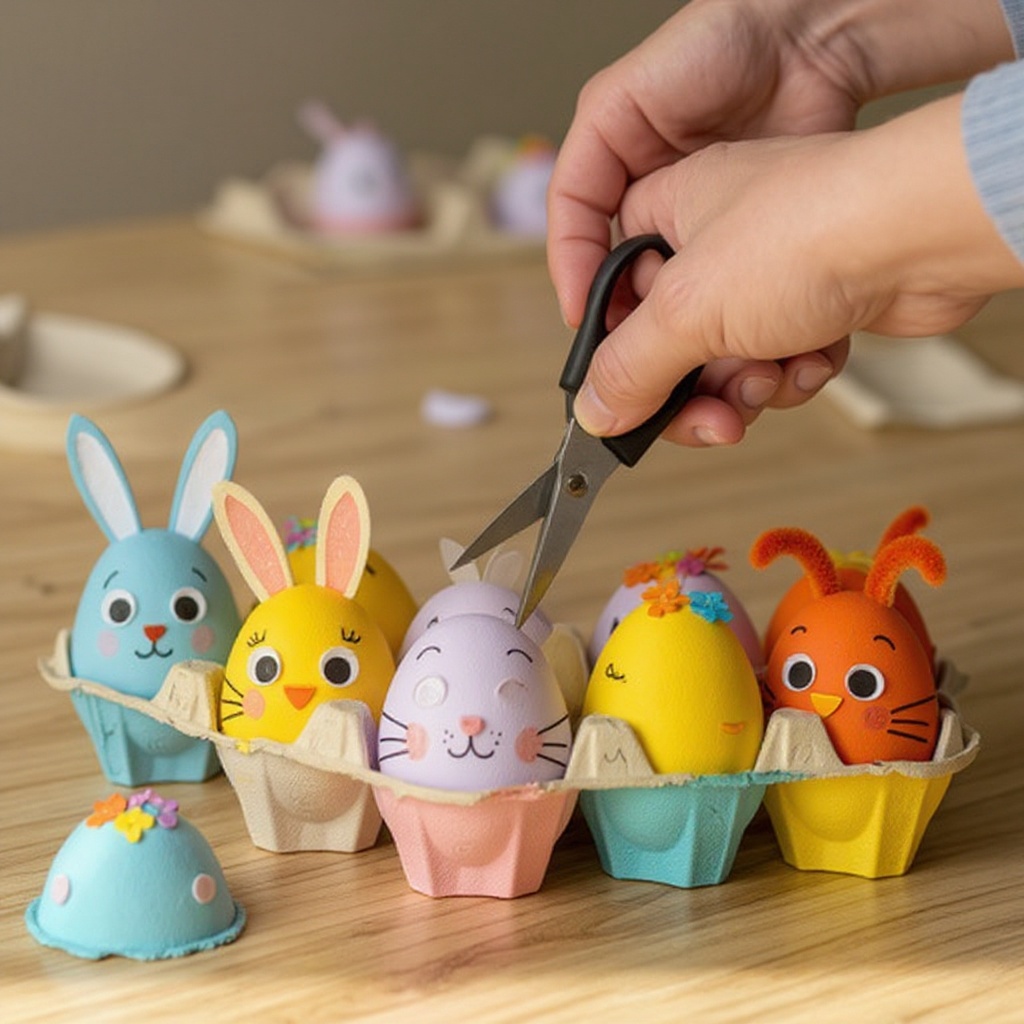
Carefully cut the egg carton into individual cups or sections using child-safe scissors. Aim for clean cuts around the base of each cup, ensuring you have a sturdy base for your critter. If you're making multiple critters, you'll need several of these individual cups.
- 2
Prepare your painting station by covering your workspace with newspaper or a plastic tablecloth to protect surfaces from paint. This step is crucial for a stress-free crafting experience, especially with younger children.
- 3
Paint the inside and outside of each egg carton section with your chosen craft paint colors. You can paint the entire cup one color, or create patterns and designs for a more unique look. Consider painting the inside a different color than the outside for added visual interest.
- 4
Allow the painted egg carton sections to dry completely. This might take anywhere from 30 minutes to an hour, depending on the thickness of the paint and humidity. You can speed up drying by placing them near a fan or in a warm, dry spot.
- 5
While the paint dries, it's time to create accessories for your critters. Cut small shapes from the construction paper to create ears, wings, antennae, or even little tails. Think about the animal you want to create – bunnies need long ears, birds need wings, and insects need antennae.
- 6
Once the paint is completely dry, use craft glue to attach the construction paper shapes to the egg carton sections. For ears, glue them to the top rim; for wings, attach them to the sides. Ensure you use enough glue to secure the pieces firmly but not so much that it oozes out excessively.
- 7
Now, it's time to give your critters some personality by adding eyes. Glue two googly eyes onto each egg carton critter's 'face' area. You can place them close together for a cute look or further apart for a more comical expression. If you don't have googly eyes, you can draw eyes with markers or cut small circles from paper.
- 8
For legs, antennae, or tails, cut pipe cleaners into smaller pieces. The length will depend on the size of your critter and the effect you want to achieve. For example, longer pieces make good legs, while shorter, bent pieces can be fun antennae.

- 9
Carefully poke small holes into the sides or bottom of the egg carton sections where you want to attach your pipe cleaner accessories. A pencil tip or the blunt end of a skewer can work for this, but adult supervision is recommended to avoid poking fingers.
- 10
Insert the pipe cleaner pieces into the holes you've made. Push them in firmly so they stay in place. These will serve as the legs, antennae, or tails for your charming creations.
- 11
Bend and shape the pipe cleaners to give your critters character and make them stand up. You can bend them into zig-zags for antennae, curve them for tails, or angle them for legs to create a sense of movement or personality.
- 12
Allow the glue to dry completely before playing with or displaying your new Easter egg carton critters. This ensures all the attached parts are secure and your critters are ready for their debut.
- 13
Optional: Add extra embellishments like glitter for sparkle, small pom-poms for noses, or draw additional details like mouths and patterns with markers or crayons. These small touches can elevate your critters from simple to spectacular.
- 14
If you're making bunnies, consider cutting out two large oval shapes for ears from construction paper and gluing them to the top of the egg carton cup. You can also add a small pom-pom for a fluffy tail.
- 15
For chicks, paint the egg carton yellow and cut out a small triangle for a beak from orange construction paper. Glue the beak on and add googly eyes.
- 16
Bugs can be made by painting the egg carton a variety of colors and adding multiple pipe cleaner legs and antennae. You can also use small circles of construction paper for wings.
- 17
Consider using a hole punch to create small holes for pipe cleaner antennae, which can sometimes be easier and neater than poking with a pencil.
- 18
If you want to create a more stable critter, you can glue the bottom of the egg carton cup to a small piece of cardstock or a larger construction paper base.
Tips & Troubleshooting
- 1If the paint is too thin and the cardboard shows through, don't worry! Simply apply a second coat of paint after the first has dried completely. This will give your critters a richer, more opaque color.
- 2For a less messy option, especially with very young children, consider using crayons or markers instead of craft paint. These are easier to control and require less cleanup, while still allowing for vibrant colors and designs.
- 3Experiment with different construction paper shapes and pipe cleaner arrangements to create a wide variety of animals. Think outside the box – you can make ladybugs, caterpillars, bees, or even fantastical creatures!
- 4Supervise young children closely when using scissors and ensure they are using child-safe versions designed for little hands. Always demonstrate proper scissor safety and technique.
- 5To make your critters stand up more easily, ensure the bottom of the egg carton cup is relatively flat. If it's uneven, you can trim it slightly or glue it onto a small piece of cardstock for added stability.
- 6Don't be afraid to mix and match colors! You can paint stripes, polka dots, or even abstract patterns on your egg carton cups to make each critter truly unique.
- 7If you're having trouble inserting pipe cleaners, try twisting the end slightly before pushing it into the hole. This can help it slide through more easily.
- 8For a more durable critter, consider using a stronger adhesive like hot glue (with adult supervision) for attaching pipe cleaners or heavier embellishments, though craft glue is perfectly adequate for most purposes.
Related Activities You Might Enjoy
Frequently Asked Questions
What are the best materials for Easter crafts for preschoolers?
For preschoolers, the best Easter craft materials are those that are safe, easy to handle, and encourage sensory exploration. Think washable craft paints, chunky crayons, glue sticks, large pom-poms, and pre-cut shapes from construction paper. Recycled materials like cardboard egg cartons, toilet paper rolls, and paper plates are fantastic because they're readily available and offer a great canvas for creativity. Pipe cleaners are also excellent for adding dimension and texture, but always ensure they are used under supervision. The key is to choose items that minimize frustration and maximize fun, allowing little ones to express themselves freely without complex steps or delicate pieces.
How can I make Easter crafts less messy for toddlers?
Making Easter crafts less messy for toddlers is all about preparation and choosing the right materials. Start by covering your entire crafting area with newspaper, a plastic tablecloth, or even a large old sheet. Use washable paints and consider using paint sticks or dabbers, which are less likely to drip than traditional brushes. Glue sticks are a lifesaver compared to liquid glue, as they are less prone to making a sticky mess. Pre-cutting shapes for them to glue on can also reduce the need for scissors. Finally, embrace the mess a little – have wet wipes or a damp cloth readily available for quick cleanups of little hands and faces. Egg carton crafts are generally quite contained, making them a good starting point.
What are some simple Easter crafts that don't require many supplies?
Simple Easter crafts that require minimal supplies can be incredibly engaging. One of the easiest is paper plate bunnies: cut a paper plate in half, decorate it with crayons or markers, and add construction paper ears and a cotton ball tail. Another option is to fold a piece of paper into an accordion fold, cut a bunny shape into the sides, and unfold to create a standing bunny. Even just a single egg carton can be transformed into various critters with just a few extra basic craft supplies like paint, googly eyes, and pipe cleaners, as demonstrated in this guide. Drawing Easter scenes with crayons or markers on plain paper is also a classic and simple activity.
Are there any screen-free Easter activities for young children?
Absolutely! Beyond crafts, there are numerous screen-free Easter activities perfect for young children. An Easter egg hunt is a classic that encourages physical activity and problem-solving. Reading Easter-themed books together fosters a love for literature and introduces holiday traditions. Singing spring songs or Easter carols can be a joyful group activity. Going for a nature walk to find signs of spring, like budding flowers or returning birds, connects children with the natural world. Baking Easter cookies or decorating them together is a delicious and engaging way to celebrate. Even simple activities like playing with playdough and creating Easter shapes can provide hours of entertainment.
How can I adapt this egg carton critter craft for different age groups?
This egg carton critter craft is wonderfully adaptable. For younger preschoolers (ages 2-3), focus on the painting and gluing of pre-cut shapes. You can pre-poke holes for pipe cleaners and have them simply insert them. For older preschoolers and kindergarteners (ages 4-5), they can participate more in cutting shapes, drawing details, and poking holes with supervision. Early elementary children (ages 6-8) can take the lead, designing their own critter types, experimenting with more complex paint designs, and even adding embellishments like glitter or felt. The complexity of the pipe cleaner shaping and the detail in the construction paper accessories can also be adjusted to suit the fine motor skills and creativity of each age group.
What other recycled materials can be used to make Easter decorations?
Beyond egg cartons, a treasure trove of recycled materials can be transformed into charming Easter decorations. Toilet paper and paper towel rolls are perfect for creating bunnies, chicks, or even Easter baskets when decorated and assembled. Plastic bottles can be cut and painted to resemble flowers or Easter eggs. Old newspapers or magazines can be rolled, cut, and glued to create textured Easter eggs or bunnies. Even bottle caps can be glued together to form colorful Easter mosaics or small decorative elements. Cardboard boxes can be cut into larger Easter shapes like crosses or bunnies for wall decorations. The possibilities are endless when you start looking at everyday 'trash' as potential craft supplies.
What Next?
Once your adorable Easter egg carton critters have fully dried, they are ready to embark on their adventures! These little creatures can be used for imaginative play, displayed as festive Easter decorations on shelves or windowsills, or even gifted to friends and family. For variations, consider adding glitter for extra sparkle, using felt scraps for softer textures, or even painting them with metallic paints for a more sophisticated look. If you enjoyed this project, you might also like making recycled bottle cap mosaics or cardboard tube animals. Store your finished critters in a dry place to keep them looking their best for years to come.
Free: 10 Paper Crafts Anyone Can Make in 5 Minutes
Get our beginner guide + new craft ideas weekly.
No spam. Unsubscribe anytime.
Did you complete this activity?
Related