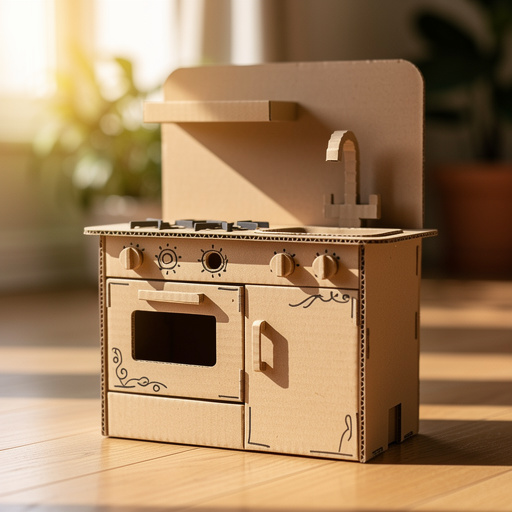
How to Build a Cardboard Box Kitchenette — Easy Step-by-Step Guide
Transform ordinary cardboard boxes into a magical pretend play kitchenette, sparking hours of creative fun for your little chefs. This beginner-friendly project is perfect for fostering imagination and creativity in children aged 3-8.
Quick answer
To make a cardboard box kitchenette, you need 2 large, 1 medium cardboard box, scissors, tape, and paint, taking about 2 hours. Start by assembling the main box structure, then cut openings for doors, add a stovetop, and decorate. This beginner-friendly activity has 15 steps and is perfect for kids aged 3-8.
What you need
Shop on Amazon · As an Amazon Associate we earn from qualifying purchases. Links above are affiliate links — we may earn a commission at no extra cost to you.
Ignite your child's imagination and culinary dreams with this delightful cardboard box kitchenette project! This DIY creation is more than just a toy; it's a gateway to endless pretend play scenarios, encouraging creativity, problem-solving, and social interaction. Perfect for rainy days or as a special gift, this project transforms humble cardboard into a cherished play space that your little ones will adore. It's a fantastic way to engage children in a hands-on activity that results in a tangible, fun-filled outcome, all while being budget-friendly and environmentally conscious.
On this page
Step-by-Step Instructions
- 1
Arrange the two large cardboard boxes side-by-side to form the base of your kitchenette. Ensure they are stable and that the open sides are facing upwards or towards the back, depending on your desired layout. This forms the main cabinet structure.
- 2
Tape the two large boxes securely together along the adjoining edges using strong packing tape. Apply tape generously to both the inside and outside seams to ensure a robust connection that will withstand enthusiastic play.
- 3
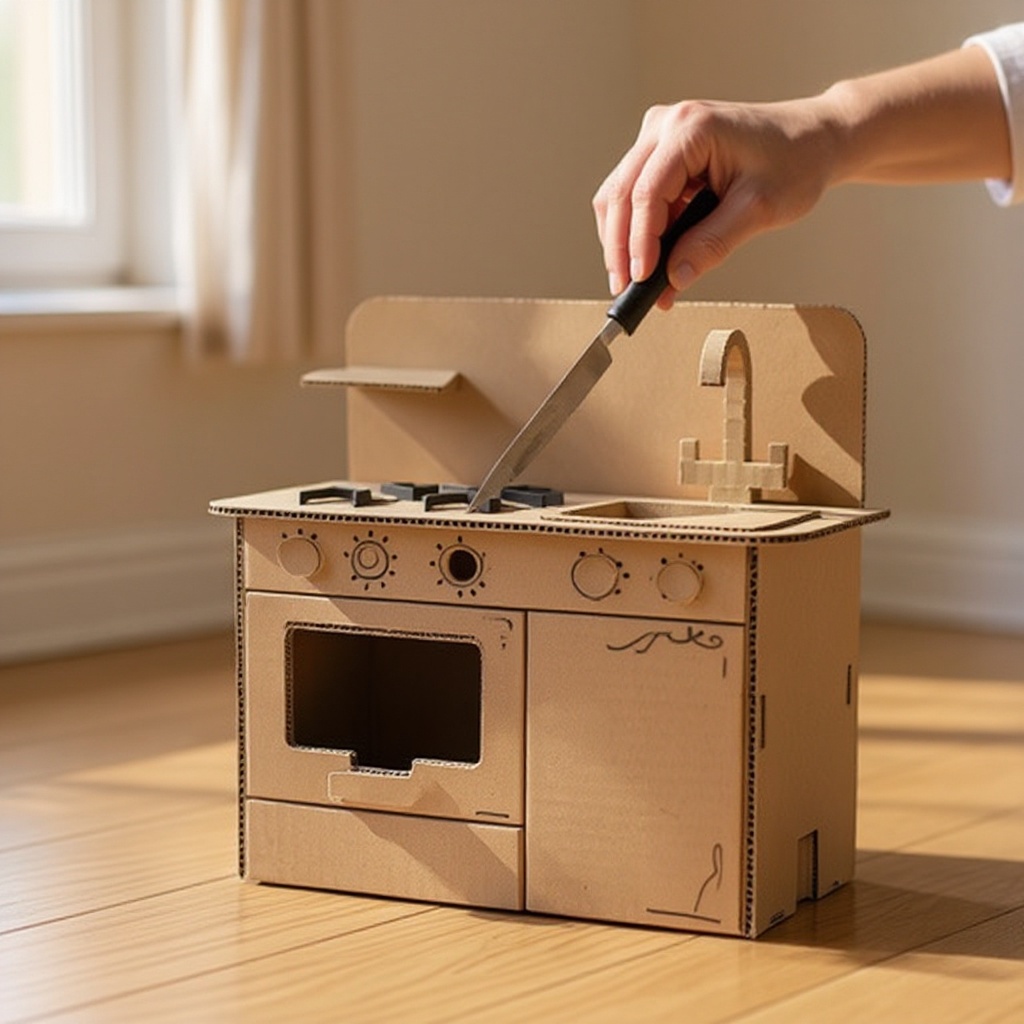
Cut a large opening on the front of one of the large boxes to create the oven door. Measure and mark a rectangular or square shape, ensuring it's large enough for little hands to reach inside. Leave one side attached as a hinge by only cutting three sides of the rectangle.
- 4
Carefully score the hinge side with your box cutter or scissors without cutting all the way through, making it easier to fold the door open and closed. This creates a functional oven door that can swing open.
- 5
Cut a smaller opening on the front of the second large box to serve as the cupboard door. Similar to the oven, mark out a door shape and cut three sides, leaving one side attached as a hinge. This provides storage space for pretend food and accessories.
- 6
Score the hinge side of the cupboard door for a clean fold. Ensure the opening is appropriately sized for easy access but also maintains the cupboard's structure when closed.
- 7
Place the medium cardboard box on top of the two large boxes, centered, to create the stovetop. Position it so it sits flush with the front edges of the base boxes and tape it securely in place. This box will be the cooking surface.
- 8
Cut out four circles on the top of the medium box to represent burners. You can trace around small bowls, cups, or even use a compass for perfect circles. Ensure they are evenly spaced and sized to look like a functional stovetop.
- 9
Reinforce all taped seams with an extra layer of tape. This is a crucial step for durability, especially on the base and where the stovetop is attached, as these areas will experience the most stress during play.
- 10
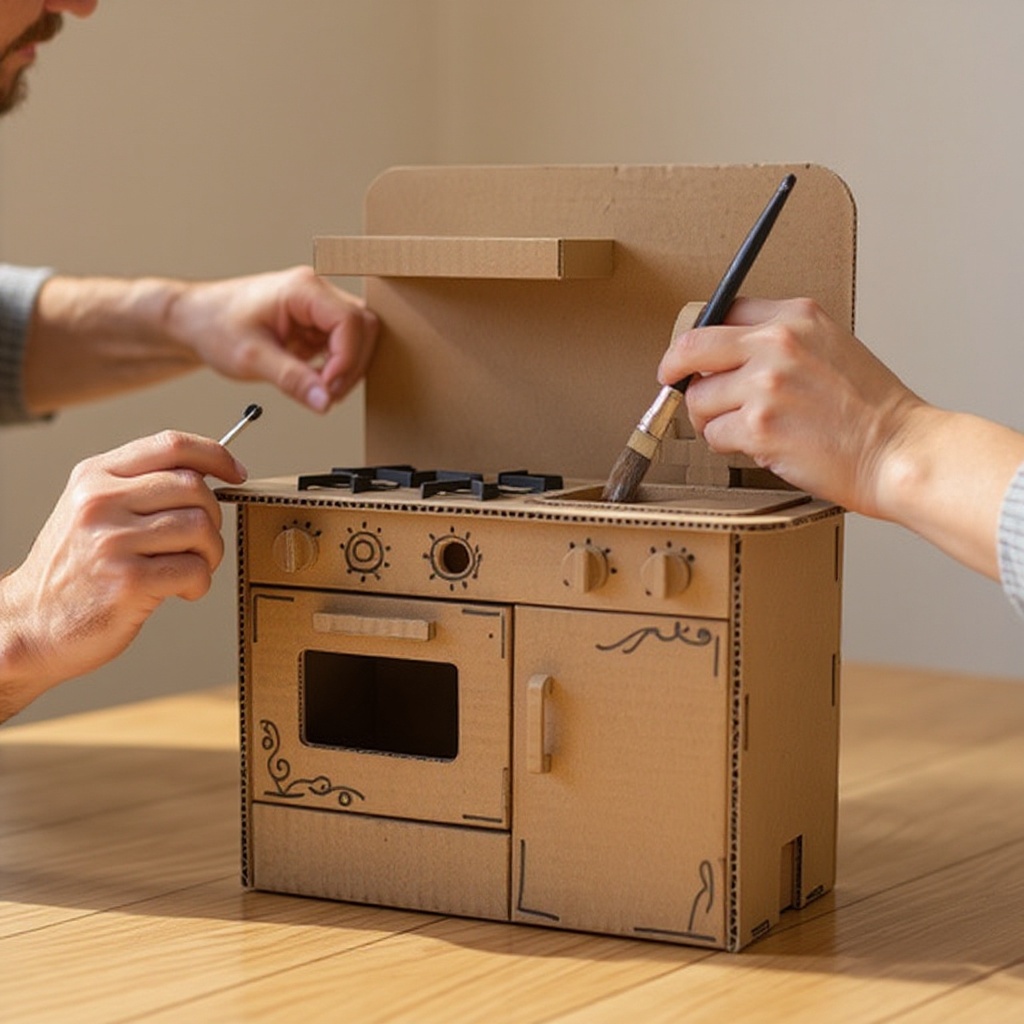
Paint the entire kitchenette structure. Use a base coat of your chosen color, such as white or a neutral tone, for a clean canvas. Allow this first coat to dry completely before proceeding to detail work.
- 11
Once the base coat is dry, paint the oven door and cupboard door in contrasting or complementary colors. Consider painting the oven door a darker color like black or dark grey, and the cupboard doors a brighter hue.
- 12
Paint the stovetop surface. A metallic silver or black paint can give a realistic stove appearance. Use a sponge or dry brush technique for a textured look if desired.
- 13
Paint details like knobs for the oven and stovetop, or draw them on with markers. Use small circles for burner controls and larger ones for oven temperature dials. You can also paint a backsplash area on the back of the kitchenette.
- 14
Attach bottle caps or plastic lids to the front of the kitchenette with tape or glue to act as pretend stove knobs and oven controls. Arrange them logically below the painted burners and oven door for a realistic touch.
- 15
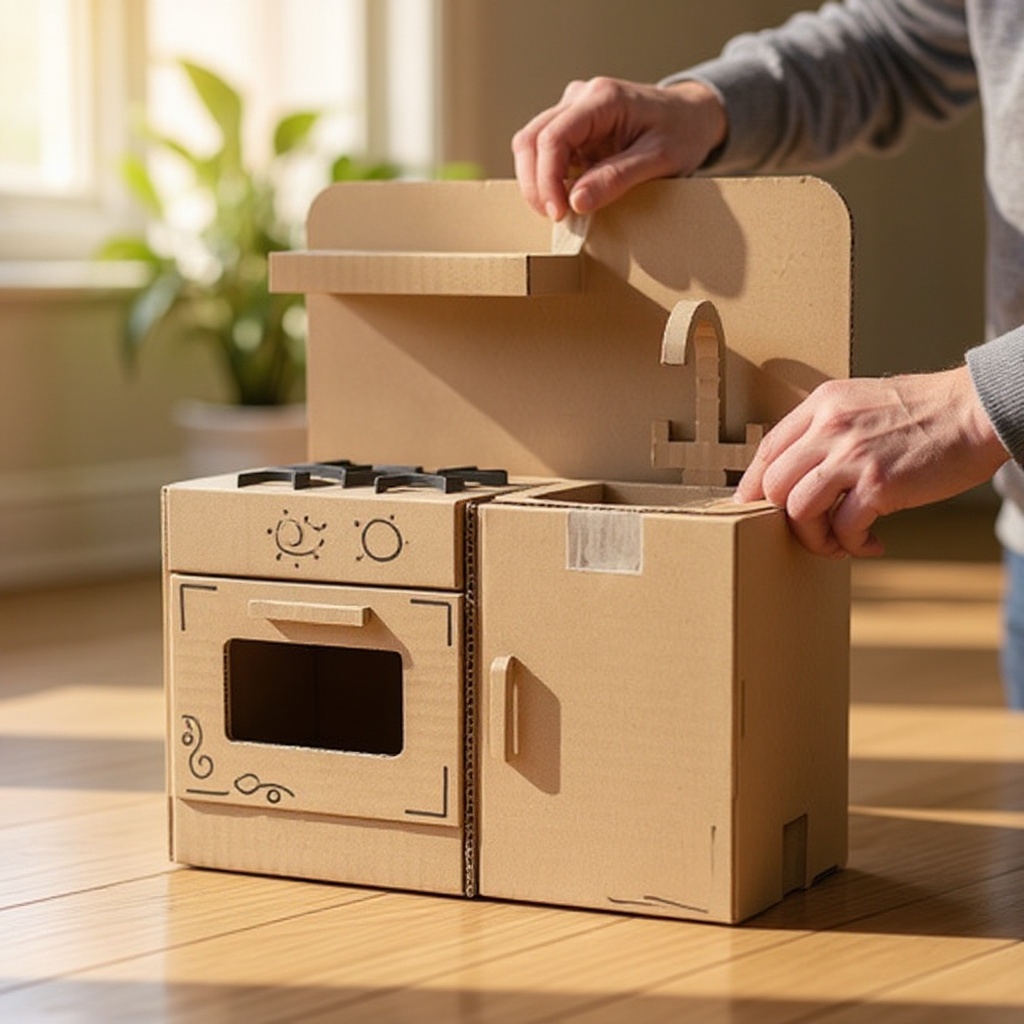
Decorate the kitchenette further with painted details, construction paper cutouts for backsplash, or even a small cardboard sink if desired. You can cut a sink shape from cardboard scraps and glue it into one of the base boxes, painting it silver or blue.
Tips & Troubleshooting
- 1For a more durable kitchenette, reinforce all taped seams with an extra layer of tape. Pay special attention to the corners and edges where the boxes join, as these are common stress points that can lead to wear and tear over time.
- 2Let children help with the painting and decorating to personalize their pretend play space. This not only makes the project more engaging for them but also fosters a sense of ownership and pride in their creation. Provide them with a variety of colors and let their creativity flow.
- 3If you don't have paint, markers and construction paper can be used to decorate the kitchenette. Markers are excellent for drawing details like knobs, burners, and even food items, while construction paper can be cut and glued to create backsplashes, window panes, or decorative elements.
- 4Consider adding a small cardboard shelf inside the cupboard for storing pretend food. Cut a piece of sturdy cardboard to fit the inside dimensions of the cupboard and secure it with tape or glue, creating a more organized and realistic storage solution.
- 5Ensure all cut edges are smooth to prevent splinters or paper cuts. After cutting, you can run your finger along the edges to feel for any rough spots and trim them away with scissors or cover them with tape for added safety.
- 6Get creative with your materials! Old magazines can be cut up to create pretend food pictures, fabric scraps can be used for curtains or a tablecloth, and even old CDs can be glued on as decorative elements or shiny stovetop accents.
- 7Consider adding a small cardboard sink by cutting a hole in the top of one of the base boxes and fitting a smaller box or a plastic container inside. Paint it silver or blue to mimic a real sink, and add a small cardboard faucet for extra detail.
- 8To make the oven door more realistic, you can cut a small window out of it and cover it with clear plastic wrap or a piece of a clear plastic container. This allows children to peek inside the oven while it's 'cooking'.
Related Activities You Might Enjoy
Frequently Asked Questions
What are the best materials for a pretend play kitchen?
Cardboard boxes are excellent for pretend play kitchens as they are lightweight, easy to cut and assemble, and can be decorated creatively. They offer a fantastic canvas for imagination and are an eco-friendly choice. Other materials like strong packing tape are essential for structural integrity, while washable craft paints and markers allow for vibrant customization. Recycled items such as bottle caps, plastic lids, and even old fabric scraps can add realistic touches and enhance the play experience. The key is to use materials that are safe, readily available, and can be easily manipulated to bring the kitchen to life.
How can I make a pretend play kitchen more realistic?
You can add realistic touches by attaching bottle caps or plastic lids for knobs, cutting out oven doors with hinges, and painting details like burners or a backsplash. Even a small cardboard sink can enhance the play experience, perhaps with a painted faucet. Consider adding a clear plastic window to the oven door so little chefs can peek inside. Using metallic paints for the stovetop and sink can mimic stainless steel. You can also create a small shelf inside the cupboard for organizing play food and utensils, making it feel more like a real kitchen.
What age is a cardboard box kitchenette suitable for?
A cardboard box kitchenette is ideal for children aged 3 to 8 years old. Younger children will enjoy imaginative play, engaging in pretend cooking, serving, and cleaning. Older children can actively participate in the construction and decoration process, developing fine motor skills and problem-solving abilities. The simplicity of the design allows for open-ended play, adapting to the developmental stages of each child within this age range. It's a versatile toy that grows with your child's imagination.
How long does it take to build a cardboard box kitchenette?
Building a basic cardboard box kitchenette typically takes about 1 to 2 hours, depending on the complexity of the design and the drying time for paint. The assembly is straightforward and can be completed in one crafting session, with drying time for paint being the main factor that might extend the overall timeline. If children are involved in the decorating, allow extra time for their creative input. This timeframe makes it a manageable weekend project or an engaging activity for an afternoon.
Can I make a cardboard box kitchenette without paint?
Absolutely! If you prefer to avoid paint or don't have it on hand, you can effectively decorate your cardboard box kitchenette using markers and construction paper. Markers are fantastic for drawing all the details, from stovetop burners and oven controls to decorative patterns and even pictures of food. Construction paper can be cut into various shapes and glued on to create a colorful backsplash, cupboard doors, or even a small sink. This method is just as creative and can be less messy, making it a great option for younger children or for a quicker project.
How can I store a cardboard box kitchenette?
Cardboard box kitchenettes are relatively lightweight and can be stored in various ways. If you have a dedicated play area, it can be a permanent fixture. Otherwise, consider placing it against a wall in a playroom or bedroom. If space is limited, you might be able to carefully disassemble parts of it, though this is less ideal for frequent play. Some people opt to add wheels to the base for easy mobility and storage. Alternatively, it can be stored in a larger closet or under a bed if space allows, though it's best to keep it accessible for spontaneous play.
What Next?
Once your cardboard kitchenette is complete, the real fun begins! Encourage your child to stock it with play food, utensils, and even create their own recipe cards. For storage, consider a designated corner of a playroom or bedroom; the lightweight nature of cardboard makes it easy to move. You could even add wheels for extra mobility! For future projects, explore building a matching refrigerator or a charming pantry to expand their culinary world. This kitchenette is a fantastic starting point for a larger pretend play village, offering endless possibilities for creative expansion.
Free: 10 Paper Crafts Anyone Can Make in 5 Minutes
Get our beginner guide + new craft ideas weekly.
No spam. Unsubscribe anytime.
Did you complete this activity?
Related