How to Make Potato Stamps — Easy Step-by-Step Guide
Unleash your creativity with simple potato stamps! This guide shows you how to carve and print with potatoes, offering endless artistic possibilities for family fun. Perfect for young artists and a fantastic way to explore the world of printmaking with minimal materials and maximum imagination.
Quick answer
To make potato stamps, you need potatoes, carving tools, and paint, taking about 30 minutes. Start by cutting a potato in half. This beginner-friendly activity has 15 steps and is perfect for kids aged 5+ with adult supervision.
What you need
Shop on Amazon · As an Amazon Associate we earn from qualifying purchases. Links above are affiliate links — we may earn a commission at no extra cost to you.
Embark on a delightful journey into the world of printmaking with the humble potato! This incredibly accessible and budget-friendly craft project is a fantastic way to spark creativity in children and adults alike. Potato stamping transforms everyday ingredients into unique artistic tools, offering a tactile and engaging experience that fosters fine motor skills and imaginative expression. It’s a perfect activity for rainy days, classroom art lessons, or simply a fun afternoon of family bonding, proving that incredible art can be made from the simplest of things.
On this page
Step-by-Step Instructions
- 1
Begin by selecting your potatoes. Choose firm, blemish-free potatoes that are a good size for handling. Avoid any that are soft or have sprouted, as these will not carve well and may spoil quickly.
- 2
Thoroughly wash the chosen potatoes under cool running water to remove any dirt or debris. Gently scrub them with your hands or a vegetable brush to ensure they are completely clean.
- 3
Pat the washed potatoes completely dry using paper towels. It's crucial that the surface is dry to prevent the paint from becoming diluted and to ensure a clean transfer of the design.
- 4
Now, it's time for the adult to take charge with the chef's knife. Carefully cut the potato in half horizontally, creating two flat surfaces. Ensure the cut is as straight and even as possible for a stable printing surface.
- 5
Select one half of the potato to be your primary stamp. The freshly cut surface is where you will carve your design. You can use the other half for a second stamp or save it for another project.
- 6
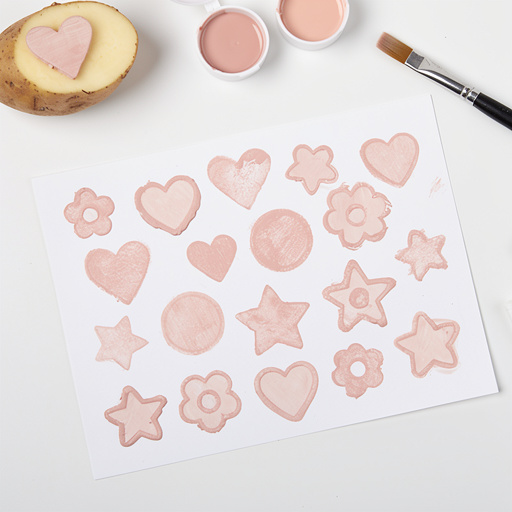
With adult supervision and guidance, use a small paring knife or a carving tool to carefully carve a simple shape into the cut surface of the potato. Think about basic geometric shapes like circles, squares, or triangles, or more playful designs such as hearts, stars, or simple flower outlines. Avoid intricate details as they may not transfer well.
- 7
As you carve, gently remove any excess potato pieces from around your carved design. The goal is to create a raised pattern that will hold the paint, leaving the background area slightly recessed.
- 8
Once your design is carved, gently dab the carved surface of the potato with a clean, dry paper towel. This step is vital to remove any residual moisture from the potato flesh, which can dilute the paint and lead to smudged prints.
- 9
Prepare your paints by dispensing them into shallow dishes or a palette. If using tempera paints, they are usually ready to go. For acrylics, you might want to add a tiny drop of water if they are very thick, but be cautious not to make them too runny.
- 10
Select your printing tool – either a paintbrush or a sponge. If using a paintbrush, load it with a moderate amount of paint. If using a sponge, dab it into the paint until it's evenly coated but not dripping.
- 11
Gently dab the painted paintbrush or sponge onto the carved surface of the potato stamp. Ensure the paint covers the raised design evenly without pooling in the recessed areas. Avoid overloading the stamp with paint, as this can lead to blurry prints.
- 12
Carefully position your painted potato stamp onto your paper or fabric. Press down firmly and evenly across the entire surface of the carved design. Apply consistent pressure to ensure a clear and complete transfer of the image.
- 13
Lift the potato stamp straight up from the paper or fabric. Doing this carefully will reveal your first beautiful print! Admire your creation and the unique texture the potato stamp provides.
- 14
Repeat the process to create more prints. Clean the potato stamp with water and paper towels between color changes or when you switch to a different design to avoid muddying your colors. If you are finished printing for the day, ensure the stamp is thoroughly cleaned.
- 15
Allow your printed creations to dry completely. Depending on the type of paint used and the thickness of the application, this could take anywhere from 30 minutes to a few hours. Place them in a well-ventilated area to speed up the drying process.
Tips & Troubleshooting
- 1For the cleanest and crispest prints, ensure the carved surface of the potato is completely dry before applying paint. Any moisture can cause the paint to spread and blur the edges of your design, diminishing the detail.
- 2Don't be afraid to experiment with different potato shapes and sizes. Larger potatoes can accommodate bigger designs and create bolder prints, while smaller ones are perfect for more delicate patterns or for little hands to hold.
- 3Try layering colors or overlapping your prints for more complex and visually interesting designs. You can print one color and let it dry slightly before adding another, or strategically overlap shapes to create new forms.
- 4If carving directly into the potato proves challenging, especially for very young children or for creating simple, uniform shapes, consider using cookie cutters. Press a metal cookie cutter firmly into the potato flesh to create a clear indentation that can then be painted and printed.
- 5Store carved potato stamps in the refrigerator in a sealed airtight container for a day or two if you need to pause your project. However, be aware that they are best used fresh, as they can start to dry out or develop mold over time.
- 6Vary the pressure you apply when stamping. Light pressure might give a more subtle, textured look, while firm pressure will yield a bolder, more defined print. Experiment to see what effects you can achieve.
- 7Consider using different types of paint. While washable tempera is great for easy cleanup, acrylic paints offer more vibrant colors and better durability on fabric. Experiment to find your preferred medium.
- 8Create a 'stamp station' with all your materials laid out. This will make the process smoother and more enjoyable, especially when working with children who might have shorter attention spans.
Related Activities You Might Enjoy
Frequently Asked Questions
What are some easy potato stamp ideas for kids?
Simple shapes like hearts, stars, circles, squares, and basic letters are fantastic starting points for potato stamps, especially for younger children. You can also try cutting out the simple outline of a flower, a smiley face, a crescent moon, or even a basic animal silhouette like a cat or a fish. For a slightly more advanced but still manageable design, consider a simple house shape or a tree. The key is to keep the shapes bold and the lines relatively thick, as intricate details can be difficult to carve and may not transfer well onto the paper.
How do you make potato stamps last longer?
Potato stamps are at their best when used fresh, as they are a natural product and will eventually degrade. For short-term storage, you can extend their life for 1-2 days by carefully cleaning them after use, patting them dry, and then storing them in an airtight container in the refrigerator. This helps to slow down the drying process and prevent spoilage. However, even with refrigeration, they will eventually start to soften, dry out, or potentially develop mold, so it's always recommended to carve and use them as soon as possible for the best results.
What kind of paint works best for potato stamps?
Washable tempera paints are an excellent choice for potato stamping, especially when working with children, as they are non-toxic, easy to clean up from hands, clothes, and surfaces, and come in a wide array of vibrant colors. If you're looking for more durable and vibrant prints, especially on fabric, acrylic paints are also a great option. They offer richer colors and a more permanent finish once dry. However, acrylic paints can be trickier to wash off, so it's advisable to protect your work area and clothing. Experimenting with both will help you discover your preference.
Can you reuse potato stamps?
Yes, absolutely! Potato stamps are wonderfully reusable as long as the carved design remains intact and the potato hasn't started to decay or become mushy. After each printing session, it's important to clean the stamp thoroughly. Gently rinse it under cool water and use paper towels to wipe away any remaining paint. Ensure the carved surface is patted dry before storing it, ideally in a cool place or the refrigerator if you plan to use it again within a day or two. With proper care, you can get multiple uses out of a single carved potato stamp.
What are some advanced potato stamp techniques or design ideas?
Once you've mastered basic shapes, you can explore more advanced techniques. Try carving multiple small shapes within a larger design, like dots inside a circle or stripes within a square, to create textured patterns. You can also experiment with carving negative space – instead of carving out a shape, carve away the background to leave your desired shape raised. Layering colors is another fantastic technique; print one color, let it dry partially, and then stamp another color over or next to it. For more intricate designs, consider using a linoleum cutter or a craft knife for finer details, always with strict adult supervision. You can also try carving a pattern that repeats across the surface of the potato for a continuous design.
How do I prepare my paper or fabric for potato stamping?
For paper, using cardstock or heavier weight paper is recommended, as it can withstand the moisture from the paint without buckling or tearing easily. If you're printing on lighter paper, consider placing a piece of scrap paper underneath to absorb any excess paint that might seep through. For fabric items like t-shirts or tote bags, pre-wash and dry them to remove any sizing or finishes that might interfere with paint adhesion. Place a piece of cardboard or thick plastic inside the fabric item to prevent the paint from bleeding through to the other side. Ensure the fabric surface is smooth and taut before stamping for the best results.
What Next?
You've now mastered the art of potato stamping! The possibilities are truly endless, from decorating greeting cards and gift wrap to personalizing fabric tote bags or creating unique wall art. Don't stop at simple shapes; try combining different stamp designs, layering colors, or even carving more intricate patterns as your confidence grows. For a different texture, consider using sweet potatoes or even apples for stamping. Once your masterpieces are dry, consider framing them for a gallery-worthy display or gifting them to loved ones. Remember, the joy is in the process and the unique, handmade charm of each print.
Free: 10 Paper Crafts Anyone Can Make in 5 Minutes
Get our beginner guide + new craft ideas weekly.
No spam. Unsubscribe anytime.
Did you complete this activity?