How to Make Custom Rubber Eraser Stamps — Easy Step-by-Step Guide
Discover the simple magic of creating your own unique stamps using everyday rubber erasers. Perfect for personalizing stationery, art projects, and gifts. This guide provides a detailed, step-by-step process for making your own custom stamps, suitable for crafters of all ages.
Quick answer
To make DIY stamps, you need rubber erasers, carving tools, and ink pads, taking about 45 minutes. Start by drawing your design onto the eraser. This beginner-friendly activity has 10 steps and is perfect for kids aged 8+ and adults.
What you need
Shop on Amazon · As an Amazon Associate we earn from qualifying purchases. Links above are affiliate links — we may earn a commission at no extra cost to you.
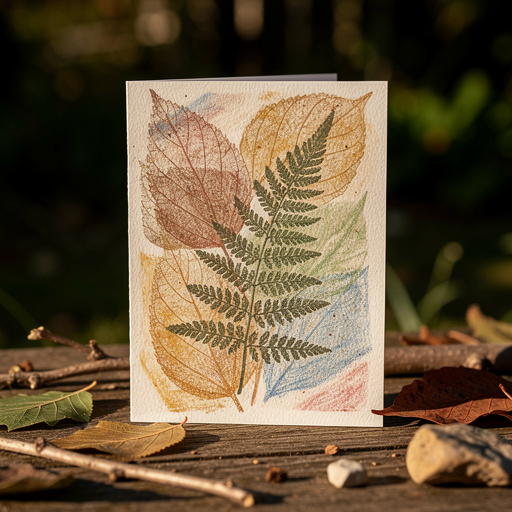
Unleash your inner artist and discover the incredibly satisfying craft of making your own custom rubber stamps from ordinary erasers. This project is a fantastic way to add a personal touch to everything from handmade cards and gift tags to journal pages and fabric projects. It’s a low-cost, accessible craft that requires minimal materials, making it perfect for beginners, kids, and anyone looking for a creative outlet. The magic lies in transforming a simple household item into a unique tool for artistic expression, allowing you to create bespoke designs that are truly your own.
On this page
Step-by-Step Instructions
- 1
Gather your materials: Ensure you have your chosen rubber erasers, a pencil, your carving tool, a cutting mat, and ink pads ready. Having everything within reach will make the carving process smoother and more enjoyable.
- 2
Prepare your eraser: If your eraser has a paper wrapper, carefully remove it. You can also lightly sand the surface of the eraser with fine-grit sandpaper to create a smoother, more uniform surface for drawing your design, though this is optional.
- 3
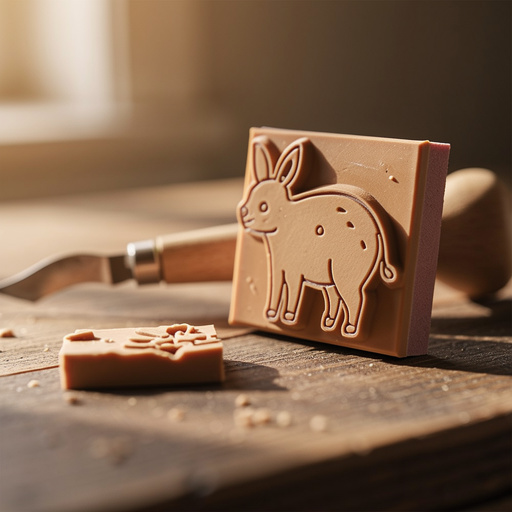
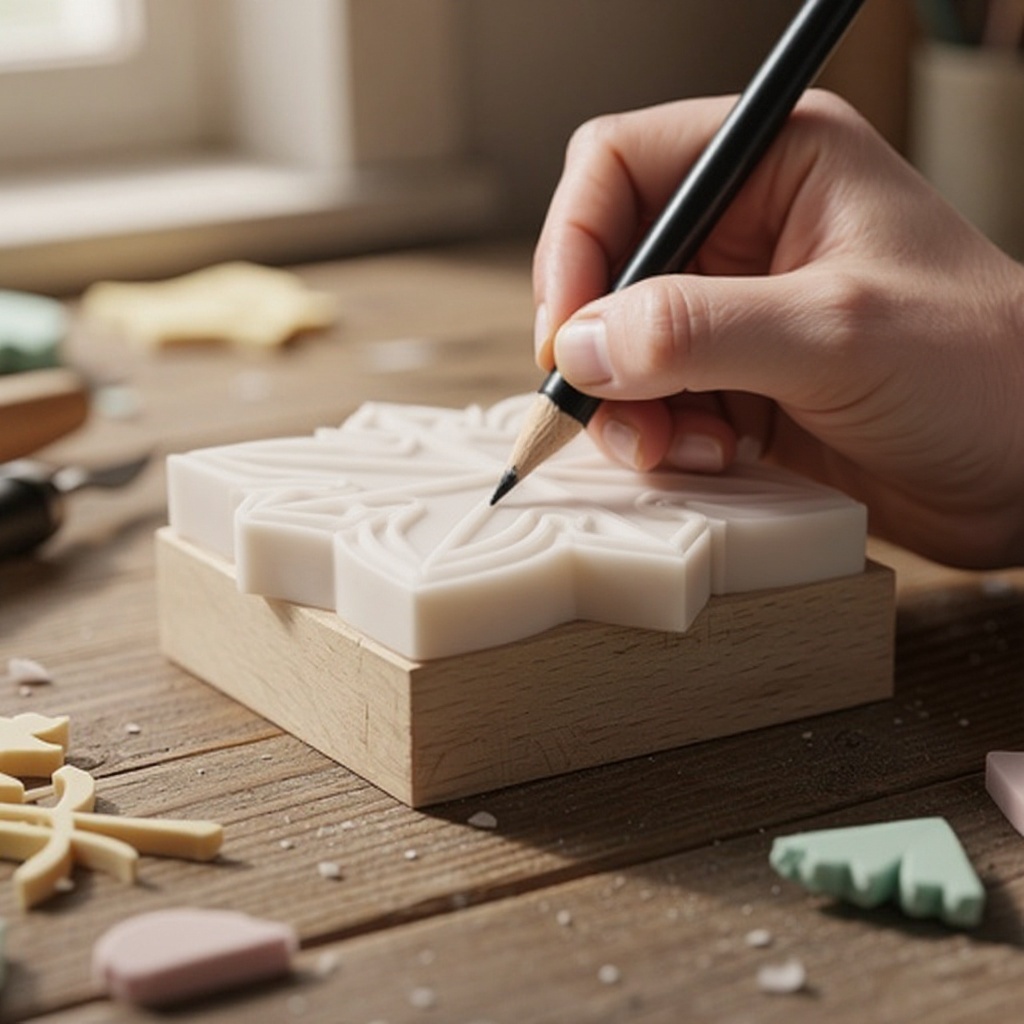
Lightly sketch your desired design onto the surface of the eraser with a pencil. Keep the design simple for your first try, focusing on bold outlines and clear shapes. Avoid overly intricate details until you gain more confidence with your carving tools.
- 4
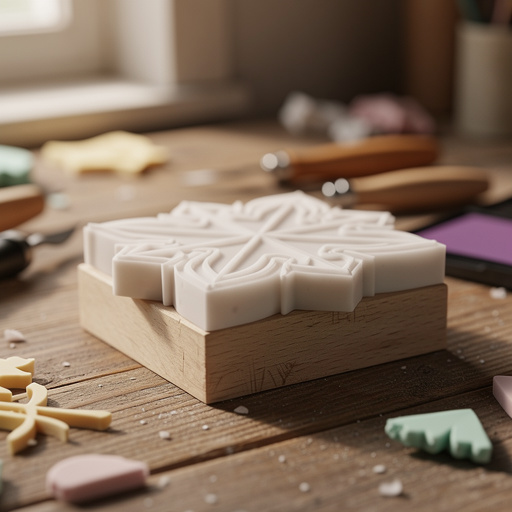
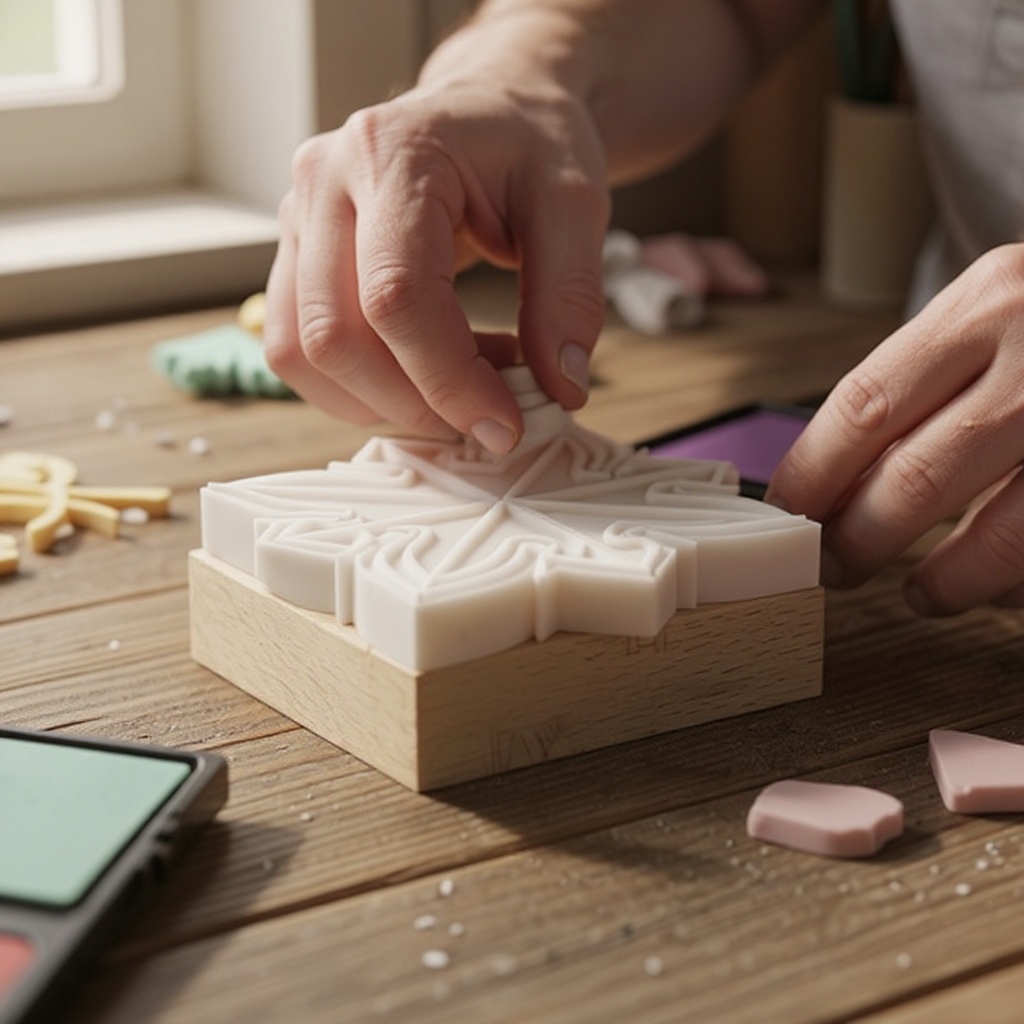
Begin carving away the rubber around your pencil lines. Hold your carving tool at a slight angle and use gentle, controlled strokes to remove small amounts of rubber at a time. The goal is to leave your design raised while removing the surrounding background.
- 5
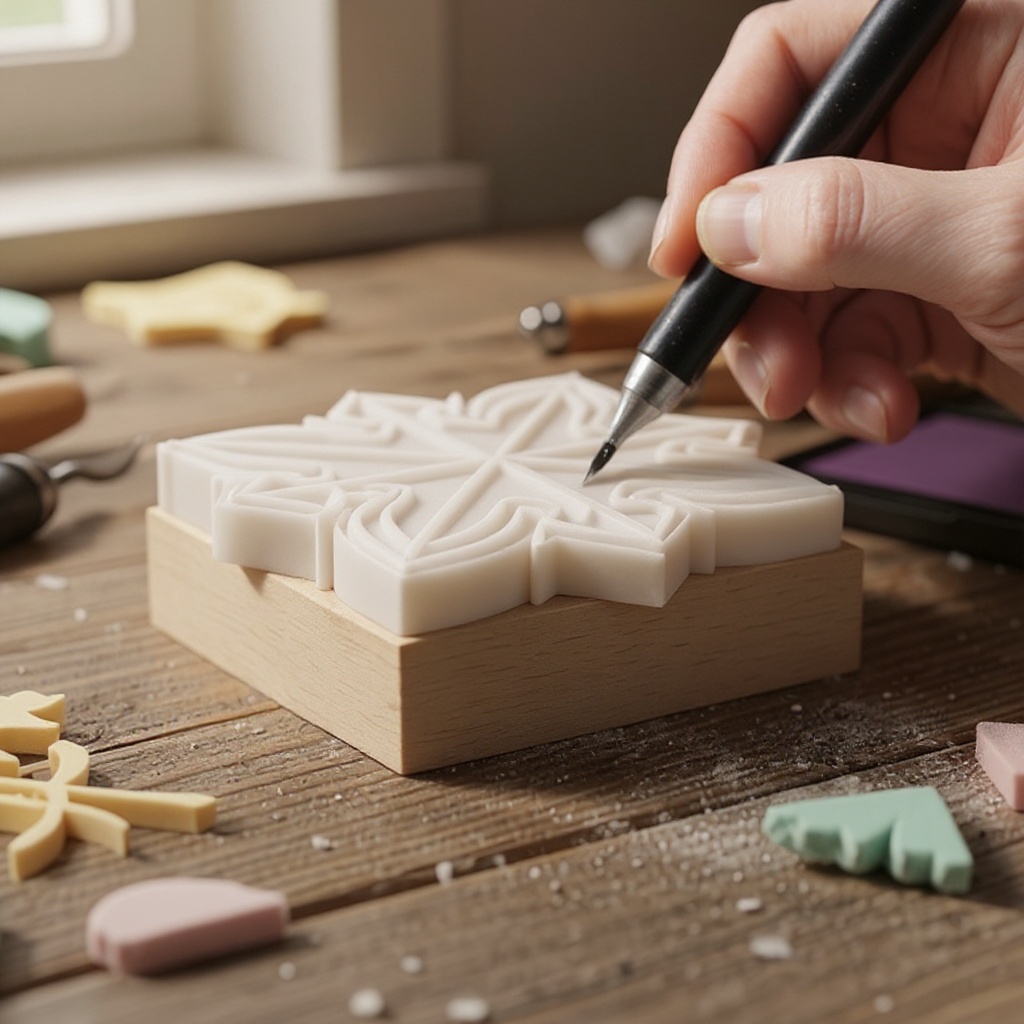
For detailed lines or fine textures, use the tip of your carving tool to create shallow grooves. This technique allows you to add subtle shading or define edges more precisely. Be patient and work slowly to avoid cutting too deep or slipping.
- 6
Continue carving until your entire design is raised and the background rubber is completely removed to your desired depth. You should be able to see the distinct shape of your design standing proud from the base.
- 7
Inspect your carved stamp for any stray pencil marks or small bits of rubber that may have been left behind. Gently clean the surface of your carved stamp with a soft brush or a damp cloth to remove any dust or smudges. Ensure it is completely dry before inking.
- 8
Test your stamp by pressing it firmly and evenly onto an ink pad, ensuring the entire raised surface is coated. Then, carefully stamp onto a scrap piece of paper to check the impression. Look for any areas that might be too faint or too dark.
- 9
If the impression is too faint or the ink isn't adhering well, you can gently sand the raised surface of your stamp very lightly with fine-grit sandpaper. This will create a slightly rougher texture that can help the ink adhere better. Be extremely careful not to sand away your design.
- 10
Once you're happy with the clarity and evenness of your stamp's impression, ink it up again with your chosen color. Press it firmly and evenly onto your paper or cardstock to create your unique print. Experiment with different pressure and angles for varied effects.
- 11
Repeat the inking and stamping process to create patterns, build up layers, or make multiple impressions for your project. Clean your stamp with a damp cloth or rubbing alcohol after use to preserve its detail and prevent ink from drying in the carved areas.
- 12
Consider creating a handle for your stamp. You can glue the carved eraser onto a small wooden block or a larger, uncarved eraser for a more comfortable grip, making it easier to apply even pressure during stamping.
- 13
For intricate designs, consider using a stencil to transfer your drawing onto the eraser. This can help ensure symmetry and accuracy, especially for geometric patterns or lettering.
- 14
If you find yourself carving too deeply, don't despair! Sometimes a slightly deeper carve can create a unique shadow effect. Embrace the imperfections as part of the handmade charm.
- 15
After carving, gently blow away any loose rubber shavings. You can also use a small brush or even a sticky lint roller to pick up any stubborn debris from the carved areas.
- 16
When testing your stamp, try different types of paper to see how the ink transfers. Thicker cardstock might hold ink differently than thinner paper, offering varied results.
- 17
If you're making a stamp with very fine lines, ensure your carving tool is sharp. A dull blade can tear the rubber rather than cutting it cleanly, leading to fuzzy edges.
- 18
For a more permanent stamp, you can seal the carved surface with a thin layer of clear sealant after it's completely dry. This can help protect the design from wear and tear over time.
Tips & Troubleshooting
- 1Start with simple shapes and bold lines. Intricate details can be challenging for beginners and may lead to frustration. Focus on mastering basic shapes like circles, squares, or simple floral motifs before attempting complex imagery.
- 2Always carve away from yourself to prevent accidents. If using a craft knife, ensure the blade is sharp for cleaner cuts and less resistance, which also reduces the risk of slipping. Keep your fingers clear of the blade's path at all times.
- 3Experiment with different types of erasers. Softer erasers, like pink pearl or white art gum, are significantly easier to carve and hold detail well. Harder, plastic-like erasers can be brittle and difficult to work with, often resulting in chipped edges.
- 4If your stamp isn't picking up ink evenly, try gently dabbing it onto the ink pad rather than pressing hard. This ensures that the ink only adheres to the raised surface of your design and doesn't seep into the carved-out areas.
- 5Store your finished stamps in a small box or container to keep them clean and protected from dust and damage. Placing them on a magnetic sheet or in a stamp album can also help keep them organized and prevent them from sticking together.
- 6Clean your stamps thoroughly after each use. A damp cloth or a bit of rubbing alcohol can remove excess ink and prevent it from drying in the carved crevices, which can dull the impression over time. Ensure the stamp is completely dry before storing.
- 7Consider the negative space as much as the positive. The areas you carve away are just as important as the design you leave raised. Think about how the background will contribute to the overall look of your stamped image.
- 8If you make a mistake while carving, don't worry! Sometimes a small error can be incorporated into the design, or you can try to carve around it to create a new element. For larger mistakes, you might be able to salvage the eraser by carving a completely new design over the old one.
Related Activities You Might Enjoy
Frequently Asked Questions
What kind of erasers are best for DIY stamps?
Large, soft rubber erasers like pink pearl or white art gum erasers are ideal for creating DIY stamps. These types of erasers are significantly easier to carve than harder, plastic-based erasers because they are more pliable and less brittle. Their softness allows for cleaner cuts and better detail retention, making the carving process more enjoyable and the resulting stamps more defined. Avoid erasers that are very hard or have a glossy finish, as these will be much more difficult to carve effectively and may result in a less satisfactory impression.
What tools can I use to carve DIY stamps?
You have several options for carving tools, depending on what you have available and the level of detail you desire. A sharp craft knife with a small, fine blade, such as an X-Acto knife, is a common and effective choice for beginners. For more specialized carving, a linoleum cutter set with interchangeable V-gouge and U-gouge blades is excellent for creating different line weights and textures. Regardless of the tool, always prioritize safety by carving away from yourself and using a stable cutting surface like a self-healing mat or thick cardboard.
How do I get a clear impression from my DIY stamp?
To achieve a clear impression, ensure the raised surface of your stamp is clean, dry, and free of any dust or debris. When inking, gently dab the stamp onto the ink pad, ensuring even coverage across the entire raised design without over-inking. Avoid pressing too hard, as this can cause ink to seep into the carved areas, blurring the design. Then, press the inked stamp firmly and evenly onto your paper or cardstock. If the impression is still faint, a light sanding of the raised surface might help ink adhere better, or try a different type of ink pad.
Can I make detailed designs with eraser stamps?
Yes, with practice and the right tools, you can absolutely create detailed designs with eraser stamps. While it's wise for beginners to start with simpler patterns and bolder lines to get a feel for the carving process, as you gain confidence and familiarity with your tools, you can gradually work towards more intricate ones. Using a sharp carving tool, a steady hand, and taking your time to carve away small amounts of rubber at a time will allow for finer lines and more complex imagery. Experimenting with different eraser types and carving techniques will also help you achieve greater detail.
How do I clean and maintain my eraser stamps?
Proper cleaning and maintenance will ensure your custom eraser stamps last longer and continue to produce crisp impressions. After each use, gently wipe the carved surface with a damp cloth or a cotton swab lightly dampened with rubbing alcohol to remove excess ink. Be sure to get into the carved crevices to prevent ink from drying and hardening. Allow the stamp to air dry completely before storing it. Storing your stamps in a clean, dry place, perhaps in a small box or container, will protect them from dust and damage, preserving their intricate details for future use.
What if I make a mistake while carving?
Mistakes are a natural part of the creative process, especially when learning a new craft like carving. If you carve too deeply in one area, you might be able to incorporate it into the design as a shadow or texture. For minor slips or unwanted lines, you can sometimes carefully carve them away or try to carve around them to create a new element. If the mistake is significant, don't be discouraged; you can often turn it into a unique feature of the stamp, or simply use the eraser to carve a completely new design. Embrace the imperfections as part of the handmade charm!
Can I use different types of ink with my eraser stamps?
Yes, you can use various types of ink with your eraser stamps, but some work better than others. Water-based inks, often found in standard ink pads, are generally safe and easy to use. Pigment-based inks tend to provide bolder, more opaque impressions and are excellent for darker colors. For stamping on fabric or other non-paper surfaces, you might need specialized fabric inks or permanent inks. Avoid oil-based inks unless specifically recommended for rubber stamps, as they can sometimes degrade the rubber over time. Always test your ink on a scrap piece of paper first to see how it interacts with your carved design.
What Next?
Congratulations on creating your own custom eraser stamps! The possibilities are endless, from creating repeating patterns for wrapping paper to designing personalized stationery. Consider experimenting with different ink colors and types, or even layering your stamps for more complex designs. For a more advanced project, try carving multiple stamps to build up intricate scenes or alphabets. Store your finished stamps carefully in a small box or tin to protect them from dust and damage, ensuring they remain ready for your next creative endeavor. Happy stamping!
Free: 10 Paper Crafts Anyone Can Make in 5 Minutes
Get our beginner guide + new craft ideas weekly.
No spam. Unsubscribe anytime.
Did you complete this activity?
Related