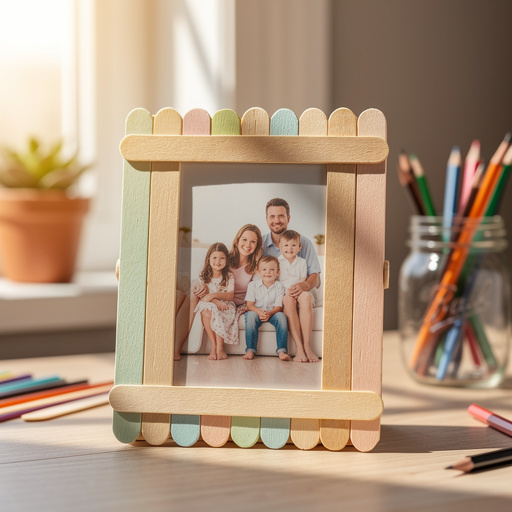
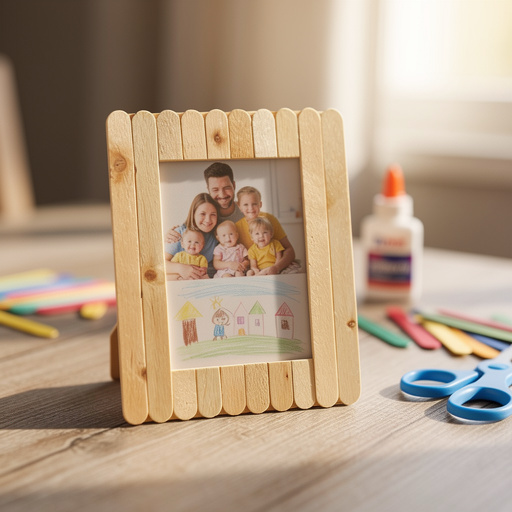
How to Make Popsicle Stick Photo Frames — Easy Step-by-Step Guide
Transform ordinary popsicle sticks into beautiful, personalized photo frames. A simple and rewarding craft for all ages!
Quick answer
To make popsicle stick photo frames, you need popsicle sticks, glue, and decorations, taking about 30 minutes. Start by gluing sticks together to form a frame. This beginner-friendly activity has 10 steps and is perfect for families and kids aged 6+.
What you need
Shop on Amazon · As an Amazon Associate we earn from qualifying purchases. Links above are affiliate links — we may earn a commission at no extra cost to you.
Unleash your creativity and preserve your cherished memories with a delightful DIY project: popsicle stick photo frames! This incredibly simple yet rewarding craft is perfect for crafters of all ages, from young children to seasoned DIY enthusiasts. It’s a fantastic way to upcycle everyday materials into something truly special, offering a personalized touch to your home decor or a heartfelt handmade gift. Get ready to transform humble popsicle sticks into charming frames that beautifully showcase your favorite photos, making every glance a happy reminder of precious moments.
On this page
Step-by-Step Instructions
- 1
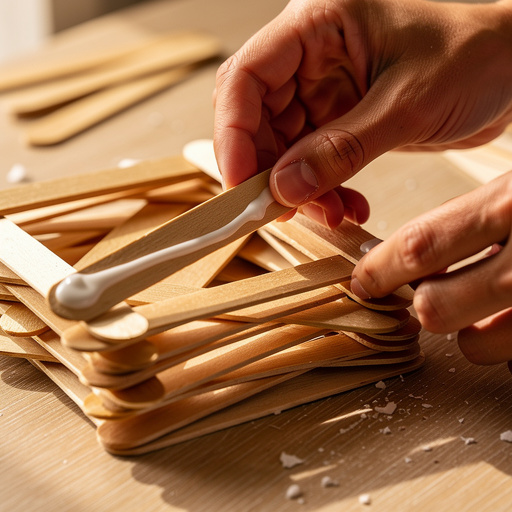
Gather your materials: Ensure you have all your popsicle sticks, chosen glue, paints, brushes, and a delightful assortment of decorative items laid out. It's also a good idea to protect your work surface with wax paper or newspaper, as glue and paint can get messy. Decide on the size and orientation of your photo frame based on the dimensions of the photo or card you intend to display.
- 2
Create the base layer: Lay two popsicle sticks parallel to each other on your protected surface. Space them apart just enough to accommodate the width of your photo, ensuring they will form the top and bottom edges of your frame. These will be the foundation for your entire structure.
- 3
Apply adhesive to the base: Carefully apply a generous line of white craft glue or wood glue along the entire length of each of these two parallel sticks. Ensure the glue reaches close to the edges, as this is where the next set of sticks will adhere.
- 4
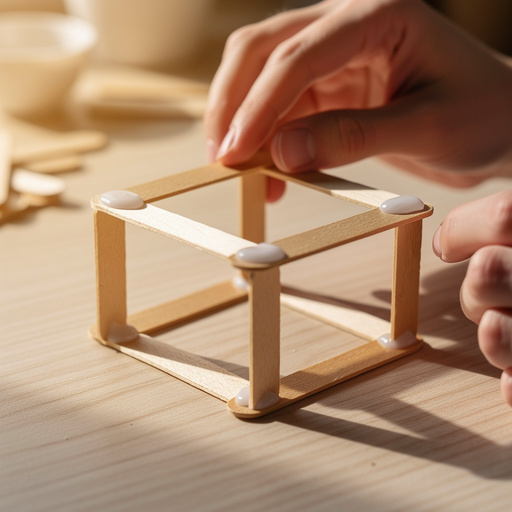
Form the initial frame: Place two more popsicle sticks perpendicularly across the ends of the first two parallel sticks, creating a basic square or rectangular shape. Press these sticks down firmly onto the glued lines, ensuring a strong bond. This forms the initial outline of your photo frame.
- 5
Reinforce the corners: For added strength and a cleaner look, apply a small dab of glue to the very ends of the perpendicular sticks before pressing them onto the parallel sticks. This helps to create a more robust corner joint that is less likely to pull apart.
- 6
Build up the frame's thickness: Continue layering popsicle sticks, alternating their direction with each new layer. For example, if your first layer was horizontal sticks with vertical sticks on top, your next layer could be horizontal sticks placed on top of the vertical ones. Aim for at least 3-4 layers of sticks to build up a sturdy and substantial frame that can hold your photo securely.
- 7
Secure overlapping edges: As you build up the layers, ensure that the ends of the sticks overlap slightly at the corners. This overlapping not only adds strength but also creates a more finished and decorative appearance. You can trim any excessively long ends if they detract from the overall look.
- 8
Begin constructing the outer edge: Once you have achieved your desired thickness for the frame's base, you can start building the outer decorative edge. Glue additional popsicle sticks around the perimeter of your layered base, allowing them to overlap slightly. This creates a more defined and visually appealing border.
- 9
Experiment with decorative layering: For a truly unique and intricate design, consider gluing sticks vertically, horizontally, or even at an angle on top of the base layers. You can create patterns, weave sticks together, or build up textured elements to add depth and visual interest to your frame.
- 10
Allow for thorough drying: Let the entire glued structure dry completely. This is a crucial step for ensuring the frame's durability. Depending on the type of glue used and the humidity, this can take anywhere from 15-20 minutes for quick-drying craft glue to an hour or more for wood glue. You can use clothespins or small clamps to hold the sticks firmly in place while the glue sets.
- 11
Prepare for painting (optional): Once the glue is completely dry and the frame is solid, you can begin the painting process if you choose to add color. Ensure your workspace is protected and have your acrylic paints and brushes ready. Consider applying a base coat of white or a light color if you plan to use vibrant hues, as this can make the colors pop.
- 12
Apply paint for vibrant color (optional): If you're painting, apply your chosen acrylic colors to the popsicle stick frame. You can paint each stick a different color, create a gradient effect, or paint the entire frame a solid hue. Use various brush sizes for detailed work and broader coverage. Allow each coat of paint to dry thoroughly before applying another, especially if you're layering colors.
- 13
Add a protective sealant (optional): For added durability and to protect your paint job and decorations, consider applying a clear sealant or Mod Podge once the paint is completely dry. This will give your frame a finished look and help prevent chipping or fading over time. Apply it evenly with a brush and let it dry completely.
- 14
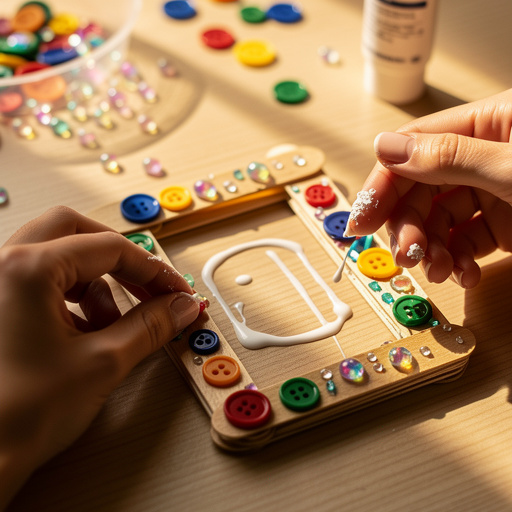
Decorate your frame with embellishments: Now for the fun part – decorating! Unleash your creativity and adorn your frame with glitter, buttons, beads, small shells, yarn, stickers, googly eyes, sequins, or any other embellishments you like. Use glue to securely attach each item, ensuring they are firmly in place.
- 15
Secure smaller decorations: For tiny items like beads or sequins, a fine-tipped glue bottle or a toothpick can be helpful for precise application. Press down gently on each decoration to ensure it adheres well to the glue.
- 16
Allow decorations to dry: Once all your decorations are in place, allow them to dry completely. This is especially important for glitter and any glued-on items, as they can shift or smudge if handled too soon.
- 17
Prepare for photo insertion: Once all glue and paint are thoroughly dry, your frame is almost ready for its photo. Carefully inspect the back of the frame to ensure there are no sharp edges or excess glue that could damage your picture.
- 18
Insert your photo or card: Carefully slide your chosen photo or card into the back of the frame. If the fit is a bit loose, you can add a small piece of cardboard or another popsicle stick glued to the back of the frame to create a snugger fit and prevent the photo from falling out.
- 19
Add a hanging mechanism (optional): If you plan to hang your frame, now is the time to add a hanging mechanism. Glue a small loop of sturdy yarn, ribbon, or a pre-made picture hanger to the back of the frame. Ensure it's securely attached to support the weight of the frame and photo.
Tips & Troubleshooting
- 1For a cleaner look and a stronger bond, consider using wood glue which dries clear and is exceptionally durable. White craft glue is also effective and often easier for younger children to handle, but it can sometimes be more visible when dry, so use it sparingly on visible edges.
- 2Don't be afraid to experiment with different arrangements of popsicle sticks for truly unique frame designs. You can try weaving them in and out, creating intricate geometric patterns, or even building up a textured, layered effect for a more rustic charm.
- 3If you intend to hang your finished frame, it's best to glue a small loop of yarn, ribbon, or a specialized picture hanger to the back of the frame before you begin adding your decorative elements. This ensures it's securely attached and integrated into the design.
- 4Ensure all glue and paint is completely dry before adding subsequent layers of decorations or handling the frame extensively. This prevents smudging, lifting of paint, and ensures a strong, lasting bond for all your embellishments.
- 5Consider using a ruler and pencil to mark your desired dimensions before you start gluing. This will help you create a more uniform and precisely sized frame, especially if you're aiming for a specific fit for your photo.
- 6For a more professional finish, you can lightly sand the edges of your popsicle sticks before you begin assembling the frame. This will remove any splinters and create a smoother surface for painting and gluing.
- 7When painting, consider using a primer first, especially if you're using darker colors or if your popsicle sticks have a lot of natural variation. A primer can help create a more even base for your paint and make your colors appear more vibrant.
- 8If you're using a lot of small, loose decorations like glitter or beads, it can be helpful to work in sections. Apply glue to a small area, add your decorations, and then move on to the next section. This prevents the glue from drying out before you can attach your embellishments.
Related Activities You Might Enjoy
Frequently Asked Questions
What kind of glue is best for popsicle stick crafts?
White craft glue or wood glue are excellent choices for popsicle stick crafts, each offering distinct advantages. Wood glue generally provides a stronger, more durable bond and dries clear, making it ideal for projects where a seamless finish is desired. It's particularly good for structural integrity. White craft glue, on the other hand, is readily available, inexpensive, and easy for children to use, making it a popular choice for younger crafters. It dries relatively quickly and is sufficient for most decorative applications. For projects that will be handled frequently or require maximum strength, wood glue is the superior option.
How long does it take to make a popsicle stick photo frame?
Making a basic popsicle stick photo frame typically involves about 30 minutes of active crafting time, which includes gathering materials, assembling the frame, and applying decorations. However, it's crucial to factor in drying time for both the glue and any paint or sealant you use. Glue can take anywhere from 15 minutes to an hour or more to dry completely, depending on the type and thickness. If you're painting, allow at least 20-30 minutes for each coat to dry thoroughly. Therefore, a finished, fully dried frame can realistically take anywhere from 1 to 2 hours from start to finish, not including drying time overnight for maximum security.
Can I make different sizes of photo frames with popsicle sticks?
Absolutely! The beauty of making popsicle stick photo frames lies in their versatility and adaptability. You can easily adjust the size of your frame by simply changing the number of popsicle sticks you use and how you arrange them. For a larger frame, you'll need more sticks for the base layers and potentially longer sticks for the outer edges. For a smaller frame, use fewer sticks. The key is to ensure your arrangement is stable and provides adequate support for your photo. Experiment with different overlapping techniques and layering to achieve the desired dimensions and structural integrity for any photo size.
What are some other decorations I can use for popsicle stick crafts?
Beyond paint and glitter, the possibilities for decorating popsicle stick crafts are virtually endless! Consider using colorful yarn to wrap around the frame for a cozy texture, or glue on small buttons and beads in patterns for a playful, tactile design. Googly eyes can add a whimsical touch, while sequins can bring a festive sparkle. For a more natural aesthetic, small shells, dried flowers, or even small pebbles can be incorporated. Fabric scraps can be cut into shapes and glued on, and stickers offer a quick and easy way to add imagery. The key is to choose decorations that complement your photo and personal style.
How do I ensure my photo frame is sturdy enough?
To ensure your popsicle stick photo frame is sturdy, focus on the layering and gluing process. Aim for at least 3-4 layers of popsicle sticks for the base of your frame, alternating the direction of the sticks with each layer to create a strong, interlocking structure. Use a good quality wood glue or a strong white craft glue, and ensure you apply it generously to all contact points. Press the sticks firmly together while the glue is wet. For extra reinforcement, you can use clothespins or small clamps to hold the sticks tightly in place as the glue dries. Overlapping the sticks at the corners also significantly enhances the frame's stability and prevents it from becoming wobbly.
Can I make a standing photo frame instead of one for hanging?
Yes, you can absolutely create a standing popsicle stick photo frame! To do this, you'll need to add a support structure to the back. After you've assembled and decorated your frame, you can create a simple easel by gluing two additional popsicle sticks to the back. One stick can be glued horizontally near the top of the frame, and then another stick can be attached to the bottom of that horizontal stick, angled downwards and outwards to create a stable leg. Alternatively, you can create a triangular support by gluing two sticks together at an angle and then attaching that to the back of the frame. Ensure the support is securely glued and dried before attempting to stand the frame.
What Next?
Once your masterpiece is complete, your popsicle stick photo frame is ready to be displayed! You can prop it up on a shelf or desk using a small easel, or if you added a hanging loop, adorn your walls with your custom creations. For storage, ensure the frames are kept in a dry place to maintain the integrity of the glue and decorations. Consider making a series of frames to create a gallery wall or explore variations like adding a backing for more stability or incorporating a small stand made from additional popsicle sticks for a freestanding display.
Free: 10 Paper Crafts Anyone Can Make in 5 Minutes
Get our beginner guide + new craft ideas weekly.
No spam. Unsubscribe anytime.
Did you complete this activity?
Related
You might also like
Popsicle Stick Picture Frames
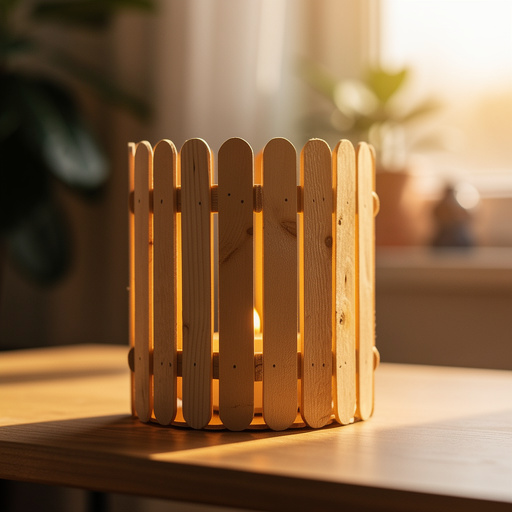
Popsicle Stick Lanterns
Napkin Art Glassware Makeover
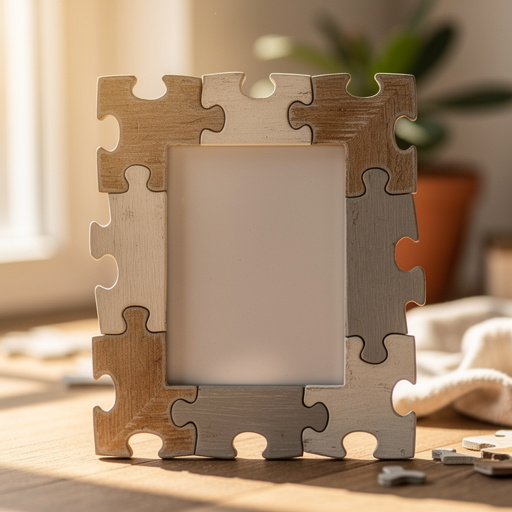
Puzzle Piece Picture Frames
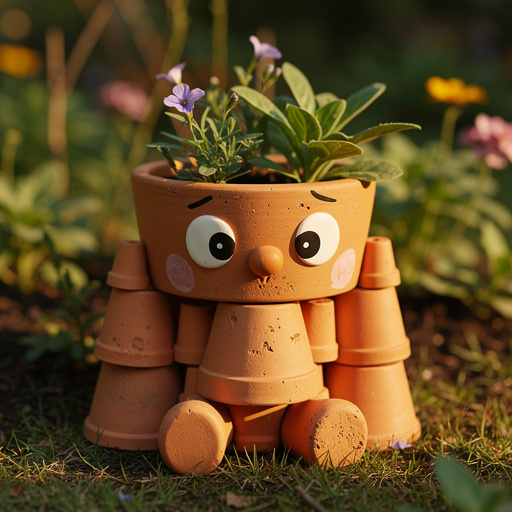
Terracotta Pot Planter Pals