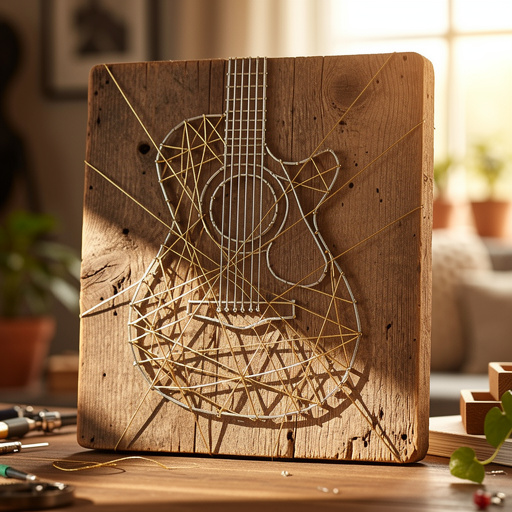
How to Create Recycled Guitar String Art — Easy Step-by-Step Guide
Transform old guitar strings into stunning wall art! This screen-free craft is a fun way to upcycle and decorate your space with musical flair.
Quick answer
To make recycled guitar string art, you need old guitar strings, a wooden plaque, strong glue, and about 60 minutes. Start by arranging your strings on the plaque. This beginner-friendly activity has 10 steps and is perfect for families with kids aged 8+.
What you need
Shop on Amazon · As an Amazon Associate we earn from qualifying purchases. Links above are affiliate links — we may earn a commission at no extra cost to you.
Are you a musician with a stash of old guitar strings gathering dust, or simply looking for a unique and eco-friendly way to add personality to your home decor? This recycled guitar string art project is the perfect solution! It's a wonderfully tactile and screen-free craft that allows you to transform discarded materials into beautiful, personalized wall art. Whether you're a seasoned crafter or a complete beginner, this project is accessible and rewarding, offering a fantastic opportunity to express your creativity while celebrating your love for music. Get ready to make some noise with your art!
On this page
Step-by-Step Instructions
- 1
Gather your old guitar strings. Carefully remove them from their packaging and gently wipe them down with a dry cloth to remove any dust or fingerprints. If they are particularly grimy, a slightly damp cloth followed by thorough drying will suffice. Ensure they are completely dry before proceeding to prevent any interference with the glue.
- 2
Select your base. A wooden plaque offers a sturdy and classic feel, while sturdy cardboard can be a more budget-friendly and lightweight option. Ensure the surface is clean, dry, and free from any debris that might prevent the glue from adhering properly. If using a very smooth wooden plaque, consider a light sanding with fine-grit sandpaper to create a slightly textured surface for better glue adhesion.
- 3
Decide on a design for your guitar wall decor. You can draw a simple shape like a guitar silhouette, musical notes, a treble clef, or an abstract pattern directly onto your chosen base with a pencil. For a more structured design, use a ruler to draw straight lines or geometric shapes. Don't be afraid to sketch out a few ideas before committing to one.
- 4
Begin arranging the guitar strings on your design area without any glue. This is your chance to experiment with different string thicknesses and colors to create visual interest and texture. Lay them out, overlap them, and see how they look together, paying attention to how the different gauges create varying widths and visual weight within your design.
- 5
Once you are happy with the overall arrangement and flow of your strings, it's time to start gluing. Begin by carefully lifting one small section of strings at a time, ensuring you remember their placement.
- 6
Apply a thin, even layer of strong craft glue to the back of the lifted section of strings or directly onto the designated area of your plaque. Avoid applying too much glue, as it can squeeze out and create an unsightly mess. If using a hot glue gun, work in very small sections as the glue dries quickly.
- 7
Gently press the glued strings firmly onto the plaque, carefully aligning them with your pencil design or the previously arranged pattern. Ensure good contact between the strings and the surface, smoothing them down to secure them in place. Use tweezers if you need to reposition a string precisely.
- 8
Continue this process, working in small, manageable sections, lifting, gluing, and pressing. This methodical approach ensures that the glue has time to set slightly before you add more weight, preventing the strings from shifting. Take your time and enjoy the meditative process of building your design.
- 9
Allow the glue to dry completely according to the glue manufacturer's instructions. This is a crucial step for the durability of your artwork. Rushing this process can lead to strings detaching later. For E6000, this might take several hours, while hot glue will set much faster.
- 10
Once the glue is thoroughly dry and your string art is firmly attached, inspect the edges of your design. Trim any excess string ends that might be sticking out or detracting from the overall aesthetic with sharp scissors. Be careful not to cut into the main design.
- 11
Optional: If you wish to add color to your guitar string art, carefully paint over the strings with acrylic paints. Use a fine-tipped brush to get into the crevices and ensure even coverage. You can paint each string a different color, create a gradient effect, or paint the entire design in a single hue. Let the paint dry completely between coats and before proceeding to the next step.
- 12
Optional: For added durability, a protective finish, and a more professional look, spray the entire piece with a clear sealant spray. Do this in a well-ventilated area, such as outdoors or near an open window, and follow the product's instructions for application. Allow the sealant to dry completely, which may take a few hours.
- 13
Consider adding a backing or hanging mechanism. If your plaque doesn't have one, attach a sawtooth hanger or eye hooks to the back for easy wall mounting. Ensure it's securely fastened to support the weight of your artwork.
- 14
If you're using a very thin base like cardboard, you might want to reinforce it by gluing a second layer of cardboard to the back once the string art is complete. This will prevent warping and provide a more substantial feel to your finished piece.
Tips & Troubleshooting
- 1If using a hot glue gun, ensure an adult is supervising closely to prevent burns. Work in small, manageable sections, applying glue quickly and pressing the strings into place before the glue cools and hardens.
- 2Experiment with different string tensions when gluing. Tighter strings can create sharper, more defined lines, ideal for geometric patterns or sharp edges. Looser strings offer a more organic, flowing feel, perfect for abstract designs or curves.
- 3Consider layering strings for added dimension and visual depth. You can glue a thicker string over a thinner one to create a raised effect, or overlap strings to build up areas and create a sense of volume within your artwork.
- 4If your plaque is very smooth, you might want to lightly sand it first with fine-grit sandpaper to give the glue better adhesion. This creates a slightly rougher surface that the glue can grip onto more effectively.
- 5For a more rustic and natural look, leave the strings as they are without painting. The natural metallic sheen of the strings can be beautiful on its own, highlighting the texture and form of your design.
- 6Don't be afraid to mix and match string types. Combining acoustic, electric, and even bass guitar strings can introduce a variety of thicknesses, colors (from silver to gold to bronze), and textures, leading to a richer and more complex visual outcome.
- 7When planning your design, think about the natural curves and flexibility of the strings. They can be bent and manipulated to create flowing lines and organic shapes, so let the material inspire your artistic direction.
- 8If you're working with a complex design or very small pieces of string, tweezers can be an invaluable tool for precise placement and manipulation, ensuring every element is exactly where you want it.
Related Activities You Might Enjoy
Frequently Asked Questions
What kind of glue is best for guitar string art?
A strong craft glue like E6000 is ideal for securely adhering guitar strings to wood or cardboard, offering excellent durability and a strong bond. Aleene's Tacky Glue is another excellent option, known for its strong hold and versatility. A hot glue gun can also work for quick assembly, but it requires adult supervision due to the heat and works best when you can press the strings into the molten glue immediately. Ensure the glue you choose is suitable for both metal and your chosen base material (wood or cardboard) for the best results.
Can I use any type of guitar strings?
Yes, you can use any old guitar strings! Acoustic, electric, bass, or even ukulele strings will work wonderfully. Different types will offer varying thicknesses and colors, adding to the unique look of your art. For instance, bass strings are much thicker and can create bold lines, while thinner electric or acoustic strings are great for finer details. Don't hesitate to mix and match them to achieve a diverse and interesting texture and visual appeal in your finished piece.
How do I clean old guitar strings before using them?
Gently wipe down the guitar strings with a dry, lint-free cloth to remove dust and fingerprints. For any tougher residue or grime, you can use a slightly damp cloth with a tiny amount of mild soap. After washing, ensure you dry the strings thoroughly with a clean cloth to prevent any moisture from affecting the glue's adhesion. Avoid harsh chemicals or abrasive cleaners, as these could damage the strings or their finish.
What kind of surface works best for this craft?
A wooden plaque or a piece of sturdy cardboard are excellent choices for your guitar string art. They provide a firm and stable base for the glue and strings, ensuring your artwork holds its shape. Ensure the surface is clean and dry before you begin applying glue. For wooden plaques, a slightly textured surface is ideal for better glue adhesion; if it's very smooth, a light sanding can help. Sturdy cardboard is a great lightweight and accessible option, but ensure it's thick enough to support the weight of the strings without bending.
How long does this project typically take?
The actual crafting time for this project is relatively short, often around 60 minutes, depending on the complexity of your design. However, the drying time for the glue is the most significant factor. If using a strong craft glue like E6000, allow at least 2-4 hours for it to cure sufficiently, and ideally 24 hours for a full, robust bond. Hot glue dries much faster, within minutes. If you opt for painting and sealing, factor in additional drying time for those steps, which can add several more hours to the overall project duration.
Can kids do this project? What age is appropriate?
Yes, this project is fantastic for kids, with an appropriate age recommendation of 8 and up, especially with adult supervision. Younger children can participate in the design and string arrangement stages. For steps involving glue application or cutting, adult assistance is recommended. If using a hot glue gun, adult supervision is absolutely essential to prevent burns. It's a wonderful way to engage children in a creative, hands-on activity that also teaches them about recycling and upcycling.
What Next?
Once your recycled guitar string art is complete and fully dry, it’s ready to be displayed as a unique piece of wall decor. Consider adding a sawtooth hanger to the back of your wooden plaque for easy mounting. For variations, try creating different shapes like abstract swirls, city skylines, or even portraits. You could also incorporate other recycled materials like old sheet music or small instrument parts. If you enjoyed this project, explore other upcycling crafts like bottle cap mosaics or tin can lanterns. Store your finished artwork away from direct sunlight and extreme humidity to preserve its beauty for years to come.
Free: 10 Paper Crafts Anyone Can Make in 5 Minutes
Get our beginner guide + new craft ideas weekly.
No spam. Unsubscribe anytime.
Did you complete this activity?