How to Make Homemade Stamps from Erasers — Easy Step-by-Step Guide
Create your own custom stamps with this simple DIY eraser carving project. Perfect for adding a personal touch to cards, journals, and more.
Quick answer
To make homemade stamps, you need erasers, carving tools, and ink pads, taking about 30 minutes. Start by drawing your design on the eraser. This beginner-friendly activity has 10 steps and is perfect for families with kids aged 8 and up.
What you need
Shop on Amazon · As an Amazon Associate we earn from qualifying purchases. Links above are affiliate links — we may earn a commission at no extra cost to you.
Unleash your inner artist and add a unique, handmade touch to all your paper crafts with this incredibly simple DIY eraser carving stamp project. Forget expensive custom stamps; with just a few common household items, you can transform ordinary erasers into personalized printing tools. This activity is not only budget-friendly but also incredibly rewarding, allowing you to create one-of-a-kind designs for greeting cards, journal embellishments, gift tags, and so much more. It's a fantastic way to express your creativity and a perfect, engaging project for families looking for a fun and educational activity for kids aged 8 and up.
On this page
Step-by-Step Instructions
- 1
Gather your materials: Ensure you have your chosen erasers, a pencil, your carving tool (craft knife or linoleum cutter), ink pads in your desired colors, and some scrap paper for testing. Having a cutting mat underneath your workspace is highly recommended for safety and to protect your table.
- 2
Prepare your eraser surface: Before you begin drawing, take a moment to clean the surface of your eraser. Gently wipe it with a dry cloth or a slightly damp paper towel to remove any dust, smudges, or debris that might interfere with your design or the ink adhesion. Allow it to dry completely if you used a damp cloth.
- 3
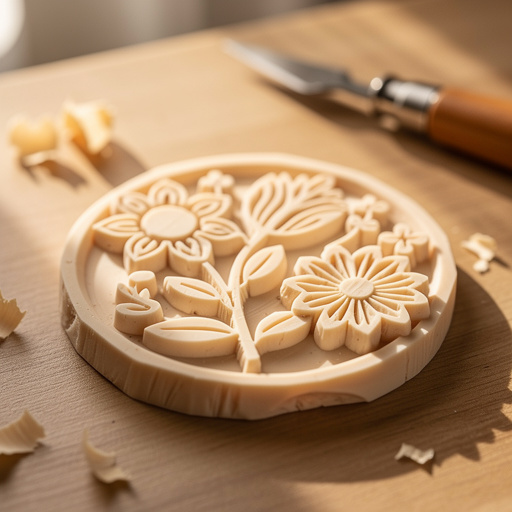
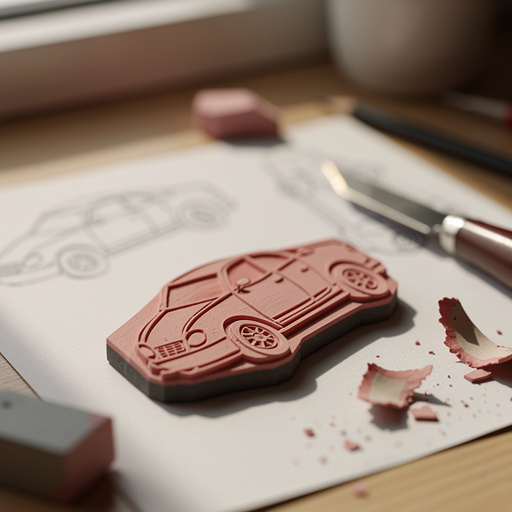
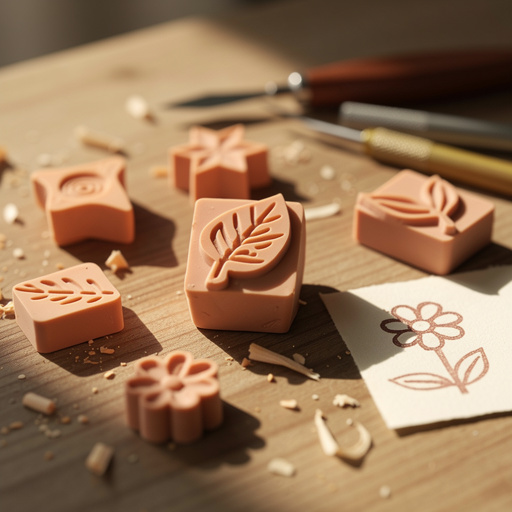
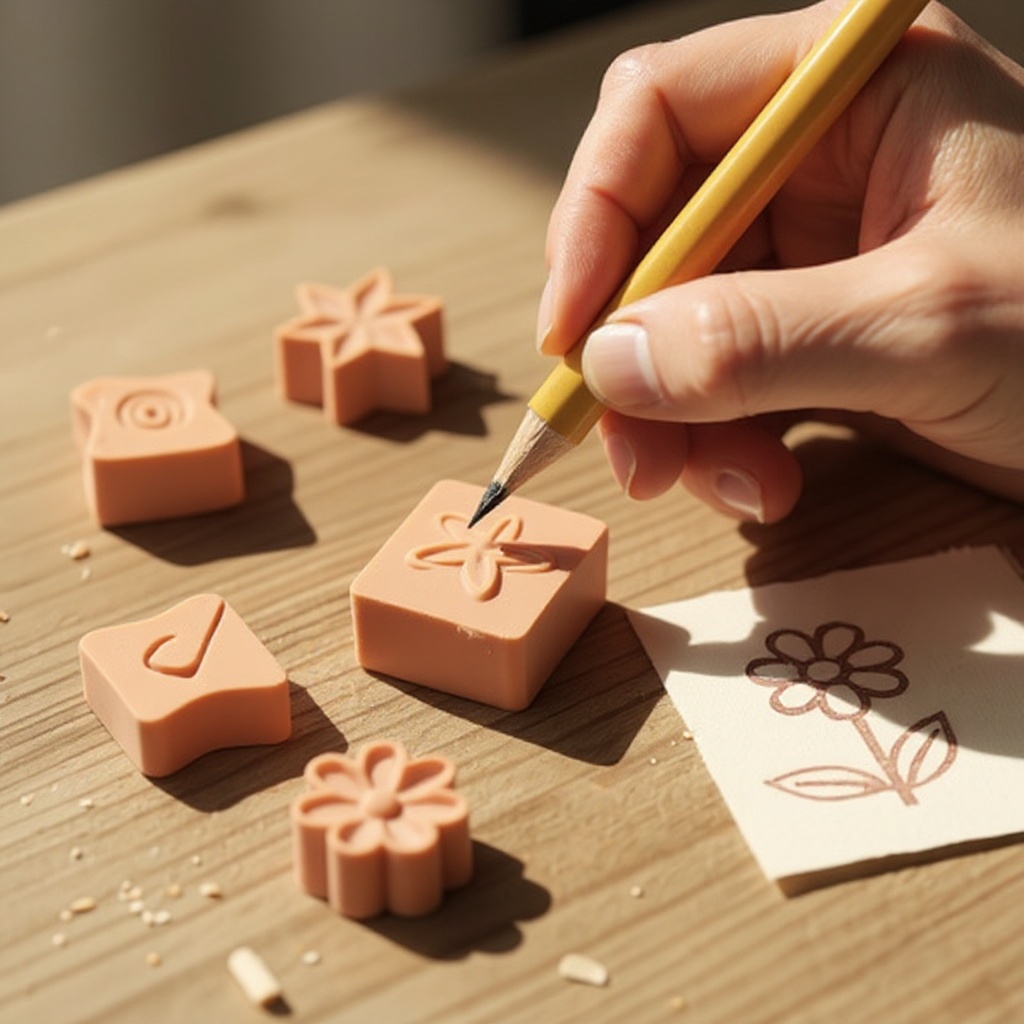
Lightly sketch your desired design onto the eraser with a pencil. For your first few stamps, it's best to keep designs simple and bold, such as basic geometric shapes (circles, squares, triangles), simple outlines of objects (hearts, stars), or single letters. Avoid very fine details or thin lines at this stage, as they can be challenging to carve and may break easily.
- 4
Consider outlining your design with a fine-tip permanent marker if you want a more defined line to follow during carving. This can help prevent accidental slips and ensure your carved lines are crisp. However, ensure the marker ink is completely dry before proceeding to the carving stage.
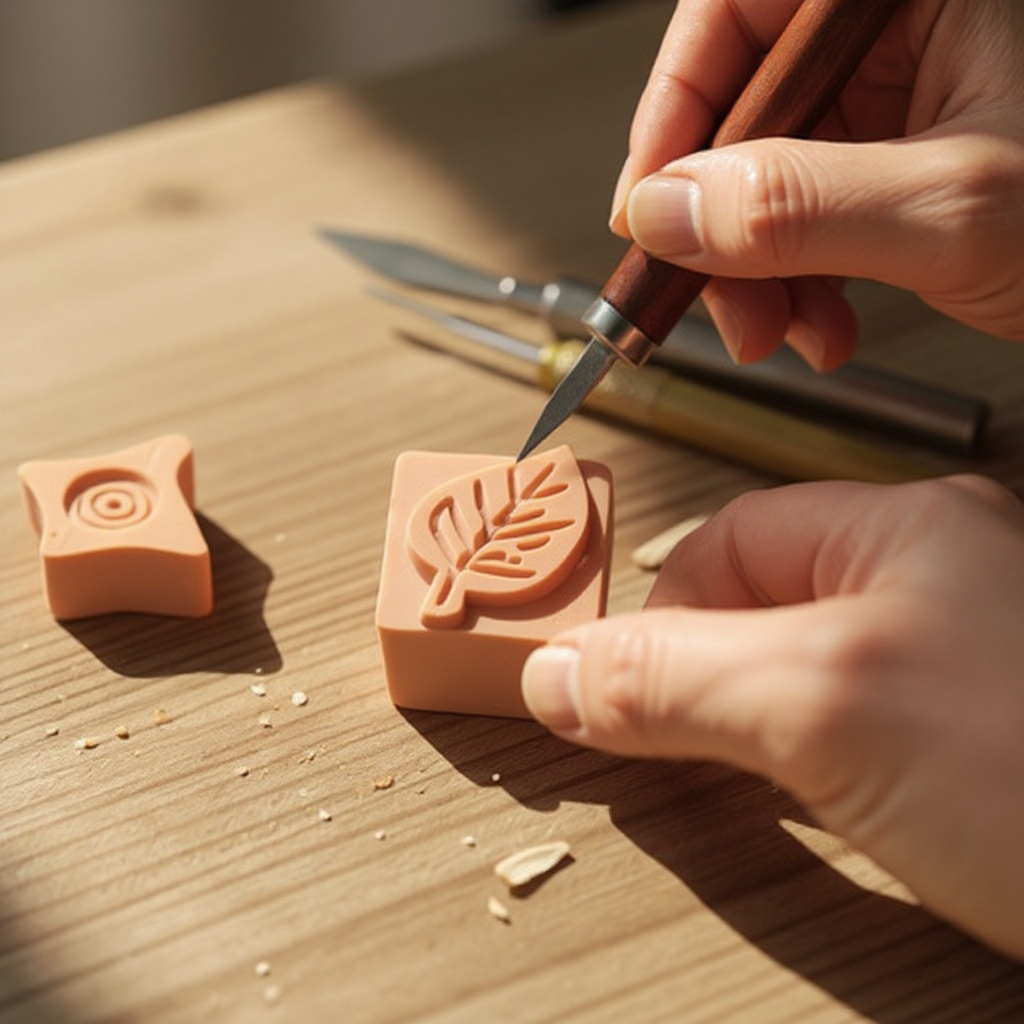
- 5
If using a craft knife, carefully hold the eraser firmly in one hand, ensuring your fingers are well away from the blade's path. Begin to carve away the areas you *don't* want to be printed. Think of it as carving out the negative space, leaving the parts of your design that you want to appear in ink raised from the surface.
- 6
When using a craft knife, it's crucial to always carve away from yourself and your body to prevent accidental cuts. Maintain a steady hand and use controlled, shallow cuts rather than trying to remove large chunks of eraser at once. This approach offers better precision and safety.
- 7
For more intricate designs or if you find a craft knife difficult to control for fine details, a linoleum cutter tool is an excellent alternative. These tools come with various shaped blades (V-shaped, U-shaped) that allow for more precise and varied line work, making them ideal for more complex patterns or lettering.
- 8
When using a linoleum cutter, select the appropriate blade for the type of line you want to create. A V-shaped blade is great for fine lines and details, while a U-shaped blade can remove larger areas more efficiently. Again, always carve away from yourself, maintaining a firm grip on both the eraser and the tool.
- 9
Continue carving, gradually removing the negative space around your design. Take your time and work in layers, checking your progress frequently. You want to ensure that the raised portions of your design are distinct and that the carved-away areas are deep enough so they don't pick up ink.
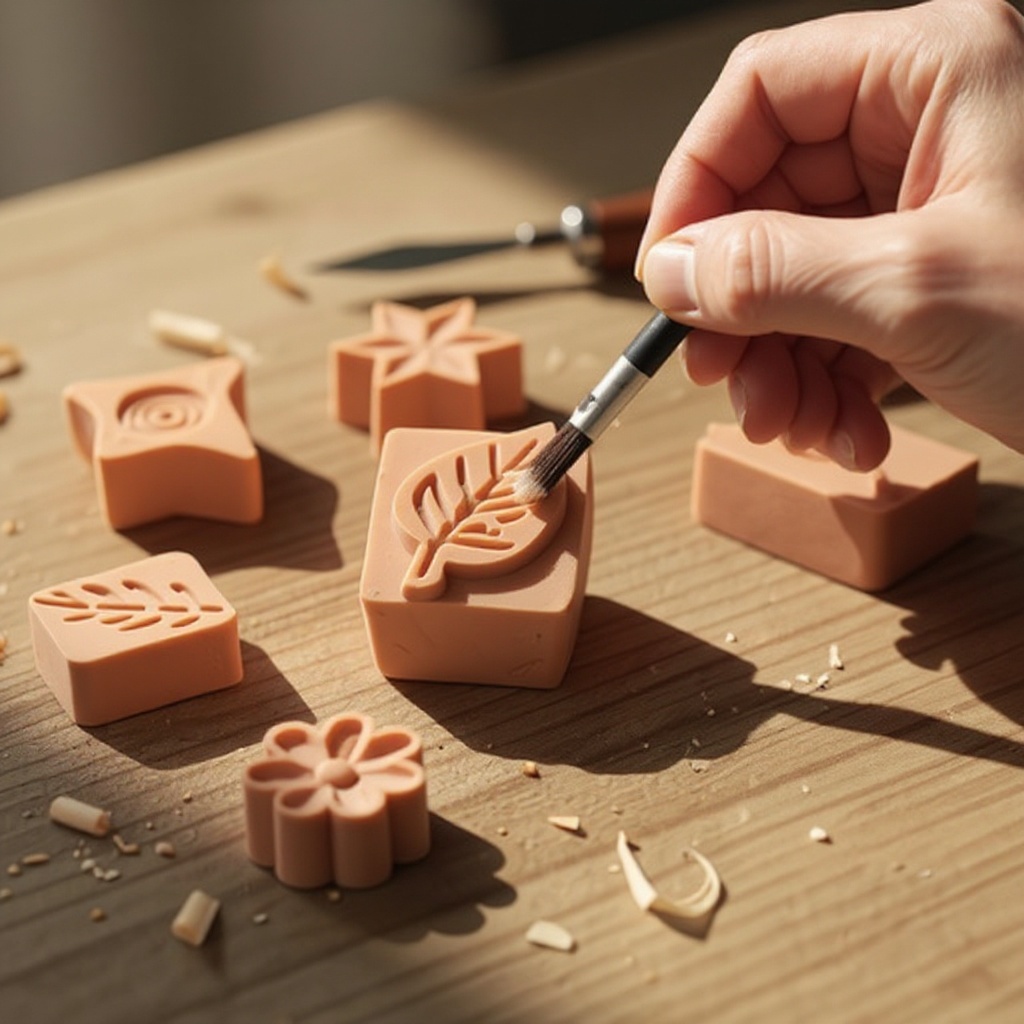
- 10
Once you are satisfied with the depth and definition of your carved design, gently brush away all eraser shavings from the carved stamp. You can use a small, soft brush, a blast of compressed air, or even carefully blow on it to remove any loose particles. This ensures a clean print without smudges.
- 11
Test your stamp by pressing it firmly and evenly onto an ink pad. Ensure the entire raised surface of your design is coated with ink, but avoid over-inking, which can lead to blurry prints. Then, carefully press the inked stamp onto a piece of scrap paper to see how your design transfers.
- 12
Examine your test print. If the ink coverage is uneven, you may need to adjust your carving depth or ensure you're inking the stamp more consistently. If the lines are too thick or blurry, you might need to go back and refine your carving to create sharper edges or remove more material from the negative space.
- 13
Once you're happy with your test print and the clarity of your stamp, it's time to use your new homemade stamp on your chosen project! Apply ink evenly to your stamp and press it firmly onto paper, cards, fabric (with appropriate fabric ink), or other craft surfaces.
- 14
If you notice any small imperfections or areas where the ink is bleeding slightly, you can sometimes carefully go back with your carving tool and deepen those areas. Alternatively, for very minor mistakes, a tiny dab of craft glue applied precisely to the affected area and allowed to dry can sometimes fill small gaps, though this should be done sparingly.
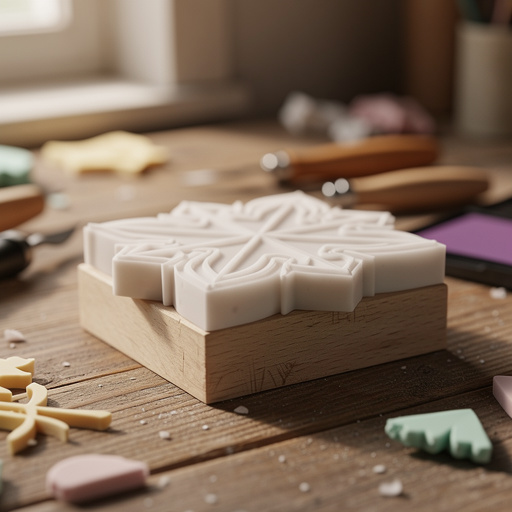
- 15
For a more professional finish, consider mounting your carved eraser onto a small block of wood or a sturdy piece of cardboard. This provides a handle for easier stamping and can help distribute pressure more evenly, leading to clearer prints. You can adhere the eraser to the block using strong craft glue.
- 16
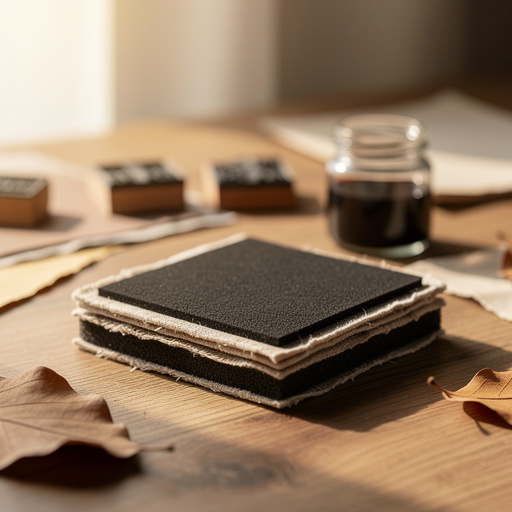
Experiment with different ink pad types. Pigment inks offer richer, more opaque colors and are great for bold designs, while dye-based inks are more translucent and good for layering. Metallic inks can add a festive shimmer, and embossing powders, when used with specific inks, can create a beautiful raised effect on your stamped images.
Tips & Troubleshooting
- 1Start with simple shapes like circles, squares, or basic letters. As you get more comfortable, you can try more complex designs. This gradual approach allows you to master the carving techniques before tackling intricate patterns, ensuring a positive and successful crafting experience.
- 2If you make a mistake while carving, don't despair! You can often fill small errors with a dab of craft glue and let it dry completely, or simply carve around the mistake to create a new detail or line. Sometimes, a 'mistake' can even lead to an interesting new design element.
- 3Store your carved stamps in a small, airtight container or a resealable bag to keep them clean and prevent the eraser from drying out or becoming brittle over time. This also protects them from dust and accidental damage, ensuring they remain in good condition for future use.
- 4Experiment with different types of ink pads, such as pigment inks for richer colors or embossing powders for a raised effect. Pigment inks provide vibrant, opaque results, while embossing powders, when paired with specific inks, create a luxurious, textured finish that adds dimension to your projects.
- 5Consider the type of eraser you use. Art gum erasers are very soft and easy to carve but can be fragile. Pink pearl erasers are a bit firmer, offering more durability and cleaner lines, making them a popular choice for stamp carving. Experiment to see which texture you prefer.
- 6When carving, think about the pressure you apply. Too little pressure will result in shallow cuts that might not prevent ink from adhering, while too much pressure can cause the eraser to crumble or the blade to slip. Find a balance that allows for clean removal of material.
- 7Clean your stamps after each use. Gently wipe them with a damp cloth or a specialized stamp cleaner to remove excess ink. This prevents colors from mixing and ensures your stamps are ready for their next creative outing.
- 8Don't be afraid to layer your stamps! Create interesting patterns and designs by overlapping different stamps or using various ink colors. This technique can add depth and complexity to your artwork, transforming simple stamped images into elaborate compositions.
Related Activities You Might Enjoy
Frequently Asked Questions
What kind of erasers are best for making stamps?
Large, flat erasers like art gum or pink pearl erasers are ideal for carving into stamps. Art gum erasers are very soft and easy to carve, making them excellent for beginners, but they can be a bit fragile and may wear down faster. Pink pearl erasers offer a good balance of softness for carving and firmness for durability, allowing for cleaner lines and a longer-lasting stamp. Avoid erasers that are too hard or have a gritty texture, as these will be difficult to carve and won't produce clear prints. The key is an eraser that is pliable enough to be shaped but firm enough to hold its form under pressure and ink.
What tools can I use to carve homemade stamps?
You have a few excellent options for carving your homemade stamps. A sharp craft knife, such as an X-Acto knife or a precision craft blade, is a common and effective tool. For more intricate designs and better control, a linoleum cutter tool is highly recommended. These tools come with interchangeable blades of various shapes and sizes (like V-shaped and U-shaped), allowing for different line weights and textures. For younger crafters or those who want a simpler approach, a blunt pencil can be used to press designs into softer erasers, creating a debossed effect rather than a carved relief. Always prioritize safety and ensure your carving tool is sharp for cleaner cuts and less effort.
How do I make my homemade stamps last longer?
To ensure your homemade eraser stamps last as long as possible, proper storage and care are essential. Store your carved stamps in a cool, dry place, away from direct sunlight and extreme temperatures, as heat and light can cause the eraser material to dry out and become brittle. Keeping them in a small container, a resealable bag, or a dedicated stamp organizer will protect them from dust, dirt, and accidental damage. After each use, gently clean your stamps by wiping them with a damp cloth or a specialized stamp cleaner to remove any residual ink. This prevents ink from drying in the crevices and ensures your stamps are always ready for their next use.
Can I make detailed designs with homemade stamps?
Yes, with practice and the right tools, you can absolutely create quite detailed designs with homemade eraser stamps. While it's wise to start with simple shapes and gradually work your way up to more intricate patterns, a linoleum cutter tool with fine-tipped blades is particularly effective for achieving detailed work. The key is to use shallow, precise cuts and to ensure that the negative space around your design is carved deeply enough so that it doesn't pick up ink. Patience and a steady hand are crucial for detailed carving. As you become more experienced, you'll discover how to manipulate the carving tools to create fine lines, textures, and even subtle shading effects.
What is the best way to ink my homemade stamp?
The best way to ink your homemade stamp is to use a light, even pressure when dabbing the stamp onto the ink pad. Avoid pressing too hard, as this can cause ink to pool in the carved areas or on the edges, leading to smudged prints. Instead, gently tap the raised surface of your stamp onto the ink pad a few times until the design is fully covered. For larger stamps or more intricate designs, you might find it helpful to use a brayer (a small roller) to apply ink evenly to the stamp surface, or to ink the stamp by dabbing the ink pad onto the stamp itself. Always test your inking technique on scrap paper first to ensure you're achieving the desired coverage without over-inking.
How do I clean my carved eraser stamps?
Cleaning your carved eraser stamps after each use is crucial for maintaining their quality and ensuring clear prints. For most water-based inks, a gentle wipe with a damp cloth or a baby wipe is usually sufficient. If you've used pigment inks or if there's stubborn residue, a specialized stamp cleaner can be very effective. For very deep crevices, you might use a soft brush, like a toothbrush or a makeup brush, to gently dislodge any remaining ink particles. After cleaning, allow the stamp to air dry completely before storing it. Avoid using harsh solvents or abrasive materials, as these can damage the eraser and your carved design.
What Next?
With your custom eraser stamps ready, the possibilities for creative expression are endless! Consider mounting your carved stamps onto wooden blocks for easier handling and a more professional feel, or even create a small stamp collection organized by theme. You can also experiment with different ink types, like metallic inks for a touch of glamour or waterproof inks for projects that need durability. For a truly unique display, frame your favorite stamped creations or bind them into a personalized art journal. This project is just the beginning of your printmaking adventure, opening doors to further exploration with linocuts and other relief printing techniques.
Free: 10 Paper Crafts Anyone Can Make in 5 Minutes
Get our beginner guide + new craft ideas weekly.
No spam. Unsubscribe anytime.
Did you complete this activity?
Related