How to Create Family Memory Jar Keepsakes — Easy Step-by-Step Guide
Capture your family's precious moments with these charming memory jars. A simple and engaging craft for all ages to create together.
Quick answer
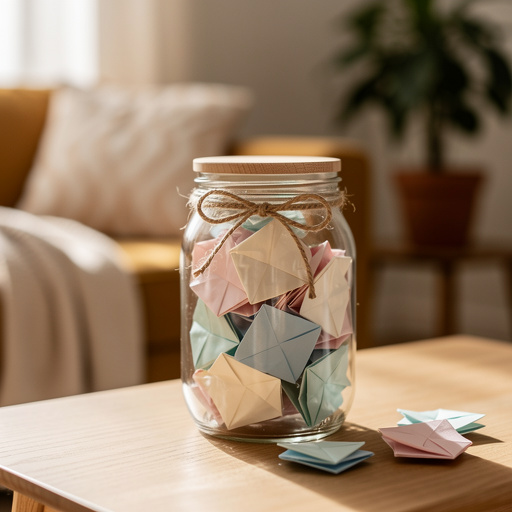
To make family memory jars, you need 3-5 clean glass jars with lids, decorative scrapbook paper, sharp scissors, white craft glue or Mod Podge, a paintbrush, fine-tip permanent markers, and optional embellishments like ribbon. The process involves decorating the jars and filling them with handwritten memories, taking approximately 60-90 minutes. This beginner-friendly activity has 10 core steps and is perfect for families looking for screen-free bonding and creating cherished keepsakes.
What you need
Shop on Amazon · As an Amazon Associate we earn from qualifying purchases. Links above are affiliate links — we may earn a commission at no extra cost to you.
In today's fast-paced digital world, tangible keepsakes that connect us to our loved ones and cherished moments are more valuable than ever. The Family Memory Jar project offers a beautiful and accessible way to bottle up those precious memories, turning everyday moments into lasting treasures. This craft is not just about decorating jars; it's about the shared experience of reminiscing, laughing, and documenting the stories that weave your family's unique tapestry. It's an ideal activity for a rainy afternoon, a family gathering, or simply a way to spend quality time together, fostering connection and creating something truly meaningful that will be treasured for years to come.
On this page
Step-by-Step Instructions
- 1
Begin by thoroughly washing and drying all your chosen glass jars and their lids. Ensure there is no residue from previous contents, as this can affect the adhesion of the paper and glue. A clean surface is crucial for a professional-looking finish.
- 2
Next, prepare your decorative scrapbook paper by cutting it into strips or shapes that will fit around your jars. You can cut long strips to wrap around the entire circumference, or smaller pieces to create a mosaic effect. Measure the height and width of the section you plan to cover on each jar to ensure a good fit.
- 3
Apply a thin, even layer of white craft glue or Mod Podge to a section of the jar that you intend to cover with paper. Avoid applying too much glue at once, as it can become messy and cause the paper to wrinkle or tear. Work in manageable sections so the glue doesn't dry before you can apply the paper.
- 4
Carefully press a piece of scrapbook paper onto the glued section of the jar, smoothing out any wrinkles or air bubbles as you go. Gently press from the center outwards to ensure good contact and a smooth finish. If you encounter stubborn wrinkles, you can try lifting the edge slightly and re-adhering.
- 5
Continue covering the jar with paper, overlapping the edges of the paper slightly for a seamless and cohesive look. This overlapping technique helps to prevent gaps and creates a more durable surface. If you're using smaller pieces, plan your layout to create an appealing pattern or design.
- 6
Once the entire jar is covered with paper, apply another thin, even layer of craft glue or Mod Podge over the entire papered surface. This top coat acts as a sealant, protecting the paper from moisture and wear, and giving the jar a finished, polished appearance. Ensure you cover all edges and overlaps.
- 7
Allow the glued paper to dry completely. This drying process is essential before moving on to the next steps, and may take approximately 20-30 minutes, depending on the humidity and the thickness of the glue. You can speed up drying slightly by placing the jars in a well-ventilated area or near a gentle fan.
- 8
While the jars are drying, it's time to prepare the heart of your memory jars: the memories themselves. Use your fine-tip permanent markers to write down cherished family memories, inside jokes, significant dates, or special qualities you admire about each other on small slips of paper or cardstock. Be specific and evocative to make each memory truly special.
- 9
Once the jars are completely dry to the touch and the Mod Podge has set, carefully begin filling them with the written memory slips. You can fold them neatly or roll them up to fit easily into the jars. Fill the jars as much or as little as you like, creating a beautiful cascade of memories.
- 10
Secure the lids tightly onto the jars to keep the memories safe and dust-free. If desired, you can further embellish the jars by tying ribbon, twine, or yarn around the neck of the jar. This adds a decorative touch and can be used to secure additional small charms or tags.
- 11
For an extra touch of personalization, consider painting the lids of your jars to complement the colors or patterns of the scrapbook paper. Ensure the paint is dry before placing them on the jars.
- 12
If you're using very thin or delicate paper, you might find that a second coat of Mod Podge over the initial sealant provides extra durability and protection. Allow each coat to dry thoroughly before applying the next.
- 13
Experiment with different paper textures and patterns to create unique and visually interesting jars. You can even incorporate fabric scraps, old maps, or pages from old books for a truly personalized and vintage feel.
- 14
To ensure a cleaner finish and minimize visible brush strokes, use a foam brush to apply the Mod Podge. Foam brushes distribute the glue more evenly and create a smoother surface compared to bristle brushes.
- 15
If you're looking for a more rustic or vintage aesthetic, consider using twine or burlap ribbon around the neck of the jar. You can also add small tags with dates or names to each jar.
- 16
For a more secure paper application, especially on curved surfaces, you can use a thin layer of double-sided tape or clear packing tape along the edges of the paper before applying glue. This helps to hold the paper in place while the glue dries.
- 17
If your jars have any rough edges or imperfections, a light sanding with fine-grit sandpaper can help to smooth them out before you begin decorating, ensuring a safer and more polished final product.
- 18
Consider creating a 'memory prompt' jar. Instead of filling it with memories immediately, write down prompts on slips of paper (e.g., 'A time we laughed until we cried,' 'My favorite family tradition') and have family members add memories as they occur throughout the year.
Tips & Troubleshooting
- 1For a cleaner finish and to minimize visible brush strokes, use a foam brush to apply the Mod Podge. Foam brushes distribute the glue more evenly and create a smoother surface compared to bristle brushes, resulting in a more professional-looking outcome.
- 2Experiment with different paper textures and patterns to create unique and visually interesting jars. You can also use fabric scraps, old maps, or pages from old books for a truly personalized and vintage feel, adding depth and character to your memory jars.
- 3Consider painting the lids of the jars to match the paper for an extra touch of polish and cohesion. This simple step can elevate the overall aesthetic of your memory jars, making them look more intentionally designed.
- 4If using very thin or delicate paper, you might find that a second coat of Mod Podge over the initial sealant provides extra durability and protection. Allow each coat to dry thoroughly before applying the next to ensure a robust finish.
- 5To ensure a secure paper application, especially on curved surfaces, you can use a thin layer of double-sided tape or clear packing tape along the edges of the paper before applying glue. This helps to hold the paper in place while the glue dries, preventing shifting and ensuring a snug fit.
- 6If your jars have any rough edges or imperfections, a light sanding with fine-grit sandpaper can help to smooth them out before you begin decorating. This ensures a safer and more polished final product, especially if children will be handling the jars.
- 7Don't be afraid to mix and match different types of paper and embellishments. Combining patterns, textures, and even adding small trinkets can create a rich and visually engaging memory jar that tells a unique story.
- 8For a more rustic or vintage aesthetic, consider using twine or burlap ribbon around the neck of the jar. You can also add small tags with dates or names to each jar, providing an extra layer of detail and organization.
Related Activities You Might Enjoy
Frequently Asked Questions
What are the best materials for family craft ideas for adults?
For family craft ideas for adults like memory jars, opt for readily available and versatile materials such as clean glass jars (mason jars, jam jars, or pickle jars work well), decorative scrapbook paper in a variety of patterns and colors, sharp scissors, white craft glue or Mod Podge, a paintbrush or foam brush for application, and fine-tip permanent markers or pens for writing. These materials are safe, easy to find at most craft or dollar stores, and allow for significant creative customization, making them perfect for a collaborative family project where everyone can contribute their unique touch.
How can adults and kids make memory jars together?
Adults can assist younger children with the more intricate tasks, such as cutting paper into specific shapes or applying glue to the jars, ensuring safety and a neat finish. Older kids and adults can focus on writing down cherished memories, jokes, and significant dates on the slips of paper, as well as designing the paper patterns and applying the final sealant coats. It's a wonderfully collaborative project where everyone contributes their skills and creativity, fostering teamwork and shared accomplishment. The process encourages conversation and reminiscing as memories are recalled and documented.
What kind of memories should we write for the memory jars?
Write down anything that brings joy, laughter, or a sense of connection to your family! This could include funny moments, personal achievements, favorite family traditions, memorable holiday celebrations, inside jokes that only your family understands, or even simple things you appreciate about each other. Think about milestones, everyday joys, acts of kindness, or times you felt particularly close. The more personal and specific the memories, the more meaningful the jar will become over time. Don't censor yourselves; even seemingly small moments can hold significant emotional weight.
Can I use other containers besides glass jars?
Yes, you can absolutely adapt this craft to other containers besides glass jars, provided they have a suitable surface for gluing and decorating. Sturdy tin cans (ensure all edges are smooth and safe), clean cardboard boxes, or even wooden boxes can be transformed into memory keepers. The key is to ensure the container is clean, dry, and has a surface that will adhere well to paper and glue. For tin cans, consider using a primer if the metal is very slick, and always check for any sharp edges before starting the project.
How long does it take to make one memory jar?
The time it takes to make one memory jar can vary depending on the complexity of the decoration and the drying time required for the glue or Mod Podge. Typically, the decorating process itself might take about 30-45 minutes. However, you need to factor in drying time, which can range from 20-30 minutes for each coat of Mod Podge, and potentially longer if conditions are humid. Writing the memories can take an additional 15-30 minutes, depending on how many you wish to include. So, while active crafting time is relatively short, the entire process from start to finish, including drying, can take anywhere from 1 to 2 hours per jar.
How should I store my completed memory jars?
Completed memory jars should be stored in a cool, dry place away from direct sunlight and extreme temperatures. Direct sunlight can cause the paper colors to fade over time, and excessive heat or humidity can potentially affect the integrity of the glue and paper. Displaying them on a shelf, mantelpiece, or in a cabinet is ideal. You can also keep them in a decorative box or trunk if you prefer to store them away. The goal is to protect them from elements that could degrade the materials and preserve the memories within for years to come.
What Next?
Once your beautiful memory jars are complete, they become more than just decorative items; they are vessels of your family's history and love. Consider creating a dedicated shelf or corner to display them, allowing their presence to be a constant reminder of your shared joy. For variations, try using different types of containers, incorporating photos, or even creating themed jars for specific events like birthdays or holidays. This project can easily lead to other memory-keeping endeavors, such as scrapbooking or creating family time capsules. The most important aspect is the shared experience and the creation of tangible reminders of your family's unique journey.
Free: 10 Paper Crafts Anyone Can Make in 5 Minutes
Get our beginner guide + new craft ideas weekly.
No spam. Unsubscribe anytime.
Did you complete this activity?