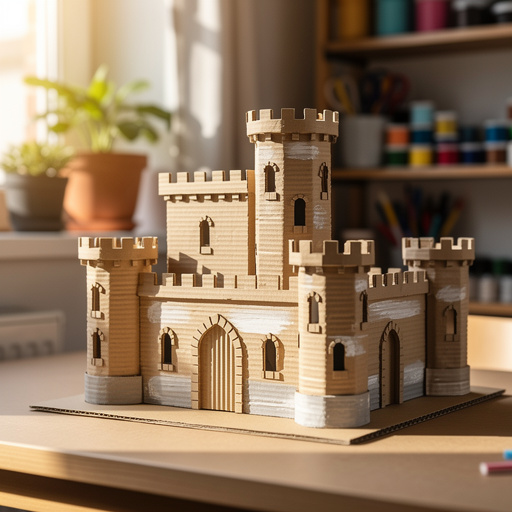
How to Build a Cardboard Castle Diorama — Easy Step-by-Step Guide
Transform a simple cardboard box into a magnificent castle diorama, complete with towers, flags, and a drawbridge. A fantastic screen-free adventure for young builders!
Quick answer
To make a cardboard castle diorama, you need a cardboard box, scissors, glue, and paint, taking about 60 minutes. Start by cutting out your castle shapes. This beginner-friendly activity has 12 steps and is perfect for families and kids aged 6+.
What you need
Shop on Amazon · As an Amazon Associate we earn from qualifying purchases. Links above are affiliate links — we may earn a commission at no extra cost to you.
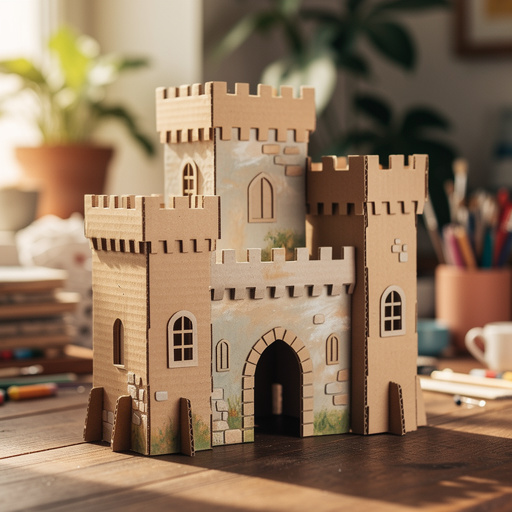
Embark on a creative journey and transform a humble cardboard box into a majestic medieval fortress! Building a cardboard castle diorama is more than just a craft; it's an invitation to imaginative play and a wonderful way to engage young minds in a screen-free activity. This project is perfect for rainy days, birthday parties, or simply as a fun family bonding experience. With just a few basic materials and a bit of imagination, you can create a stunning miniature world that sparks stories of knights, dragons, and royal adventures.
On this page
Step-by-Step Instructions
- 1
Prepare your cardboard box by ensuring all flaps are securely closed and glued or taped shut, creating a solid base for your castle. This step is crucial for structural integrity, so make sure there are no loose edges that could cause your castle to collapse later.
- 2
On one of the larger sides of the box, use a pencil and ruler to draw a large, imposing archway for the castle entrance. This will serve as the main opening and the focal point of your diorama, so make it proportionate to the size of your box.
- 3
Carefully cut out the archway you've drawn using either scissors or a craft knife; remember that adult supervision is essential when using a craft knife for safety. If using scissors, make small, controlled cuts and take your time to achieve a clean edge.
- 4
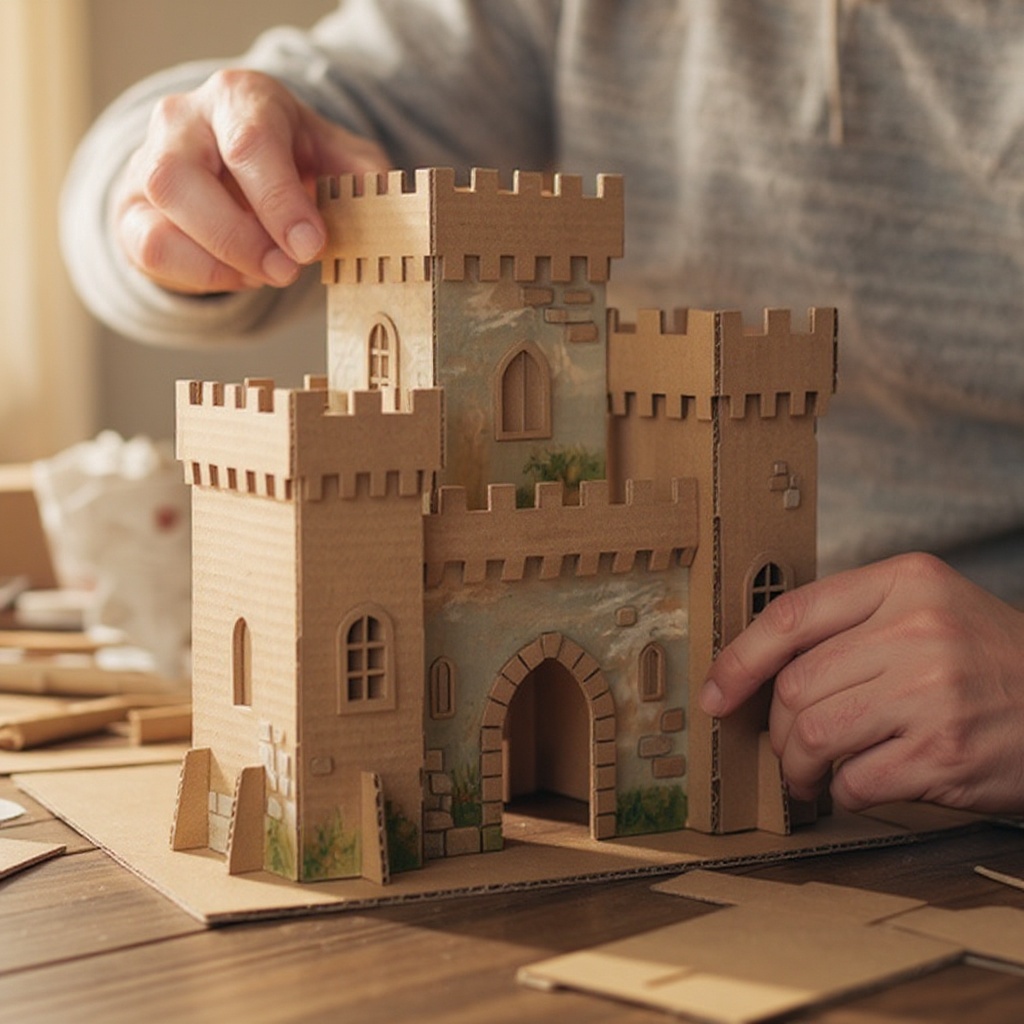
Prepare your castle towers by cutting the cardboard tubes into smaller sections, aiming for 2 to 4 towers of varying heights to add visual interest and a more realistic castle silhouette. You can cut them to be the same height as the box, slightly taller, or shorter, depending on your desired aesthetic.
- 5
Securely glue the cardboard tube towers to the top corners and sides of the box, ensuring they are firmly attached and stand upright. Position them strategically to create a classic castle outline, with at least one tower at each corner and potentially one in the center of a side.
- 6
Add battlements, the characteristic notched tops of castle walls, by cutting small, square notches along the top edges of the main box and the attached towers. This detail significantly enhances the castle's appearance, so aim for consistent spacing and size of the notches.
- 7
Paint the entire exterior of the box and the towers with a base coat of grey or brown acrylic paint, providing a uniform foundation for your castle's stone texture. Allow this base coat to dry completely before proceeding to the next step, which is essential for preventing the paint from smudging.
- 8
Once the base coat is dry, begin adding details to make your castle look more realistic and engaging. Use darker shades of grey or black paint to draw stone patterns, individual bricks, or mortar lines, and add small window shapes and door outlines.
- 9
Create your castle flags by cutting out small, simple flag shapes from colorful scrap paper or cardstock, such as red, blue, or white. You can make them rectangular, triangular, or even swallow-tailed for a more authentic medieval feel.
- 10
Attach the flags to the twigs or craft sticks, which will serve as flagpoles, by gluing or taping them securely. Ensure the flags are firmly attached so they don't detach during play or display.
- 11
Glue the completed flags to the tops of the towers, positioning them so they appear to be flying in the wind. This adds a final touch of color and grandeur to your castle's silhouette.
- 12
Paint a simple drawbridge shape on a separate piece of scrap cardboard, using brown or grey paint to mimic wood or stone. Once dry, carefully glue this drawbridge to the bottom edge of the archway, creating the illusion of a functional entrance.
- 13
Add a moat around the base of your castle by painting a wavy blue line or a solid blue area. You can also incorporate greenery by painting patches of green or gluing on small bits of craft moss to represent grass and foliage.
- 14
Consider adding a portcullis (a grated gate) by cutting thin strips of black cardstock and gluing them in a grid pattern inside the archway. This adds another layer of defensive detail to your castle.
- 15
For added realism, you can create texture on the castle walls by dabbing on different shades of grey and brown paint with a sponge, or by mixing a small amount of sand into your paint before applying it. This technique mimics the rough texture of stone.
- 16
If you want to create a more elaborate interior, carefully cut a small opening in the back of the box to reveal a hidden room, a dungeon, or a royal chamber. This adds an element of surprise and encourages imaginative play.
- 17
For a more finished look on your towers, you can create small cardboard triangles and glue them to the tops of some of the towers to form conical roofs. This adds architectural variety to your castle design.
- 18
Experiment with different painting techniques to enhance the stone effect. Dry brushing with a lighter grey over a darker base can highlight the texture, while a wash of diluted black paint can add depth and shadow to the crevices.
- 19
Add small details like arrow slits (thin vertical rectangles) on the tower walls or a coat of arms painted above the main entrance. These small touches can make a big difference in the overall appearance of your castle.
- 20
If you're using a hot glue gun, ensure you have a steady hand and work quickly, as the glue sets fast. Be mindful of where the hot glue is applied to avoid accidentally gluing your fingers to the cardboard.
Tips & Troubleshooting
- 1If using a hot glue gun, ensure an adult is always present to prevent burns and supervise its use. Hot glue can cause serious burns, so it's crucial to have a responsible adult overseeing this part of the process.
- 2Experiment with different paint textures by dabbing paint on with a sponge for a stone effect, or by using a stiff brush to create a rough, uneven surface. This technique can make your cardboard castle look much more like real stone.
- 3Add small figures or toy knights to your diorama for extra play value and to bring your castle to life. Having characters to interact with the castle will encourage imaginative storytelling and extend the playtime.
- 4You can cut out a small opening in the back of the box to create a hidden room or dungeon, adding an element of surprise and encouraging further imaginative play. This secret space can be a great feature for storytelling.
- 5For a more realistic look, consider adding a roof to some of your towers using small cardboard triangles, or even by cutting and shaping larger pieces of cardboard to create different architectural styles. This adds visual depth and complexity.
- 6Don't be afraid to get creative with your materials! You can use dried leaves, small pebbles, or even bits of fabric to add unique textures and details to your castle and its surroundings, like a forest or a rocky terrain.
- 7To make your drawbridge functional, you can attach it with a small piece of string or yarn, allowing it to be lowered and raised. This adds an interactive element that kids will love.
- 8Consider painting the inside of the archway black or a dark color to create the illusion of depth, making it look like a dark, mysterious entrance to the castle.
Related Activities You Might Enjoy
Frequently Asked Questions
What kind of cardboard box is best for a castle diorama?
The ideal cardboard box for a castle diorama is one that is sturdy and medium-sized, typically around 12x12x12 inches. Boxes that previously held small appliances, electronics, or were used for shipping are often perfect. Ensure the box is clean, free of any food residue or strong odors, and has intact flaps that can be securely glued or taped shut. A double-walled box will offer extra durability, ensuring your castle stands tall and can withstand enthusiastic play. Avoid flimsy boxes like those from cereal or thin product packaging, as they may not hold their shape well.
Can I make this castle diorama without a craft knife?
Absolutely! While a craft knife offers precision for cutting intricate shapes like arches and windows, strong scissors can also be used effectively. If you're using scissors, opt for a sharp pair that can handle thicker cardboard. You might need to make multiple passes to cut through the material cleanly, especially for the archway. Be patient and make slow, controlled cuts to avoid tearing the cardboard. For very detailed work, you could also consider using a box cutter, but always with the utmost adult supervision and caution.
How can I make the castle look more realistic?
To achieve a more realistic castle appearance, focus on texture and detail. Use a variety of grey and brown acrylic paints to create a convincing stone effect; you can achieve this by layering different shades, dry-brushing lighter colors over darker ones, or even dabbing paint on with a sponge. For added texture, consider mixing a little sand or fine gravel into your paint before applying it to the walls. Gluing on small pebbles or craft moss around the base can simulate natural landscaping, and adding details like battlements, arrow slits, and a textured drawbridge will further enhance its authenticity.
What other details can I add to my cardboard castle?
The possibilities for adding details to your cardboard castle are vast and limited only by your imagination! Consider adding a functional drawbridge by attaching it with string so it can be lowered and raised. You can create a portcullis by gluing thin strips of black cardstock in a grid pattern inside the archway. Small windows with shutters made from cardstock, a courtyard area inside the castle walls, or even a moat filled with blue paint or glitter can add significant visual interest. Small toy figures, like knights, dragons, or royalty, can bring your castle to life and encourage imaginative play.
What age group is this project suitable for?
This cardboard castle diorama project is wonderfully versatile and can be enjoyed by a wide range of ages, with adult supervision. It's particularly well-suited for children aged 6 and up, as they can handle the cutting and painting with some guidance. Younger children can participate by helping with painting, decorating, and adding smaller details under close supervision. Teenagers and adults can also find this project enjoyable, especially if they are looking for a creative outlet or a fun way to create props for imaginative play or even small-scale dioramas. The complexity can be scaled up or down depending on the skill level of the participants.
How long does it typically take to build this castle diorama?
The estimated time to build this cardboard castle diorama is approximately 60 minutes for the core construction and painting. However, this can vary significantly depending on the complexity of the details you choose to add and the drying time of the paint. If you're adding intricate stone patterns, multiple flags, a detailed drawbridge, or landscaping elements, you might spend an additional 30-60 minutes. Allowing adequate drying time between paint coats is also crucial; this can add several hours to the overall project duration, especially if you're working in a humid environment. It's best to approach this as a project that can be completed over a day or two to allow for proper drying and detailed work.
Can I make the castle more durable for extended play?
To enhance the durability of your cardboard castle diorama for extended play, consider reinforcing key structural points. Use extra layers of cardboard or sturdy tape on the inside seams of the box and where the towers are attached. Applying a sealant or varnish over the painted surfaces can also protect the paintwork from wear and tear. For the towers, if they are made from toilet paper rolls, you could consider using slightly thicker paper towel rolls or even wrapping them in a layer of cardstock for added rigidity. Ensuring all glued connections are strong and dry will also contribute significantly to its longevity.
What Next?
Once your magnificent cardboard castle diorama is complete, the real fun begins! Encourage your young builders to populate their creation with small toy figures, creating epic tales of bravery and adventure. For display, consider placing it on a shelf or using it as a centerpiece for a themed party. If you wish to store it, carefully dismantle any glued-on elements or find a safe space where it won't be crushed. This project is a fantastic springboard for further creativity; perhaps a dragon's lair, a bustling medieval village, or even a futuristic space station diorama could be your next adventure!
Free: 10 Paper Crafts Anyone Can Make in 5 Minutes
Get our beginner guide + new craft ideas weekly.
No spam. Unsubscribe anytime.
Did you complete this activity?
Related