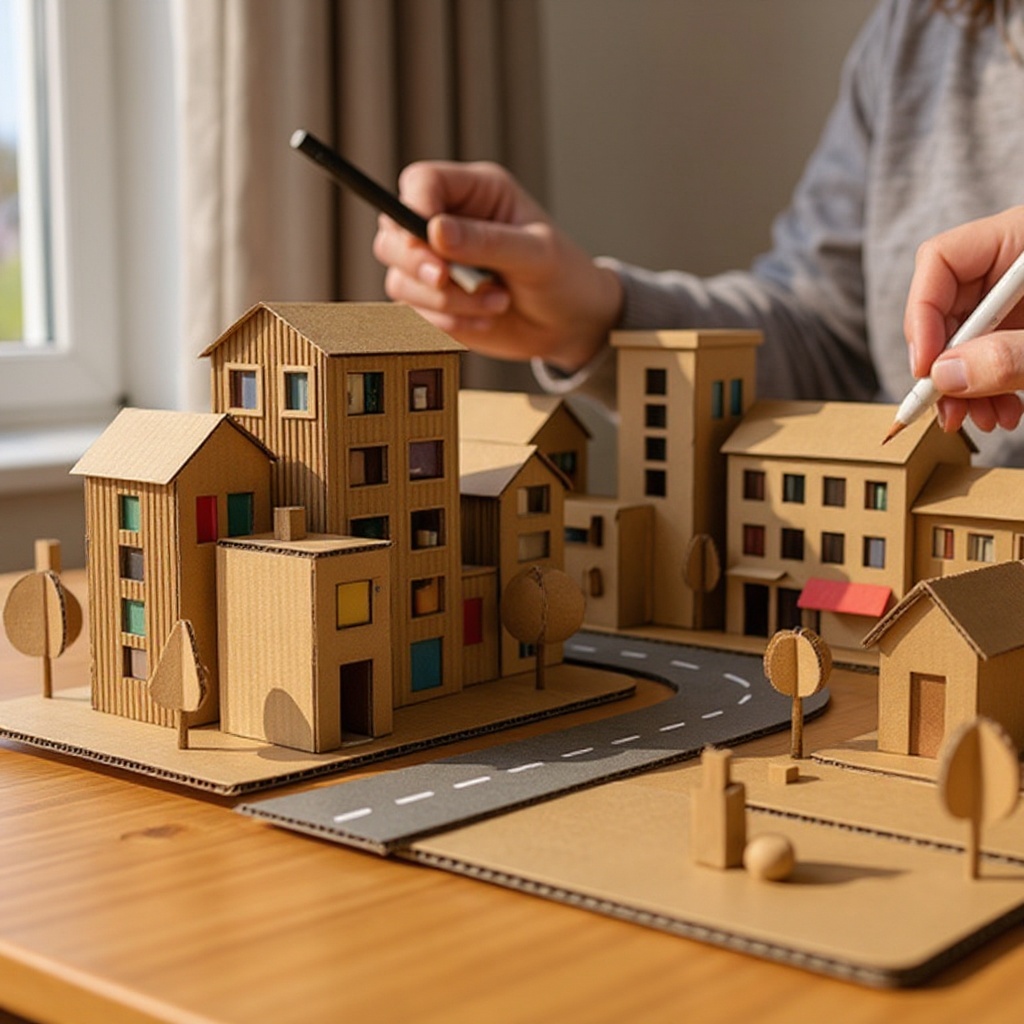
How to Build a Cardboard Cityscape Diorama — Easy Step-by-Step Guide
Transform recycled cardboard into a bustling miniature city! This fun craft lets you design and build your own unique cityscape diorama. Perfect for imaginative play and display.
Quick answer
To make a cardboard cityscape diorama, you need cardboard boxes, scissors, glue, and paint, taking about 90 minutes. Start by cutting and assembling box buildings, then add roads and details. This beginner-friendly activity has 12 steps and is perfect for families and kids aged 6+.
What you need
Shop on Amazon · As an Amazon Associate we earn from qualifying purchases. Links above are affiliate links — we may earn a commission at no extra cost to you.
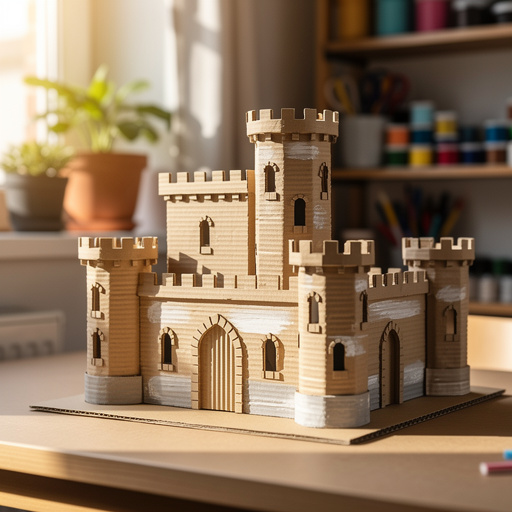
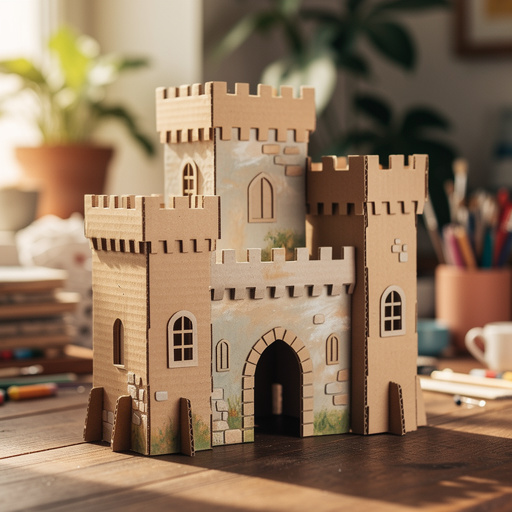
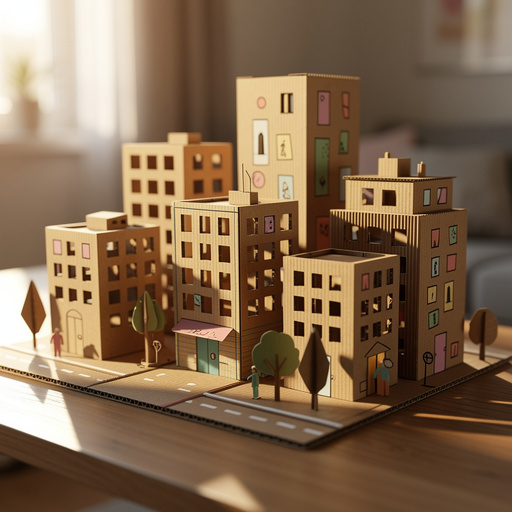
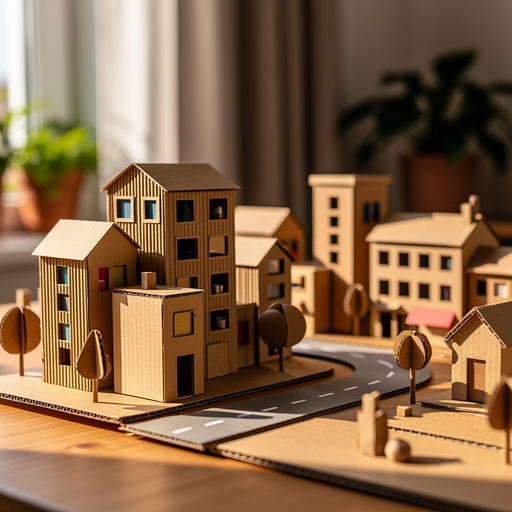
Unleash your inner architect and urban planner with this incredibly fun and rewarding Cardboard Cityscape Diorama project! It's a fantastic way to repurpose everyday materials, turning humble cardboard boxes into a vibrant, miniature metropolis. This project is perfect for sparking creativity in children, offering a hands-on learning experience about design, spatial reasoning, and even basic engineering principles. Whether you're looking for a rainy-day activity, a school project, or just a unique way to decorate a shelf, this diorama is a delightful adventure for all ages.
On this page
Step-by-Step Instructions
- 1
Gather your cardboard boxes and decide on the overall size and shape of your cityscape. Consider the space where you plan to display your finished diorama and choose boxes that will fit comfortably, ensuring a good variety of sizes and shapes to create visual interest.
- 2
Using a ruler and pencil, sketch out the basic shapes of your buildings on the cardboard boxes. Think about different heights and widths to create a dynamic skyline; some buildings can be tall and slender, while others can be short and wide, mimicking a real city's diverse architecture.
- 3
Carefully cut out the building shapes using a craft knife or scissors. For windows and doors, you can cut them out completely to create openings, or simply draw them on with markers or paint for a simpler approach; ensure your cuts are as straight as possible for a cleaner look.
- 4
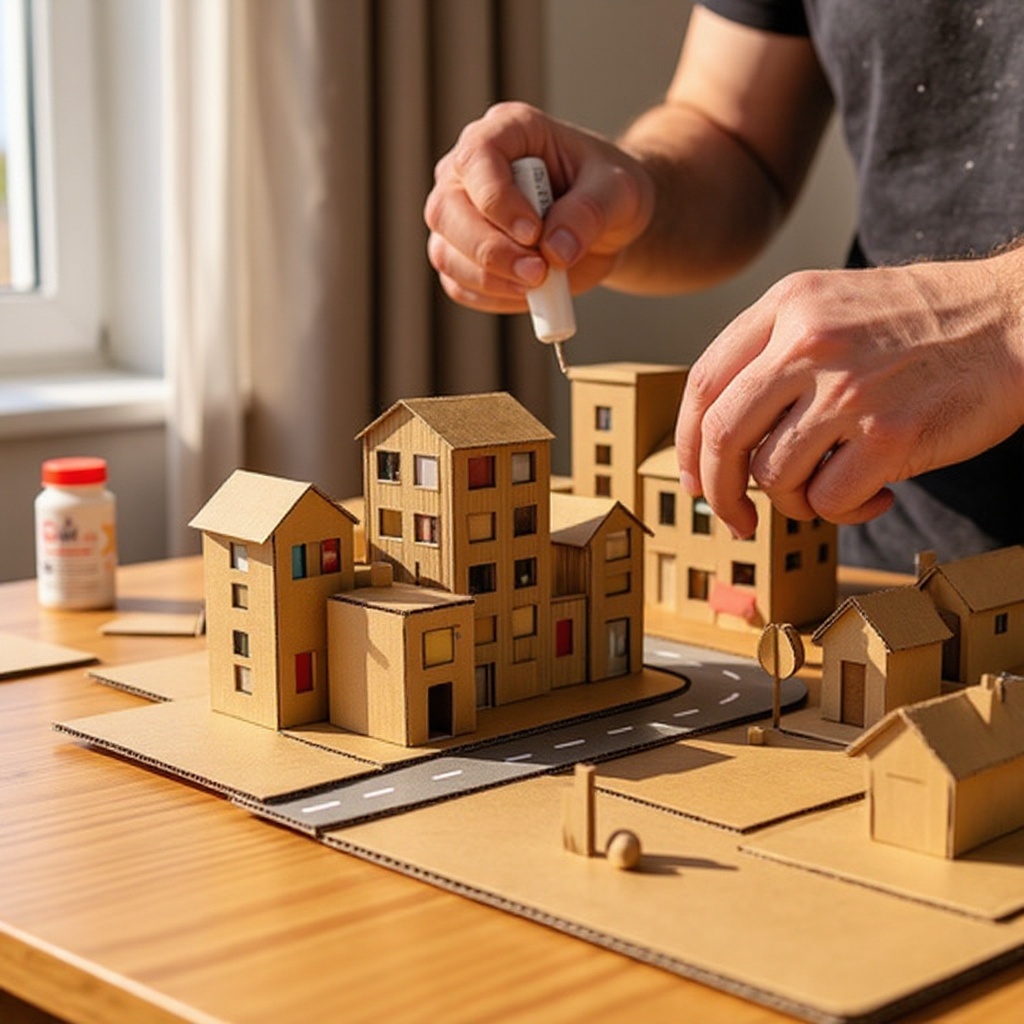
Assemble the buildings by gluing the sides together. Apply a generous amount of white craft glue along the edges and hold them in place until the glue begins to set, or use a hot glue gun for a faster bond, ensuring an adult is present and supervising closely.
- 5
Once the glue is dry and the buildings are sturdy, it's time to paint! Paint the buildings in your desired colors, applying a base coat first. You can create realistic brick patterns with red and brown, mimic concrete with grays, or opt for vibrant, imaginative hues for a whimsical city.
- 6
While the paint is drying on your main structures, you can begin creating smaller details to enhance your cityscape. For example, use craft sticks to fashion streetlights by gluing a small piece of paper or a bead to the top, or roll up strips of green paper to create miniature trees.
- 7
To add more depth and variety, consider creating different types of buildings. You can cut out sections of boxes to make garages, add angled roofs for houses, or even stack smaller boxes on top of larger ones to simulate skyscrapers.
- 8
Once the paint on your buildings is completely dry, arrange them on a flat surface that will serve as your base. This could be a large, flat piece of cardboard, a sturdy tray, or even a piece of foam board, allowing you to experiment with different layouts before committing.
- 9
Glue the buildings down to your base to secure them in place, ensuring they are positioned in a way that creates an interesting and balanced cityscape. You can place them close together for a dense urban feel or spread them out for a more suburban look.
- 10
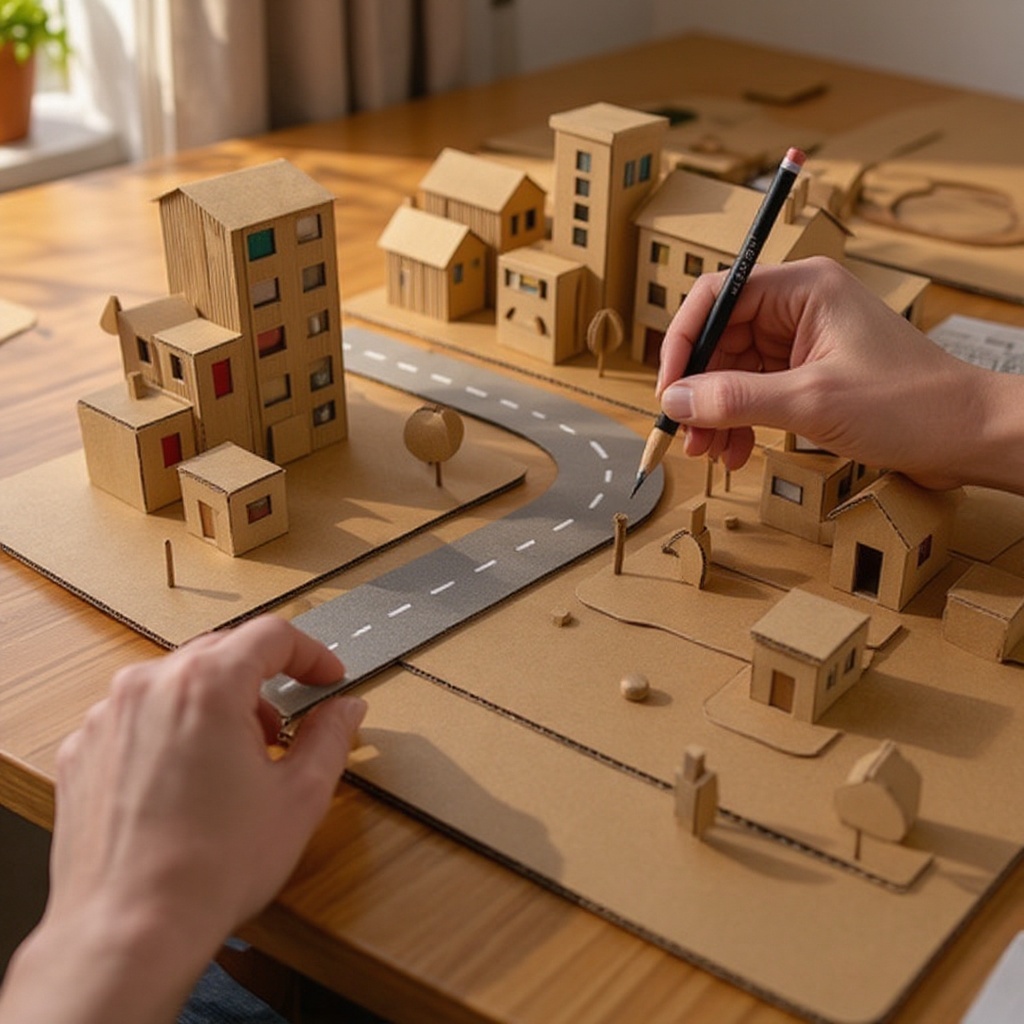
Use markers or colored pencils to draw roads, sidewalks, and other street details between the buildings. You can create crosswalks, traffic lights, and even parking spaces to bring your city to life and give it a sense of place.
- 11
Add any optional embellishments to further enhance your diorama. Sprinkle glitter for a magical sparkle, glue on bottle caps to represent manhole covers or streetlights, or place small toy cars and figurines to populate your miniature world.
- 12
Allow all glue and paint to dry completely before handling or playing with your cardboard cityscape diorama. This ensures that all elements are securely attached and the paint is fully cured, preventing smudges or damage.
- 13
Your cardboard cityscape diorama is now ready to be displayed or used for imaginative play! Encourage storytelling and exploration as you interact with your newly created miniature world.
Tips & Troubleshooting
- 1For cleaner cuts and more precise lines, especially when working with thicker cardboard, use a craft knife on a cutting mat. Always supervise children closely when they are using sharp tools like craft knives or scissors.
- 2Experiment with different textures before painting to add realism and visual interest to your buildings. You can glue on small pieces of fabric for a textured wall effect, or crumple up paper and glue it on to simulate rough surfaces.
- 3To create a more realistic and cohesive look for your cityscape, consider using a limited color palette for your buildings, or research and mimic real-world architectural styles. This can give your diorama a professional and polished appearance.
- 4Consider adding a background to your cityscape for an immersive effect. You can paint a sky on a separate piece of cardboard and attach it behind your buildings, or even create a simple mountain range or distant landscape.
- 5If you want to make your city more interactive and engaging, design some buildings with openable doors or roofs. This can be achieved by carefully cutting along three sides of a door or roof section and scoring the fourth side to create a hinge.
- 6Don't be afraid to mix and match different types of cardboard. Corrugated cardboard from shipping boxes can provide a sturdy base or larger structures, while thinner cereal boxes are perfect for smaller details and intricate designs.
- 7For a quick and easy way to create windows and doors, use stencils or templates. You can draw your own or find printable templates online, then trace them onto your cardboard before cutting or painting.
- 8Consider adding a 'green' element to your city by creating small parks or green spaces. Use green construction paper or felt for grass, and small twigs or rolled-up paper for trees to add a touch of nature to your urban landscape.
Related Activities You Might Enjoy
Frequently Asked Questions
What kind of cardboard is best for crafts?
The best kind of cardboard for crafts like this cityscape diorama is clean, sturdy cardboard that is free from excessive grease or heavy printing. Cardboard from shipping boxes or cereal boxes generally works very well, providing good stability for structures. Thicker cardboard offers more durability and makes it easier to create freestanding buildings. Avoid cardboard that is flimsy, water-damaged, or has food stains, as these can compromise the integrity of your project and may not hold glue or paint effectively.
How can I make cardboard buildings look realistic?
To make your cardboard buildings look realistic, focus on details and color. Use a ruler to draw straight lines for windows, doors, and architectural features. Paint your buildings in colors that mimic real-world materials, such as brick red, concrete gray, or earthy browns. Add details like window panes with thin black lines, door frames, and even small roof elements. You can also experiment with adding textures by lightly scoring the cardboard before painting or by gluing on small pieces of textured paper or fabric.
Can I make a cardboard cityscape without paint?
Absolutely! You can create a visually appealing cardboard cityscape without using paint. One effective method is to cover your cardboard buildings with colored construction paper, patterned wrapping paper, or even pages from old magazines for a unique collage effect. This allows for a wide range of colors and textures. You can also use colored markers or colored pencils to draw details directly onto the cardboard, creating intricate designs for windows, doors, and decorative elements.
How do I attach cardboard pieces securely?
For securely attaching cardboard pieces, white craft glue (like PVA glue) is a reliable option for most projects, as it dries clear and forms a strong bond. Apply a generous amount to the edges you want to join and hold them together until the glue begins to set. For faster assembly or stronger bonds, especially with thicker cardboard or when creating more complex structures, a hot glue gun is very effective. Always ensure adult supervision when using a hot glue gun due to the heat involved.
What are some ideas for adding details to my cardboard city?
Adding details is what truly brings a cardboard cityscape to life! Consider creating miniature streetlights using craft sticks and small beads or paper circles. You can make trees by rolling up green construction paper or using small twigs. For roads, use black or gray markers or paint, and add details like crosswalks and traffic lines. Bottle caps can be repurposed as manhole covers, car wheels, or even small decorative elements on buildings. Small toy cars, figurines, or even tiny printed signs can further populate your miniature world.
How can I make my cardboard cityscape more durable?
To make your cardboard cityscape more durable, start with sturdy cardboard boxes, preferably from shipping or thicker corrugated materials for the main structures and base. Ensure all glued joints are secure and allow ample drying time for both glue and paint. Once assembled and decorated, you can apply a clear sealant spray or a coat of Mod Podge over the entire diorama. This will protect the paint, add a layer of water resistance, and strengthen the cardboard, making it more resilient to handling and environmental factors.
What Next?
Congratulations on building your very own cardboard cityscape! This diorama is more than just a craft; it's a canvas for endless imaginative stories and adventures. Consider adding more layers to your city by creating a second tier of buildings or even a subway system beneath the streets. For display, a simple wooden base or a painted tray can elevate its presentation. Store your masterpiece in a dry place away from direct sunlight to preserve the paint and glue. This project is a gateway to countless other cardboard creations, so keep those boxes handy!
Free: 10 Paper Crafts Anyone Can Make in 5 Minutes
Get our beginner guide + new craft ideas weekly.
No spam. Unsubscribe anytime.
Did you complete this activity?
Related