How to Create Your Own Adventure Map — Easy Step-by-Step Guide
Unleash your inner cartographer and design your very own fantasy adventure map! This screen-free activity is perfect for sparking imagination and planning epic quests. It's a fantastic way to develop storytelling skills and create a tangible representation of a fictional world, making it ideal for aspiring game designers, writers, or anyone who loves a good adventure. This beginner-friendly project is suitable for families and individuals alike, offering hours of creative fun.

Quick answer
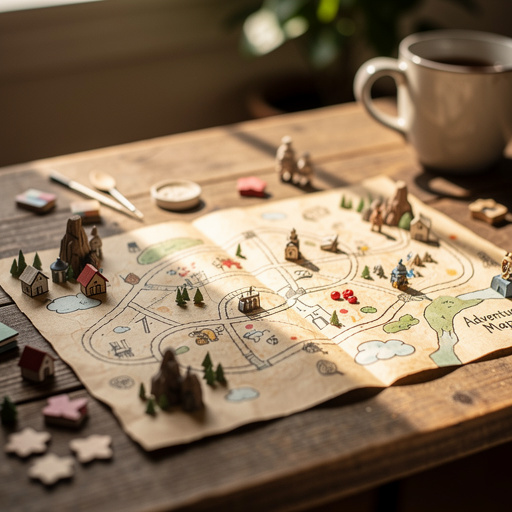
To create your own adventure map, you'll need paper, pencils, markers, and about 60 minutes. Start by sketching your landmasses. This beginner-friendly activity has 12 steps and is perfect for families with kids aged 8+.
What you need
Shop on Amazon · As an Amazon Associate we earn from qualifying purchases. Links above are affiliate links — we may earn a commission at no extra cost to you.
Embark on a creative journey and bring your wildest worlds to life with this engaging Adventure Map Creation Kit! This project is more than just drawing; it's about building entire realms, populating them with intriguing locations, and setting the stage for unforgettable adventures. It’s a wonderful screen-free activity that fosters imagination, problem-solving, and artistic expression, making it an ideal pastime for families, solo creators, or anyone looking to escape into their own unique universe. Get ready to become the architect of your own destiny!
On this page
Step-by-Step Instructions
- 1
Begin by lightly sketching the main landmasses of your world with a pencil. Think about continents, islands, or large lakes, focusing on organic, flowing shapes rather than perfect geometric forms to create a more natural feel.
- 2
Add major geographical features like mountains, rivers, and forests. Use different pencil strokes to suggest texture: short, jagged lines for mountains, flowing wavy lines for rivers, and clusters of small circles or scribbles for forests.
- 3
Draw in bodies of water such as oceans, seas, and large lakes, connecting them to rivers where appropriate. Ensure your rivers have a clear source, often in mountainous regions, and flow logically towards larger bodies of water.
- 4
Begin to add details to your landmasses, like hills, valleys, and plains. Use lighter shading or fewer lines to denote flatter areas and more concentrated shading or contour lines for elevated terrain.
- 5
Consider where settlements might be located – villages, towns, or cities. Mark these with small circles or squares, varying their size to indicate population or importance, and think about their proximity to resources like water and fertile land.
- 6
Add important landmarks or points of interest, such as castles, ruins, caves, or magical sites. These are often focal points for quests and should be visually distinct, perhaps with unique shapes or symbols.
- 7
Draw roads or paths connecting settlements and landmarks, indicating travel routes. Consider the terrain; roads might wind around mountains or follow river valleys, and some paths might be more rugged or less defined.
- 8
Introduce smaller geographical details like swamps, deserts, or icy tundras. Use distinct patterns or textures to differentiate these biomes from plains or forests, adding depth and variety to your world.
- 9
Think about the climate and how it might affect the landscape. For instance, areas near mountains might be drier on one side (rain shadow effect) or have glaciers, while coastal regions might have beaches or cliffs.
- 10
Once your pencil sketch is complete and you're happy with the layout, carefully go over all your lines with a fine-tip black marker. This step defines your map and makes it ready for coloring, so take your time and be precise.
- 11
Begin coloring your map. Start with the large areas like oceans and skies, using your chosen colors. For oceans, consider varying shades of blue to suggest depth, and for the sky, you might add subtle clouds or a gradient.
- 12
Color in your landmasses, using different shades for different terrains like green for plains, brown for mountains, and darker green for forests. Blend colors where terrains meet to create a natural transition.
- 13
Add details to your settlements and landmarks with color, making them stand out. Use vibrant colors for important buildings like castles or vibrant hues for magical sites to draw the eye.
- 14
Introduce atmospheric effects or subtle details like fog in valleys, snow on mountain peaks, or even a hint of a magical aura around enchanted locations. These small touches can significantly enhance the mood and story of your map.
- 15
Finally, add a title to your map in a prominent location, using a font that suits the theme of your world. You can also add a compass rose for direction and a scale bar if you wish to indicate distances.
Tips & Troubleshooting
- 1Don't be afraid to make mistakes! The eraser is your friend. Light sketching allows for easy correction, so embrace the process of refinement and don't strive for perfection on the first pass.
- 2Experiment with different textures and shading techniques to make your map look more realistic or fantastical. For example, stippling can create a rocky texture, while cross-hatching can add depth to shadowed areas.
- 3Consider the story or purpose of your map. Is it for a treasure hunt, a fantasy role-playing game, or just for fun? Knowing the context will help you decide what elements to emphasize and how to stylize your map.
- 4You can add a legend or key to explain symbols used on your map, like different types of terrain or buildings. This is especially useful if you've created unique icons for specific features, making your map more understandable.
- 5Think about scale and proportion as you draw. While it doesn't need to be perfectly accurate, having a general sense of how large different features are relative to each other will make your map more believable.
- 6Layer your colors for richer effects. For instance, you can lightly sketch a mountain range in brown, then add darker brown or even purple shading for depth, and finally a touch of white for snow-capped peaks.
- 7Don't forget the negative space! The areas between your drawn features are just as important. Ensure they are clean and well-defined, and consider if they represent oceans, plains, or even unexplored territories.
- 8Consider adding a border to your map. This can be a simple line, an ornate design, or even incorporate thematic elements related to your world, giving your creation a finished and professional look.
Related Activities You Might Enjoy
Frequently Asked Questions
What materials do I need to make a game design book?
To create your own adventure map, which can be a foundational element of game design, you'll need sturdy paper, pencils for sketching and outlining, an eraser for corrections, a fine-tip black marker for inking, and a good set of colored pencils or markers to bring your world to life. These are common household craft supplies that are readily available. Having a variety of pencil hardnesses can also be beneficial for creating different line weights and shading effects, enhancing the visual appeal and detail of your map.
How long does it take to make an adventure map?
This adventure map creation activity typically takes about 60 minutes to complete, though this can vary depending on the complexity and detail you wish to add. This timeframe includes the initial sketching of landmasses and features, inking the lines with a marker, and then coloring your unique world. For beginners or younger artists, it might take a bit longer, while experienced mapmakers might finish sooner. The goal is to enjoy the process of creation, so don't rush it!
Is this a good activity for kids who want to be game designers?
Absolutely! Creating an adventure map is a fantastic way for aspiring game designers to practice world-building, map-making, and visual storytelling, all key elements in game design. It encourages them to think about geography, points of interest, travel routes, and potential challenges within a fictional space. This hands-on activity helps develop spatial reasoning, creativity, and the ability to translate abstract ideas into a tangible visual format, which are crucial skills for anyone interested in game development.
Can I make a game design book with just paper and pencil?
While you can certainly sketch out game ideas with just paper and pencil, a full adventure map benefits greatly from the addition of markers and colored pencils to bring the world to life and add detail. Pencils are excellent for initial drafts and fine details, but markers provide bold outlines and vibrant colors that make your map pop. Colored pencils allow for subtle shading and blending, creating depth and texture. Together, these materials offer a richer and more engaging experience for map creation.
What are some ways to make my adventure map unique?
To make your adventure map truly unique, consider incorporating unusual geographical features like floating islands, crystal caves, or sentient forests. You can also invent fantastical creatures and mark their habitats, or design unique symbols for your settlements and landmarks that reflect the culture of your world. Think about adding a narrative element, such as marking the locations of ancient prophecies, hidden treasures, or the paths of legendary heroes. Even small details like a peculiar weather pattern or a magical anomaly can add a distinctive flair.
How can I add more detail and realism to my map?
Adding detail and realism involves thinking about how real-world geography works. For instance, rivers typically originate in higher elevations and flow downhill, often carving valleys. Mountains can cast rain shadows, creating arid regions on their leeward side. Consider adding different types of forests (e.g., coniferous vs. deciduous), varying terrain types within landmasses (e.g., rolling hills transitioning into rocky outcrops), and depicting coastlines with beaches, cliffs, or fjords. Using varied line weights and shading techniques can also enhance the sense of depth and texture.
What Next?
Once your adventure map is complete, you've created a portal to countless stories! Consider laminating it for durability or framing it as a piece of art. This map can serve as the foundation for a tabletop role-playing game, a treasure hunt, or even a written story. For your next project, try creating a detailed legend for your map, designing characters that inhabit your world, or even building a 3D model of a key location. The possibilities are as boundless as your imagination!
Free: 10 Paper Crafts Anyone Can Make in 5 Minutes
Get our beginner guide + new craft ideas weekly.
No spam. Unsubscribe anytime.
Did you complete this activity?