How to Make a Cardboard Tube Guitar — Easy Step-by-Step Guide
Transform everyday paper tubes and cardboard into a strum-worthy guitar! This fun craft is perfect for little musicians and creative minds. Learn how to make your own musical masterpiece with our easy-to-follow guide.

Quick answer
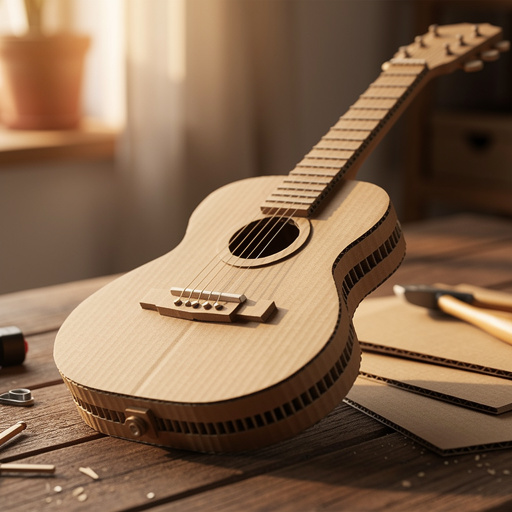
To make a cardboard tube guitar, you need paper tubes, cardboard, scissors, tape, and decorating supplies, taking about 45 minutes. Start by cutting a soundhole in the tube. This beginner-friendly activity has 10 steps and is perfect for families and kids aged 6+. You can add decorative elements and even 'strings' for a more realistic look and feel.
What you need
Shop on Amazon · As an Amazon Associate we earn from qualifying purchases. Links above are affiliate links — we may earn a commission at no extra cost to you.
Unleash your inner rockstar with this incredibly fun and simple cardboard tube guitar craft! Perfect for sparking imagination and encouraging creative play, this project transforms humble household recyclables into a vibrant musical instrument. It’s an ideal activity for rainy days, birthday parties, or just a fantastic way to spend quality time with children aged 6 and up. Get ready to strum, sing, and rock out with your very own handmade guitar!
On this page
Step-by-Step Instructions
- 1
Gather all your materials. Ensure you have everything laid out and ready to go before you begin, which will make the crafting process smoother and more enjoyable.
- 2
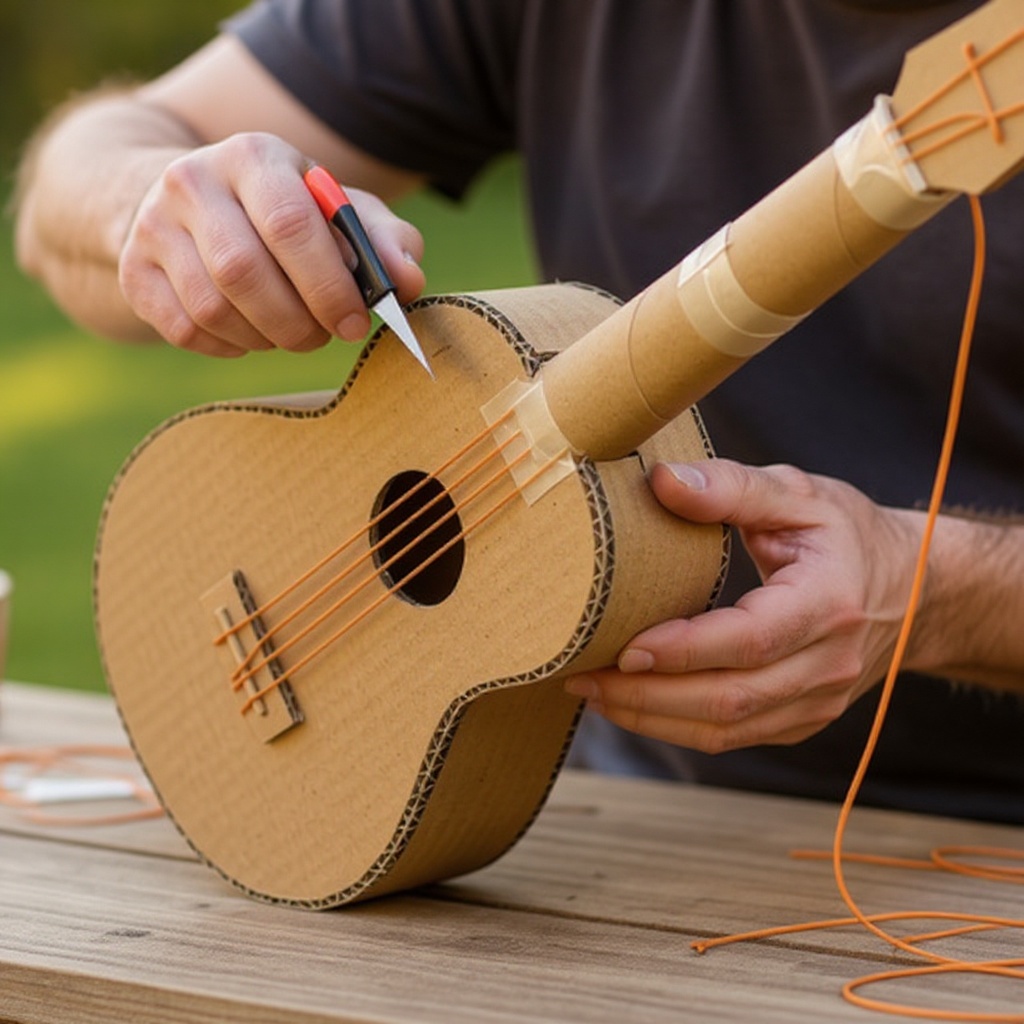
On the cardboard tube, draw and cut out a circular soundhole using scissors or a craft knife. Aim for a hole about 2-3 inches in diameter; a larger hole will produce a slightly different visual effect and can be a focal point for decoration. If using a craft knife, always have an adult present and cut on a protected surface.
- 3
Carefully cut out the soundhole. If using scissors, poke a starting hole with the tip of the scissors or a pencil, then carefully cut around your drawn circle. For a cleaner cut with a craft knife, make several shallow passes rather than trying to cut through the cardboard in one go.
- 4
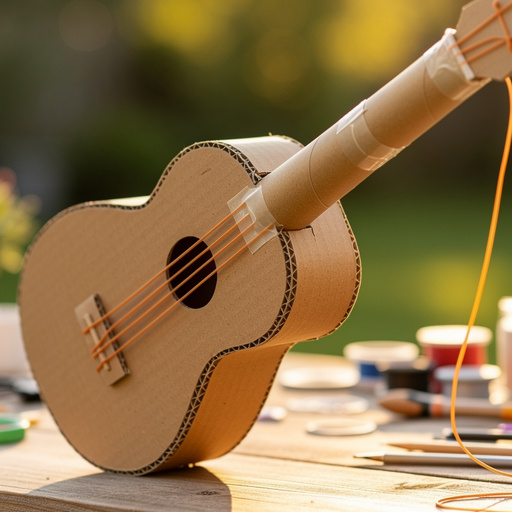
Cut a neck shape from the sturdy cardboard. This should be a long rectangle, about 1 inch wide and 6-8 inches long, with a slightly wider base (about 1.5-2 inches wide) to create a surface for attaching it securely to the tube. You can use a ruler to ensure your lines are straight.
- 5
Prepare the neck for attachment. You can gently score or fold the wider base of the neck piece to create tabs that will wrap around the cardboard tube, providing a stronger bond.
- 6
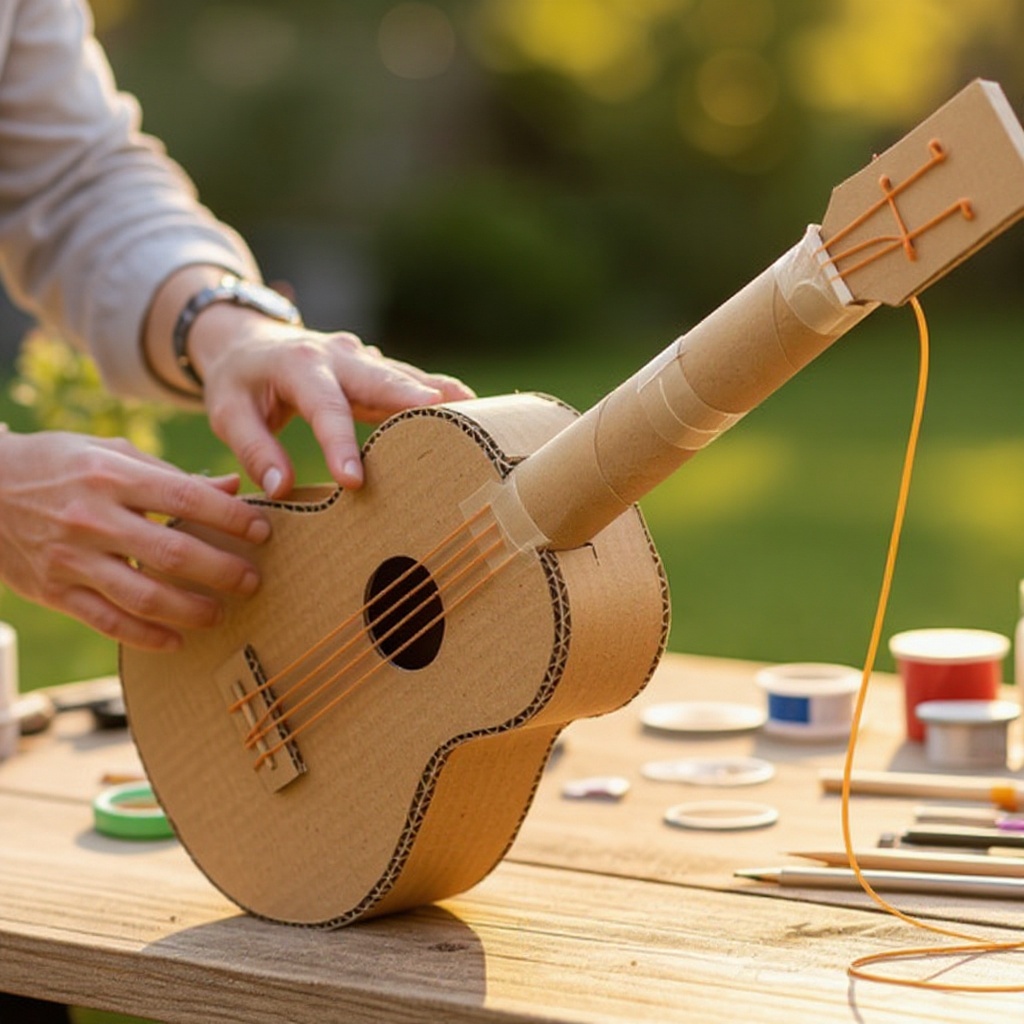
Attach the cardboard neck to one end of the cardboard tube using tape. Apply tape generously along the seam where the neck meets the tube, ensuring it's securely fastened and won't wobble. Wrap the tape around both the neck and the tube for maximum stability.
- 7
Cut a headstock shape from the remaining cardboard. This can be a simple rectangle, a more decorative shape like a fan or a paddle, about 2 inches wide and 3 inches long. This is where you can really let your creativity shine and give your guitar a unique personality.
- 8
Attach the headstock to the other end of the cardboard neck using tape. Again, use plenty of tape to ensure a strong connection, as this part will be handled frequently.
- 9
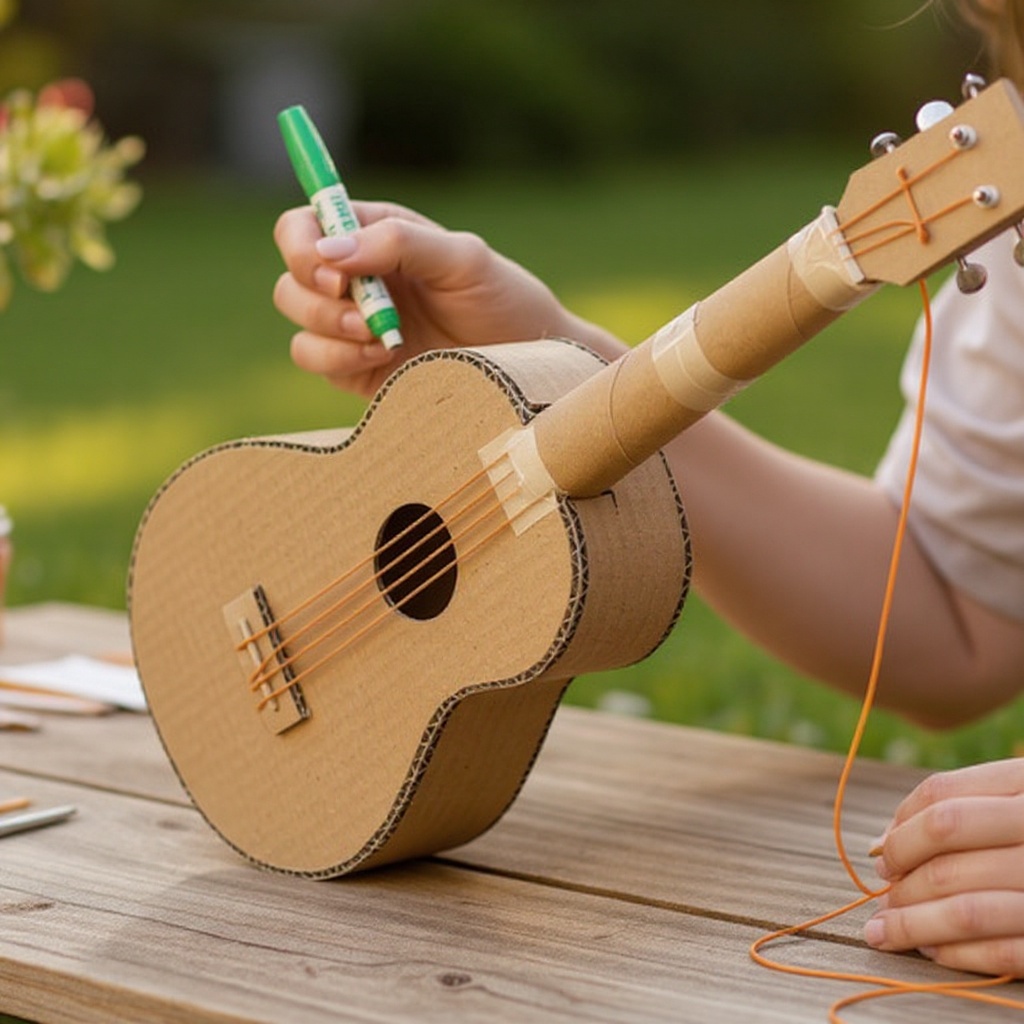
Reinforce all the taped connections with extra tape for durability. Go over all the seams and attachment points with additional layers of tape, especially where the neck meets the body and where the headstock meets the neck. This will ensure your guitar can withstand enthusiastic strumming.
- 10
Now for the fun part: decorating your guitar! Use markers, crayons, or paint to color the cardboard tube and neck. You can create realistic wood grain, vibrant patterns, or even draw on cool designs like flames or stars. Let your imagination run wild!
- 11
Add details like tuning pegs and a bridge. You can draw these on with markers, cut them out from scrap paper and glue them on, or even use small bottle caps or beads for a 3D effect. Think about where these elements would be on a real guitar.
- 12
Cut thin strips of scrap paper or construction paper to create 'strings'. Glue or tape these across the soundhole and up to the headstock. Ensure they are spaced evenly and are taut enough to look like strings, but not so tight that they will tear the cardboard.
- 13
Optional: For more realistic and tactile strings, stretch rubber bands, yarn, or string across the soundhole and secure them to the headstock. If using yarn or string, you might need to punch small holes in the headstock and tie them off, or use strong glue. Ensure they are taut but not so tight they break the cardboard or warp the neck.
- 14
Allow all glue and paint to dry completely before proceeding to the next step or playing with your guitar. This is crucial for a neat finish and to prevent smudges or damage to your hard work.
- 15
Test your guitar! Gently strum the paper or rubber band strings to see what kind of sounds you can create. While it won't produce musical notes like a real instrument, it’s perfect for imaginative play and making fun noises.
Tips & Troubleshooting
- 1If your cardboard tube is very thin, you can reinforce it by wrapping it with a layer of paper before decorating. This adds an extra layer of strength and provides a smoother surface for painting or drawing.
- 2Experiment with different headstock shapes and soundhole designs to make each guitar unique. You could try a classic Fender-style headstock or a more abstract shape for a modern look. Consider different sizes and shapes for the soundhole too.
- 3For a more robust guitar, consider using a thicker cardboard for the neck and headstock, like from a shipping box. This will provide greater stability and make the guitar more durable for enthusiastic play.
- 4Let paint and glue dry completely before handling to avoid smudges and damage. Patience is key in crafting; rushing the drying process can lead to a less polished final product.
- 5Consider adding a 'pickguard' by cutting a shape from contrasting colored paper and gluing it below the soundhole. This adds a professional touch and protects the 'body' from imaginary strumming.
- 6If you're using rubber bands for strings, try using different thicknesses and tensions to see how it affects the 'sound' and feel. This adds another layer of experimentation to the craft.
- 7For a more secure attachment of the neck, consider using hot glue (with adult supervision) in addition to tape. This can create a very strong bond, especially if you're using heavier cardboard.
- 8Don't be afraid to get messy with the decorating! Glitter, stickers, fabric scraps, and even small buttons can be incorporated to make your cardboard guitar truly one-of-a-kind.
Related Activities You Might Enjoy
Frequently Asked Questions
What kind of paper is best for making a guitar?
For the main body of the guitar, a sturdy cardboard tube is ideal, such as those from paper towels, wrapping paper, or mailing tubes. For the neck and headstock, a thicker, more rigid cardboard, like that found in cereal boxes or shipping boxes, will provide better structural integrity and prevent bending. When it comes to decorating, you can use a variety of papers, including construction paper, cardstock, or even old magazines for collage effects. For the 'strings,' thinner paper strips, yarn, or rubber bands work best, offering different visual and tactile qualities depending on your preference.
How do I make the guitar strings?
There are several fun ways to create the guitar strings for your DIY instrument. The simplest method is to cut thin strips of paper or construction paper, about 1/4 inch wide, and then glue or tape them across the soundhole, stretching them tautly up to the headstock. For a more tactile and visually appealing string, you can use yarn or string. You might need to punch small holes in the headstock and tie the ends securely, or use a strong craft glue. For a bouncy, strumming effect, stretch rubber bands across the soundhole and attach them to the headstock. Experiment with different tensions to see how it affects the look and feel of your guitar.
Can I make a playable paper guitar?
This cardboard tube guitar craft is primarily designed for imaginative play and visual appeal, rather than producing actual musical notes like a real instrument. While you can strum the paper or rubber band 'strings' and create fun strumming sounds, it won't produce distinct musical pitches. The joy of this craft lies in the creative process of building and decorating your own unique instrument, and then using it as a prop for pretend play, singing, and storytelling. It’s a fantastic way to engage children’s creativity and fine motor skills.
What age is this paper guitar craft suitable for?
This paper guitar craft is generally suitable for children aged 6 and up. At this age, children typically have developed enough fine motor skills to handle scissors and tape with some guidance. Younger children, around ages 4-5, can certainly participate, but they will require more direct adult supervision and assistance, especially when it comes to cutting with scissors or using a craft knife. An adult should always handle the craft knife for safety reasons. The decorating aspect is perfect for all ages, allowing for a wide range of creative expression.
How long does it take to make a cardboard tube guitar?
The actual assembly of the cardboard tube guitar, including cutting and taping the pieces together, usually takes about 30-45 minutes. However, the decorating phase can vary significantly depending on the complexity of the designs and the amount of detail you wish to add. If you're doing simple coloring, it might only add another 15-20 minutes. If you're painting intricate patterns, adding glued-on embellishments, or creating detailed paper cutouts, the decorating time could extend to an hour or more. Factor in drying time for paint and glue, which can add several hours to the overall project duration.
What are some ways to make the guitar look more realistic?
To enhance the realism of your cardboard tube guitar, consider adding details that mimic a real instrument. You can draw or glue on tuning pegs on the headstock, create a bridge by gluing a small piece of cardboard or a craft stick across the body near the bottom, and add a soundhole rosette (a decorative pattern around the soundhole) using colored paper or paint. For the strings, using actual guitar strings (if you have old ones) or even thicker yarn can give a more authentic look. Painting the guitar with wood grain patterns or a glossy finish can also contribute to a more realistic appearance.
What Next?
Congratulations on creating your very own cardboard tube guitar! This project is a fantastic springboard for further creativity. Consider adding more elaborate details like pickguards, volume knobs, or even a strap made from fabric scraps. For a truly unique instrument, try different tube sizes or combine multiple tubes for a larger guitar. Once your masterpiece is complete, it can serve as a wonderful prop for imaginative play, a unique room decoration, or even a gift for a budding musician. Store it carefully to preserve its artistic integrity for future jam sessions!
Free: 10 Paper Crafts Anyone Can Make in 5 Minutes
Get our beginner guide + new craft ideas weekly.
No spam. Unsubscribe anytime.
Did you complete this activity?
Related