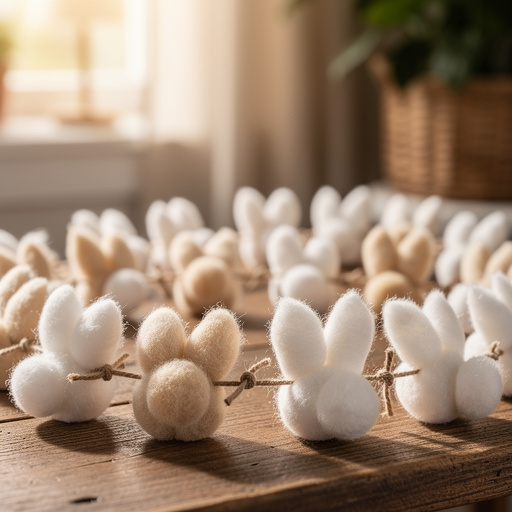
How to Make a Bunny Tail Cotton Ball Garland — Easy Step-by-Step Guide
Craft a whimsical garland featuring fluffy bunny tails made from cotton balls. A simple and sweet decoration for your Easter celebrations.
Quick answer
To make a Bunny Tail Cotton Ball Garland, you need cotton balls, string, and glue, taking about 30 minutes. Start by gluing cotton balls onto a string, spacing them evenly. This beginner-friendly activity has 7 steps and is perfect for families with young children, offering a delightful way to add a touch of spring charm to your home.
What you need
Shop on Amazon · As an Amazon Associate we earn from qualifying purchases. Links above are affiliate links — we may earn a commission at no extra cost to you.
Welcome to the delightful world of DIY Easter decor! This Bunny Tail Cotton Ball Garland is an incredibly charming and simple project that brings a touch of whimsical spring magic into your home. Its fluffy, cloud-like appearance evokes the softness of bunny tails, making it a perfect addition to your Easter celebrations or any spring-themed gathering. This craft is exceptionally beginner-friendly, making it an ideal activity for families to enjoy together, fostering creativity and creating lasting memories. Get ready to transform everyday materials into a beautiful, handcrafted decoration that will surely bring smiles.
On this page
Step-by-Step Instructions
- 1
**Step 1: Prepare Your Workspace and Materials.** Before you begin, clear a clean and well-lit area for crafting. Lay out all your chosen materials, ensuring everything is within easy reach. This includes your cotton balls, string, glue, and any optional decorative items. Having everything organized beforehand will make the crafting process much smoother and more enjoyable, especially if working with children.
- 2
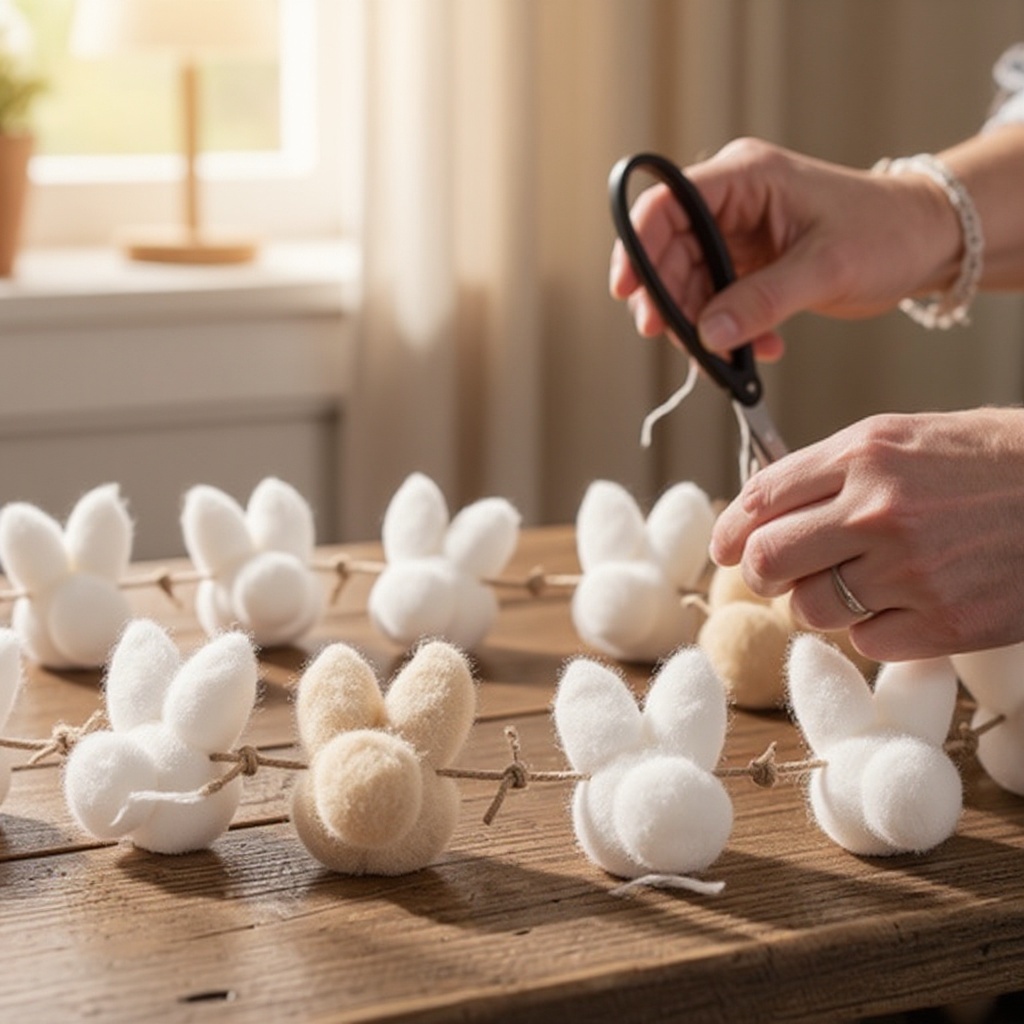
**Step 2: Determine and Cut Your Garland Length.** Decide how long you want your Bunny Tail Cotton Ball Garland to be. Measure and cut your string or twine to this desired length using sharp scissors. Remember to add a few extra inches to each end of the string; these will serve as loops for easy hanging later on. A measuring tape can help ensure consistent spacing between your bunny tails.
- 3
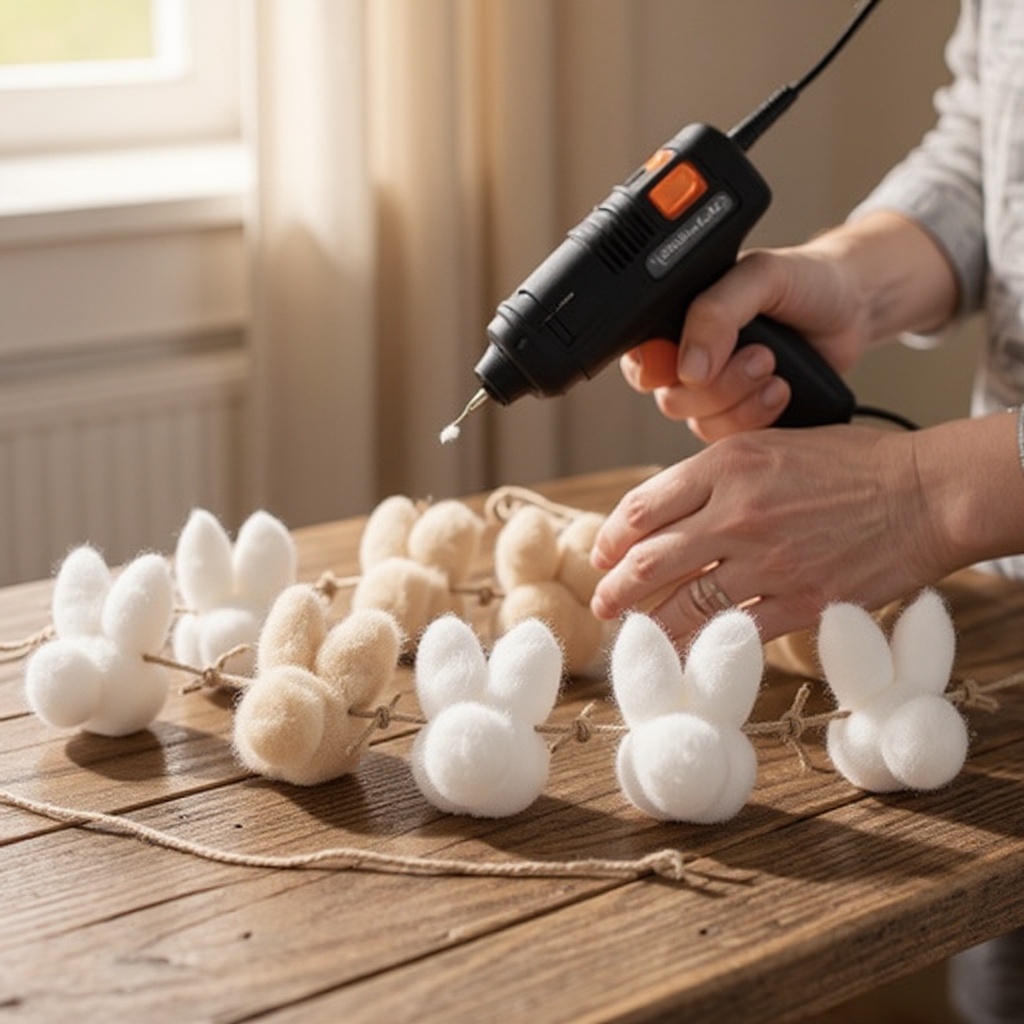
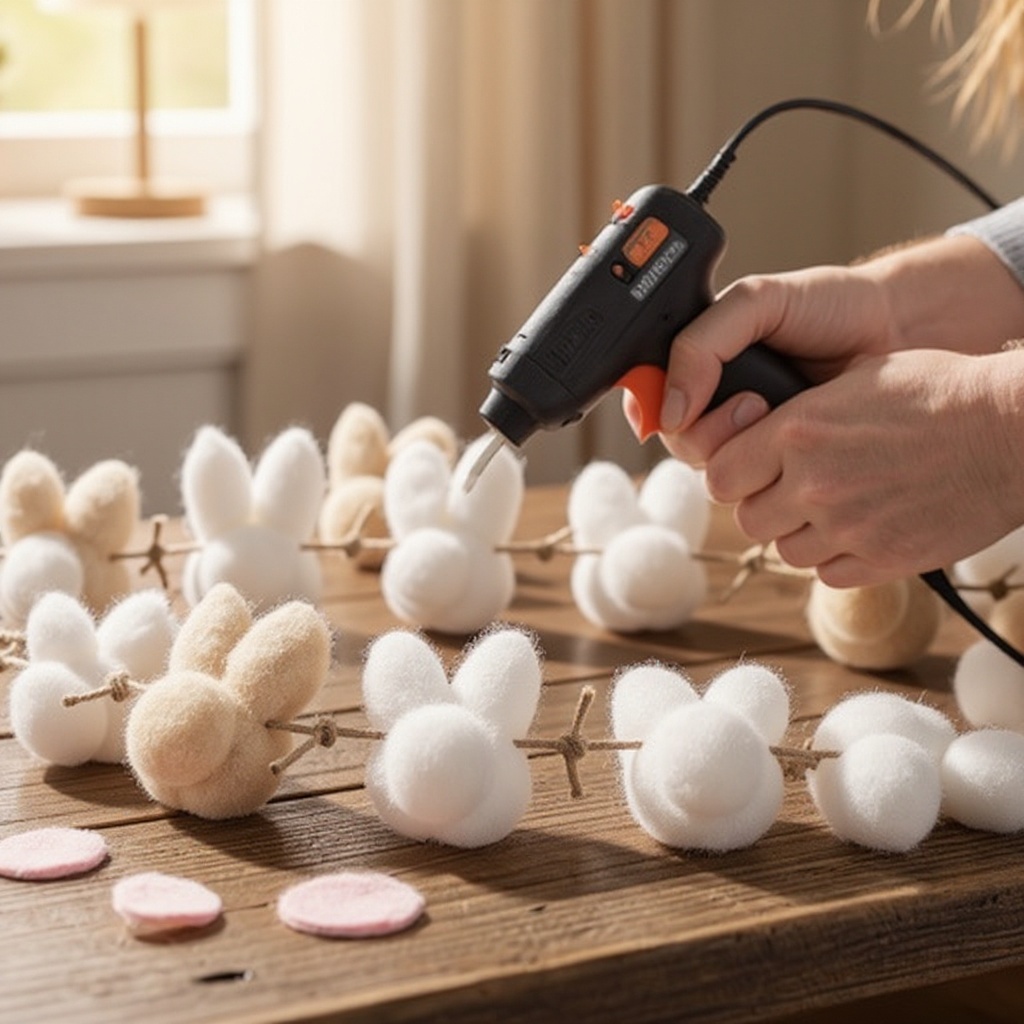
**Step 3: Prepare Your Adhesion Method.** If you are using white craft glue, open the bottle and have it ready. If you're using a hot glue gun, plug it in and allow it to heat up fully according to the manufacturer's instructions; ensure it's placed on a heat-resistant surface and kept away from children. If you plan to use a needle and thread, thread your string through the eye of a large-eyed needle now.
- 4
**Step 4: Apply Adhesive to the First Cotton Ball.** Take your first cotton ball and decide which side you want to attach to the string. Apply a small, concentrated amount of glue to this specific side. If using craft glue, a dab from the bottle or a small amount spread with a brush works well. For hot glue, a small bead of glue is sufficient; avoid excessive amounts that will ooze out.
- 5
**Step 5: Attach the First Cotton Ball to the String.** Carefully press the glued side of the cotton ball firmly onto the string. Hold it in place for a few seconds to allow the glue to begin setting, ensuring a secure bond. If you're using a needle, you can thread the needle through the center of the cotton ball and then pull the string through, securing it with a knot or a dab of glue on the back.
- 6
**Step 6: Space and Attach Subsequent Cotton Balls.** Determine the spacing you desire between each bunny tail. A common and attractive spacing is about 1 to 2 inches apart. Apply glue to the next cotton ball and press it onto the string at your chosen interval. Continue this process, working your way down the string, ensuring each cotton ball is securely attached and evenly spaced.
- 7
**Step 7: Continue Gluing Until Desired Length is Reached.** Keep repeating steps 4, 5, and 6, applying glue to cotton balls and attaching them to the string. Continue this until you have covered the entire desired length of your garland. It's important to maintain consistent spacing for a visually appealing and uniform look. Take your time to ensure each cotton ball is firmly adhered.
- 8
**Step 8: Add Hanging Loops.** Once you have attached the last cotton ball, you should have a few inches of string remaining at each end. You can leave these as is for tying, or you can create small loops by folding the end of the string back on itself and securing it with glue or a knot. These loops will make it much easier to hang your finished garland.
- 9
**Step 9: Allow Glue to Dry Completely.** Before handling or hanging your garland, it's crucial to allow all the glue to dry thoroughly. This is especially important if you used white craft glue, as it needs time to cure and become strong. Rushing this step can lead to cotton balls detaching. Let the garland rest undisturbed for at least an hour, or longer if needed.
- 10
**Step 10: (Optional) Create and Attach Inner Ears.** If you wish to add a more detailed bunny look, now is the time to create the inner ears. Cut small, oval shapes from your pink felt or cardstock. These should be proportionally smaller than the cotton balls. Use a small amount of glue to attach one pink oval to the front of some, or all, of your cotton ball 'bunny tails'.
- 11
**Step 11: (Optional) Add Decorative Bows.** For an extra touch of charm, you can tie small bows around the string between the cotton balls. Cut small pieces of ribbon or twine and tie them into neat bows. This adds texture and color, further enhancing the festive appeal of your garland. Ensure the bows are tied securely so they don't unravel.
- 12
**Step 12: Inspect and Trim Any Loose Threads.** Once the glue is completely dry and any optional embellishments are added, carefully inspect your garland. Trim any stray glue strands or loose threads from the string or cotton balls for a clean, polished finish. This final check ensures your garland looks its best.
Tips & Troubleshooting
- 1For younger children, using white craft glue and letting it dry thoroughly between attaching cotton balls is a safer and less messy option than a hot glue gun. This method also allows them more time to practice their fine motor skills without the rush of fast-drying adhesive.
- 2To make the garland more festive, you can tie small bows made of ribbon or twine around the string between the cotton balls. Consider using pastel-colored ribbons or even small pieces of burlap for a rustic touch that complements the cotton balls beautifully.
- 3If you want a more uniform look, try to use cotton balls of similar size and shape. You can even sort through your bag of cotton balls beforehand to select the fluffiest and most consistent ones for your project.
- 4Hang your finished garland above a doorway, on a mantelpiece, or across a window for a charming Easter display. It also looks lovely draped around a mirror or along the edge of a shelf, adding a whimsical touch to any room.
- 5Experiment with different types of string or twine. Natural jute twine offers a rustic, earthy feel, while colorful baker's twine or even thin yarn can add pops of color and a softer aesthetic to your garland.
- 6Don't be afraid to mix and match! You can create sections of plain bunny tails and then add sections with the pink felt ears for visual interest. This allows for a personalized and unique garland design.
- 7If you're concerned about the cotton balls shifting on the string, you can add a tiny dab of glue on the string on either side of each cotton ball once it's attached. This will permanently secure them in place, preventing any movement.
- 8Consider adding a subtle scent to your garland by lightly spraying it with a fabric refresher or a subtle essential oil blend (like lavender or vanilla) after the glue has fully dried. Test on a small, inconspicuous area first to ensure it doesn't discolor the cotton.
Related Activities You Might Enjoy
Frequently Asked Questions
How long does it take to make a cotton ball garland?
This craft typically takes about 30 minutes to an hour to complete, depending on the length of the garland and the age and speed of the crafters. The actual gluing and attaching of cotton balls is quite quick, especially if using a hot glue gun. However, if you're using white craft glue, you'll need to factor in drying time between attaching cotton balls, or allow for a longer drying period at the end. It's a quick and rewarding activity for families looking for a fun, short-term project that yields beautiful results for seasonal decor.
What kind of glue is best for a cotton ball garland?
White craft glue (like PVA or Elmer's glue) is a great option for a mess-free and safe experience, especially for younger children who can help with the crafting process. It dries clear and holds the cotton balls securely, though it requires a bit more drying time. A hot glue gun can be used by adults for faster adhesion, significantly speeding up the process. However, it requires strict adult supervision due to the high temperatures involved. Both methods will result in a durable garland, so choose based on your comfort level and the age of the crafters.
Can I make this garland with my toddler?
Yes, this is a wonderful craft for toddlers with adult supervision! They can help with applying glue (with guidance, perhaps using a glue stick or a large-tipped craft glue bottle) and pressing the cotton balls onto the string. Focus on the process, not perfection! Toddlers might not achieve perfectly even spacing, but the charm of their handmade creation will be undeniable. It's a fantastic way to develop their fine motor skills and introduce them to the joy of crafting. Ensure you use non-toxic glue and keep small parts away from their mouths.
How do I hang the cotton ball garland?
To hang your finished cotton ball garland, you'll want to utilize the extra string left at each end. You can create small loops by folding the end of the string back on itself and securing it with a knot or a dab of glue. These loops can then be used to tie the garland to hooks, nails, or even small command strips placed on your wall. Alternatively, you can simply tie the ends of the string directly around banisters, curtain rods, or branches. For a temporary display, strong double-sided tape can also work on smooth surfaces.
Can I make the bunny tails more realistic or fluffy?
Absolutely! To make your bunny tails more realistic and fluffy, start with high-quality, plump cotton balls. If you find your cotton balls are a bit compressed, you can gently tease apart the fibers on the outer edges to create a softer, more voluminous look before gluing them. For an even more enhanced fluffiness, you can layer two cotton balls together for each 'tail,' gluing them back-to-back before attaching to the string. Another technique is to use a small amount of fiberfill stuffing and wrap it around a small ball of glue on the string, then gently shape it into a fluffy tail.
What other decorations can I add to the garland?
The possibilities for embellishing your Bunny Tail Cotton Ball Garland are endless! Beyond the optional pink felt ears, consider adding small, colorful pom-poms in pastel shades like yellow, blue, or green to represent spring flowers. You could also tie tiny, colorful ribbons or bows around the string between the cotton balls for added texture and visual interest. For a more whimsical touch, small wooden beads or even miniature faux carrots could be incorporated. If you're feeling adventurous, you could even paint some of the cotton balls in soft spring colors before attaching them.
What Next?
Congratulations on creating your beautiful Bunny Tail Cotton Ball Garland! This versatile decoration can be hung in so many ways to enhance your spring ambiance. Consider draping it across a fireplace mantel, along a bookshelf, above a window, or even as a festive addition to a party backdrop. For future celebrations, store your garland carefully by coiling it loosely and placing it in a breathable container to prevent crushing the cotton balls. You can also experiment with variations, such as adding small felt carrots or pastel-colored beads between the bunny tails for extra flair. This project is a fantastic stepping stone into more elaborate spring crafts; perhaps your next adventure could be creating matching bunny ear headbands or painted egg decorations!
Free: 10 Paper Crafts Anyone Can Make in 5 Minutes
Get our beginner guide + new craft ideas weekly.
No spam. Unsubscribe anytime.
Did you complete this activity?
Related