How to Master Drawing Fundamentals with Line Control Exercises — Easy Step-by-Step Guide
Unlock your drawing potential with these simple yet powerful line control exercises. Perfect for building confidence and foundational skills for all ages.
Quick answer
To master drawing fundamentals, you need paper, pencils, and about 30 minutes. Start by practicing straight lines and curves. This beginner-friendly activity has 8 steps and is perfect for families and kids aged 8+.
What you need
Shop on Amazon · As an Amazon Associate we earn from qualifying purchases. Links above are affiliate links — we may earn a commission at no extra cost to you.
Embarking on your drawing journey can feel daunting, but mastering the basics is the key to unlocking your creative potential. This guide introduces you to fundamental line control exercises, a surprisingly effective and enjoyable way to build confidence and precision. These drills are designed to be accessible to everyone, regardless of age or prior experience, making them a fantastic activity for families, aspiring artists, or anyone looking to refine their hand-eye coordination. Prepare to transform simple marks on paper into the building blocks of your artistic future!
On this page
Step-by-Step Instructions
- 1
Step 1: Take one sheet of paper and orient it vertically. Hold your pencil lightly, about an inch from the tip, between your thumb and index finger, with your middle finger providing support. This grip allows for greater freedom of movement and control.
- 2
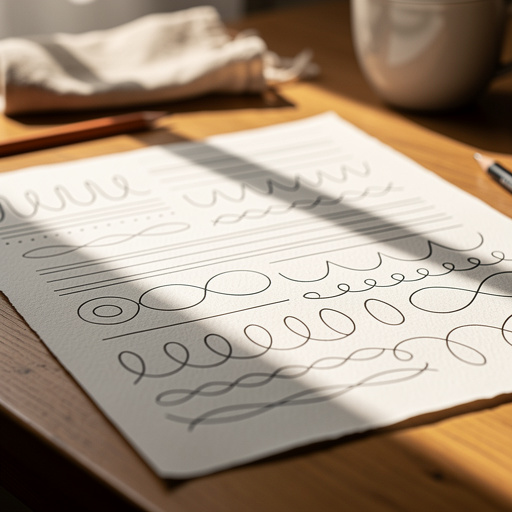
Step 2: Practice drawing a series of parallel straight lines from top to bottom across the entire page. Aim for consistent spacing and pressure, imagining you are creating invisible guidelines that your pencil should follow. Try to make each line a single, unbroken stroke.
- 3
Step 3: Fill another page with horizontal parallel lines, moving from left to right. Focus on keeping the lines straight and evenly spaced, maintaining a steady hand and consistent pencil pressure. This exercise helps develop control over lateral movements.
- 4
Step 4: On a new page, draw diagonal lines from the top-left to the bottom-right, filling the page with parallel strokes. This requires a slightly different arm motion and angle, encouraging you to adapt your drawing posture and technique.
- 5
Step 5: Repeat Step 4, but draw diagonal lines from the top-right to the bottom-left. This diagonal direction further challenges your control and helps you understand how different angles affect your line quality and consistency.
- 6
Step 6: Take a fresh page and practice drawing a series of connected curves that flow smoothly. Imagine drawing waves or gentle hills, focusing on creating a consistent arc and avoiding sharp angles. Let your arm guide the motion for a more fluid result.
- 7
Step 7: Fill a page with circles of varying sizes, trying to make them as round as possible. Don't worry about perfection; focus on the motion of drawing a continuous loop. Try drawing them freehand without lifting your pencil too much.
- 8
Step 8: Combine straight lines and curves to create simple abstract patterns, filling the page with a mix of shapes and movements. Experiment with overlapping lines, creating grids with curved elements, or filling spaces with a combination of strokes.
- 9
Step 9: Introduce variations in line weight. On a new page, draw a series of vertical lines, but intentionally vary the pressure from light to dark within each line. This teaches you to control the darkness and thickness of your marks.
- 10
Step 10: Practice drawing dashed lines. Create a page filled with short, evenly spaced dashes, both vertically and horizontally. This exercise hones your ability to create consistent breaks and control the length of individual marks.
- 11
Step 11: Explore spiral patterns. Draw a series of concentric circles that gradually get smaller, or start from the center and spiral outwards. This helps develop smooth, continuous circular motion.
- 12
Step 12: Create cross-hatching. On a new page, draw a series of parallel lines, then go over them with another set of parallel lines at an angle, creating a shaded effect. Experiment with different angles and densities of lines.
- 13
Step 13: Practice drawing ellipses. These are essentially stretched circles and are fundamental for drawing spheres, cylinders, and many other 3D objects. Focus on creating smooth, symmetrical oval shapes.
- 14
Step 14: Fill a page with zig-zag lines. Vary the height and width of your zig-zags, focusing on creating sharp, consistent angles. This builds control for drawing angular shapes and textures.
- 15
Step 15: Draw overlapping circles and ovals. This helps you understand how to create depth and form by showing how shapes interact in space.
- 16
Step 16: Create a page of freehand squares and rectangles. Focus on making the corners as close to 90 degrees as possible and the sides parallel. This is a great exercise for developing straight-line precision.
- 17
Step 17: Combine elements from previous steps. Draw a page filled with a random arrangement of straight lines, curves, circles, and zig-zags. The goal is to create an interesting abstract composition using a variety of your practiced strokes.
- 18
Step 18: Practice drawing parallel curves. Similar to parallel straight lines, but with a flowing, wave-like quality. Ensure the distance between the curves remains consistent.
- 19
Step 19: Fill a page with stippling. Use the tip of your pencil to create many small dots, varying the density to create areas of light and shadow. This is a slow but rewarding technique for building form.
- 20
Step 20: Create a page of contour lines. Imagine drawing the outline of an object without lifting your pencil, focusing on capturing the shape and form through continuous lines. This can be done by observing an object or imagining one.
Tips & Troubleshooting
- 1Don't press too hard on the pencil; lighter strokes are easier to control and erase. Using a lighter touch allows for more flexibility and makes it simpler to correct mistakes without leaving heavy indentations on the paper.
- 2Try drawing with your whole arm, not just your wrist, for smoother, more fluid lines. Engaging your shoulder and elbow allows for larger, more sweeping movements, which are essential for creating long, unbroken lines and curves.
- 3Experiment with different pencil grades (e.g., a softer 4B) to see how it affects your line quality. Softer leads produce darker, richer lines and can be great for shading, while harder leads create lighter, finer lines suitable for detailed work.
- 4If you make a mistake, use your eraser to gently correct it, or simply draw over it to practice control. Don't be afraid of errors; they are opportunities to learn and refine your technique. Sometimes, drawing over a mistake can even lead to interesting artistic effects.
- 5Turn your paper as you draw to find the most comfortable angle for creating different types of lines. Your body mechanics play a crucial role in drawing, and adjusting the paper's orientation can significantly improve your comfort and the quality of your lines.
- 6Focus on the motion and the flow rather than the perfect outcome. The goal of these exercises is to build muscle memory and develop a sense of control over your drawing tools. Enjoy the process of making marks on the paper.
- 7Listen to music or a podcast while you draw. This can help you relax and get into a flow state, making the practice more enjoyable and less intimidating. It can also help you develop a rhythm for your drawing.
- 8Set a timer for each exercise. This helps you stay focused and ensures you're dedicating a specific amount of time to each drill, promoting consistent practice and preventing burnout.
Related Activities You Might Enjoy
Frequently Asked Questions
Why are drawing fundamentals important?
Drawing fundamentals like line control, shape, and proportion are the building blocks of all art. Mastering them gives you the confidence and skill to draw anything you can imagine. Think of them as the alphabet and grammar of visual language. Without a solid understanding of how to create and control lines, draw basic shapes accurately, and understand how objects relate to each other in terms of size and placement, creating complex or realistic drawings becomes significantly more challenging. These foundational skills empower you to translate your ideas from your mind onto paper with greater accuracy and intention, opening up a world of creative possibilities.
How long should I practice drawing fundamentals?
Even 15-30 minutes of focused practice a few times a week can make a significant difference. Consistency is key to building muscle memory and improving your drawing skills. It's more beneficial to practice for shorter, regular periods than to have one long, infrequent session. Aim to integrate these exercises into your routine, perhaps before starting a larger drawing project or as a dedicated warm-up. Over time, you'll notice a marked improvement in your ability to control your lines and shapes, leading to more confident and expressive artwork.
What's the best way to practice drawing lines?
Practice drawing a variety of lines: straight, curved, diagonal, and wavy. Focus on making them consistent in thickness and spacing. Drawing with your arm, not just your wrist, helps create smoother lines. Experiment with different pressures to achieve varying line weights. The key is repetition and mindful observation of your own marks. Try to make each line a single, confident stroke. Don't be afraid to fill entire pages with just one type of line until you feel a sense of mastery over it.
Can kids do these drawing exercises?
Absolutely! These exercises are designed to be accessible for younger artists. They help develop fine motor skills and visual-spatial reasoning, which are beneficial for children's development. For younger children, you might encourage them to focus on the fun of making marks and exploring different movements rather than strict perfection. These drills can be a wonderful way for families to bond and create together, fostering creativity and improving hand-eye coordination in a playful and engaging manner. It's a great way to introduce them to the joy of drawing.
What if my lines aren't perfectly straight or my circles aren't perfectly round?
That's completely normal and expected, especially when you're starting out! The goal of these exercises isn't immediate perfection, but rather the development of control and confidence through practice. Every imperfect line is a step towards improvement. Embrace the wobbly lines and slightly lopsided circles; they are evidence of your effort and learning process. As you continue to practice, you'll naturally see an increase in accuracy and fluidity. The key is persistence and a positive attitude towards your progress, no matter how small it may seem.
How can I make these exercises more challenging as I improve?
As you become more comfortable, you can introduce variations to increase the challenge. Try drawing faster or slower, using different types of pencils (like charcoal or colored pencils), or incorporating shading techniques like cross-hatching and stippling within your line patterns. You could also try drawing on different textured papers or using larger sheets of paper to encourage bigger arm movements. Another great way to challenge yourself is to set specific time limits for each exercise or to try drawing without looking at your paper, relying solely on your muscle memory and spatial awareness.
What Next?
Congratulations on completing these foundational line control exercises! You've taken a significant step towards mastering the art of drawing. To continue your progress, try varying the pressure and speed of your lines, or explore different drawing tools like charcoal or pastels. Consider creating a sketchbook dedicated to these drills, filling its pages with your progress. You can even frame some of your best abstract pattern pages as unique wall art! Remember, consistent practice is your greatest ally in becoming a confident and skilled artist.
Free: 10 Paper Crafts Anyone Can Make in 5 Minutes
Get our beginner guide + new craft ideas weekly.
No spam. Unsubscribe anytime.
Did you complete this activity?