How to Build a Marble Run DIY — Easy Step-by-Step Guide
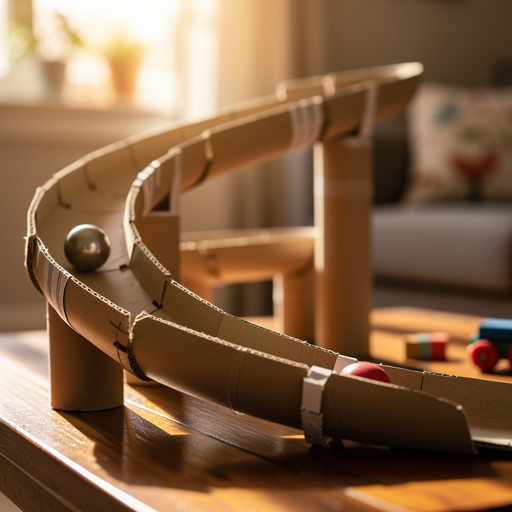
Unleash your inner engineer and build an amazing marble run using recycled cardboard tubes! This fun, screen-free activity is perfect for a rainy afternoon.
Quick answer
To make a marble run DIY, you need cardboard tubes, scissors, tape, and marbles, taking about 60 minutes. Start by cutting tubes at angles. This beginner-friendly activity has 10 steps and is perfect for families with kids aged 6+.
What you need
Shop on Amazon · As an Amazon Associate we earn from qualifying purchases. Links above are affiliate links — we may earn a commission at no extra cost to you.
Looking for a captivating and educational activity that sparks imagination and problem-solving skills? Building a DIY marble run from recycled cardboard tubes is the perfect project! It's an incredibly rewarding, screen-free experience that transforms everyday materials into a dynamic, gravity-powered adventure. This project is ideal for families seeking engaging indoor fun, educators looking for hands-on STEM learning, or anyone who enjoys the satisfaction of creating something functional and exciting from scratch. Get ready to engineer your own thrilling track for marbles to race down!
On this page
Step-by-Step Instructions
- 1
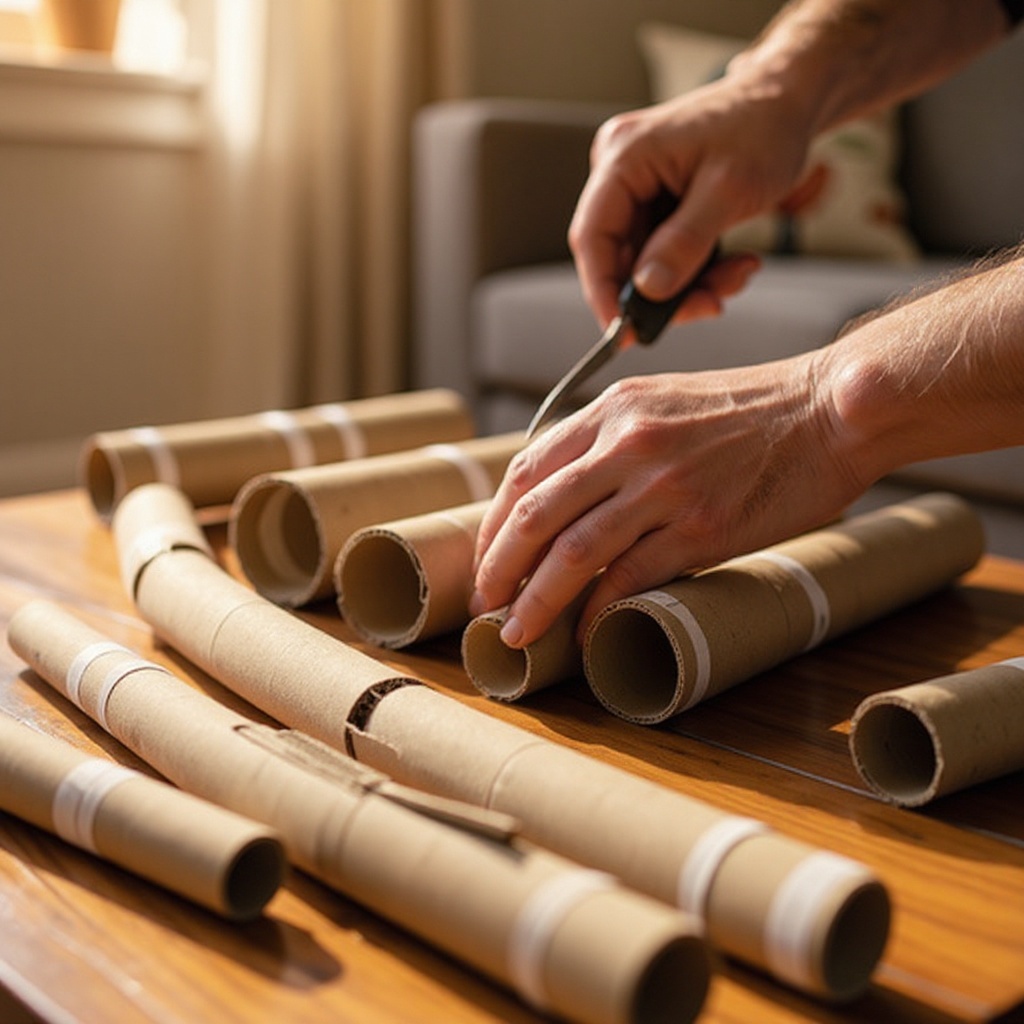
Gather all your cardboard tubes and ensure they are clean and dry. Remove any old labels or residue to ensure tape adheres properly. Having a variety of tube lengths will allow for more dynamic track designs.
- 2
Plan your marble run's general layout and decide where it will be built. Will it cascade down a wall, stretch across a table, or be a freestanding structure? Consider the available space and how gravity will play a role in guiding the marbles.
- 3
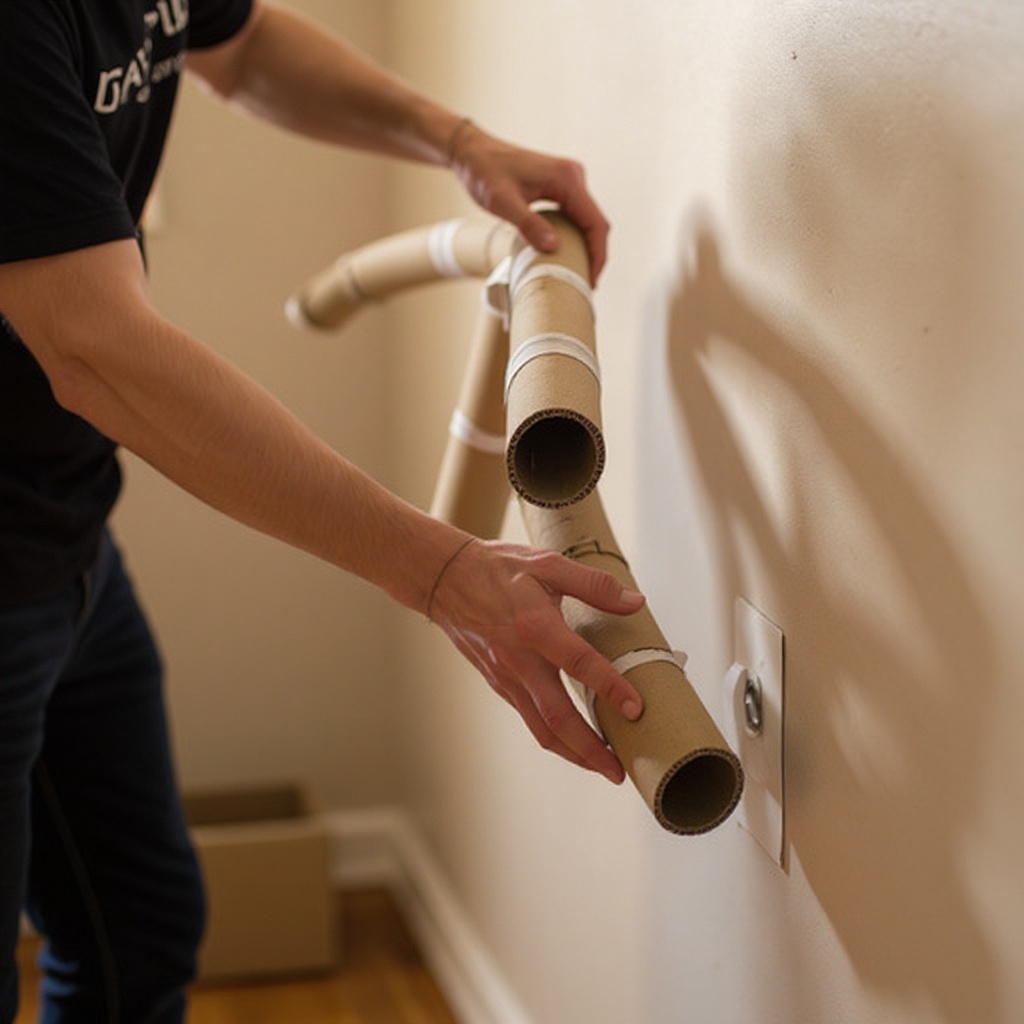
Using scissors or a craft knife (with adult supervision), carefully cut a long slit down one side of each cardboard tube. This slit is crucial as it allows you to bend and angle the tube, creating the necessary slope for the marbles to roll.
- 4
Adjust the angle of the cut to control the steepness of your track sections. A more pronounced angle (cutting deeper into the tube) will create a steeper, faster section, while a shallower cut will result in a gentler, slower slope. Experiment with different angles to see how they affect the marble's speed.
- 5
Begin by attaching your first tube to your chosen base or wall. Use tape to secure it firmly, ensuring it's angled downwards towards where the next section will be. Make sure the tape is applied smoothly to avoid snagging the marble.
- 6
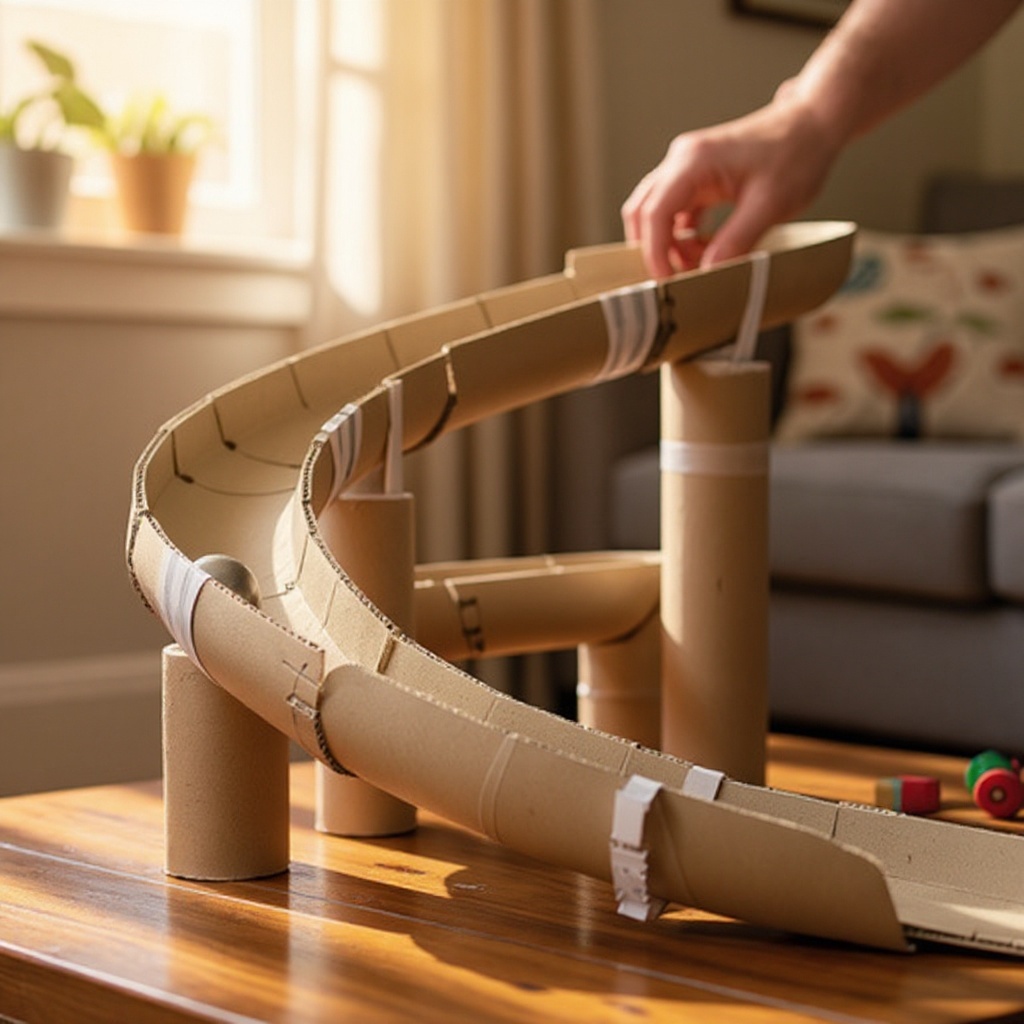
Connect the next tube to the end of the first, ensuring the angle continues the downward path for the marble. Overlap the tubes slightly where they connect to create a smooth transition and prevent the marble from dropping out.
- 7
Continue connecting tubes, creating twists, turns, and drops to make the marble run exciting. Think about how you can incorporate different types of movement, such as gentle curves, sharp turns, or sudden drops to increase the challenge and fun.
- 8
Use extra tape to reinforce any wobbly connections or to create small barriers along the sides of the tubes. These barriers are essential for keeping the marble on track, especially on turns or steeper sections.
- 9
Test your marble run by gently rolling a marble down the completed sections. Observe where it gets stuck, falls off, or loses momentum. Pay close attention to the transitions between tubes and any areas that seem too flat or too steep.
- 10
Adjust the angles of the tubes based on your testing. You might need to increase the downward slope in some areas or flatten out others. Add more tape to secure loose connections or create new sections to improve the marble's flow and speed. Continue testing and refining until the marble completes the run successfully.
- 11
Consider adding a starting point or a 'launching station' at the top of your marble run. This could be a simple funnel or a small platform where you can place the marble before releasing it.
- 12
Introduce different types of turns and inclines. You can create gentle curves by slightly bending the slit tubes, or sharper turns by using shorter tube sections and more pronounced angles. Experiment with creating 'loops' or 'spirals' if you're feeling adventurous.
- 13
Reinforce critical connection points with additional tape or even a dab of hot glue (with adult supervision). This is especially important for sections that experience a lot of marble traffic or are under stress.
- 14
Add 'catch basins' or 'collection points' at the end of your marble run to gather the marbles. This could be a simple box or a designated area where the marbles naturally come to rest.
- 15
If you encounter issues with marbles falling off, create small 'walls' or 'guardrails' by taping strips of cardboard along the sides of the tubes. These can be made from scrap cardboard or even the leftover pieces from cutting the slits.
- 16
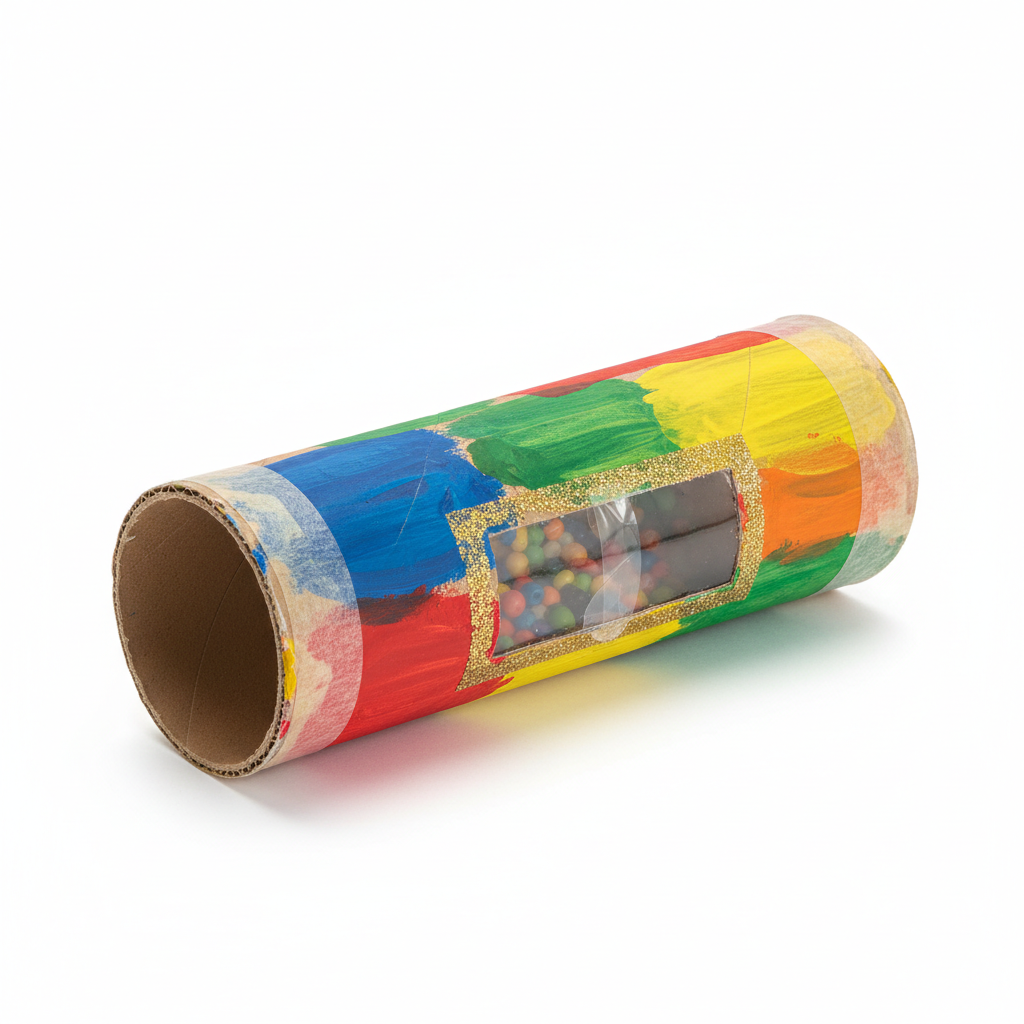
Decorate your marble run! Once the structure is stable and functional, use paint, markers, or stickers to add color and personality. You can create themed tracks or simply make it visually appealing.
- 17
Test with different marbles. Observe how marbles of varying sizes and weights travel down the track. Some might be too large for certain turns, while others might not have enough momentum for flatter sections.
- 18
Consider adding interactive elements. This could include a small ramp made from scrap cardboard, a simple lever mechanism, or even a small tunnel made from a larger tube.
Tips & Troubleshooting
- 1If your tubes are very long, you can cut them in half to create more pieces and more complex turns. This is especially useful for paper towel rolls or wrapping paper rolls, allowing you to build a more extensive and intricate track.
- 2Experiment with different marble sizes! Smaller marbles might fit through tighter turns and steeper drops, while larger ones might require wider tracks and gentler slopes. This adds an extra layer of challenge and discovery to your marble run.
- 3For a more stable and robust marble run, tape the tubes to a large piece of cardboard that can stand on its own or be leaned against a wall. This provides a solid backing and makes it easier to manage multiple tube connections.
- 4If marbles are consistently falling off, try adding small 'walls' or 'guardrails' by taping strips of cardboard along the sides of the tubes. These can be made from the offcuts of your tubes or from other scrap cardboard pieces.
- 5Don't be afraid to get creative with your design! You can add funnels made from cut-off bottle tops, bridges constructed from cardboard scraps, or even small ramps to give your marbles an extra boost.
- 6Consider the physics of your marble run. Marbles gain speed with gravity, so ensure each section has a downward slope. Gentle curves are better for maintaining speed than sharp, abrupt turns, which can cause marbles to lose momentum or fly off.
- 7Use a variety of tape types for different purposes. Masking tape is great for general assembly, while packing tape can offer stronger adhesion for critical joints. Painter's tape is useful for temporary adjustments during the testing phase.
- 8Incorporate sound elements! You can add small bells or chimes that the marbles hit as they pass, creating a more engaging sensory experience for the builder and the observer.
Related Activities You Might Enjoy
Frequently Asked Questions
What are the best materials for a DIY marble run?
The best materials for a DIY marble run are readily available household items that are easy to manipulate and connect. Cardboard tubes, such as those from toilet paper, paper towels, and wrapping paper, are ideal for creating the track sections due to their cylindrical shape and ease of cutting. Strong adhesive tape, like masking tape or packing tape, is essential for securely joining the tubes together and attaching them to a base or wall. Marbles are, of course, the stars of the show for testing and playing. For added stability and design flexibility, a large piece of sturdy cardboard can serve as an excellent base, and optional items like craft sticks or hot glue can provide extra reinforcement for more complex structures.
How do you make a marble run stay together?
To ensure your DIY marble run remains structurally sound and functional, the key is secure adhesion and thoughtful construction. Use strong tape, such as masking tape or packing tape, to firmly attach the cardboard tubes to each other and to your chosen base or wall. Overlap the ends of the tubes slightly where they connect to create a smooth transition and prevent marbles from getting stuck or falling out. Reinforce any connections that seem wobbly or are subjected to significant marble traffic with extra layers of tape or even a small amount of hot glue (with adult supervision). Crucially, ensure that each section of the track has a consistent downward angle to maintain the marble's momentum and prevent it from stopping or rolling backward.
Can kids build a marble run by themselves?
With appropriate adult supervision, children as young as 6 years old can actively participate in and even lead the construction of a DIY marble run. Younger children can assist with gathering materials, planning the general layout, and applying tape to secure the tubes. As they get older, they can take on more complex tasks like cutting the slits in the tubes (with adult help for safety) and designing intricate twists and turns. This project is a fantastic way to foster independence, encourage problem-solving skills as they troubleshoot track issues, and boost their creativity as they envision and build their unique marble pathways. It's a rewarding collaborative activity that builds confidence.
How long does it take to build a marble run?
The time it takes to build a basic DIY marble run can vary, but typically ranges from 45 to 60 minutes for a straightforward design. This timeframe includes gathering all your materials, cleaning and preparing the cardboard tubes, cutting the necessary slits and angles, assembling the track sections, and initial testing. For more elaborate designs with multiple levels, complex turns, or decorative elements, the project could extend to an hour or more. The age and experience of the builders will also influence the duration; younger children might take longer to complete tasks, while older children or adults can often assemble a more intricate run more quickly. The iterative process of testing and refining the track is also a significant part of the build time.
What are some ways to make a marble run more challenging?
To elevate your DIY marble run from simple to challenging, consider incorporating a variety of obstacles and design features. Introduce steeper drops and sharper turns that require precise angles to navigate successfully. You can create 'jump' sections by leaving a small gap between tubes, forcing the marble to fly across. Incorporate tunnels made from larger cardboard tubes or even PVC pipes for a different texture and sound. Adding interactive elements like a simple lever to release marbles, a spinning wheel, or a series of gates that the marble must pass through can also increase the complexity. Experimenting with different marble weights and sizes will also reveal how they interact with various track elements, adding another layer of challenge.
How can I make my marble run more stable and durable?
Ensuring your cardboard tube marble run is stable and durable is key to long-lasting fun. Start by using a sturdy base, such as a large, flattened cardboard box or a piece of thick poster board, to build upon. When attaching tubes, use generous amounts of strong tape, like packing tape, and ensure it's applied smoothly and firmly. For critical connection points or areas that experience a lot of stress, consider reinforcing them with additional tape or even a small amount of hot glue (with adult supervision). If building vertically against a wall, use plenty of tape to secure each section, ensuring it can withstand the weight and momentum of the marbles. Regularly check for any loose connections and reinforce them as needed.
What Next?
Congratulations on building your fantastic cardboard tube marble run! This project is just the beginning of your engineering journey. Consider adding more complex elements like bridges, tunnels made from larger tubes, or even incorporating small pulleys for a unique challenge. You can also paint or decorate your marble run to make it a vibrant display piece. For storage, consider disassembling it carefully or finding a large, flat surface to lean it against. The possibilities are endless, and the learning and fun will continue with every new track you design!
Free: 10 Paper Crafts Anyone Can Make in 5 Minutes
Get our beginner guide + new craft ideas weekly.
No spam. Unsubscribe anytime.
Did you complete this activity?
Related