How to Make a Pinecone Bird Feeder Kit — Easy Step-by-Step Guide
Assemble your own charming pinecone bird feeder kit with this easy-to-follow guide. A wonderful screen-free activity for families to connect with nature.
Quick answer
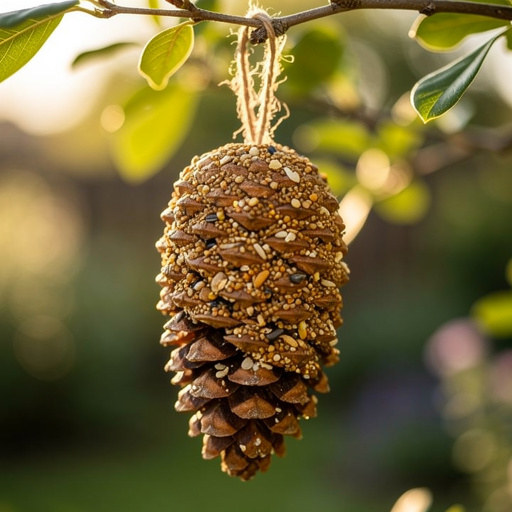
To make a pinecone bird feeder kit, you need pinecones, peanut butter, birdseed, and string, taking about 20 minutes. Start by coating the pinecone in peanut butter. This beginner-friendly activity has 7 steps and is perfect for families and kids aged 4+.
What you need
Shop on Amazon · As an Amazon Associate we earn from qualifying purchases. Links above are affiliate links — we may earn a commission at no extra cost to you.
Embark on a delightful journey into nature with this simple yet rewarding Pinecone Seed Feeder project. More than just a craft, it's an invitation to observe the wonders of the natural world right in your backyard. This activity is perfectly suited for families seeking screen-free bonding time, offering a hands-on experience that educates and entertains children aged four and up. By creating these feeders, you're not only providing a vital food source for local birds, especially during colder months, but you're also fostering a deeper appreciation for wildlife and the environment. Get ready to spread some cheer, one pinecone at a time!
On this page
Step-by-Step Instructions
- 1
Lay down newspaper or a drop cloth to protect your workspace. This step is crucial for easy cleanup, especially when working with sticky peanut butter and loose seeds. Ensure the entire crafting area is covered to prevent any accidental messes on tables or floors.
- 2
Select your pinecones and inspect them for any loose scales or debris. Gently brush them off if necessary. You want pinecones that are open enough to hold the peanut butter and seeds effectively, so avoid tightly closed ones.
- 3
Tie a piece of twine securely around the top of each pinecone, creating a loop for hanging. Make sure the knot is tight and the loop is sturdy enough to support the weight of the feeder once it's coated and hung. Double-check that the twine won't slip off the pinecone.
- 4
Using a butter knife or spatula, spread a generous layer of peanut butter all over the outside of each pinecone, getting into the crevices. Aim for an even coating, ensuring that all the nooks and crannies are filled with peanut butter, as this will act as the 'glue' for the birdseed.
- 5
For more intricate coverage, you can use a small paintbrush to dab peanut butter into the smaller gaps between the pinecone scales. This ensures maximum seed adhesion and provides more food for the birds.
- 6
In a shallow dish or plate, combine the birdseed and optional cornmeal. Mix well. The cornmeal adds a bit of bulk and can help the seeds stick better, but it's not essential if you don't have it on hand. Ensure the birdseed is a good quality mix that appeals to local birds.
- 7
If you're adding extra treats like small unsalted nuts or dried fruit, mix them in with the birdseed now. This will create a more enticing and varied meal for your feathered friends.
- 8
Roll each peanut butter-covered pinecone in the birdseed mixture, pressing gently to ensure the seeds stick all over. You can also use your hands to press the seeds into the peanut butter, making sure every surface is well-covered.
- 9
If some areas are still bare after rolling, you can go back and add a little more peanut butter to those spots and re-roll them in the seed mixture. The goal is a thoroughly coated pinecone.
- 10
Carefully place the coated pinecones on the newspaper to set for about 10-15 minutes, allowing the peanut butter to slightly firm up. This brief setting period helps the seeds adhere more firmly before hanging, preventing them from falling off too easily.
- 11
While the feeders are setting, prepare your hanging location. Identify suitable trees or branches that are accessible but also safe from predators.
- 12
Once slightly set, your DIY bird feeder kits are ready to be hung in trees or on branches for your feathered visitors! Ensure the loop is securely placed over a branch or hook.
- 13
Observe the feeders from a distance to see which birds are attracted to them. This is a great opportunity to learn about local bird species.
- 14
If you are creating these as kits to give away, pack each pinecone individually in a clear plastic bag or wrap them in parchment paper with the twine loop sticking out. Include a small note with instructions on how to hang them.
Tips & Troubleshooting
- 1If peanut butter is too stiff, warm it slightly for a few seconds in the microwave to make it easier to spread. Be careful not to overheat it, as you don't want it to become liquid. Just a few seconds should be enough to soften it to a more spreadable consistency.
- 2For a nut-free option, use sunflower seed butter or a thick mixture of suet and birdseed. Sunflower seed butter is a great alternative for those with allergies, and suet provides a high-energy food source for birds, especially in winter.
- 3Add a sprinkle of dried fruit or small unsalted nuts to the seed mixture for extra variety. This can attract a wider range of bird species and provide additional nutrients. Ensure any nuts are unsalted and chopped into small, manageable pieces for smaller birds.
- 4Hang your feeders in a location visible from a window so you can enjoy watching the birds without disturbing them. This allows for quiet observation and minimizes stress on the birds, encouraging them to visit regularly.
- 5Consider the height at which you hang your feeders. They should be high enough to be out of reach of ground predators like cats but low enough for you to easily reach for refilling or maintenance.
- 6If you live in an area with squirrels, you might want to hang your feeders on a thin branch or use a squirrel baffle to deter them from raiding the feeders. Squirrels can be persistent and will often empty feeders quickly.
- 7To make the feeders last longer and provide a more substantial meal, you can press additional seeds into the peanut butter after the initial rolling. This creates a denser coating and offers more food for the birds.
- 8Clean up any spilled peanut butter or birdseed from the ground beneath the feeder to avoid attracting unwanted pests. A small tray placed underneath can also help catch falling seeds and debris.
Related Activities You Might Enjoy
Frequently Asked Questions
What kind of pinecones are best for bird feeders?
Look for large, open pinecones that have plenty of nooks and crannies for the peanut butter and seeds to stick to. Avoid small, tightly closed pinecones as they offer less surface area for the food. The ideal pinecone will have its scales spread wide apart, creating little pockets where the peanut butter and seeds can nestle. Pinecones that have been collected after a rain or have been exposed to moisture might be more tightly closed, so ensure yours are thoroughly dry. You can even gently open them further by placing them in a warm, dry place for a day or two before crafting. The more texture and space between the scales, the more successful your feeder will be in attracting and holding onto the delicious birdseed.
Can I use crunchy peanut butter for bird feeders?
While crunchy peanut butter can work for making pinecone bird feeders, smooth peanut butter is generally easier to spread evenly and allows more seeds to adhere to the pinecone. The smooth texture ensures a consistent coating, which acts as the perfect adhesive for the birdseed. With crunchy peanut butter, the nut pieces can create uneven surfaces, making it harder to get a uniform layer of seeds. This might result in some areas being less appealing to birds or seeds falling off more easily. If you only have crunchy peanut butter available, you can try to mash the larger chunks a bit to create a smoother consistency, but smooth is definitely the preferred choice for optimal results and ease of application.
How long do DIY pinecone bird feeders last?
These feeders can last for several days to a week, depending on weather conditions and how quickly the birds consume them. In dry, mild weather, they might hold up longer, while rain or heavy winds can cause them to degrade faster. The peanut butter can also melt in very hot temperatures, leading to seeds falling off. It's best to replace them when they look depleted, messy, or if the peanut butter appears to be melting significantly. Regularly checking on your feeders will help you determine when it's time for a fresh batch, ensuring a continuous food source for your feathered visitors.
Where is the best place to hang a pinecone bird feeder?
Hang your feeders from tree branches or shepherd's hooks in a location that is safe from predators like cats, and ideally visible from a window so you can enjoy watching the birds. Placing them in a spot that offers some shelter from harsh weather, like under the canopy of a larger tree, can also help them last longer. Avoid hanging them too close to dense bushes where predators might hide. The visibility from a window is key for enjoyable birdwatching without disturbing the birds themselves. Ensure the branch or hook is sturdy enough to support the weight of the feeder, especially after it has been coated with peanut butter and seeds.
What if my peanut butter is too hard to spread?
If your peanut butter is too stiff and difficult to spread, you can warm it slightly to make it more pliable. Place the peanut butter in a microwave-safe bowl and heat it for just a few seconds – 10 to 15 seconds should be sufficient. Stir it well after heating, as the heat can be uneven. Be very careful not to overheat it, as you don't want it to become runny. The goal is to achieve a consistency that is soft enough to spread easily with a knife or spatula but not so liquid that it drips off the pinecone. This simple trick will make the coating process much smoother and more effective.
Can I make these feeders nut-free for birds with allergies?
Absolutely! For a nut-free option, you can substitute the peanut butter with sunflower seed butter or a thick mixture of suet and birdseed. Sunflower seed butter is a readily available alternative that birds often enjoy. If using suet, ensure it's rendered and mixed with enough birdseed to create a thick paste that will adhere to the pinecone. You can also try using a mixture of vegetable shortening and birdseed, or even a thick paste made from rolled oats and water, though these might not be as appealing or long-lasting as peanut butter-based options. Always ensure any ingredients you use are unsalted and free from artificial additives.
How can I make my pinecone feeders more attractive to a wider variety of birds?
To attract a broader range of feathered friends, consider adding a sprinkle of dried fruit pieces (like raisins or cranberries, chopped small) or small, unsalted nuts (such as chopped peanuts or sunflower seeds) to your birdseed mixture. Different birds have different dietary preferences, and these additions can provide extra appeal. You can also experiment with different types of birdseed blends. For instance, a mix with millet and cracked corn might attract ground-feeding birds, while a blend with sunflower seeds and safflower seeds is popular with finches and cardinals. Ensuring the pinecones are well-coated and hung in a safe, accessible location will also encourage more visitors.
What Next?
Congratulations on creating your very own Pinecone Seed Feeder Kits! These delightful creations are more than just a craft; they're a bridge connecting your home to the vibrant world of birds. Consider making a few extra to gift to friends or family, spreading the joy of nature observation. For a touch of extra flair, you could tie small, colorful ribbons to the twine loops. Once hung, remember to observe from a distance to avoid startling your new avian visitors. As the seasons change, you can experiment with different seed mixes or even add dried berries to attract a wider variety of birds. This project is a fantastic starting point for further nature exploration, perhaps leading to bird identification guides or even building a more permanent birdhouse. Enjoy the delightful spectacle of birds flocking to your handmade feeders!
Free: 10 Paper Crafts Anyone Can Make in 5 Minutes
Get our beginner guide + new craft ideas weekly.
No spam. Unsubscribe anytime.
Did you complete this activity?
Related