How to Make Friendship Bracelet Bead Kits — Tips, Tricks & Common Mistakes to Avoid
Assemble charming friendship bracelet bead kits for your friends, offering a fun and creative activity they can enjoy together or individually.

Quick answer
To make friendship bracelet bead kits, you need assorted beads, embroidery floss, scissors, and small containers, taking about 30 minutes to assemble. These kits provide a fun, screen-free crafting experience for friends, encouraging creativity and connection.
What you need
Shop on Amazon · As an Amazon Associate we earn from qualifying purchases. Links above are affiliate links — we may earn a commission at no extra cost to you.
Looking for a thoughtful and engaging gift that sparks creativity? Assembling friendship bracelet bead kits is a wonderful project that allows you to share the joy of crafting with your loved ones. These kits are perfect for birthdays, holidays, or just because, offering a delightful screen-free activity that fosters connection and personal expression. Whether for a group of friends or a solo crafting session, these kits provide all the essentials for creating beautiful, handmade bracelets, making them a truly special and memorable present.
On this page
Step-by-Step Instructions
- 1
Step 1: Gather your supplies. Ensure you have all the beads, floss, cords, containers, scissors, and packaging materials ready before you begin assembly. This will make the process much smoother and more efficient, preventing last-minute scrambles and ensuring a professional finish for each kit.
- 2
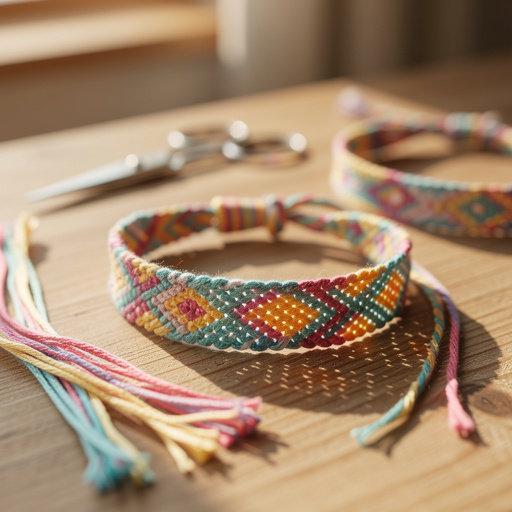
Step 2: Prepare the embroidery floss. Cut 5-10 strands of embroidery floss for each kit, each strand about 30 inches long. This length is ideal for creating bracelets without being too cumbersome, allowing for various knotting techniques and lengths. For thicker bracelets, consider using more strands.
- 3
Step 3: Sort and organize the embroidery floss. Gently tie the strands together at one end with a small piece of floss or a colorful thread, leaving a loop for easy attachment to a clipboard or pin. This keeps them organized and prevents tangling during storage and use, making the crafting process more enjoyable for your friend.
- 4
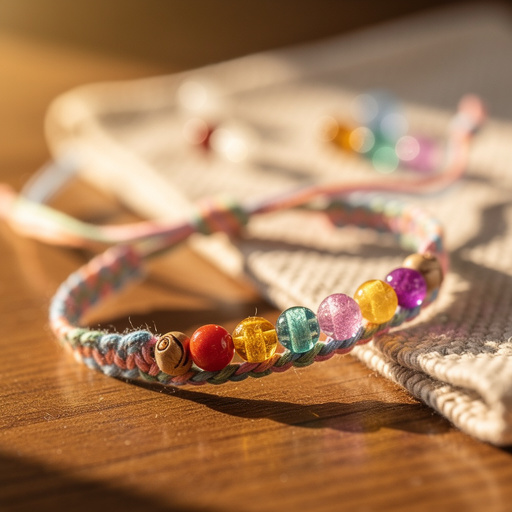
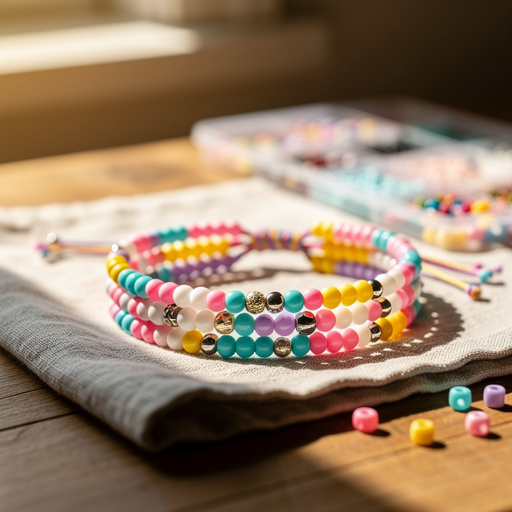
Step 4: Select seed beads for each container. Choose a variety of colors and finishes for each of the 10 plastic containers. Aim for about 20 grams of seed beads per container, ensuring a good mix of popular colors and perhaps a few metallic or iridescent options for added sparkle.
- 5
Step 5: Add accent beads. Distribute the larger accent beads, such as alphabet beads or small charms, among the containers. Include a few unique pieces in each to make the kits feel special and personalized, perhaps spelling out a common positive word or including a variety of shapes.
- 6
Step 6: Include elastic cord and jewelry wire. Cut a 1-yard piece of clear elastic cord and a 1-yard piece of jewelry wire for each kit. These are essential for different bracelet-making techniques, offering versatility for creating stretchy bracelets or more structured beaded designs.
- 7
Step 7: Add scissors and instruction cards. Place one pair of sharp embroidery scissors and one pre-printed instruction card into each kit. The instructions should cover basic knotting and beading techniques, ensuring your friend has the foundational knowledge to start crafting immediately.
- 8
Step 8: Assemble the containers. Carefully place the sorted seed beads, accent beads, elastic cord, and jewelry wire into their respective plastic containers. Ensure the lids snap shut securely to prevent spills, and consider adding a small label to each container if you've organized beads by type or color.
- 9
Step 9: Organize the floss bundles for packaging. For the embroidery floss, you can either tie them together with a small piece of floss or use a small binder clip to keep them neat and prevent tangling within the gift bag. This ensures the floss remains presentable and easy to work with.
- 10
Step 10: Prepare the instruction cards. Ensure the instruction cards are clear, concise, and easy to understand, covering at least one basic knotting technique (like a square knot or a simple braid) and how to thread beads onto the cords. Visual aids like simple diagrams can be extremely helpful for beginners.
- 11
Step 11: Add a personal touch to the floss. You can tie a small, decorative bead onto the knot of the floss bundle as a charming detail. This small embellishment adds an extra layer of thoughtfulness and visual appeal to the floss component of the kit.
- 12
Step 12: Consider a bead sorting tray. If you have extra small bead trays or even small muffin tins, these can be a fantastic addition to the kit, making the actual crafting process much easier for your friend by providing a designated space for beads.
- 13
Step 13: Test the container closures. Before packaging, double-check that all the plastic container lids are securely fastened. This is crucial to prevent beads from spilling during transport or storage, ensuring the kit arrives intact and ready for crafting.
- 14
Step 14: Select a diverse bead selection. When choosing beads, aim for a wide range of colors, shapes, and sizes to offer maximum creative freedom to your friends. A good mix of opaque, transparent, metallic, and matte finishes will provide ample design possibilities.
- 15
Step 15: Include a variety of cord types. Offering both embroidery floss and elastic cord provides versatility, allowing for different bracelet styles and closure methods. This caters to various preferences and skill levels.
- 16
Step 16: Finalize the packaging. Place one assembled container, the prepared embroidery floss bundle, and the instruction card into a decorative gift bag or box. If using bead trays, place them inside the bag as well. Ensure the gift bags or boxes are sturdy enough to protect the contents and visually appealing.
- 17
Step 17: Add a personal note. Write a short, handwritten note to each friend, explaining the kit and wishing them happy crafting. This adds a personal and heartfelt element to the gift, making it even more special.
- 18
Step 18: Consider a theme. If your friends have shared interests, you could theme the bead kits, such as 'ocean blues' or 'sparkle and shine,' for an extra personalized touch. This can make the gift feel even more curated and thoughtful.
- 19
Step 19: Add decorative elements to packaging. Tie a ribbon or bow around the gift bag or box for an elegant touch. You can also add a personalized tag with your friend's name and a short, heartfelt message.
- 20
Step 20: Double-check all components. Before handing over the gifts, do a final sweep to ensure every kit has all the necessary components and nothing has been forgotten. This final check guarantees a complete and satisfying crafting experience for your friends.
Tips & Troubleshooting
- 1To make the kits even more special, include a few unique charms or letter beads that spell out your friend's initial or a special word. This adds a deeply personal touch that elevates the gift beyond a generic craft supply and shows you've put extra thought into their individual preferences.
- 2When selecting embroidery floss, consider including metallic or variegated threads for added visual interest. These can create stunning effects in friendship bracelets and make the kits feel more luxurious, offering a step up from standard cotton floss.
- 3If your friends are younger, consider including larger, easier-to-handle beads and pre-cut lengths of elastic cord. This will make the crafting process more accessible and less frustrating for them, reducing the risk of dropped beads and making threading simpler.
- 4For a more eco-friendly option, consider using small glass jars with metal lids instead of plastic containers. They are reusable and add a vintage charm to the kits, appealing to environmentally conscious friends and offering a more sustainable packaging solution.
- 5Include a small diagram or link to a simple video tutorial on your instruction card. While the goal is screen-free, a quick reference can be helpful for beginners who might get stuck on a specific knot, providing a safety net for learning.
- 6Organize the beads within the containers by color or type if you have the time. This makes it easier for your friend to find exactly what they're looking for, streamlining the creative process and reducing potential frustration from sifting through mixed beads.
- 7Don't forget to include a small piece of paper with a few basic knot-tying instructions, like a square knot or a simple braid. This is essential for those who might not be familiar with friendship bracelet techniques, providing them with the fundamental skills to get started.
- 8Consider adding a few extra beads of each type to your kits. This allows for mistakes or the desire to make a slightly longer bracelet without running out of materials, ensuring a more complete and less stressful crafting experience.
Related Activities You Might Enjoy
Frequently Asked Questions
What are the best types of beads to include in a friendship bracelet kit?
The best types of beads for friendship bracelet kits are those that are easy to thread and offer a good variety of colors and textures. Seed beads, which are tiny glass or plastic beads, are a staple for creating intricate patterns and are perfect for filling up space on embroidery floss. Larger accent beads like alphabet beads, small charms (e.g., hearts, stars, initial charms), or faceted glass beads can add personality and visual interest, making each bracelet unique. For younger crafters, consider larger pony beads or smooth wooden beads that are easier to handle and thread, and ensure the bead holes are large enough to accommodate the embroidery floss or elastic cord you provide.
How can I make these friendship bracelet bead kits suitable for different age groups?
To cater to different age groups, adjust the complexity of the materials and instructions. For younger children (ages 6-9), opt for larger beads with bigger holes, pre-cut lengths of elastic cord, and simple threading instructions. Avoid very small beads that can be a choking hazard and focus on bright, appealing colors. For tweens and teens (ages 10-15), you can include a wider variety of seed beads, alphabet beads, and more intricate embroidery floss colors, along with instructions for basic knotting techniques. For adults, you can offer more sophisticated bead options, specialized charms, and perhaps even a small spool of jewelry wire for more advanced designs, along with more complex pattern suggestions.
What if my friend doesn't know how to make friendship bracelets?
That's precisely why the instruction card is so important! Ensure your instruction card includes clear, step-by-step diagrams or written instructions for at least one fundamental friendship bracelet technique, such as a basic square knot or a simple braid. You can also include a QR code that links to a short, beginner-friendly video tutorial online. This provides a helpful resource without requiring constant screen time. The goal is to empower them with the basic knowledge to get started, and the included beads and floss will encourage experimentation and learning through practice.
How can I make the packaging of the bead kits more appealing and gift-worthy?
Presentation is key to making your friendship bracelet bead kits feel like a special gift. Start with sturdy, attractive packaging like decorative paper bags, small gift boxes, or even reusable fabric pouches. Tie a ribbon or bow around the package for an elegant touch. You can also add a personalized tag with your friend's name and a short, heartfelt message. Consider including a small, related item like a cute sticker, a colorful pen, or a small notebook to jot down design ideas, further enhancing the gift experience and making it feel more complete and cherished.
What are some common mistakes to avoid when assembling these kits?
A common mistake is not cutting enough embroidery floss; ensure your strands are long enough (around 30 inches) to comfortably complete a bracelet. Another pitfall is using containers that don't seal properly, leading to spilled beads. Always test the closures. Forgetting to include scissors or clear instructions can also be frustrating for the recipient, so double-check that all essential components are present. Lastly, avoid overcrowding the containers; it's better to have slightly less in each if it means they can be easily accessed and organized by your friend.
Can I include tools other than scissors in the kit?
While scissors are essential, you could consider including a few other small, helpful tools depending on the complexity you're aiming for. A small beading needle can be useful for threading very small beads onto thinner cords. A bead stopper or a small clamp can help keep beads from rolling away while working. For kits aimed at slightly more advanced crafters, a small spool of jewelry wire and crimp beads could open up possibilities for wire-wrapped or more structured designs. However, keep the kit size and cost in mind when deciding on additional tools.
What Next?
Once your friends have completed their bracelets, they'll have a tangible reminder of your thoughtful gift and the fun they had creating it. Encourage them to wear their creations proudly or even gift them to others, continuing the spirit of friendship. For storing leftover beads and floss, small craft organizers or compartmentalized boxes are ideal. As a next project, consider assembling DIY earring kits or personalized candle-making kits, building on the success of these friendship bracelet bead kits. The possibilities for handmade gifting are endless!
Free: 10 Paper Crafts Anyone Can Make in 5 Minutes
Get our beginner guide + new craft ideas weekly.
No spam. Unsubscribe anytime.
Did you complete this activity?
Related