Coffee Filter Marker Chromatography Art
Coffee Filter Marker Chromatography Art is a fun and educational science experiment that transforms ordinary coffee filters and washable markers into beautiful, abstract art pieces. By understanding how water interacts with ink, you can create unique tie-dye effects and explore the principles of chromatography in a visually engaging way. This project is perfect for a rainy day, a classroom activity, or simply a creative outlet for all ages.

Quick answer
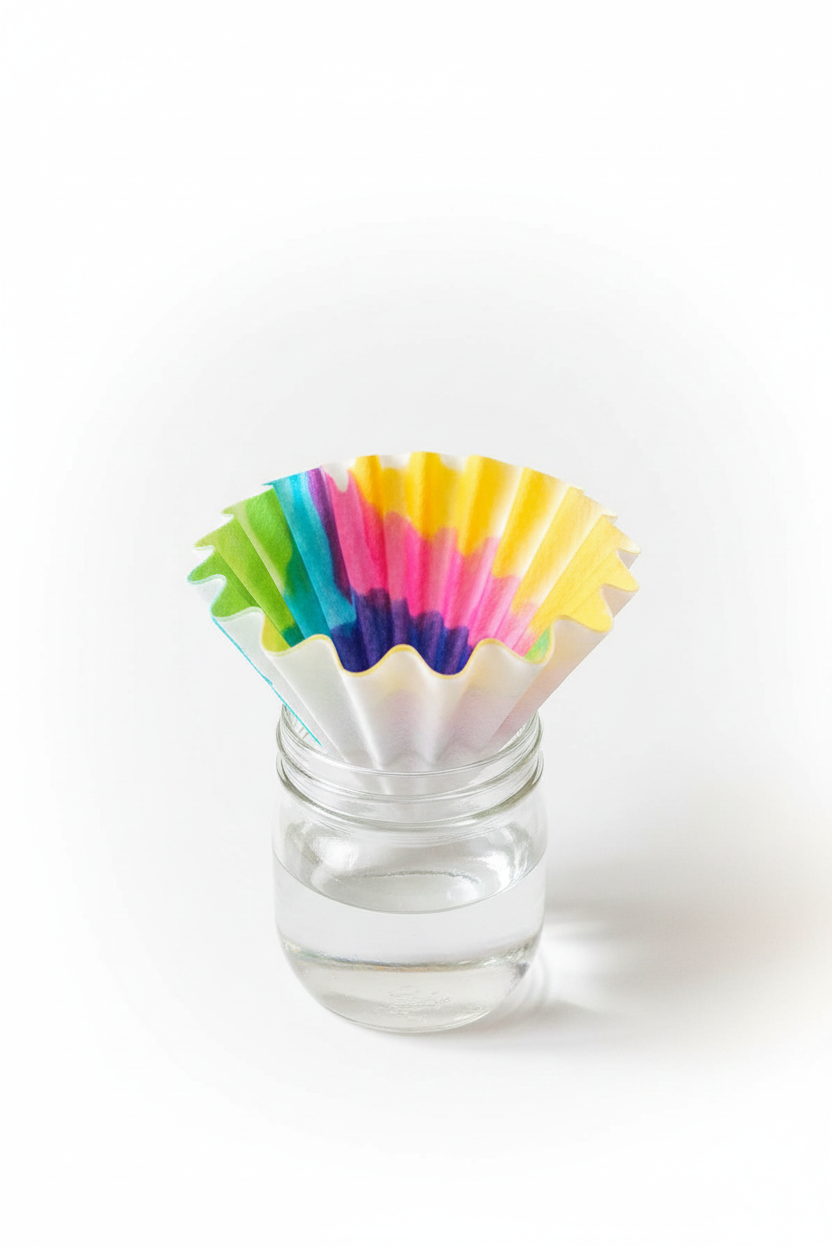
This project uses washable markers, coffee filters, and water to separate ink colors, creating beautiful watercolor-like art through capillary action. It's a simple, engaging science experiment for all ages.
What you need
Shop on Amazon · As an Amazon Associate we earn from qualifying purchases. Links above are affiliate links — we may earn a commission at no extra cost to you.
Unleash your inner scientist and artist with the captivating Coffee Filter Marker Chromatography Art project! This delightful activity is a fantastic way to explore the wonders of science while creating stunning, vibrant artwork. It’s incredibly accessible, requiring only common household items, making it perfect for engaging children in hands-on learning or for anyone seeking a relaxing and visually rewarding creative escape. Prepare to be amazed as simple marker colors transform into intricate patterns and beautiful gradients, offering a unique blend of education and aesthetic appeal that will spark curiosity and joy.
On this page
Step-by-Step Instructions
- 1
Prepare Your Workspace: To prevent any accidental marker stains from transferring to your table or floor, lay down a generous layer of newspaper or a protective plastic tablecloth. This is especially important if you're using darker marker colors or if your coffee filters are particularly thin.
- 2
Select Your Coffee Filters: Choose your coffee filters. Unbleached filters can sometimes yield slightly different results due to their natural composition, offering another variable to explore. Ensure they are dry and free from any creases or tears.
- 3
Color Your Coffee Filter: Using your washable markers, begin to color a large circle or a series of concentric rings onto the flat, round base of the coffee filter. Focus the majority of your coloring in this central area, as this is where the water will begin its journey upwards. You can also add dots or lines radiating outwards from the center for more intricate patterns.
- 4
Experiment with Color Placement: Don't be afraid to layer colors or place them adjacent to each other. For instance, placing blue next to yellow can create a fascinating green separation, or using black can reveal a surprising spectrum of underlying colors. The key is to apply the marker color generously but avoid saturating the paper to the point of tearing.
- 5
Fold the Filter: Carefully fold the colored coffee filter in half, bringing the edges together. Then, fold it in half again, creating a quarter-circle. Continue folding it in half one more time until it is an eighth of a circle. The tip of this folded filter should be the uncolored center of the original circle you colored.
- 6
Prepare the Water Bath: Fill a small glass jar, drinking cup, or even a small plastic container with about 1 to 2 inches of water. The exact amount will depend on the size of your coffee filter and how high you want the colors to travel.
- 7
Adjust Water Level for Desired Effect: For a more subtle effect, use less water. If you want the colors to spread further up the filter, you can add a little more water, but be careful not to overfill the container, as this could cause the filter to become waterlogged too quickly.
- 8
Secure the Filter: Take a pencil, craft stick, or clothespin and gently secure the folded coffee filter to it. The pencil or stick should rest across the top of the folded filter, with the tip of the filter hanging down.
- 9
Begin the Chromatography: Carefully place the folded coffee filter into the water bath. The crucial part here is to ensure that only the very tip of the folded point of the coffee filter is touching the water. The rest of the colored portion should remain above the water level.
- 10
Observe the Capillary Action: As the water begins to be absorbed by the coffee filter paper, you will notice it traveling upwards through the fibers. This process is called capillary action, and it's the driving force behind the color separation.
- 11
Watch the Colors Unfurl: Observe closely as the water moves up the filter, carrying the ink pigments with it. The different components of the marker ink will separate at different rates, creating beautiful, organic patterns, tie-dye effects, and watercolor-like blooms.
- 12
Monitor the Water Absorption: Keep an eye on how quickly the water is absorbed and how far the colors are spreading. If the water level drops too low, you can carefully add a tiny bit more, but avoid disturbing the filter's position.
- 13
Recognize Color Separation: You'll start to see distinct bands of color appearing as the ink components separate. For example, a black marker might reveal streaks of blue, red, and yellow as the water travels up. This is the core of the chromatography experiment!
- 14
Determine Saturation Point: Continue observing until you are satisfied with the color saturation and the spread of the pigments. This process can take anywhere from a few minutes to 30-40 minutes, depending on the marker, the filter, and the water level.
- 15
Gently Remove from Water: Once you're happy with the artistic results, carefully lift the coffee filter out of the water. You can do this by gently removing the pencil or craft stick, or by carefully lifting the entire setup.
- 16
Allow for Initial Draining: Let the excess water drip back into the cup for a few moments. You can gently squeeze the very tip of the filter if you wish, but be careful not to smudge the delicate color patterns that have formed.
- 17
Transfer to Drying Surface: Lay the colored coffee filters flat on your prepared newspaper or protective surface. Ensure they are not overlapping each other to allow for even drying and to prevent colors from bleeding onto each other.
- 18
Final Drying: Allow the coffee filters to dry completely. This typically takes about an hour, but can vary depending on humidity and air circulation. Once dry, they will be stiffened slightly and ready for further crafting or display.
Tips & Troubleshooting
- 1Experiment with Different Marker Brands: Not all washable markers are created equal, and their ink compositions can vary significantly. Try using markers from different brands to see how the color separation and patterns change, which can lead to even more surprising and beautiful results.
- 2Focus on Darker Colors for Dramatic Effects: While all colors will separate to some extent, black, brown, purple, and deep blues often yield the most dramatic and visually striking results. These colors are typically made up of multiple pigments, making their separation particularly fascinating to observe.
- 3Layering Colors Can Create New Hues: Don't hesitate to layer different colors on top of each other before folding the filter. This can lead to the creation of new, unexpected colors as the pigments separate and blend in interesting ways during the chromatography process.
- 4Adjust Water Level for Control: The amount of water in your container is a key factor in controlling the outcome. Less water will result in a more concentrated color spread near the bottom, while more water will allow the colors to travel further up the filter, creating a more diffused and ethereal effect.
- 5Use a Pencil or Craft Stick for Precision: Securing the coffee filter to a pencil or craft stick before placing it in the water helps maintain a consistent contact point. This ensures that the water travels up the filter evenly and prevents the filter from collapsing into the water, which can lead to muddy colors.
- 6Don't Over-Color the Filter: While it's tempting to apply a lot of marker, avoid saturating the coffee filter to the point where the paper becomes overly wet or tears easily. A good, solid coloring is sufficient; the water will do the work of spreading the pigments.
- 7Consider the Type of Coffee Filter: While standard paper coffee filters work wonderfully, you might find that unbleached filters offer a slightly different texture and absorbency, potentially leading to unique artistic outcomes. Experimenting with different types can add another layer of discovery to this project.
- 8Patience is Key for Observation: Chromatography is a process that unfolds over time. Resist the urge to rush the drying or separation. Take the time to truly observe the subtle changes and the way the colors interact and move up the filter; this is where the magic truly happens.
Related Activities You Might Enjoy
Frequently Asked Questions
What is chromatography and how does it apply to this art project?
Chromatography is a scientific technique used to separate mixtures into their individual components. In this art project, the 'mixture' is the ink from your washable markers, and the 'solvent' is the water. As the water travels up the porous coffee filter paper through capillary action, it carries the different colored pigments in the ink with it. Because each pigment has a different solubility and affinity for the paper, they travel at different speeds, causing them to separate and create distinct bands or patterns of color. This visually demonstrates the principle of chromatography in a fun and accessible way, revealing the hidden colors within seemingly solid marker hues.
Why do some marker colors separate better than others?
The effectiveness of color separation in this project depends on the composition of the marker ink. High-quality washable markers, especially those designed for art and craft, often contain multiple pigments to create a single color. For instance, a black marker might be a blend of blue, red, and yellow pigments. When water is introduced, these individual pigments separate based on their properties like solubility and how strongly they bind to the paper fibers. Colors like black, brown, and purple are frequently made from a complex mix of pigments, leading to more dramatic and visible separation. Simpler, primary colors might be made of fewer pigments, resulting in less noticeable separation.
Can I use permanent markers for this project?
No, it is strongly recommended to use only washable markers for this coffee filter art project. Permanent markers are designed to be water-resistant and do not break down easily with water. If you were to use permanent markers, the ink would likely not travel up the coffee filter with the water, and you would not achieve the desired color separation or artistic effect. The beauty of this project lies in the way washable inks interact with water, allowing for the fascinating reveal of underlying pigment colors. Permanent markers would simply create a colored smudge or remain largely unchanged.
What can I do with my finished coffee filter art?
Your finished coffee filter art pieces are incredibly versatile and can be used in a variety of creative ways! Once completely dry, they can be trimmed into shapes and glued onto greeting cards or handmade gift tags for a unique touch. They make beautiful bookmarks, or you can punch a hole in the top and hang them as delicate suncatchers in a window. You could also layer several dried filters together to create a more complex piece of art, or even use them as decorative elements in scrapbooking projects. Their delicate, watercolor-like appearance adds a special handmade charm to any application.
How can I make the colors spread further up the coffee filter?
To encourage the colors to spread further up the coffee filter, you can adjust a few variables. Firstly, ensure you are using a good quality, absorbent coffee filter paper. Secondly, use a slightly deeper water bath, ensuring the tip of the filter is submerged a bit more, but be careful not to let the colored part of the filter touch the water directly. Thirdly, consider using markers that are known to have a higher concentration of pigments that are more soluble in water. Finally, patience is key; allowing the water to travel for a longer period will naturally lead to a greater spread of color. You can also try folding the filter into a more pointed shape to create a narrower channel for the water to travel.
Are there any safety concerns with this project?
This project is generally very safe for all ages, as it primarily involves common household items like coffee filters, washable markers, and water. However, adult supervision is always recommended, especially for younger children, to ensure they handle the materials appropriately and do not ingest any of the markers or water. It's also wise to protect your workspace with newspaper or a plastic cloth, as marker ink, even washable, can sometimes stain surfaces if not handled carefully. Beyond these minor precautions, it's a wonderfully safe and enjoyable activity for everyone involved.
What Next?
Once your coffee filter art is completely dry, you'll have a collection of unique, vibrant creations ready to be admired or transformed into further crafts. Consider using them as decorative elements for greeting cards, bookmarks, or even as delicate suncatchers by attaching them to a window. For a more advanced exploration, try experimenting with different types of paper or even fabric markers to see how the chromatography process varies. This project is a gateway to understanding more complex scientific principles and a wonderful way to add a splash of handmade beauty to your world.
Free: 10 Paper Crafts Anyone Can Make in 5 Minutes
Get our beginner guide + new craft ideas weekly.
No spam. Unsubscribe anytime.
Did you complete this activity?
Related
You might also like
Baking Soda Fizzing Paint
Density Bottle with Oil & Water
Sparkling Crystal Garden
Floating Egg Density Challenge
Sparkly Borax Slime Fun