How to Create Fabric Ink Stencil Prints — Easy Step-by-Step Guide
Discover the joy of creating unique fabric designs with simple stencils and fabric ink. This beginner-friendly activity is perfect for personalizing tote bags, t-shirts, and more.
Quick answer
To make fabric ink stencil prints, you need fabric, stencils, fabric ink, and a sponge brush, taking about 60 minutes. Start by preparing your fabric and stencil. This beginner-friendly activity has 10 steps and is perfect for families with kids aged 6+.
What you need
Shop on Amazon · As an Amazon Associate we earn from qualifying purchases. Links above are affiliate links — we may earn a commission at no extra cost to you.
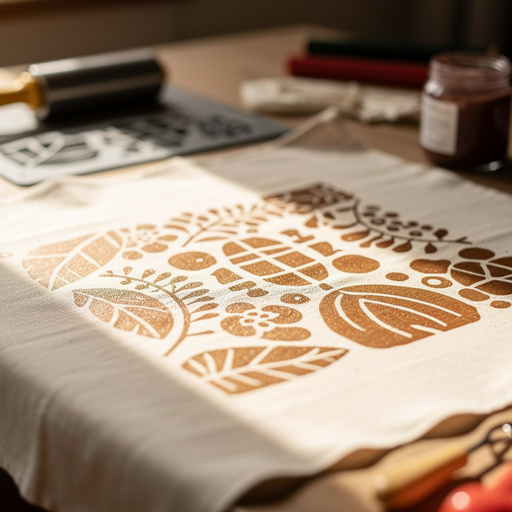
Unleash your inner artist and transform plain fabrics into personalized masterpieces with the simple yet effective technique of fabric ink stencil printing. This rewarding DIY project is incredibly accessible, making it perfect for crafters of all ages, including families looking for a fun and engaging activity. Whether you're aiming to create unique gifts, update your wardrobe, or add a custom touch to home decor, stencil printing offers a fantastic way to express your creativity and achieve professional-looking results with minimal fuss. Get ready to make your mark!
On this page
Step-by-Step Instructions
- 1
Gather all your materials and choose your fabric item. Ensure your fabric item is clean and dry, free from any wrinkles or creases, as these can affect the stencil placement and ink application. Pre-washing your fabric is recommended to remove any sizing or finishes that might interfere with ink adhesion.
- 2
Prepare your workspace by laying down plastic sheeting or newspaper to protect your surface from ink spills. This step is crucial for easy cleanup and to prevent accidental staining of your table or floor.
- 3
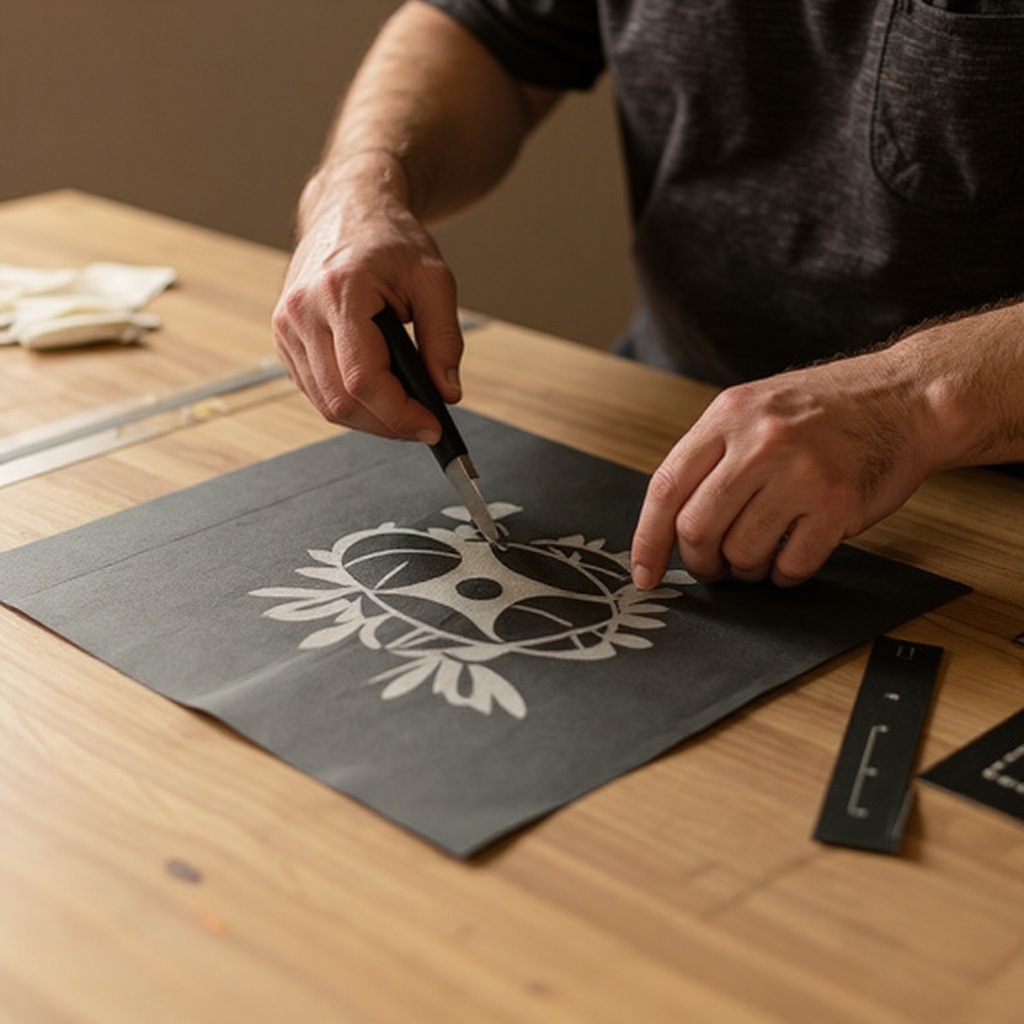
If making your own stencils, draw your design on cardstock or craft foam using a pencil or marker. Consider the size and complexity of your design in relation to the fabric item you're decorating. For intricate designs, consider using a craft knife on a cutting mat for cleaner cuts, ensuring you remove the desired areas to create the stencil openings.
- 4
Carefully cut out your stencil design using scissors or a craft knife. If using cardstock, ensure the edges are smooth and the cut-outs are clean to prevent ink bleeding under the stencil. For craft foam, a craft knife will yield the best results for precise shapes, creating sharp, defined edges for your prints.
- 5
Place a piece of cardboard or thick paper inside your fabric item. This crucial step prevents ink from bleeding through to the other side of the fabric, ensuring a clean print on both the front and back if desired, or simply protecting the inner layers from accidental ink transfer. Ensure it's smooth and flat.
- 6
Position your stencil onto the fabric where you want your design to appear. Take your time to center it perfectly or place it at an interesting angle, and smooth out any wrinkles in the fabric beneath the stencil to ensure a flat surface. A smooth surface is key to achieving crisp lines.
- 7
Secure the stencil firmly in place using masking tape or painter's tape around the edges. Apply the tape generously to all sides of the stencil, pressing down firmly to create a good seal and prevent any ink from seeping underneath the stencil's borders. Ensure there are no gaps where ink can escape.
- 8
Open your fabric ink or paint and stir it gently with a clean tool or the sponge brush itself. Avoid vigorous shaking, which can create air bubbles that might transfer to your print; gentle stirring ensures a smooth, consistent consistency. If the ink seems too thick, you can add a tiny amount of fabric medium or water, but do so sparingly.
- 9
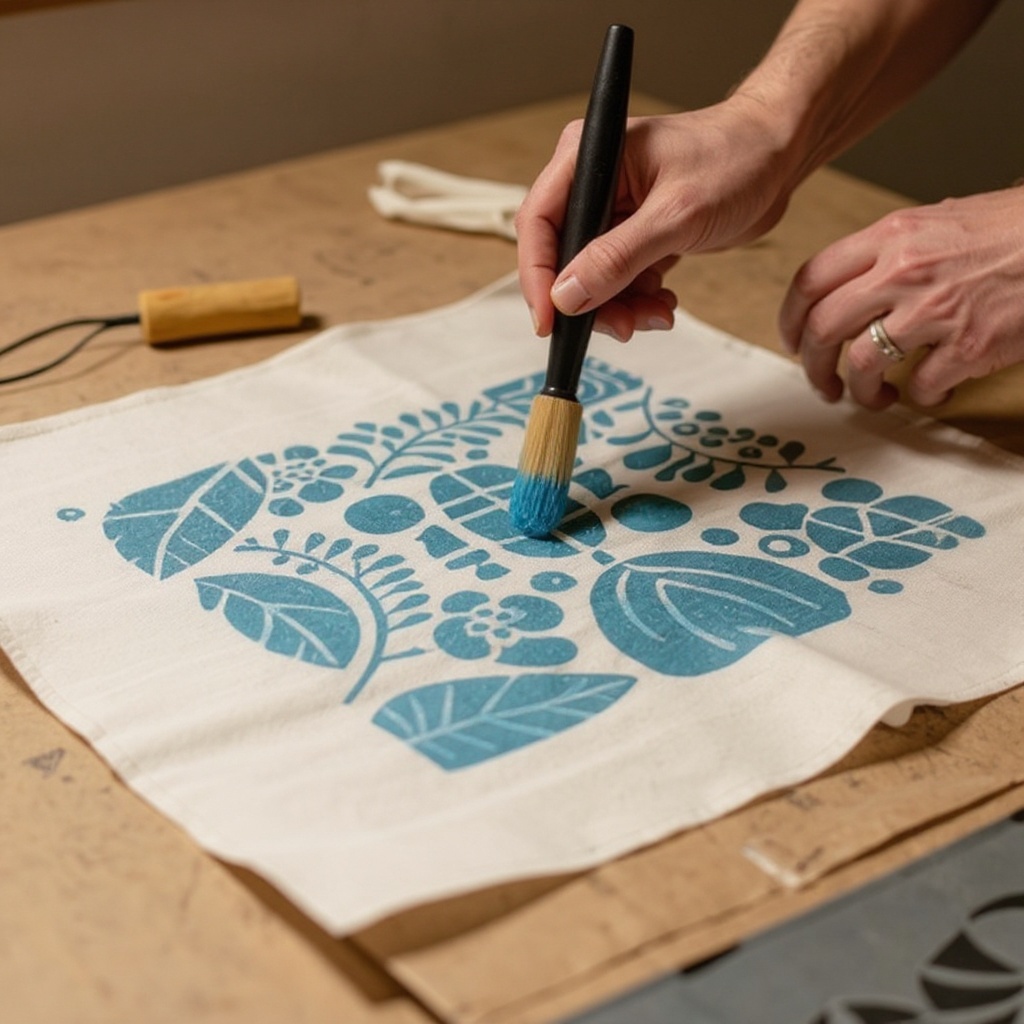
Dip your sponge brush or foam dauber into the ink, dabbing off any excess on a paper towel. This is a critical step to avoid overloading your brush, which is a common cause of smudged or blurry prints and ink seeping under the stencil. You want just enough ink to cover the surface without dripping.
- 10
Gently dab the ink over the stencil openings, ensuring even coverage. Work in light, dabbing motions, building up the color gradually rather than applying one heavy coat. Make sure to cover all the edges of the stencil openings for a complete design. Continue dabbing until the desired opacity is achieved.
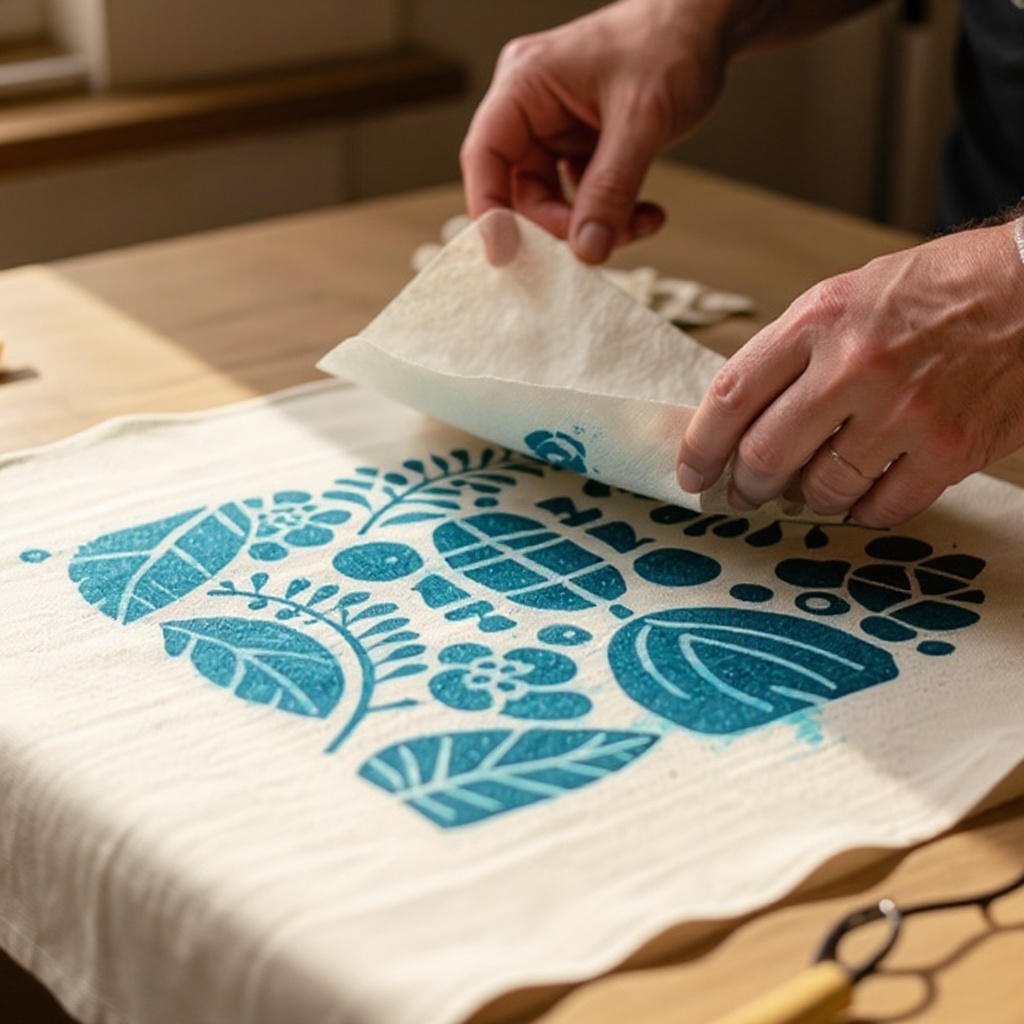
- 11
Carefully lift the stencil straight up to reveal your design. Peel it away slowly and evenly to avoid any accidental smudging of the wet ink. If any ink smudged, gently blot it with a damp paper towel immediately, being careful not to spread the ink further. A clean, upward motion is best.
- 12
Allow the ink to dry completely according to the fabric ink manufacturer's instructions, usually 24-48 hours. This drying period is essential for the ink to properly adhere to the fabric fibers before any further handling or heat setting. Avoid touching or moving the fabric during this time.
- 13
If your fabric ink requires heat setting, follow the manufacturer's instructions precisely. This typically involves ironing the design on a medium-high setting (without steam) for a few minutes or tumble drying on high heat to permanently bond the ink to the fabric, making it washable. Ensure the iron is hot enough but not so hot that it scorches the fabric.
- 14
Once heat-set, your fabric ink stencil print is permanent and ready for use. You can now wash your creation according to the fabric ink's care instructions, typically on a gentle cycle with mild detergent.
Tips & Troubleshooting
- 1For crisp edges, ensure your stencil is completely flat against the fabric and don't overload your brush with ink. Any lifting of the stencil or excess ink can lead to fuzzy or blurred lines, so a firm seal and light application are key. Press down firmly on the stencil edges before applying ink.
- 2Experiment with layering different colors or stencils for more complex designs. Let the first layer dry completely before adding the second to prevent colors from bleeding into each other and to achieve distinct patterns. This technique can create depth and visual interest in your prints.
- 3Wash your stencils and tools immediately after use to prevent ink from drying and becoming difficult to remove. Soaking them in warm, soapy water is usually effective, and prompt cleaning will ensure they are ready for your next project. Dried ink can be very stubborn.
- 4Always test your ink on a scrap piece of fabric first to check for color saturation and potential bleed-through. This allows you to adjust your technique or ink consistency before committing to your final project piece. It's a small step that can save a lot of disappointment.
- 5Consider using different application tools for varied textures. A stencil brush can create a softer, more blended look, while a foam roller might offer a smoother, more uniform coverage, depending on the desired effect. Even a stiff-bristled toothbrush can create a splatter effect.
- 6For larger designs or multiple prints, consider using a spray adhesive specifically designed for stencils. A light mist on the back of the stencil can help it adhere more firmly to the fabric, further reducing the risk of ink bleed. Ensure you use a repositionable adhesive and follow product instructions carefully.
- 7If you're working with a very absorbent fabric, you might need to apply a second coat of ink after the first has slightly dried to achieve a vibrant color. However, always be mindful of not applying too much ink at once to avoid smudging. Build up color in thin layers for best results.
- 8When removing the stencil, try to lift it straight up rather than sliding it. This motion minimizes the chance of dragging wet ink across your design and creating unwanted streaks or smudges. A slow, steady lift is crucial for a clean reveal.
Related Activities You Might Enjoy
Frequently Asked Questions
What is the best beginner screen printing kit?
While this tutorial focuses on stencil printing, for true screen printing, look for kits with pre-stretched screens, emulsion, and squeegees. Brands like Speedball or Grafix offer beginner-friendly options that provide all the necessary components for a successful introduction to screen printing. These kits often include detailed instructions and all the materials needed to create your first screen-printed designs on fabric, making the learning curve much smoother for newcomers to the craft. Research reviews to find a kit that matches your budget and desired complexity.
Can I use regular paint for fabric printing?
Regular craft paint is not recommended for fabric as it will likely wash out. Use fabric ink or fabric paint specifically designed to adhere to textiles and withstand washing. These specialized paints contain binders that cure and become permanent when heat-set, ensuring your designs remain vibrant and intact through multiple washes. Regular acrylics or tempera paints lack these properties and will fade or wash away, leaving your hard work undone. Always opt for products labeled for fabric use.
How do I make my own stencils for fabric printing?
You can create stencils from sturdy cardstock, acetate sheets, or thin craft foam. Draw your design and carefully cut out the areas you want to print, ensuring the stencil material is smooth and flat. For intricate designs, a craft knife and cutting mat are highly recommended for precision. The key is to have clean, sharp edges on your cut-outs to prevent ink from bleeding under the stencil and to achieve crisp print results. Experiment with different materials to see what works best for your designs.
How do I heat set fabric ink?
Most fabric inks require heat setting to become permanent. This usually involves ironing the design on a medium-high setting (without steam) for a few minutes, or tumble drying on high heat. Always check the ink's specific instructions, as different brands and types of ink may have slightly different requirements for optimal curing. Proper heat setting is crucial for ensuring your beautiful stencil prints can withstand washing and wear. Ensure the fabric is completely dry before ironing.
What kind of fabric is best for stencil printing?
Natural fibers like cotton and linen are generally the best choices for fabric ink stencil printing due to their absorbency and smooth texture, which allows the ink to penetrate and adhere well. Tightly woven fabrics will yield sharper prints than loosely woven ones. While synthetic blends can be used, they may not absorb ink as readily, potentially leading to less vibrant or slightly different color results. Always pre-wash your fabric to remove any sizing or finishes that might interfere with ink adhesion.
How can I achieve multi-color stencil prints?
To achieve multi-color stencil prints, you'll need to work in layers, allowing each color to dry completely before applying the next. You can use the same stencil with different colors, or use multiple stencils that overlap. Ensure that the previous color is fully dry to prevent muddying or smudging. For precise alignment with multiple stencils, consider using registration marks on your stencils or fabric to guide placement for subsequent layers. Patience is key for successful multi-color designs.
What are some common mistakes to avoid when stencil printing on fabric?
Common mistakes include using too much ink, which leads to bleeding and smudging, and not securing the stencil firmly enough, allowing ink to seep underneath. Another pitfall is not allowing adequate drying time between layers or before heat setting, which can compromise the permanence of the design. Also, using the wrong type of paint (non-fabric specific) will result in prints that wash out. Always test your technique on scrap fabric first to identify and correct these issues before working on your final project.
What Next?
Congratulations on creating your unique fabric ink stencil prints! You've successfully brought your designs to life on fabric, opening up a world of creative possibilities. Consider framing your smaller prints as unique wall art, or sew them onto cushions for a personalized touch. For future projects, explore different stencil materials like freezer paper for a more temporary stencil, or try combining stencil printing with other fabric art techniques like embroidery or fabric markers. Remember to store your finished items flat or rolled to prevent creasing, and your stencils clean and dry for their next artistic adventure.
Free: 10 Paper Crafts Anyone Can Make in 5 Minutes
Get our beginner guide + new craft ideas weekly.
No spam. Unsubscribe anytime.
Did you complete this activity?
Related