Beaded Wire Tree of Life Pendant: A DIY Jewelry Masterpiece
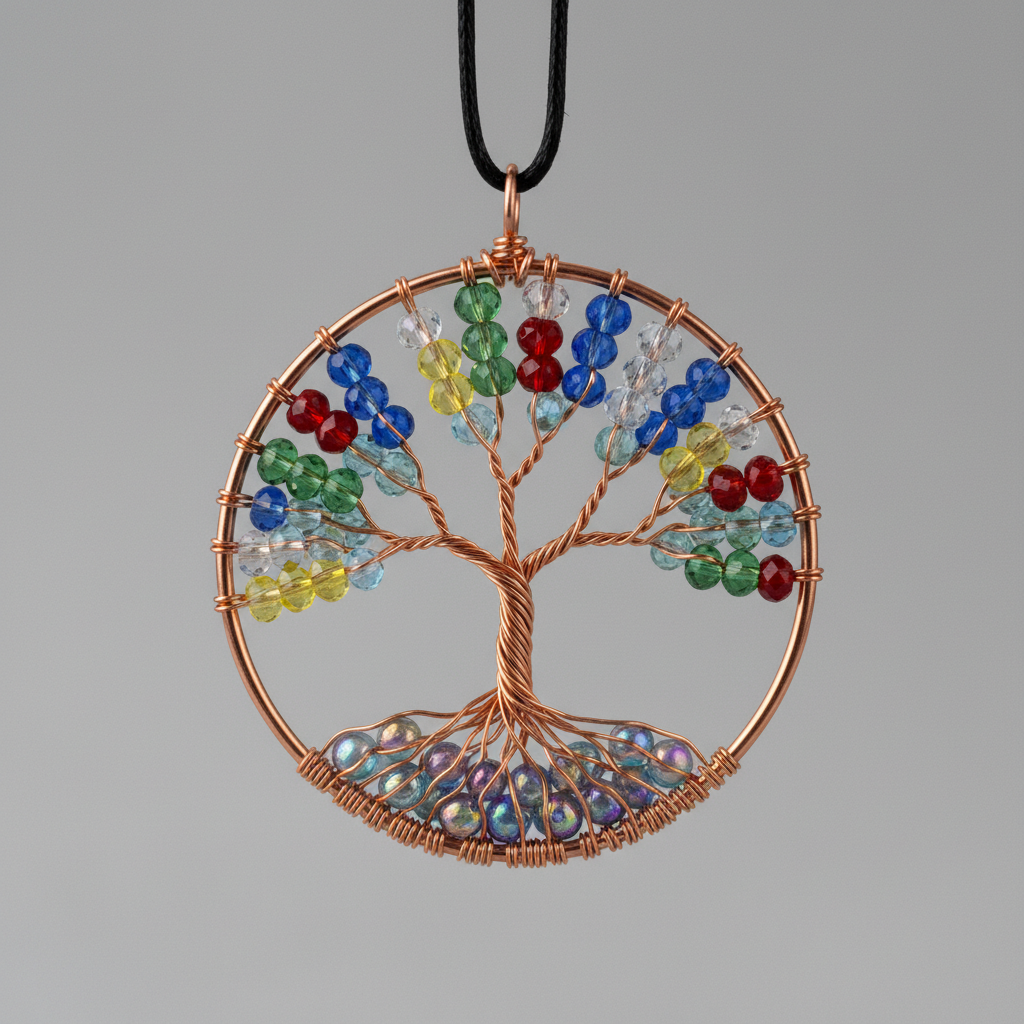
Unleash your inner artisan and craft a beautiful Beaded Wire Tree of Life Pendant. This project combines the elegance of wirework with the sparkle of beads to create a meaningful and unique piece of jewelry. Perfect for beginners and experienced crafters alike, this tutorial guides you through each step, from forming the base to adding intricate beaded branches. The Tree of Life symbolizes growth, strength, and interconnectedness, making this pendant a thoughtful gift or a personal keepsake. Get ready to create a wearable work of art!
Quick answer
Create a Beaded Wire Tree of Life Pendant by forming a wire hoop, attaching beaded wire branches, and securing a jump ring for hanging. This DIY project is suitable for jewelry makers with basic wireworking skills.
What you need
Shop on Amazon · As an Amazon Associate we earn from qualifying purchases. Links above are affiliate links — we may earn a commission at no extra cost to you.
Embark on a creative journey to craft your very own Beaded Wire Tree of Life Pendant. This project is more than just a jewelry-making endeavor; it's an opportunity to imbue a piece with personal meaning and symbolism. The Tree of Life, representing connection, wisdom, and rebirth, makes this pendant a truly special accessory or a heartfelt gift. Whether you're looking to expand your jewelry-making repertoire or seeking a mindful, hands-on activity, this tutorial offers clear, step-by-step guidance. Prepare to be captivated by the beauty you can create with simple wire and beads.
On this page
Step-by-Step Instructions
- 1
Form the Pendant Base: Using heavy gauge craft wire and round nose pliers, carefully form a circle to serve as the base of your pendant. Aim for a consistent, smooth curve, and leave a small tail of wire extending from the circle, about 1-2 inches long, for securing.
- 2
Secure the Base: Twist the tail of the heavy gauge wire around the main circle a few times to firmly secure it. Ensure the twists are snug but not so tight that they distort the hoop's shape.
- 3
Trim Excess Base Wire: Use wire cutters to carefully trim away any excess heavy gauge wire from the secured tail. Cut as close to the twists as possible to create a clean finish on the back of your pendant.
- 4
Prepare for a Branch: Cut a generous length of fine gauge craft wire, approximately 12 to 18 inches. The longer the wire, the more beads you can add to your branch, allowing for greater fullness and detail.
- 5
Add Beads to Branch Wire: Thread several seed beads onto the fine gauge wire. You can add as many or as few as you like to create the desired fullness for your branch, ensuring they are distributed evenly along the wire.
- 6
Create the Beaded Branch: Fold the fine gauge wire in half, ensuring the beads are trapped securely in the fold. This creates a central point for twisting and a balanced beaded section.
- 7
Twist the Branch: Twist the two ends of the fine gauge wire together a few times, just below the beads, to create a small, sturdy beaded branch. This secures the beads and forms a stem for attachment.
- 8
Shape the Branch: Gently bend the beaded branch into a graceful curved shape, mimicking a natural tree branch. You can use your fingers or the round nose pliers to create gentle bends and undulations.
- 9
Attach Branch to Base: Using flat nose pliers, carefully twist the ends of the beaded branch around the heavy gauge hoop of your pendant base to attach it. Aim to wrap the wire ends around the hoop securely, tucking them in neatly.
- 10
Prepare for the Next Branch: Cut another generous length of fine gauge craft wire, repeating step 4. You can vary the length of this wire to create branches of different sizes and lengths.
- 11
Add Beads for Variation: Thread seed beads onto the new fine gauge wire. Consider using a different color combination or bead size for this branch to add visual interest and depth to your tree.
- 12
Form the Second Beaded Branch: Fold the fine gauge wire in half, trapping the beads, and twist the ends together below the bead cluster, as described in steps 5 and 6. This creates another unique branch.
- 13
Shape and Position the Second Branch: Gently curve this new beaded branch, and then attach it to the pendant base using flat nose pliers, as in step 9. Position it strategically to begin building the tree's canopy, perhaps overlapping slightly with the first branch.
- 14
Continue Building the Tree: Repeat steps 10 through 13 to create additional beaded branches. Attach these new branches around the pendant base, layering and arranging them to form the shape of a tree. Experiment with different angles and overlaps to create a full, organic look.
- 15
Refine Branch Placement: As you add more branches, take a moment to step back and assess the overall shape of your tree. Use your pliers to gently adjust the position and curve of each branch, ensuring a balanced and aesthetically pleasing design.
- 16
Secure Loose Wire Ends: Once you are satisfied with the overall design and fullness of your tree, use wire cutters to carefully trim away any remaining excess fine gauge wire ends. Tuck any sharp points in with your flat nose pliers to prevent snagging.
- 17
Prepare the Hanger: Open a jump ring using flat nose pliers. Grip each side of the jump ring with a separate plier and twist them apart horizontally, rather than pulling them open, to maintain the ring's shape.
- 18
Attach the Hanger: Carefully attach the opened jump ring to the top of your pendant base, ensuring it is positioned where you want the pendant to hang.
- 19
Secure the Hanger: Use flat nose pliers to securely close the jump ring, gripping each side and twisting them back together until they meet seamlessly. This creates a sturdy loop for hanging your pendant.
Tips & Troubleshooting
- 1Vary your bead choices to create a more dynamic Tree of Life. Consider using a mix of opaque, transparent, and metallic seed beads for added texture and sparkle. You can also incorporate slightly larger accent beads for focal points within the branches.
- 2When forming the hoop base, practice making smooth, consistent circles. If you find it difficult to achieve a perfect circle freehand, you can use a round object like a marker or a dowel as a guide for your pliers.
- 3Don't be afraid to experiment with the number of beads on each branch. Some branches can be sparse and delicate, while others can be densely beaded to create a fuller canopy effect, adding visual interest to your pendant.
- 4When twisting the fine gauge wire to create the branches, aim for consistent tension. Over-twisting can make the wire brittle, while under-twisting might not secure the beads effectively. Find a balance that creates a firm yet flexible stem.
- 5To achieve a truly organic look for your tree, vary the lengths and angles of your branches. Some can extend outwards, while others can curve inwards or upwards, mimicking the natural growth patterns of a tree.
- 6When attaching branches to the hoop, ensure the wire ends are tucked in securely. This not only creates a cleaner look but also prevents the wire from snagging on clothing or skin.
- 7If you're new to wire wrapping, practice on scrap wire first. This will help you get a feel for the pliers and how the wire behaves, reducing the chances of mistakes on your final piece.
Related Activities You Might Enjoy
Frequently Asked Questions
What is the significance of the Tree of Life symbol?
The Tree of Life is a powerful and ancient symbol found in many cultures and mythologies across the world. It represents interconnectedness, symbolizing the connection between all living things and the universe. It often signifies growth, strength, wisdom, and the cyclical nature of life, death, and rebirth. In many traditions, it is also seen as a bridge between the heavens and the earth, connecting the spiritual and physical realms. Creating a Tree of Life pendant can be a personal affirmation of these concepts, making it a meaningful piece of jewelry to wear or gift.
Can I use different types of beads for this project?
Absolutely! While seed beads are ideal for creating the delicate branches of the Tree of Life, you can certainly experiment with other small beads. Consider using tiny glass pearls, cubic zirconia rondelles, or even small gemstone chips for a different aesthetic. The key is to ensure the beads are small enough to thread onto your fine gauge wire and don't overpower the wire structure. If you use larger beads, you might need to adjust the length of your fine gauge wire and how you twist it to secure them properly.
How can I make the pendant more durable?
To enhance the durability of your Beaded Wire Tree of Life Pendant, ensure all wire connections are made securely. When twisting the fine gauge wire for the branches, give it a few firm twists to prevent unraveling. For the base hoop, make sure the initial wire is twisted around itself several times. You can also consider using a jewelry sealant or clear nail polish on the wire twists, especially where branches attach to the base, to add an extra layer of protection and prevent loosening over time. However, be mindful that this might slightly alter the shine of the wire.
What if my wire breaks while I'm working?
Wire breakage can happen, especially with finer gauges or if the wire is bent back and forth too many times. If your fine gauge wire breaks while adding beads, simply cut the broken end as close to the beads as possible and start a new branch from the base hoop with a fresh piece of wire. If the heavy gauge wire for the base breaks prematurely, you might need to start over with a new piece, ensuring you leave enough tail for securing. Patience is key; sometimes a fresh start is the best solution.
How do I prevent the jump ring from opening on its own?
The key to a secure jump ring is to open and close it correctly. Instead of pulling the ends apart, which can distort the ring's shape and weaken the connection, grip each side of the jump ring with your flat nose pliers and twist them horizontally in opposite directions. To close it, reverse the motion, twisting them back together until the ends meet perfectly. A properly closed jump ring should have no gap, ensuring your pendant stays securely attached to its chain or cord.
Can I make a larger or smaller version of this pendant?
Yes, you can absolutely adjust the size of your Beaded Wire Tree of Life Pendant. For a larger pendant, start with a larger diameter hoop for the base and use longer lengths of fine gauge wire for the branches. You might also want to use slightly thicker seed beads or incorporate larger accent beads to maintain visual balance. For a smaller pendant, use a smaller hoop and shorter lengths of wire, opting for the smallest seed beads available. The principles of wire wrapping and bead threading remain the same regardless of scale.
What Next?
Congratulations on creating your exquisite Beaded Wire Tree of Life Pendant! This versatile design offers endless possibilities for customization. Experiment with different bead colors and types to reflect seasons, moods, or personal milestones. Consider adding a small gemstone at the center for an extra touch of elegance. Once complete, store your pendant in a soft pouch to prevent scratching, or display it proudly on a jewelry stand. For your next project, explore creating matching earrings or a larger statement necklace using the same wire-wrapping techniques.
Free: 10 Paper Crafts Anyone Can Make in 5 Minutes
Get our beginner guide + new craft ideas weekly.
No spam. Unsubscribe anytime.
Did you complete this activity?
Related
You might also like

Shrink Plastic Statement Earrings

Clay & Button Charm Bracelets

Clay & Button Bead Necklace

Wire Wrapped Crystal Sun Catcher

Clay Bead & Charm Creations