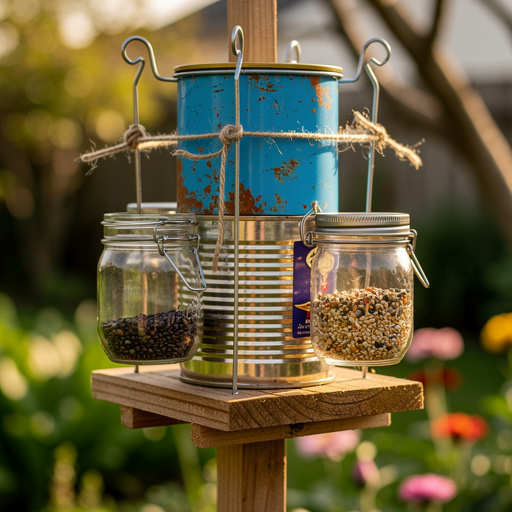
How to Create a Recycled Container Bird Buffet — Easy Step-by-Step Guide
Transform everyday recyclables into a delightful bird buffet! This easy craft is perfect for families looking to attract feathered friends to their yard. With simple materials and clear instructions, you'll be creating a haven for birds in no time.
Quick answer
To make a recycled container bird buffet, you need empty containers (plastic bottle, tin can), scissors, a hole punch, string, and birdseed, taking about 30 minutes. Start by cleaning and decorating your containers. This beginner-friendly activity has 10 steps and is perfect for families with children aged 6+.
What you need
Shop on Amazon · As an Amazon Associate we earn from qualifying purchases. Links above are affiliate links — we may earn a commission at no extra cost to you.
Welcome to the wonderful world of backyard bird feeding! This project, the Recycled Container Bird Buffet, is a fantastic way to give new life to everyday household items while providing a much-needed food source for your local avian visitors. It's an incredibly rewarding and educational activity, perfect for sparking curiosity in children and fostering a deeper connection with nature. Imagine the joy of watching a variety of birds flock to your creation – it’s a simple yet profound way to bring the beauty of the natural world right to your doorstep.
On this page
Step-by-Step Instructions
- 1
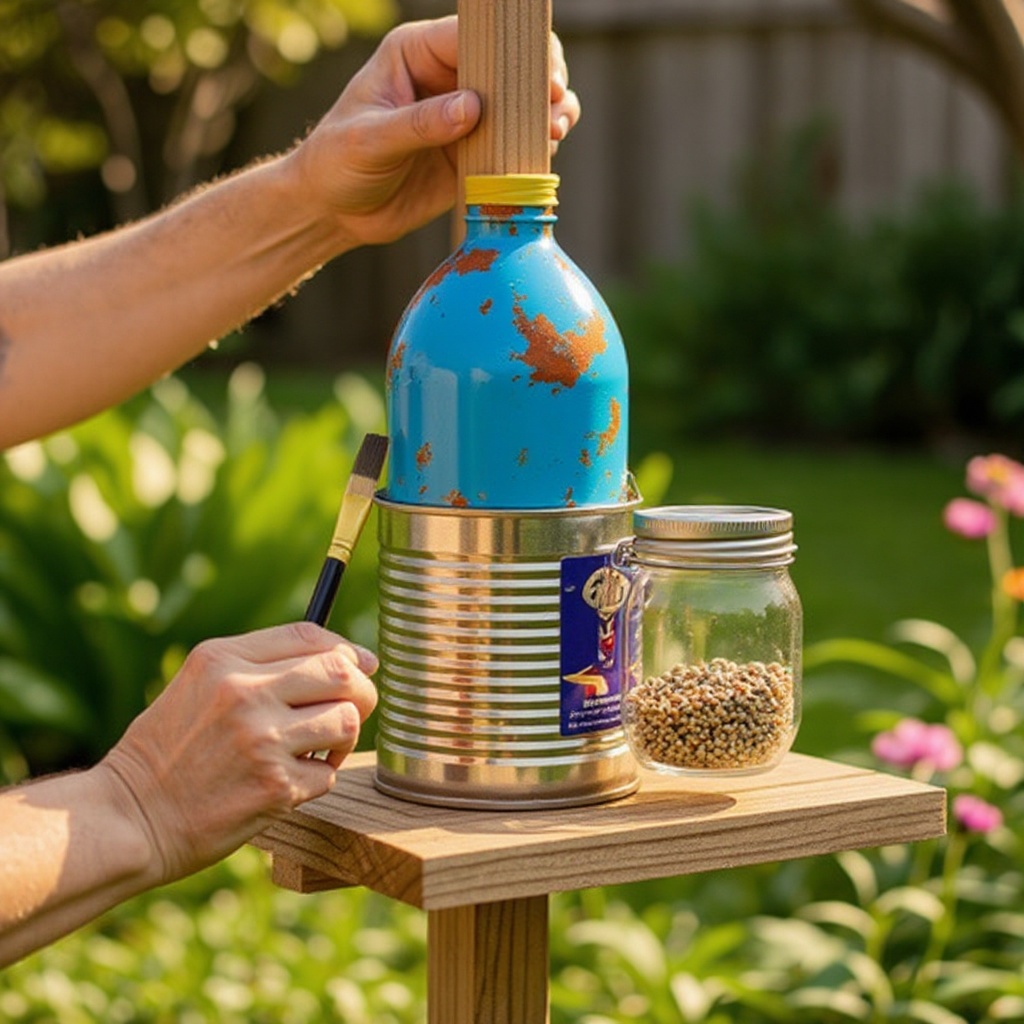
Gather your clean, empty plastic bottle and tin can. Ensure both containers are thoroughly washed and dried to remove any residue that could be harmful to birds. Remove any labels from the containers for a cleaner look and better adhesion if you plan to decorate them.
- 2
Prepare your tin can edges. If the tin can has any sharp edges after opening, carefully use fine-grit sandpaper to smooth them down. Alternatively, an adult can cover any potentially sharp edges with a layer of duct tape or strong adhesive tape for added safety.
- 3
If using paint or markers, now is the time to get creative! Decorate the outside of both your plastic bottle and tin can with non-toxic paints, markers, or stickers. Allow ample time for the decorations to dry completely before proceeding to the next steps, ensuring no fumes remain.

- 4
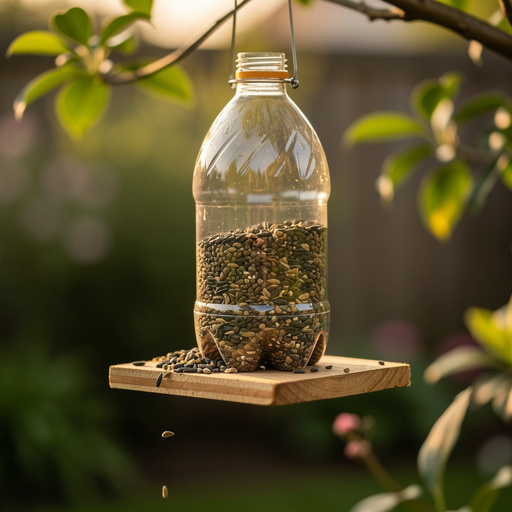
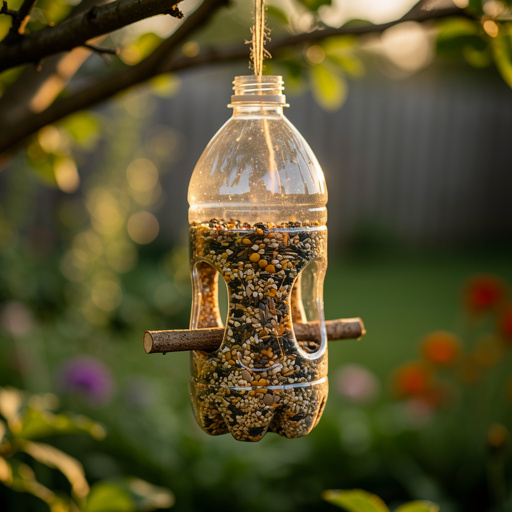
For the plastic bottle: Using scissors or a craft knife, carefully cut two small feeding ports opposite each other, approximately 2 inches from the bottom of the bottle. Make these holes about 1-2 inches in diameter, ensuring they are large enough for birds to access the seed but not so large that all the seed spills out at once.
- 5
For the tin can: Using scissors or a craft knife, carefully cut two small feeding ports opposite each other, about 1 inch from the bottom of the can. These holes should be slightly smaller than those on the plastic bottle, perhaps 1 inch in diameter, to prevent excessive seed loss.
- 6
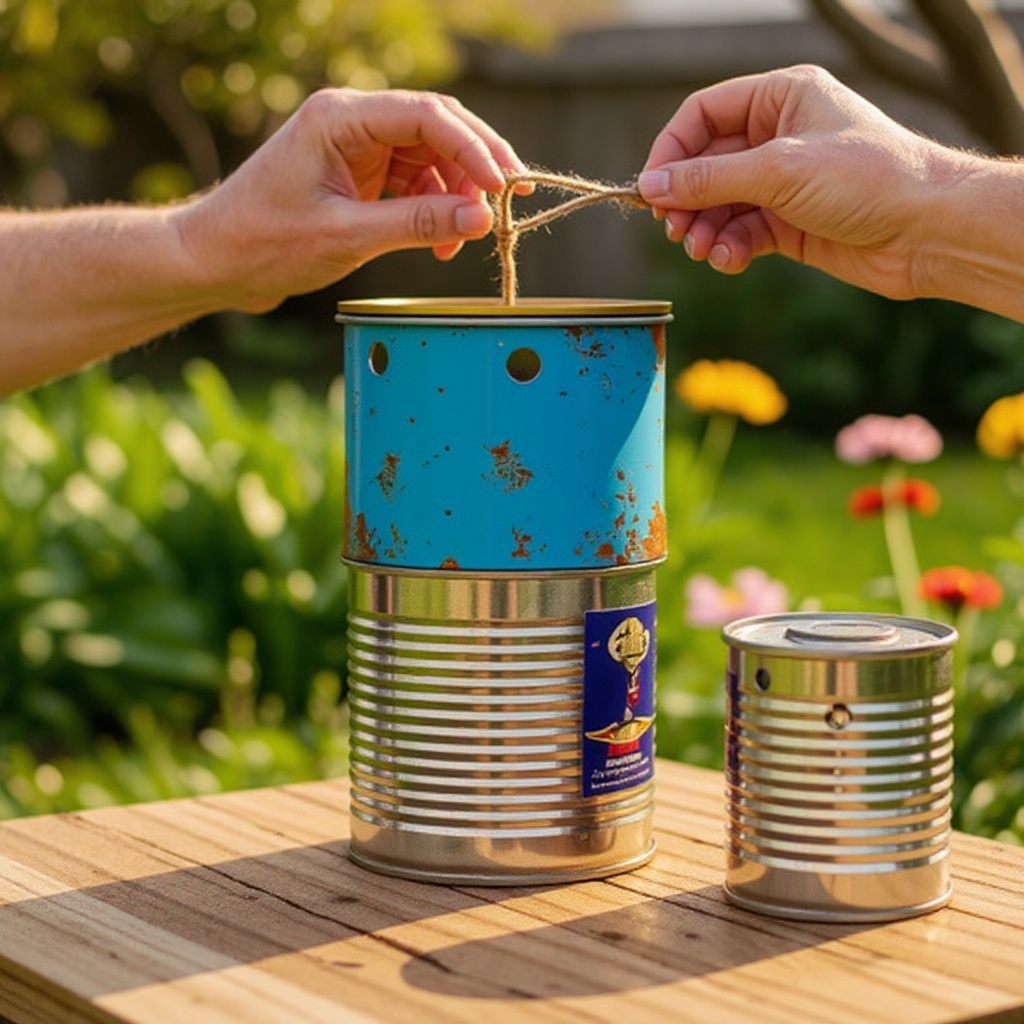
Using the hole punch, create two holes near the top rim of the plastic bottle, directly opposite each other. These holes will be used to create the hanging mechanism for your feeder.
- 7
Repeat step 6 for the tin can, using the hole punch to create two holes near the top rim, opposite each other. Ensure these holes are sturdy enough to support the weight of the feeder when filled with seed.
- 8
Thread one end of the twine through one of the holes at the top of the plastic bottle and the other end through the opposite hole. Tie the ends securely together on the outside of the bottle to create a strong, reliable hanging loop.
- 9
Repeat step 8 for the tin can, threading the twine through its designated holes and tying securely to form its own hanging loop. Ensure the knots are tight and won't slip.
- 10
Fill the bottom half of the plastic bottle with birdseed through the top opening. Gently shake the bottle to settle the seed, ensuring it flows easily towards the feeding ports. Avoid overfilling, as this can lead to wasted seed.
- 11
Fill the bottom half of the tin can with birdseed through the top opening. Similar to the plastic bottle, ensure the seed is settled and accessible through the feeding ports. Be mindful not to overfill the can.
- 12
Optional: For the plastic bottle, you can add perches by carefully poking small holes just below the feeding ports and inserting short twigs or wooden dowels. This provides a comfortable spot for birds to land while they eat.
- 13
Inspect both feeders for any sharp edges or loose parts that could harm the birds. Double-check that the feeding ports are smooth and the hanging loops are secure.
- 14
Choose a suitable location in your yard to hang your recycled bird feeders. Look for a spot that offers some protection from the elements and predators, such as a tree branch or a sturdy hook.
- 15
Hang your recycled bird feeders from tree branches or hooks in your yard. Ensure they are at a height that is accessible to birds but also safe from ground predators like cats. Ideally, place them at least 10 feet away from windows to help prevent bird collisions.
- 16
Observe your new bird buffet and enjoy watching the various feathered visitors that come to dine! It may take a few days for birds to discover and trust the new feeders, so be patient.
Tips & Troubleshooting
- 1Ensure the edges of the tin can are smooth after cutting to prevent injury to birds. If the edges are sharp, you can cover them with duct tape or strong adhesive tape for a safer finish. Regularly check the tape for wear and tear.
- 2Experiment with different types of birdseed to attract a variety of local birds. Sunflower seeds, millet, and nyjer seeds are popular choices, but research what native birds in your area prefer for the best results.
- 3For added stability and a more natural look, you can glue small twigs or dowels below the feeding ports on the plastic bottle to act as perches. Ensure they are securely attached and don't obstruct the feeding ports.
- 4If you don't have a hole punch, an adult can carefully poke holes with a skewer, a nail, or the tip of scissors. Be sure to make the holes clean and large enough for the twine to pass through easily.
- 5Place feeders at least 10 feet away from windows to help prevent bird collisions. Birds can be disoriented by reflections in glass, and feeders placed too close can increase the risk of impact.
- 6Consider the weather when placing your feeders. In windy areas, ensure the feeders are securely hung and won't swing excessively. In rainy climates, position them under eaves or dense foliage for some protection.
- 7Regularly check the feeders for any damage or wear and tear. Birds are attracted to clean and well-maintained feeders, so keeping them in good condition is essential for their continued use.
- 8If you have squirrels or other larger animals that might raid your feeders, consider placing them on poles with baffles or in locations that are difficult for them to access. This ensures the seed is available for the birds.
Related Activities You Might Enjoy
Frequently Asked Questions
What are the best materials for a DIY bird feeder?
For DIY feeders, recycled materials like plastic bottles, milk cartons, and tin cans are excellent choices due to their availability and ease of modification. Natural items such as pinecones coated in peanut butter and seeds, or hollowed-out gourds, also make wonderful feeders. When selecting materials, prioritize those that are clean, free from harmful chemicals, and can be safely modified without creating sharp edges. Ensure any paint or decorations used are non-toxic and completely dry before filling with seed. The goal is to create a safe, accessible, and durable feeding station for your feathered friends.
How do I attract birds to my new feeder?
To attract birds to your new feeder, start with a high-quality birdseed mix that includes popular options like black oil sunflower seeds, millet, and cracked corn. Place the feeder in a safe location away from predators, ideally near trees or shrubs that offer cover and perching opportunities. Birds often feel more secure when they have a place to escape to. Keep the feeder clean and consistently refilled, as a reliable food source is key to building trust. You can also try adding a water source, like a bird bath, nearby, as water is just as important as food for attracting birds.
How often should I clean my bird feeder?
It's best to clean bird feeders every 1-2 weeks to prevent the spread of diseases among bird populations. This frequency can increase during wet weather, as moisture can promote mold and bacterial growth. To clean, empty any remaining seed and use a mild soap and water solution, or a diluted bleach solution (1 part bleach to 9 parts water), to scrub the feeder. Rinse thoroughly with clean water and allow it to dry completely in the sun before refilling. This simple maintenance ensures a healthy feeding environment for your visitors.
Can I use any type of container for a bird feeder?
While many containers can be adapted, it's important to ensure they are clean, free of sharp edges, and suitable for holding birdseed without leaching harmful chemicals. Avoid containers that might have residual chemicals from their original contents, especially if they held cleaning supplies or pesticides. Small openings that could trap birds or prevent them from accessing the seed should also be avoided. Always prioritize the safety and well-being of the birds when choosing and modifying containers for your DIY feeders.
What kind of birdseed is best for attracting a variety of birds?
A good all-around birdseed mix that attracts a wide variety of birds typically includes black oil sunflower seeds, which are a favorite for many species due to their high fat content and thin shells. Millet is another excellent addition, appealing to ground-feeding birds like sparrows and finches. Cracked corn is also popular with larger birds like jays and cardinals. For smaller birds like goldfinches, nyjer (thistle) seed is a must. Avoid mixes with a lot of red milo or wheat, as these are often less appealing to many common backyard birds and can lead to waste.
How can I protect my bird feeders from squirrels and other pests?
Squirrels can be persistent visitors to bird feeders, often consuming more seed than intended. To protect your feeders, consider using squirrel baffles, which are dome-shaped or cone-shaped devices that prevent squirrels from climbing up poles or reaching the feeder. Placing feeders on poles away from jumping-off points like trees or fences can also help. Some feeders are designed with weight-activated perches that close off access to the seed when a heavier animal like a squirrel lands on them. You can also try using squirrel-resistant seed mixes or placing feeders in locations that are difficult for them to access.
What Next?
Congratulations on creating your very own Recycled Container Bird Buffet! You've not only provided a valuable food source for birds but also contributed to reducing waste. Feel free to experiment with different container shapes and sizes for future feeders, or try adding natural elements like pinecones or suet. Once your feeders are up, observe which birds visit and perhaps research their favorite seeds. Remember to store any leftover birdseed in an airtight container to keep it fresh and dry, ready for your next refilling adventure.
Free: 10 Paper Crafts Anyone Can Make in 5 Minutes
Get our beginner guide + new craft ideas weekly.
No spam. Unsubscribe anytime.
Did you complete this activity?
Related