How to Make a Plastic Bottle Bird Feeder — Easy Step-by-Step Guide
Transform an old plastic bottle into a charming bird feeder! This easy, screen-free project is perfect for families looking to connect with nature and upcycle. It's a fantastic way to give new life to discarded materials while providing a valuable food source for local birds. Get ready to welcome a variety of feathered visitors to your backyard with this simple yet rewarding craft.

Quick answer
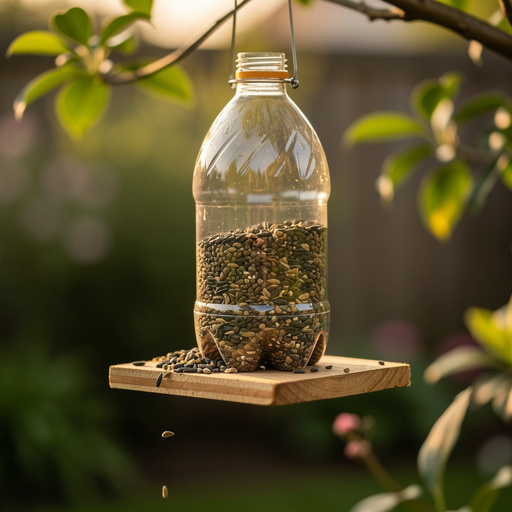
To make a plastic bottle bird feeder, you need a clean 2-liter plastic bottle with its cap, two wooden spoons, scissors or a craft knife (with adult supervision), about 18 inches of twine or strong string, and birdseed. The project takes approximately 30 minutes to complete. Start by carefully cutting holes for the wooden spoons to act as perches and seed trays. This beginner-friendly activity has 7 core steps and is perfect for kids aged 6 and up with adult supervision.
What you need
Shop on Amazon · As an Amazon Associate we earn from qualifying purchases. Links above are affiliate links — we may earn a commission at no extra cost to you.
Discover the joy of connecting with nature right in your own backyard by transforming a simple plastic bottle into a delightful bird feeder. This project is more than just a craft; it's an opportunity to engage children in environmental responsibility, teach them about local wildlife, and create a beautiful, functional addition to your garden. Its screen-free nature makes it accessible for even the youngest crafters, fostering a sense of accomplishment and a deeper appreciation for the natural world. Gather your materials and prepare to welcome a symphony of chirps and fluttering wings!
On this page
Step-by-Step Instructions
- 1
Begin by thoroughly washing and drying the plastic bottle and its cap. Any residue from the original contents could be harmful to birds, so a good rinse is crucial. Ensure the bottle is completely dry inside and out to prevent mold or mildew from forming on the seed.
- 2
Using a permanent marker, lightly mark where you intend to cut the holes for the wooden spoons. For the first set of holes, measure about 2 inches up from the very bottom of the bottle. Mark two opposite points on the bottle's circumference.
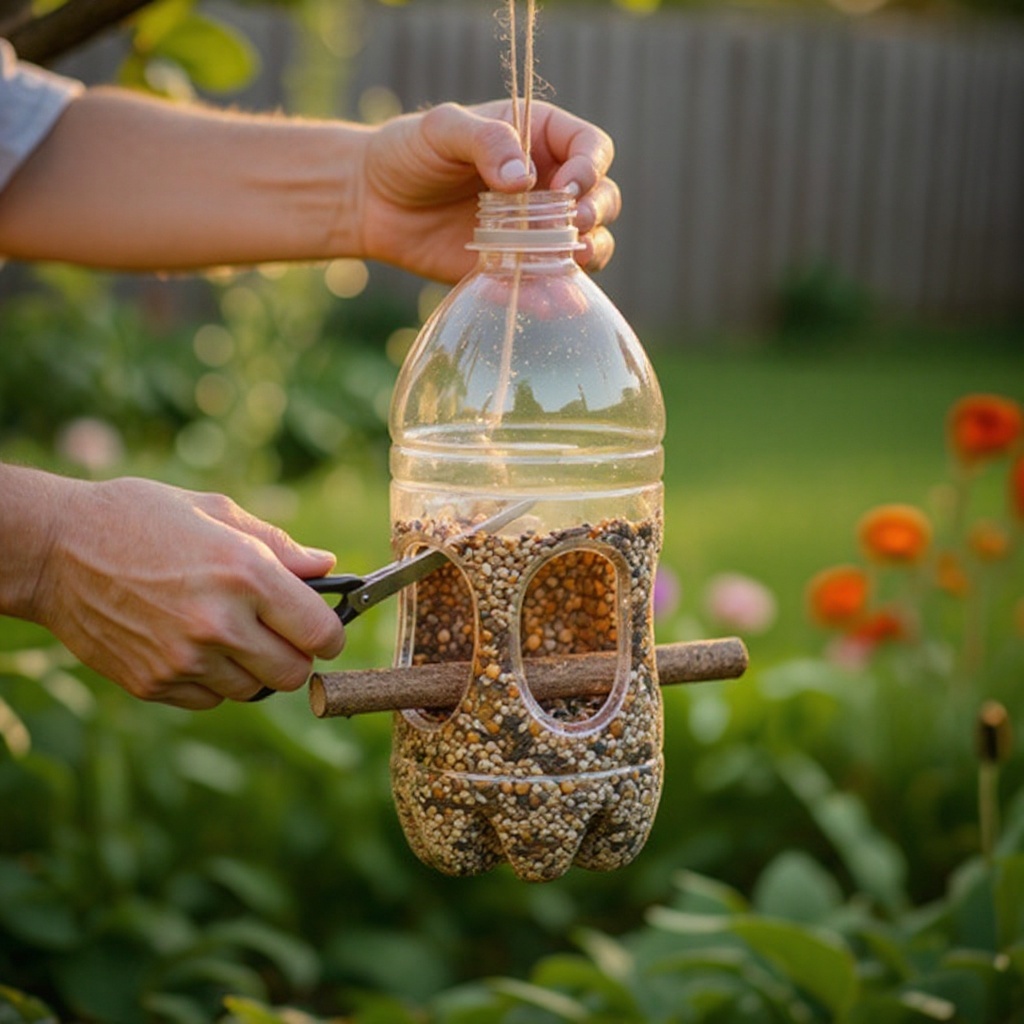
- 3
Carefully use scissors or a craft knife to cut the two small holes you marked. These holes should be just large enough for the handle of a wooden spoon to pass through snugly. It's better to start smaller and enlarge the hole if needed, rather than making it too big, which could lead to seed spillage.
- 4
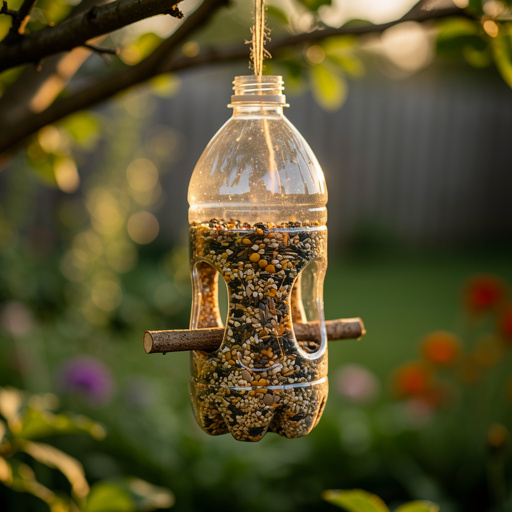
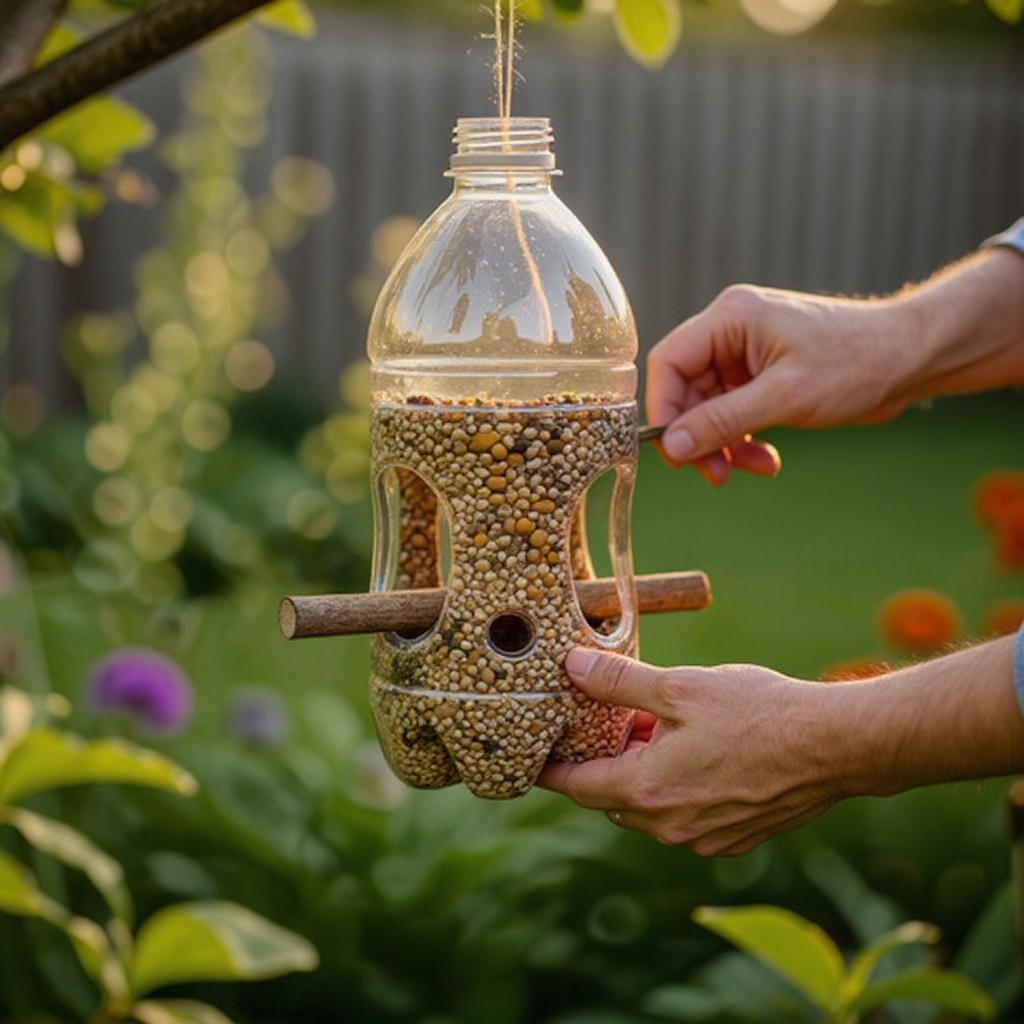
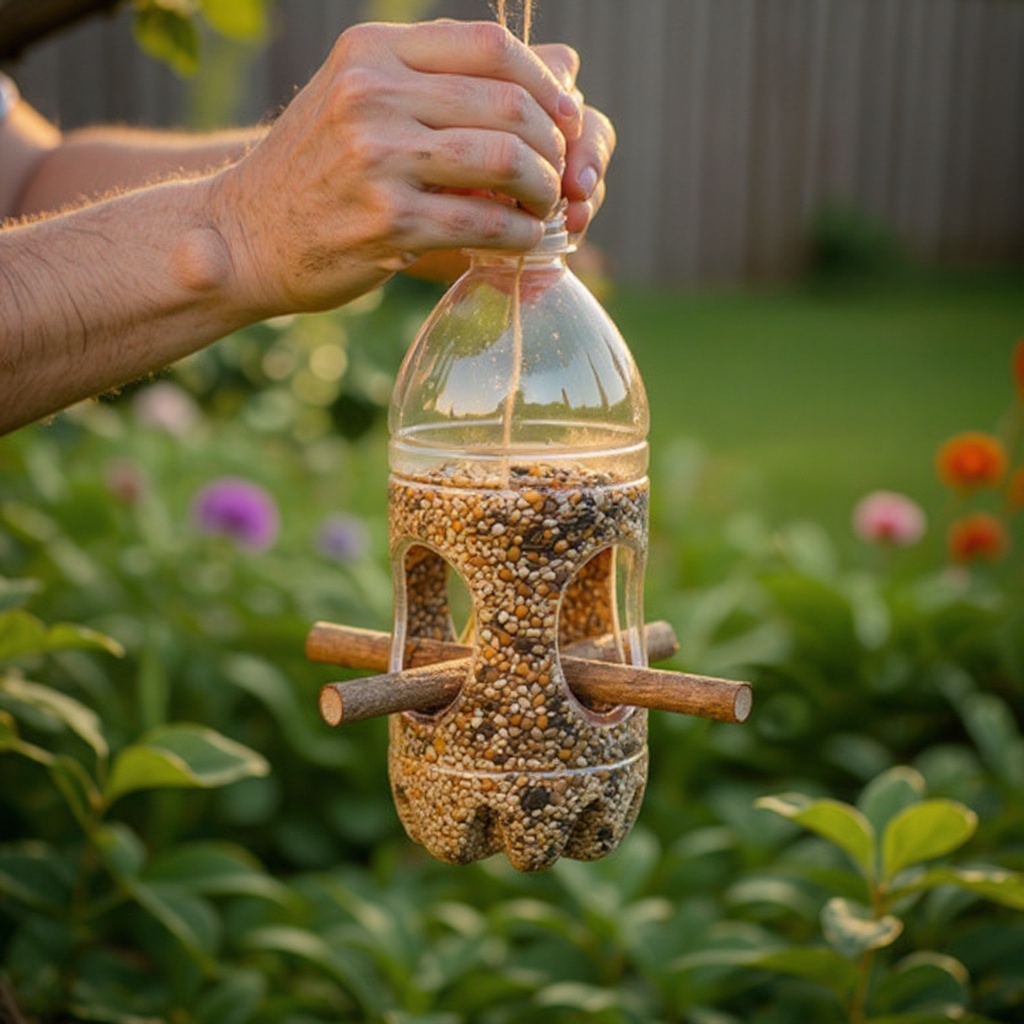
Gently insert the handle of one wooden spoon through the first set of opposite holes. Push it through until the spoon's bowl is positioned on the outside of the bottle, facing upwards. This bowl will serve as a perch for the birds and a small tray to catch spilled seed.
- 5
Now, decide on the placement for your second set of perches. Measure approximately 3 to 4 inches above the first set of holes. Mark two new opposite points on the bottle for these holes, ensuring they are staggered from the first set to provide more landing options.
- 6
Repeat the cutting process for this second set of holes, making them the same size as the first set. Again, aim for a snug fit for the spoon handle to ensure stability and prevent excessive seed loss.
- 7
Insert the second wooden spoon through this new set of holes. Similar to the first spoon, ensure its bowl faces outwards and upwards, creating another comfortable perch and seed catching area for visiting birds.
- 8
Before attaching the hanging mechanism, take a moment to inspect the spoon insertions. Ensure both spoons are firmly in place and the bowls are oriented correctly to hold seed. If a spoon feels loose, you can try gently widening the hole slightly and re-inserting it, or even adding a small dab of non-toxic glue on the inside if absolutely necessary (though usually not required with a snug fit).
- 9
Now, prepare the cap for hanging. Carefully poke a small hole in the very center of the plastic bottle cap. This hole should be just large enough for your twine or string to pass through easily.
- 10
Thread one end of your twine or string through the hole in the cap from the outside. Once the string is through, tie a secure knot on the inside of the cap. A double or triple knot will ensure it doesn't pull back through the hole.
- 11
Ensure the knot is substantial enough to prevent it from slipping through the cap. You can also add a small washer or a bead on the inside before tying the knot for extra security, though this is often optional.
- 12
The loop created by the string hanging from the cap is what you'll use to hang your bird feeder. Adjust the length of the loop to your preference, ensuring it's long enough to comfortably loop over a branch or hook.
- 13
With the cap and hanging mechanism ready, it's time to fill your feeder. Carefully pour your chosen birdseed into the open bottle. Fill it to a level that won't immediately spill out of the spoon bowls when the cap is on.
- 14
Once filled, screw the cap back onto the bottle tightly. This will keep the seed dry and prevent it from spilling out during handling or when the feeder is hanging.
- 15
Your plastic bottle bird feeder is now complete and ready for its avian guests! Find a suitable location to hang it, such as a sturdy tree branch, a shepherd's hook, or a dedicated feeder pole.
- 16
For a more polished finish and to potentially extend the life of the plastic, you can lightly sand any rough edges around the cut holes using fine-grit sandpaper. This also makes the feeder safer for little hands during the crafting process.
- 17
Consider adding a small amount of seed to the bowls of the wooden spoons initially to attract the birds and show them where the food source is located. This can be especially helpful for new feeders.
- 18
Observe your new bird feeder from a distance to see which birds are attracted to it. Different seed mixes will attract different species, so you can experiment with various types to see who visits your garden.
Tips & Troubleshooting
- 1If the holes you cut for the wooden spoons are too large, the birdseed might spill out too quickly, leading to waste and attracting unwanted pests. Try to make them just large enough for the spoon handle to fit snugly. If a hole is slightly too big, you can try wrapping a bit of tape around the spoon handle before inserting it to create a tighter fit.
- 2For a more stable and durable feeder, consider using a slightly larger plastic bottle, such as a 3-liter soda bottle or even a sturdy juice bottle. These often have thicker plastic and a wider base, which can better withstand the elements and the weight of the seed.
- 3To add a touch of personality and make your bird feeder a colorful addition to your garden, decorate the outside of the bottle with non-toxic, waterproof paints. Acrylic paints are a good choice, but ensure they are completely dry and cured before filling the feeder with seed to avoid any harmful fumes.
- 4It is absolutely essential that the wooden spoons are completely dry before inserting them into the bottle. Any residual moisture can promote the growth of mold and mildew, which can be harmful to birds and spoil the birdseed.
- 5Safety must be the top priority when working with sharp tools like scissors or a craft knife. Adult supervision is crucial for children of all ages when cutting the plastic bottle. Consider using a cutting mat to protect your work surface.
- 6When choosing birdseed, opt for a high-quality mix that doesn't contain a lot of filler ingredients like red millet, which many smaller birds tend to ignore. Sunflower seeds, nyjer seed, and cracked corn are generally popular choices that attract a wide variety of species.
- 7To help the birds get accustomed to their new feeding spot, you can initially place the feeder in a location that is easily visible and accessible. Once they start using it regularly, you can gradually move it to a more secluded spot if desired, perhaps closer to natural cover.
- 8Regularly check the seed level and the condition of the feeder. If you notice any signs of mold or spoilage, empty and clean the feeder thoroughly before refilling it. This ensures a healthy and safe feeding environment for your feathered visitors.
Related Activities You Might Enjoy
Frequently Asked Questions
What kind of plastic bottle is best for a bird feeder?
A clean, empty 2-liter plastic soda bottle generally works best for this project due to its sturdy construction, common availability, and ideal size for holding a good amount of birdseed. Ensure it's thoroughly washed with soap and water to remove any residue from its original contents, and then completely dried before you begin crafting. Bottles from carbonated beverages tend to be more robust than those for still drinks, offering better durability against weather and bird activity. You can also experiment with slightly larger bottles, like 3-liter ones, for a feeder that requires less frequent refilling.
How do I make sure the birdseed doesn't spill out?
The key to preventing excessive birdseed spillage lies in the precision of your cuts for the wooden spoon handles. You want to create holes that are just large enough for the handle to fit snugly, providing a secure perch. The bowl of the wooden spoon is designed to catch most of the seed that might fall as birds eat. Any excess seed will then fall onto this spoon-bowl perch, creating a secondary feeding area. If you find a hole is slightly too large, you can try wrapping a bit of tape around the spoon handle to create a tighter fit before inserting it.
Can I use something other than wooden spoons?
While wooden spoons are ideal for this particular design because their bowls naturally form a seed tray and their handles provide a comfortable perch, you can certainly experiment with alternative materials. Sturdy twigs or dowel rods of an appropriate diameter can be used for perches. However, you would need to devise a way to create a seed tray beneath them, perhaps by cutting a larger opening and attaching a small plastic lid or a piece of sturdy cardboard as a tray. Ensure any alternative materials are securely fitted and offer a stable, safe spot for birds to land.
Where is the best place to hang a plastic bottle bird feeder?
The ideal location for your plastic bottle bird feeder is a spot that offers visibility for you to enjoy watching the birds, but also provides safety for the birds themselves. Hang it from a sturdy tree branch or a shepherd's hook at least 5-6 feet off the ground to deter ground predators like cats. Placing it near some shrubs or bushes can provide birds with a safe haven to retreat to if they feel threatened. Avoid hanging it too close to windows, as this can lead to bird collisions. Ensure the feeder is easily accessible for refilling and cleaning.
How often should I clean my bird feeder?
Regular cleaning of your bird feeder is crucial for the health and well-being of the birds. Ideally, you should clean it every two weeks, or more frequently if you notice any signs of spoilage, mold, or if it becomes particularly wet. To clean, take down the feeder, empty any remaining seed, and wash it thoroughly with warm, soapy water. You can use a mild bleach solution (one part bleach to nine parts water) for a more thorough disinfection, but be sure to rinse it extremely well afterward. Allow the feeder to dry completely before refilling it with fresh seed. This prevents the spread of diseases among bird populations.
What kind of birdseed is best to use?
The best type of birdseed to use depends on the birds you hope to attract to your garden. For a general mix that appeals to a wide variety of common garden birds, opt for a blend that includes black oil sunflower seeds, safflower seeds, and cracked corn. Nyjer (thistle) seed is excellent for attracting finches, while suet cakes or peanut pieces can attract woodpeckers and chickadees. Avoid seed mixes that are heavily laden with red millet or milo, as these are often less appealing to smaller songbirds and can lead to waste. Experimenting with different seed types is part of the fun of bird feeding!
Can I decorate the bird feeder?
Absolutely! Decorating your plastic bottle bird feeder can make it a more attractive and personalized addition to your garden. However, it's essential to use only non-toxic, waterproof paints and materials. Acrylic paints are a good choice, but ensure they are completely dry and cured before filling the feeder with seed to avoid any potential harm to the birds. You can also use permanent markers for designs. Avoid anything that could flake off or be ingested by the birds. Keep decorations simple and functional, ensuring they don't obstruct the birds' access to the seed or perches.
What Next?
Congratulations on creating your very own plastic bottle bird feeder! This eco-friendly project is a fantastic starting point for exploring further DIY nature crafts. Consider decorating your feeder with non-toxic paints or adding a small roof made from another recycled material for extra weather protection. Once your feeder is empty, simply refill it or consider making a few more to place in different locations around your garden. Remember to clean your feeder periodically to maintain a healthy environment for your feathered visitors. Enjoy the delightful spectacle of birds visiting your handmade creation!
Free: 10 Paper Crafts Anyone Can Make in 5 Minutes
Get our beginner guide + new craft ideas weekly.
No spam. Unsubscribe anytime.
Did you complete this activity?
Related
You might also like
Cardboard Tube Seed Starters
Cardboard Tube Seedling Starters
Toilet Paper Roll Animal Puppets
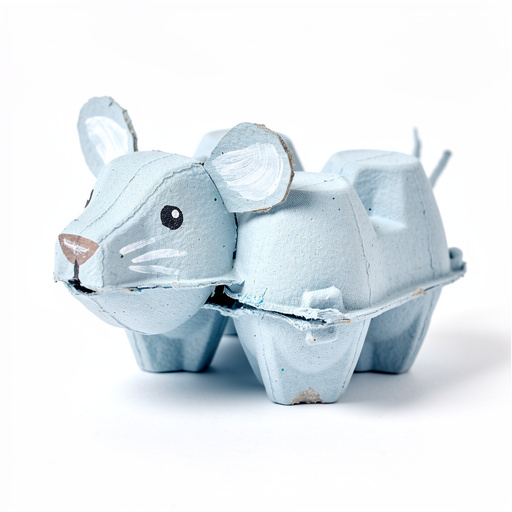
Egg Carton Critters
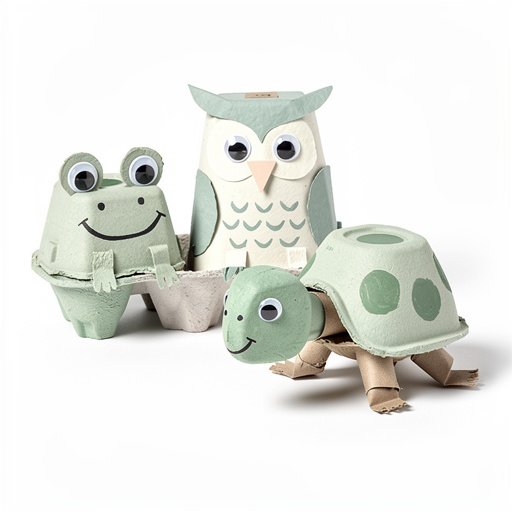
Egg Carton Critters & Creations