How to Build a DIY Bird Feeder from PVC Pipe — Easy Step-by-Step Guide
Create a long-lasting bird feeder using simple PVC pipes and fittings. This project is a fantastic way to attract feathered friends to your yard and is easy enough for families to tackle together.
Quick answer
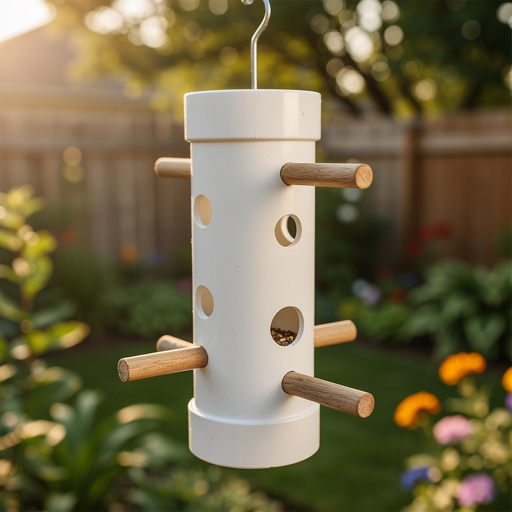
To make a DIY bird feeder from PVC pipe, you need PVC pipe, caps, a connector, and screws, taking about 30 minutes. Start by cutting the pipe to size. This beginner-friendly activity has 8 steps and is perfect for families and nature lovers.
What you need
Shop on Amazon · As an Amazon Associate we earn from qualifying purchases. Links above are affiliate links — we may earn a commission at no extra cost to you.
Welcome to a delightful DIY project that brings nature right to your doorstep! Building a PVC pipe bird feeder is an incredibly rewarding and straightforward endeavor, perfect for crafters of all skill levels, especially families looking for an engaging weekend activity. Unlike traditional wooden feeders that can weather and rot, a PVC feeder offers exceptional durability and is remarkably easy to clean, ensuring a safe and hygienic dining spot for your feathered visitors. This project not only provides a consistent food source for local birds, helping them through various seasons, but also offers a wonderful opportunity to observe and learn about the diverse avian life in your own backyard. Get ready to attract a symphony of chirps and flutters with this simple yet effective creation!
On this page
Step-by-Step Instructions
- 1
Measure and cut the 3-inch PVC pipe to a length of 1 foot. Ensure your cut is as straight and perpendicular as possible for a snug fit with the fittings. A clean cut will make assembly much easier and prevent gaps.
- 2
Smooth any rough edges or burrs on the cut ends of the 3-inch PVC pipe with sandpaper. This step is crucial for safety, preventing sharp edges that could harm birds, and also ensures a better seal with the cap and adapter.
- 3
Mark two points on opposite sides of the 3-inch PVC pipe, approximately 2 inches from one end. These marks will guide where you drill the pilot holes for your perches. Ensure they are directly across from each other for balance.
- 4
Using a drill bit that matches the diameter of your 1-inch PVC pipe pieces (or slightly smaller for a snug fit), drill pilot holes at the marks you made in the previous step. Drill straight through both sides of the pipe to create openings for the perches.
- 5
Now, drill a slightly larger hole, around 1/4 to 3/8 inch in diameter, through the center of the 3-inch PVC pipe, about 1 inch from the bottom end. This is your essential drainage hole, preventing water from accumulating and spoiling the seed.
- 6
Insert the two 4-inch long 1-inch PVC pipe pieces into the pilot holes you drilled in step 4. These will serve as the perches for the birds. You may need to gently twist or tap them into place to ensure a secure fit. If the holes are a bit tight, you can slightly enlarge them with your drill bit, but be careful not to make them too loose.
- 7
Attach the 3-inch PVC end cap to the end of the 1-foot pipe that is closest to the perch holes. This cap will serve as the sturdy bottom of your bird feeder, preventing seed from falling out the bottom. Ensure it's pressed on firmly.
- 8
Screw the 3-inch PVC threaded adapter onto the opposite end of the 1-foot pipe. This adapter will create the threaded opening at the top of your feeder, allowing for easy refilling. Make sure it's screwed on straight and securely.
- 9
Screw the 3-inch PVC threaded plug into the adapter. This plug acts as the lid for your feeder, keeping the seed dry and protected from the elements. It should screw in smoothly, indicating a good thread connection.
- 10
Test the fit of the threaded plug. It should screw in and out easily without being too loose or too tight. If it feels stiff, you might need to clean the threads on both the plug and the adapter. If it's too loose, consider adding a small amount of Teflon tape to the threads of the plug for a better seal.
- 11
Inspect the perch connections. Ensure the 1-inch PVC pipes are firmly seated in their holes and do not wobble excessively. If they feel loose, you can add a small amount of PVC cement to the inside of the pilot hole before inserting the perch for a permanent and secure hold, though this will make future replacement more difficult.
- 12
Check the drainage hole. Make sure it's clear of any debris and that the seed won't easily fall out. If the hole seems too large, you can try to find a slightly smaller drill bit for future projects or consider adding a small piece of mesh over the hole on the inside, secured with a dab of waterproof glue, though this is usually unnecessary if the hole is appropriately sized.
- 13
Consider adding a hanging mechanism if desired. For hanging, drill two small holes near the top of the feeder, on opposite sides, just below the threaded adapter. These holes should be large enough to thread a sturdy wire, rope, or chain through. Ensure the holes are aligned so the feeder hangs level.
- 14
If you plan to hang the feeder, thread a durable wire, rope, or chain through the holes you drilled in the previous step. Secure the ends with knots or crimps, ensuring the hanging material is strong enough to support the weight of the feeder filled with seed and potentially a few birds.
- 15
For a more permanent and weather-resistant feeder, you can apply PVC primer and cement to the end cap and threaded adapter before attaching them to the 3-inch pipe. Follow the instructions on the primer and cement carefully, ensuring good ventilation during application and allowing adequate drying time before use. This will make disassembly for cleaning more challenging but provides a very robust feeder.
- 16
Once all components are assembled, give the feeder a final check. Ensure all parts are securely attached and there are no sharp edges or loose pieces that could be a hazard to birds. The feeder should feel solid and well-constructed.
Tips & Troubleshooting
- 1If you want to hang your feeder, you can drill two holes near the top of the feeder and thread a sturdy wire or rope through them. Ensure the wire or rope is weather-resistant and strong enough to hold the weight of the feeder and its contents, especially when wet.
- 2Consider using different sizes of PVC pipe and fittings to create feeders of various capacities. A wider diameter pipe will hold more seed and require less frequent refilling, while a shorter pipe might be suitable for smaller birds or limited space.
- 3Ensure the drainage hole is large enough to allow water to escape but not so large that seed spills out. A 1/4 to 3/8 inch diameter hole is usually sufficient for most types of bird seed.
- 4For added stability and a more permanent build, you can glue the end cap and threaded adapter in place using PVC primer and cement. However, be aware that this will make disassembly for cleaning more difficult, so consider if this is the best option for your needs.
- 5To make refilling even easier, you can attach a small eye hook to the threaded plug. This provides a convenient handle to grip when unscrewing and screwing the plug back into place.
- 6If you live in an area with strong winds, consider securing the feeder to a post or a sturdy structure rather than just hanging it. This will prevent it from swinging excessively and potentially spilling seed.
- 7You can customize the appearance of your PVC feeder by painting it with non-toxic, outdoor-safe paint. Choose colors that blend with your garden or bright colors that might attract certain bird species. Ensure the paint is fully cured before filling with seed.
- 8Periodically check the perches to ensure they are still secure. If they become loose over time, you can re-secure them with a dab of strong, waterproof adhesive or by re-drilling and using PVC cement for a more robust fix.
Related Activities You Might Enjoy
Frequently Asked Questions
How do I refill a PVC bird feeder?
Refilling your PVC bird feeder is a simple process designed for convenience. Begin by locating the threaded plug at the top of the feeder. Gently unscrew this plug, turning it counter-clockwise. Once removed, you'll have access to the main tube of the feeder. Pour your desired bird seed into this opening, filling it to your preferred level, but avoid overfilling to prevent spillage. After filling, carefully screw the plug back into the threaded adapter, turning it clockwise until it is snug and secure. This ensures the seed remains protected from moisture and pests. This easy-to-access design makes regular maintenance a breeze.
What kind of bird seed should I use in a PVC feeder?
A PVC bird feeder is versatile and can accommodate a wide variety of bird seeds, making it attractive to a broad range of avian visitors. Common and highly recommended seeds include black oil sunflower seeds, which are a favorite among many songbirds due to their high fat content. Mixed seed blends are also excellent, offering a diverse buffet for different species. For smaller birds like finches, nyjer seed (also known as thistle seed) is a popular choice. It's crucial to ensure that the seed you use is dry and fresh to prevent mold and spoilage, which can be harmful to birds. Avoid using seeds that are damp or have been stored for extended periods.
How do I clean a PVC bird feeder?
Regular cleaning is essential for maintaining a healthy environment for your feathered guests. To clean your PVC bird feeder, start by unscrewing the threaded plug and then the threaded adapter from the main pipe. You can also remove the end cap if it's not permanently glued. Wash all the components thoroughly with warm water and a mild dish soap. A bottle brush or a long-handled scrub brush can be helpful for reaching inside the pipe. Rinse all parts meticulously to remove any soap residue. Allow all pieces to dry completely in the sun or air before reassembling and refilling. This process should be done every few weeks, or more often if you notice any signs of mold or debris.
Can I make a PVC bird feeder without drilling?
While drilling is the most common and effective method for creating drainage and perch holes in a PVC bird feeder, it is possible to adapt the design if drilling is not an option. For drainage, you could potentially use a PVC pipe with a wider opening at the bottom and rely on gravity and the seed's flow to manage water, though this is less ideal. Alternatively, you might find a PVC fitting with pre-drilled holes or a mesh bottom. For perches, you could explore feeders that don't require them, where birds perch on the edge of the feeding port, or use adhesive solutions to attach perches, though these may not be as durable. However, for a functional and safe feeder, drilling is highly recommended.
How long will a PVC bird feeder last?
One of the significant advantages of a PVC bird feeder is its exceptional durability and longevity. Unlike wooden feeders that are susceptible to rot, insect damage, and weathering, PVC is a robust material that can withstand various environmental conditions. With proper construction and occasional cleaning, a well-made PVC bird feeder can last for many years, often five to ten years or even longer. The material is resistant to UV rays, moisture, and temperature fluctuations, ensuring it maintains its structural integrity. Regular inspection for any cracks or damage, and prompt repair if needed, will further extend its lifespan, providing a reliable food source for birds season after season.
What are the benefits of using PVC pipe for a bird feeder?
The benefits of using PVC pipe for a bird feeder are numerous and make it an excellent choice for DIY enthusiasts and nature lovers alike. Firstly, PVC is incredibly durable and weather-resistant, meaning your feeder will stand up to rain, sun, and snow without degrading quickly, unlike wood. Secondly, it's exceptionally easy to clean; the smooth, non-porous surface prevents mold and bacteria from accumulating, promoting a healthier feeding environment for birds. Thirdly, PVC is lightweight and easy to cut and assemble, making it a beginner-friendly material for crafting. Finally, it's cost-effective, allowing you to create a high-quality, long-lasting bird feeder without a significant investment.
Can I add a roof to my PVC bird feeder?
Yes, you can absolutely add a roof to your PVC bird feeder to provide extra protection for the seed from rain and snow, and to offer shelter for the birds while they eat. To do this, you could use a larger diameter PVC cap or a specialized PVC roof fitting. You might need to adapt the top of your feeder slightly to accommodate the roof, perhaps by using a reducer fitting to connect the main feeder pipe to a wider roof section. Another simple option is to use a piece of weather-resistant wood or plastic, cut into a suitable shape, and attach it securely to the top of the feeder using screws or strong, waterproof adhesive. Ensure the roof extends slightly beyond the feeder's opening to effectively deflect precipitation.
What Next?
Congratulations on building your very own PVC pipe bird feeder! This durable and functional feeder is ready to welcome a variety of birds to your garden. Consider mounting it on a sturdy pole or hanging it from a tree branch for optimal viewing and accessibility for your feathered friends. For those who enjoy this project, explore variations like using larger diameter pipes for greater seed capacity or incorporating decorative elements to personalize your feeder. You can also experiment with different perch materials or even add a small roof to offer extra protection from the elements. This project is a gateway to further nature-inspired crafts, encouraging a deeper connection with the natural world around you.
Free: 10 Paper Crafts Anyone Can Make in 5 Minutes
Get our beginner guide + new craft ideas weekly.
No spam. Unsubscribe anytime.
Did you complete this activity?
Related