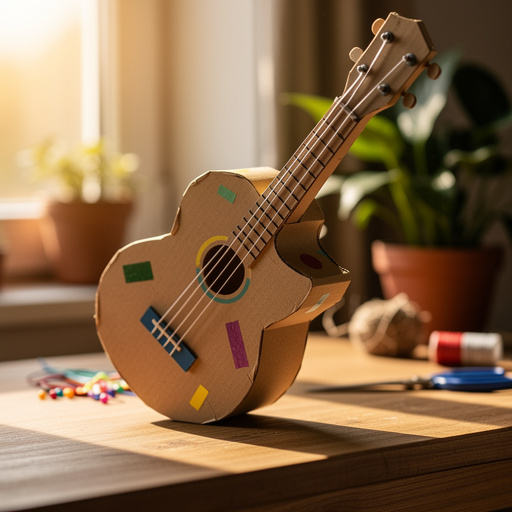
How to Make a Guitar Out of Paper — Easy Step-by-Step Guide
Strum your own tune with this easy-to-make paper guitar! A fun, screen-free craft for the whole family that uses common household items. This beginner-friendly activity has 10 steps and is perfect for families and kids aged 5+.
Quick answer
To make a guitar out of paper, you need a cardboard tube, paper, scissors, tape, and glue, taking about 45 minutes. Start by decorating the tube. This beginner-friendly activity has 10 steps and is perfect for families and kids aged 5+.
What you need
Shop on Amazon · As an Amazon Associate we earn from qualifying purchases. Links above are affiliate links — we may earn a commission at no extra cost to you.
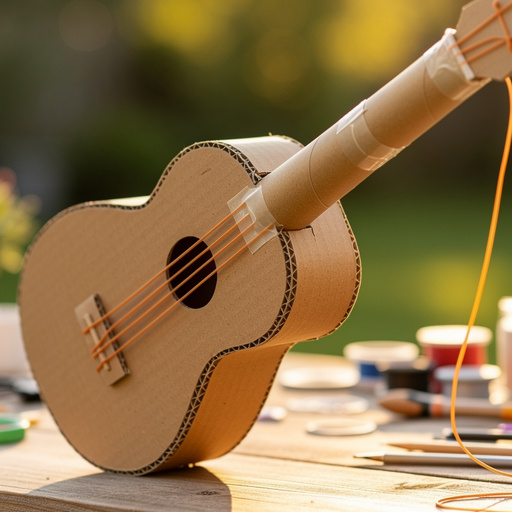
Unleash your inner rockstar with this delightful DIY Cardboard Tube Guitar! This project is more than just a craft; it's an invitation to creativity, imaginative play, and a fantastic screen-free activity for the whole family. Using simple, everyday materials, you can transform a humble paper towel tube into a vibrant, personalized musical instrument. It’s the perfect way to spend an afternoon, fostering fine motor skills, artistic expression, and a sense of accomplishment for crafters of all ages, especially those aged 5 and up.
On this page
Step-by-Step Instructions
- 1
Gather all your materials. Ensure you have everything laid out and ready to go before you begin, which will make the crafting process smoother and more enjoyable. Having your scissors, tape, glue, and decorating supplies within easy reach will prevent interruptions.
- 2
Prepare the guitar body. Take your paper towel tube and measure the circumference. Cut a piece of sturdy cardstock to wrap around the tube, ensuring it overlaps by about half an inch to an inch. This overlap will be crucial for securely attaching the cardstock to form a solid body.
- 3
Secure the body. Carefully wrap the cut cardstock around the paper towel tube, aligning the edges. Use tape to firmly secure the overlapping section, creating a smooth, cylindrical guitar body. Make sure the tape is applied smoothly to avoid wrinkles and ensure a strong bond.
- 4
Create the soundhole. On your contrasting construction paper, draw a circle approximately 3 inches in diameter. This will be the iconic soundhole of your guitar. You can use a compass, a round object like a cup, or freehand draw the circle.
- 5
Cut out the soundhole. Carefully cut out the construction paper circle you just drew. Aim for a clean, smooth edge to make the soundhole look as professional as possible. If you're using scissors for the first time, practice on scrap paper first.
- 6
Attach the soundhole. Apply glue to the back of the construction paper soundhole. Center it on the front of your taped cardboard tube body and press down firmly. Ensure the edges are well-adhered to prevent them from peeling up later.
- 7
Prepare the guitar neck pieces. From your additional sheet of cardstock or sturdy paper, cut two strips. Each strip should be approximately 1 inch wide and at least 6 inches long. These will form the main structure of your guitar's neck.
- 8
Attach the neck base. Take one of the cardstock neck strips and apply glue or tape to one of its 1-inch ends. Position this end at the top of the guitar body, where the neck would naturally begin, and press firmly to secure it. Repeat this process with the second neck strip, placing it directly beside the first one.
- 9
Shape the neck. Gently bend the two neck strips inwards towards each other, so they meet at the top. This inward curve will create the characteristic shape of a guitar neck. Once they are meeting at the desired angle, secure them together firmly with tape along their joined edge.
- 10
Create the headstock. Cut a small rectangle from cardstock, measuring about 2 inches by 1 inch. This will serve as the headstock of your guitar, where the tuning pegs would typically be located. You can round the corners of the headstock for a more realistic guitar appearance.
- 11
Attach the headstock. Apply glue or tape to the bottom edge of the headstock rectangle. Carefully attach it to the very top of the joined neck strips, ensuring it is centered and securely fastened. This completes the basic structure of your paper guitar.
- 12
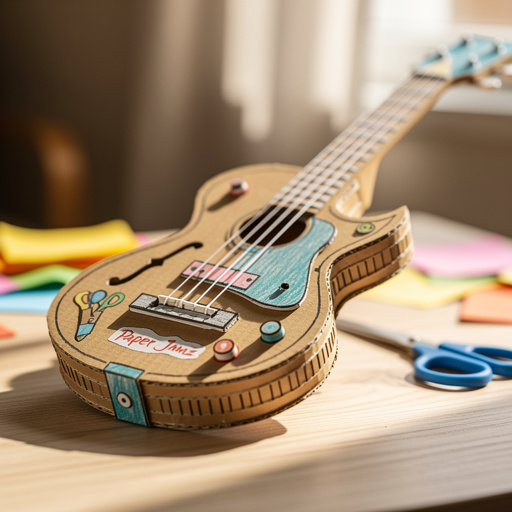
Decorate your guitar! Now for the fun part: unleash your artistic flair. Use crayons, markers, colored pencils, or even paint to decorate the entire guitar body and neck. Draw intricate designs, vibrant patterns, or even try to mimic the look of a real guitar.
- 13
Add string details. If you like, you can draw strings directly onto the decorated guitar body and neck using a fine-tipped marker or a contrasting colored pencil. You can draw six parallel lines running from the headstock down to the body for a realistic effect.
- 14
Allow glue to dry. Before you start strumming your new paper guitar, ensure all the glue has dried completely. This is especially important for the soundhole and the neck attachments to ensure they are firmly in place and won't detach during play.
- 15
Reinforce for durability (Optional). For a sturdier guitar, consider adding an extra layer of cardstock around the main body tube. You can cut another piece of cardstock to wrap around the existing body and secure it with glue or tape for added strength.
- 16
Add tuning pegs (Optional). To make your guitar look even more like a real instrument, you can draw or glue on small circles or rectangles onto the headstock to represent tuning pegs. These can be made from small scraps of cardstock or even buttons.
- 17
Embellish with extras (Optional). Get creative with decorations! You can use stickers, glitter glue, or even cut out small shapes from different colored paper to add unique details and textures to your guitar. Think about adding a pickguard or decorative inlays.
- 18
Consider alternative materials (Optional). If you don't have cardstock readily available, you can use two layers of regular paper glued together for the guitar body and neck. This will provide a bit more rigidity than a single sheet.
- 19
Test your sound (Optional). While it won't produce actual music, you can gently tap on the soundhole or strum the drawn strings to imagine the sounds your guitar might make. This adds another layer of imaginative play.
- 20
Final inspection. Once everything is dry and decorated, give your guitar a final inspection. Ensure all parts are securely attached and that there are no sharp edges or loose pieces. Your DIY Cardboard Tube Guitar is now ready for its debut!
- 21
Share your creation. Take a picture of your finished guitar and share it with friends and family! It's always fun to see how different people interpret the same craft and to inspire others to create their own musical masterpieces.
- 22
Playtime! Your DIY Cardboard Tube Guitar is now ready for endless hours of imaginative play. Encourage children to create their own songs, put on concerts, or use it as a prop in their imaginative adventures.
- 23
Clean up your workspace. Once the crafting is complete, take a few minutes to tidy up your workspace. Put away all the materials, tools, and any scraps, ensuring your crafting area is ready for your next creative endeavor.
- 24
Store your guitar. When not in use, store your paper guitar in a safe place where it won't get crushed or damaged. A shelf or a designated craft bin would be ideal.
- 25
Reflect on the process. Talk about what you enjoyed most about making the guitar. Did you have a favorite step? What would you do differently next time? This reflection can help improve future crafting experiences.
- 26
Consider a second guitar. Once you've mastered this design, why not make another one? You could experiment with different sizes of tubes, different paper colors, or even try creating different types of guitars like a ukulele or a bass.
- 27
Display your artwork. Your DIY Cardboard Tube Guitar is a work of art! Find a special place to display it, perhaps on a mantelpiece, a bookshelf, or even hang it on the wall as a decorative piece.
Tips & Troubleshooting
- 1For a sturdier guitar, use a paper towel tube that is slightly thicker or reinforce the body with an extra layer of cardstock. This will help prevent the tube from denting or collapsing during enthusiastic strumming sessions.
- 2Get creative with decorations! You can use stickers, glitter glue, or even cut out small shapes from different colored paper to add details. Consider adding googly eyes for a whimsical touch or drawing a personalized name on the headstock.
- 3If you don't have cardstock, you can use two layers of regular paper glued together for the guitar body and neck. Ensure the glue is applied evenly and allow ample drying time between layers for maximum strength.
- 4To make it look more like a real guitar, you can draw or glue on tuning pegs on the headstock. Small circles cut from cardstock or even buttons can effectively mimic these details.
- 5Experiment with different soundhole shapes. Instead of a circle, try cutting out a star, a heart, or even a unique abstract shape for a more personalized touch.
- 6Encourage children to name their guitars and create a backstory for them. This adds an extra layer of imaginative play and ownership to their creation.
- 7If you want to add a strap, punch small holes on either side of the guitar body and thread a piece of yarn or ribbon through them. This allows the guitar to be worn like a real instrument.
- 8Consider using patterned paper for the body or soundhole for an even more visually interesting guitar. Scrapbooking paper often comes in a wide variety of fun designs.
Related Activities You Might Enjoy
Frequently Asked Questions
Can I make a guitar out of just paper?
Yes, you can absolutely make a guitar primarily out of paper and a cardboard tube! This project ingeniously utilizes common paper products and a readily available tube to construct a fun, decorative instrument. While it won't produce actual musical notes, it's a fantastic way to engage in creative play and artistic expression. The cardboard tube provides the foundational structure, while various types of paper are used for the body, soundhole, neck, and headstock, allowing for a wide range of customization and design possibilities.
What kind of paper is best for making a paper guitar?
Sturdy cardstock is highly recommended for the guitar body and neck because it holds its shape well and provides a good base for decorating. Its rigidity ensures that the guitar maintains its form and can withstand gentle handling. Regular construction paper is excellent for decorative elements like the soundhole, as it's easy to cut and comes in a variety of vibrant colors. For added durability, you can even use two layers of regular paper glued together if cardstock isn't available, but cardstock will generally yield a more robust result.
How do I make the strings on a paper guitar?
There are a couple of easy ways to create strings for your paper guitar. The simplest method is to draw them directly onto the decorated guitar body and neck with markers or crayons. Use a fine-tipped marker in a contrasting color for a clear definition. For a more tactile and visually interesting effect, you could also glue on thin yarn, embroidery floss, or even thin ribbon. Apply a thin line of glue along where the strings would be and carefully press the yarn or ribbon into the glue.
Is this a good craft for young children?
Yes, this is a fantastic craft for young children aged 5 and up. It's a wonderful activity that encourages creativity, fine motor skill development, and imaginative play. Adult supervision is definitely recommended for the cutting steps, especially when using scissors, to ensure safety. However, the decorating portion of the craft is a great independent activity where children can express their artistic vision freely. It's a rewarding project that results in a tangible toy they can be proud of.
How long does it take to make this paper guitar?
This DIY Cardboard Tube Guitar is a relatively quick and satisfying craft project. The actual construction and assembly typically take about 30-45 minutes, depending on the speed and experience of the crafter. The majority of this time is spent on cutting, taping, and gluing the main components. The decorating phase can vary significantly; a child might spend 15-30 minutes on simple coloring, while someone looking for intricate details could spend an hour or more. So, while the core build is fast, the creative embellishment time is flexible.
Can I make a guitar with a different sized tube?
Absolutely! While the instructions are based on a standard paper towel tube, you can certainly adapt them for different sized tubes. If you use a toilet paper tube, your guitar will be smaller and more like a ukulele. If you find a longer or wider tube, you can adjust the size of your cardstock body and neck pieces accordingly. You might need to experiment a bit with the proportions to ensure everything looks balanced, but the core principles of construction remain the same, making it a versatile project.
What if I don't have cardstock? Can I still make the guitar?
Yes, you can still make a perfectly good paper guitar even if you don't have cardstock. The key is to provide enough structure. You can achieve this by using two layers of regular printer paper or construction paper glued together for the guitar body and neck. Make sure to apply the glue evenly and press the layers firmly together, allowing them to dry completely before proceeding with the next steps. This double-layer approach will give you a much sturdier result than a single sheet of paper, making your guitar more durable for play.
What Next?
Congratulations on creating your very own DIY Cardboard Tube Guitar! This project is a fantastic starting point for a world of creative exploration. You can further enhance your guitar by adding more intricate details like frets drawn on the neck, or even attaching real strings made from yarn or thin ribbon for a more realistic look. Consider making a whole band of instruments or using your guitar as a prop for storytelling and imaginative play. Once your masterpiece is complete, display it proudly on a shelf or use it for your next family jam session!
Free: 10 Paper Crafts Anyone Can Make in 5 Minutes
Get our beginner guide + new craft ideas weekly.
No spam. Unsubscribe anytime.
Did you complete this activity?
Related