How to Make a No-Sew Fleece Pillow — Easy Step-by-Step Guide
Create a cozy and personalized fleece pillow without any sewing! This fun and simple project is perfect for kids looking for screen-free creative activities. It's a fantastic way to make a custom accent for a bedroom or a comfy companion for story time.
Quick answer
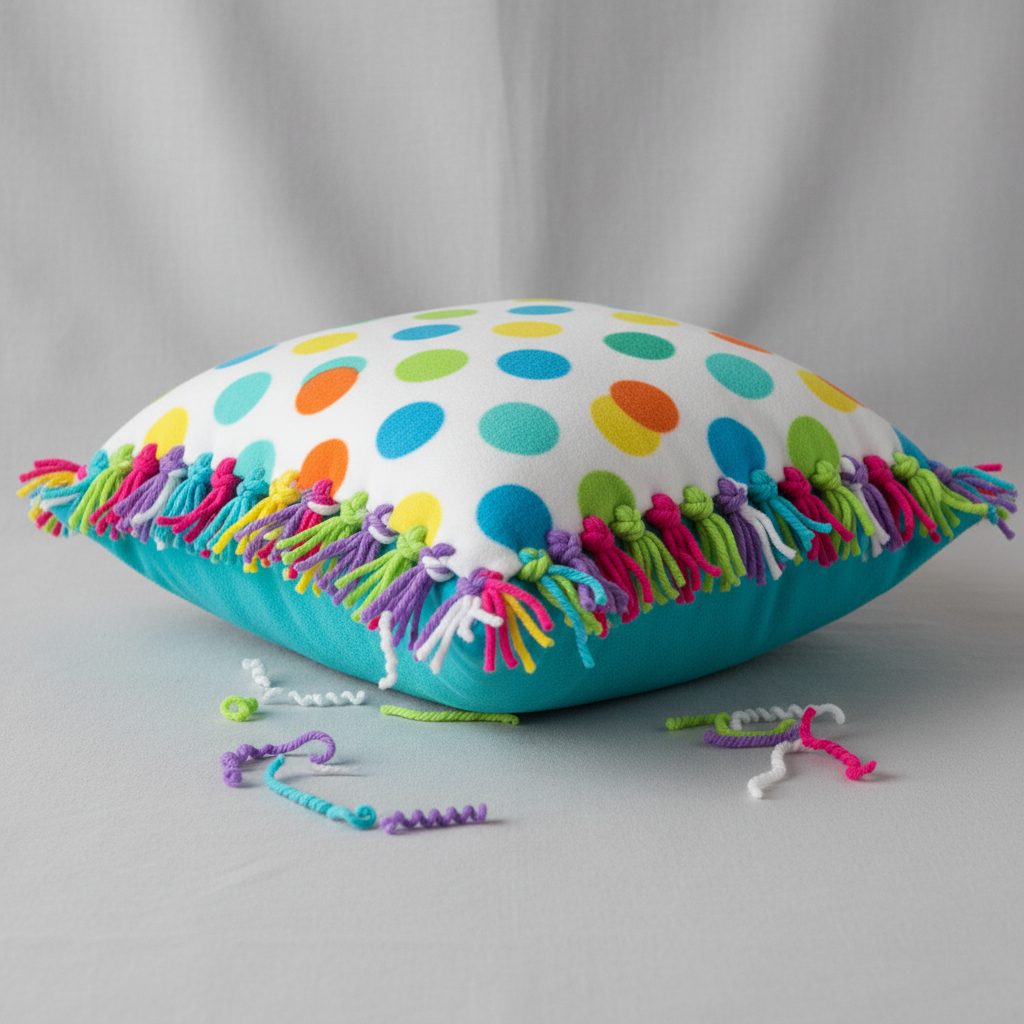
To make a no-sew fleece pillow, you need two pieces of fleece fabric (e.g., 12x12 inches each), fabric scissors, and polyester fiberfill stuffing (about 4-6 oz). The process involves cutting fringe around the edges and tying them together to create a pillow. This beginner-friendly activity has 10 core steps and is perfect for 10-year-olds, taking approximately 30 minutes to complete.
What you need
Shop on Amazon · As an Amazon Associate we earn from qualifying purchases. Links above are affiliate links — we may earn a commission at no extra cost to you.
Looking for a fun, creative, and screen-free activity that results in something cozy and useful? This no-sew fleece pillow project is an absolute winner! It’s incredibly simple, making it perfect for young crafters, beginners, or anyone who wants a quick DIY project. The magic lies in transforming two pieces of soft fleece into a plush pillow using just scissors and your hands. Imagine the satisfaction of creating a custom pillow for your bed, a reading nook, or even as a thoughtful handmade gift. This project fosters creativity, fine motor skills, and provides a tangible, huggable reward for your efforts.
On this page
Step-by-Step Instructions
- 1
Lay one piece of fleece fabric flat on a protected surface, ensuring the right side (the side with the intended pattern or texture) is facing upwards. This prepares your base layer for the pillow construction.
- 2
Carefully place the second piece of fleece fabric directly on top of the first piece, also with the right side facing upwards. Align the edges as precisely as possible to ensure an even final product.
- 3
Using your sharp fabric scissors, trim both pieces of fleece so they are the exact same size and shape. This step is crucial for ensuring the fringe ties will align correctly and the pillow will have clean edges.
- 4
Starting at one corner of the layered fabric, cut a 1-inch by 1-inch square out of each of the four corners. This removes excess fabric and creates the starting point for your fringe.
- 5
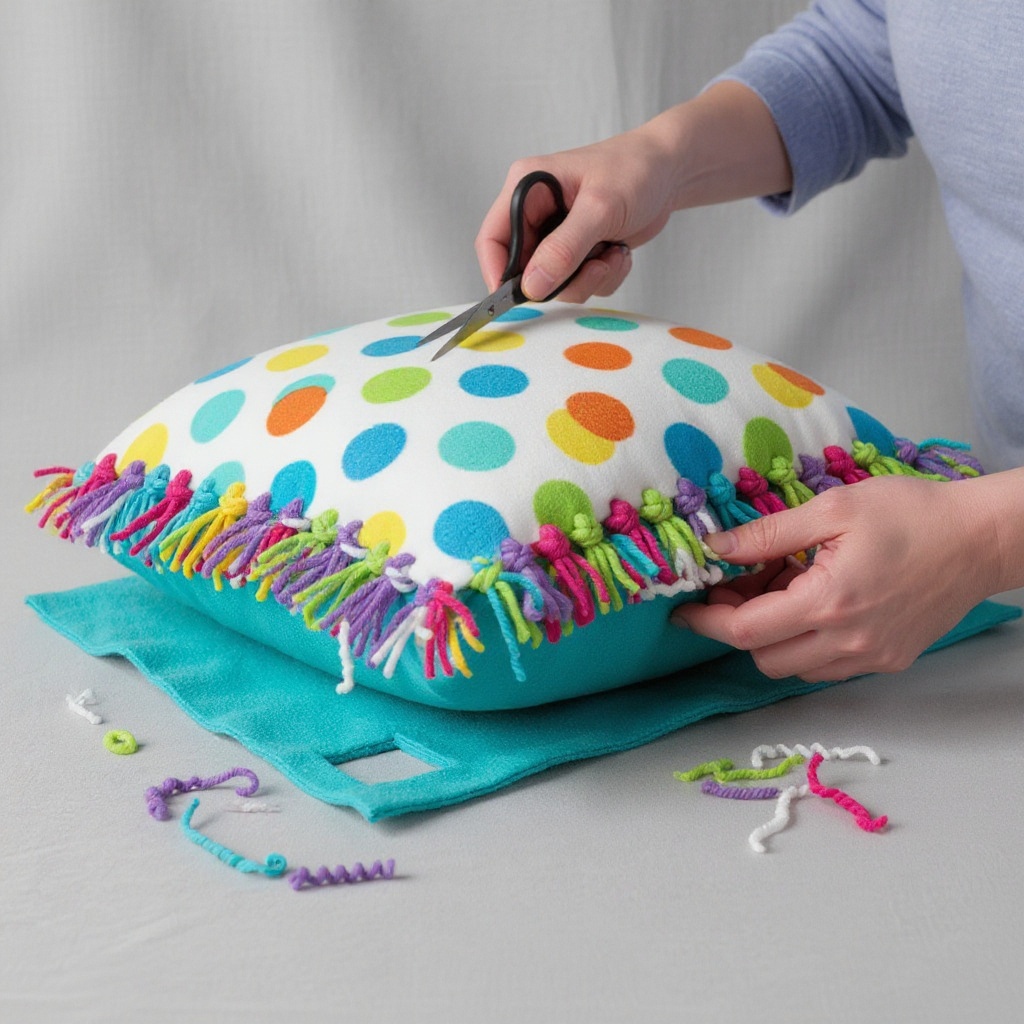
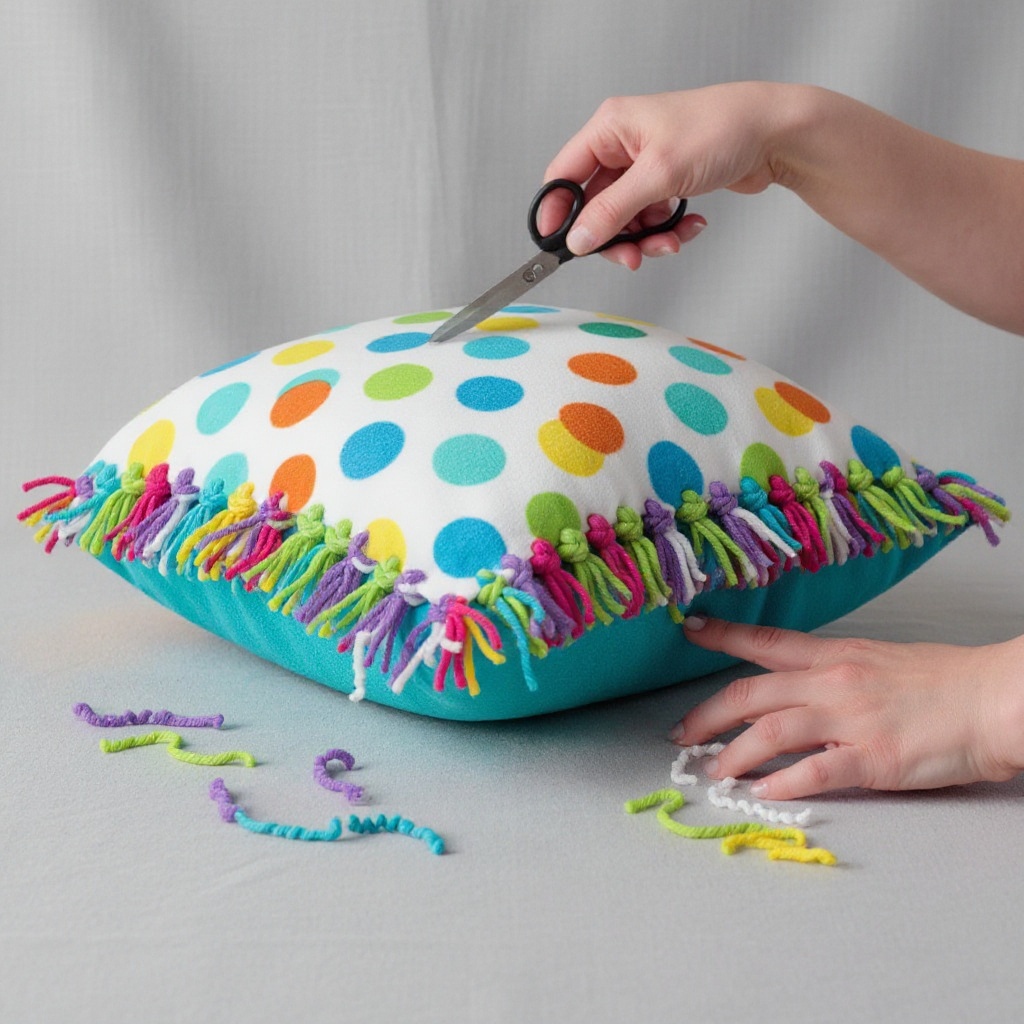
Along one of the sides of the fabric, begin cutting 1-inch long fringe strips. These strips should be approximately 1/2 inch apart, and you must cut through both layers of fleece simultaneously. Aim for consistent spacing and length for the neatest outcome.
- 6
Repeat the fringe cutting process on the remaining three sides of the fabric. Ensure each side has evenly spaced, 1-inch long fringe strips that go through both layers of fleece.
- 7
Now, it's time to start tying! Take one fringe strip from the top layer and its corresponding fringe strip from the bottom layer. Tie them together securely in a double knot. This knot will form the seam of your pillow.
- 8
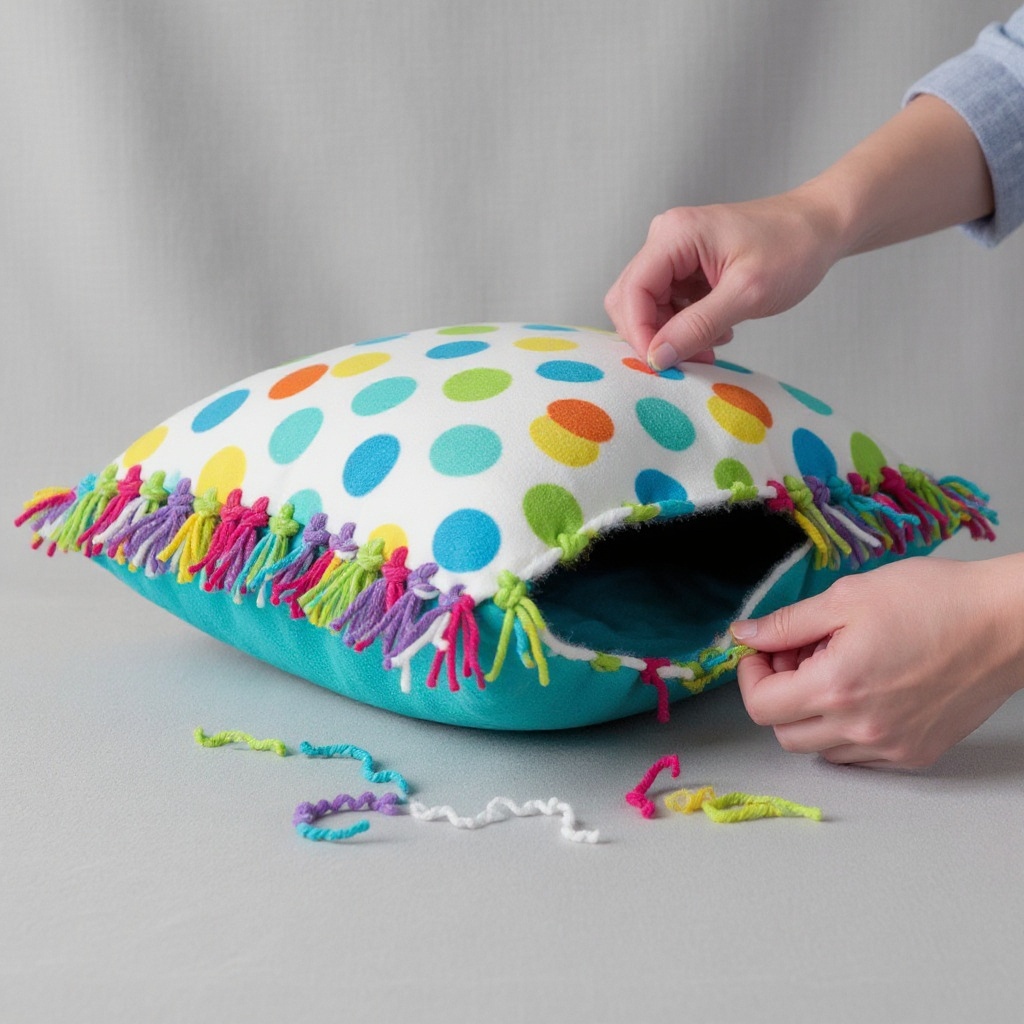
Continue tying the fringe strips together all the way around the pillow. As you work, intentionally leave a 4-5 inch opening on one of the sides. This opening is essential for stuffing the pillow.
- 9
Begin stuffing the pillow through the opening you left. Use your polyester fiberfill stuffing, gently pushing it into the corners and edges first, then filling the center. Distribute the stuffing evenly to ensure a plump and comfortable pillow.
- 10
Once the pillow is stuffed to your desired firmness, it's time to close the opening. Tie the remaining fringe strips together in double knots, just as you did for the rest of the pillow. Ensure these knots are tight to prevent stuffing from escaping.
- 11
Gently shape and fluff your newly created no-sew fleece pillow. Give it a good squeeze and pat to ensure the stuffing is evenly distributed and the pillow is as comfortable as possible.
- 12
Inspect all the tied knots to ensure they are secure. If any feel loose, tie them again to prevent any unraveling or stuffing leakage over time. This final check ensures the longevity of your pillow.
Tips & Troubleshooting
- 1If your fringe strips aren't tying easily, it might be because they are too thick or unevenly cut. Ensure your scissors are sharp and that you are cutting consistently through both layers. You can also try making the fringe slightly longer if you're having trouble reaching to tie them.
- 2Experiment with different fabric patterns and colors for a unique look. You can even layer different patterns by placing a patterned fleece on the bottom and a solid color on top, or vice versa, for a visually interesting effect. Consider seasonal themes or coordinating with your existing decor.
- 3For a firmer pillow, use less stuffing and pack it in tightly. For a softer, more squishy pillow, use more stuffing and don't pack it in as densely. The amount of stuffing is entirely up to your personal preference for comfort.
- 4Consider adding fabric paint or permanent markers to the fleece before you start cutting fringe for extra decoration. You can draw designs, write messages, or create patterns on the fabric. Just be sure to let any paint or ink dry completely before proceeding with the cutting and tying steps.
- 5To ensure your fringe strips are perfectly even, use a ruler and a fabric marker or chalk to draw faint lines indicating where each cut should begin and end. This is especially helpful for beginners or when working with larger pieces of fabric.
- 6Don't be afraid to get creative with the shape! While this tutorial focuses on a square pillow, you can adapt the fringe method to create round, heart-shaped, or even custom-shaped pillows by carefully cutting and fringing the desired outline. Just remember to cut out the corner squares accordingly for the shape.
- 7When tying the fringe, pull the strips taut before making the double knot. This helps to create a tighter seam and a more defined edge for your pillow. It also ensures the stuffing is held securely inside.
- 8For a truly unique pillow, consider using two different textures of fleece, such as a smooth fleece and a shaggy or faux fur fleece. This can add an interesting tactile element to your finished project.
Related Activities You Might Enjoy
Frequently Asked Questions
Can a 10-year-old do this no-sew pillow project alone?
Yes, with adult supervision for cutting and tying, a 10-year-old can easily complete this no-sew pillow project. It's designed to be simple and fun for their age group, focusing on basic cutting and knot-tying skills. The primary need for supervision would be during the cutting phase to ensure safety with scissors and to help guide them in making straight, even cuts. The tying of the fringe is generally straightforward and manageable for this age group, offering a great sense of accomplishment once completed. It's an excellent activity for developing fine motor skills and fostering independence in a creative context.
What kind of fabric is best for a no-sew pillow?
Fleece fabric is ideal for no-sew projects like this pillow because it's soft, cozy, and most importantly, it doesn't fray easily when cut. This characteristic is crucial for the fringe method to work effectively without the edges unraveling. Any medium-weight fleece will work well for this pillow, offering a good balance of softness and structure. You can find fleece in a vast array of colors, patterns, and textures, allowing for endless customization. Avoid very thin or stretchy fleece, as it might be more difficult to cut evenly and tie securely.
How do I make the fringe strips even?
To make even fringe strips, you can use a ruler to mark the 1-inch intervals before cutting. Measure and mark every inch along the edge of the fabric where you intend to cut the fringe. Then, use a fabric marker or chalk to draw a faint line connecting these marks across the width of the fringe you want to create. Ensure your scissors are sharp for clean cuts through both layers of fleece. Cutting along these marked lines will help ensure uniformity in the length and spacing of your fringe, leading to a neater and more professional-looking finished pillow.
Can I make a different shape pillow?
Absolutely! While this tutorial uses squares, you can adapt the fringe method to create heart-shaped or even round pillows by carefully cutting and fringing the desired shape. For a round pillow, you would cut out a circle from both fabric layers and then cut fringe all the way around the circumference. For a heart shape, you would cut out the heart outline and then proceed with fringing along the curved edges. Remember to adjust the initial corner cuts or remove excess fabric to accommodate the chosen shape, ensuring the fringe can still be tied effectively.
How much stuffing do I need for a standard-sized pillow?
For a standard 12x12 inch pillow, you will typically need about 4 to 6 ounces of polyester fiberfill stuffing. This amount will give you a comfortably plump pillow. However, the exact quantity can vary depending on your desired firmness and how tightly you pack the stuffing. If you prefer a very firm pillow, you might use slightly less or pack it in more densely. Conversely, for a super soft and squishy pillow, you might opt for a bit more stuffing. It's always a good idea to have a little extra on hand in case you need to adjust the fullness.
What are the benefits of using fleece for this project?
Fleece is the perfect material for this no-sew pillow project for several key reasons. Firstly, its inherent lack of fraying means that when you cut it, the edges remain neat and tidy, which is essential for the fringe technique to look good and hold together. Secondly, fleece is incredibly soft and cozy, making the finished pillow wonderfully comfortable and inviting. It's also durable and easy to care for, often machine washable. The wide variety of colors and patterns available in fleece fabric allows for immense creativity and personalization, making each pillow unique.
Can I make this pillow larger or smaller?
Yes, you can absolutely make this pillow larger or smaller by adjusting the initial size of your fleece fabric pieces. The core steps of cutting fringe and tying remain the same regardless of the dimensions. For a larger pillow, simply start with larger squares or rectangles of fleece, ensuring you maintain the 1-inch fringe length and 1/2-inch spacing. You will likely need more stuffing for a larger pillow. For a smaller pillow, use smaller fabric pieces and adjust the fringe length proportionally if desired, though 1-inch fringe often works well even on smaller items.
What Next?
Congratulations on creating your very own no-sew fleece pillow! This versatile project opens the door to endless customization. Consider layering different colored or patterned fleece for a unique visual effect, or even adding appliques before you start cutting the fringe. For a more decorative touch, you could use fabric markers to draw designs on the fleece before assembly. These pillows are perfect for adding a pop of color to any room, serving as comfortable floor cushions, or even as travel companions. Store them neatly on a couch or bed, and enjoy the warmth and comfort you've created with your own hands.
Free: 10 Paper Crafts Anyone Can Make in 5 Minutes
Get our beginner guide + new craft ideas weekly.
No spam. Unsubscribe anytime.
Did you complete this activity?