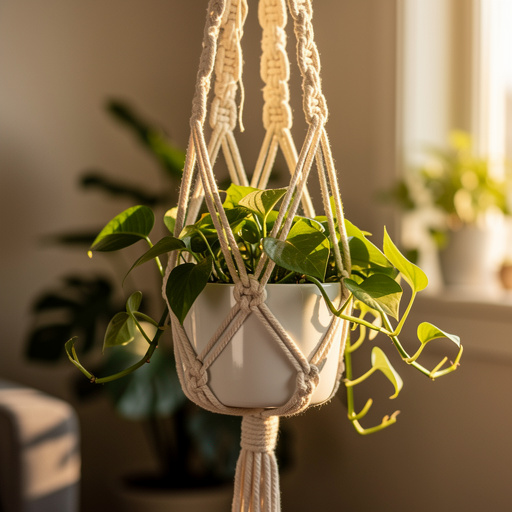
How to Make a Macrame Plant Hanger — Easy Step-by-Step Guide
Discover the joy of macrame with this beginner-friendly guide. Learn essential knots and create a beautiful macrame plant hanger, perfect for adding a handmade touch to your home.

Quick answer
To make a macrame plant hanger, you need cotton cord and a ring, taking about 60 minutes. Start by attaching cords to the ring using a Lark's Head knot. Then, tie square knots and diagonal square knots to form the body of the hanger, finishing with a gathering knot and fringe. This beginner-friendly activity has 10 main steps and is perfect for families looking for screen-free crafts.
What you need
Shop on Amazon · As an Amazon Associate we earn from qualifying purchases. Links above are affiliate links — we may earn a commission at no extra cost to you.
Embark on a creative journey with this incredibly accessible macrame plant hanger project! Perfect for beginners, this tutorial demystifies the art of macrame, transforming simple cords into a stunning piece of functional art. It's a wonderfully mindful activity, offering a satisfying escape from screens and a chance to create something beautiful with your own hands. Whether you're looking to adorn your living space with a touch of bohemian charm or searching for a thoughtful handmade gift, this macrame plant hanger is an ideal starting point for anyone eager to explore the world of fiber crafts.
On this page
Step-by-Step Instructions
- 1
Cut your 8 lengths of macrame cord to 10 feet each. Ensure your cuts are as straight as possible to avoid unevenness later on. Using a measuring tape guarantees accuracy, which is crucial for consistent knotting.
- 2
Fold each cord in half, creating a distinct loop at the top. This loop will be the attachment point to your ring, so make sure it's centered and the two halves of the cord are of equal length.
- 3
Thread the loop of each folded cord through the ring, then pull the loose ends through the loop to attach them securely. This technique is known as a Lark's Head knot, and it's the foundation for attaching all your cords. You should now have 16 strands hanging from the ring, with each original cord creating two working strands.
- 4
Gather 4 strands together, about 2 inches down from the ring. This initial grouping will form the first section of your hanger's body. Ensure these 4 strands are held together evenly before proceeding to the next step.
- 5
Tie a gathering knot by wrapping another piece of cord (about 12 inches long) tightly around the 4 strands. Begin by creating a loop with the 12-inch cord, pointing downwards, and wrap the working end of the cord around the bundle and through the loop. Then, tuck the end of the wrapping cord through the loop you created and pull the top end of the 12-inch cord snug, drawing the loop and the tucked end upwards under the wraps. Pull it snug to secure all the strands together.
- 6
Separate the 4 strands into two pairs. Take one pair of strands and tie a square knot. To do this, cross the left strand over the right strand, then bring it under and through the opening created. Pull both ends to tighten. Next, cross the right strand over the left strand, bring it under and through the opening, and pull to tighten. Repeat this sequence 3-4 times to create a solid, decorative knot.
- 7
Repeat step 5 with the other pair of strands, creating a second square knot directly below the first. Ensure this second square knot is aligned with the first and tied with the remaining two strands from the initial group of four.
- 8
Now, to create the diagonal pattern, take two strands from the first square knot and two strands from the second square knot. Combine these four strands and tie a square knot with them, about 2 inches below the previous knots. This intentional spacing and mixing of strands is what gives the macrame hanger its characteristic diamond or net-like appearance.
- 9
Repeat step 7 with the remaining strands, creating another diagonal square knot. This involves taking the two 'outer' strands from the first square knot and the two 'inner' strands from the second square knot and tying a square knot with them. This continues the alternating pattern and builds the structure of the hanger.
- 10
Continue creating alternating diagonal square knots, working your way down the cords. Aim for about 4-6 rows of these diagonal knots, ensuring they are evenly spaced. Measure the distance between your rows to maintain consistency and a professional look. You can adjust the number of rows to achieve your desired hanger length.
- 11
Once you have completed your desired length of knotting, gather all 16 strands together about 4-6 inches from the bottom of your last knots. This section will form the base that holds your plant pot. Ensure all strands are gathered evenly before tying the final knot.
- 12
Tie another gathering knot here, securing all the cords tightly. Use the same technique as described in step 5, ensuring the knot is firm and centered to prevent the plant from slipping out. This knot is crucial for the structural integrity of the hanger.
- 13
Trim the excess cord below the final gathering knot to your desired length, creating a fringe. You can opt for a short, neat fringe or a longer, more dramatic one. Use your sharp scissors for a clean cut.
- 14
Gently unravel the ends of the fringe if you desire a softer, fuller look. This can be done by separating the plies of the macrame cord and then teasing them apart with your fingers or a comb. This adds a bohemian touch and can make the fringe appear more luxurious.
Tips & Troubleshooting
- 1If your knots are uneven, gently loosen them and re-tighten. Macrame is forgiving, and most knots can be adjusted. Practicing on scrap cord before starting your project can help you get a feel for the tension needed for consistent knots.
- 2Experiment with different lengths for your fringe to create unique looks. A shorter fringe can give a more minimalist feel, while a longer, fuller fringe adds a bohemian flair. You can even create layers by trimming some strands shorter than others.
- 3You can add beads by threading them onto the cords before tying knots. Ensure the bead hole is large enough for your cord to pass through easily. Place beads strategically within the knotting pattern for added visual interest and texture.
- 4To make a longer plant hanger, simply use longer cords and add more rows of knots. Remember to account for the extra cord needed for knotting and the desired fringe length when calculating your initial cord lengths.
- 5For a tighter, more compact hanger, you can tie your knots closer together. Conversely, wider spacing between knots will create a more open, airy design. Experiment to find the look that best suits your style and the plant you intend to display.
- 6Consider using different types of cord, such as jute or nylon, for a different aesthetic and durability. However, for beginners, cotton is highly recommended due to its softness and ease of handling.
- 7If you find your hands getting tired, take breaks. Macrame can be repetitive, so pacing yourself is key to enjoying the process and avoiding strain. A comfortable workspace with good lighting also makes a big difference.
Related Activities You Might Enjoy
Frequently Asked Questions
What is the best cord for macrame beginners?
For macrame beginners, 3mm or 4mm 100% cotton cord is ideal. It's soft, easy to handle, and forgiving for practicing knots without being too bulky. Natural cotton has a beautiful texture and is readily available, but you can also find it in a wide array of colors to match your decor. Avoid synthetic cords like polyester or nylon when you're just starting, as they can be slippery and harder to work with. The thickness is important too; thinner cords can be fiddly, while very thick cords can be cumbersome for intricate knotting.
How many knots do I need to know for macrame?
For basic macrame projects like a plant hanger, you primarily need to master the Lark's Head knot and the Square knot. These two knots form the foundation for many beautiful designs. The Lark's Head knot is used to attach your cords to a ring or dowel, and the Square knot is the workhorse for creating patterns and structure. Once you're comfortable with these, you can explore variations like the half square knot or the diagonal square knot, which are essential for creating the classic diamond patterns seen in many plant hangers and wall hangings.
Where can I find a good macrame for beginners book?
You can find excellent macrame for beginners books at most major bookstores, online retailers like Amazon, and even some craft supply stores. Look for titles that emphasize clear diagrams and simple projects, as visual aids are crucial for learning macrame knots. Some popular authors and publishers known for beginner-friendly macrame guides include 'The Macrame Book' by Charlotte L. Day, or books from brands like Sterling Publishing. Reading reviews can also help you identify books with easy-to-follow instructions and inspiring project ideas.
How long should macrame cords be for a plant hanger?
For a standard-sized plant hanger, 8 cords of 10 feet each is a good starting point. This allows enough length for knotting and a decent fringe. However, the ideal cord length can vary depending on the complexity of your design, the size of the plant pot you intend to hold, and your personal preference for fringe length. If you plan on making a longer hanger or incorporating more elaborate knotting patterns, you'll need to increase the cord length accordingly. It's always better to have a little extra cord than not enough.
Can I use different types of cord for my macrame plant hanger?
Absolutely! While cotton cord is highly recommended for beginners due to its softness and ease of handling, you can certainly experiment with other materials as you gain confidence. Jute cord offers a more rustic, natural look and is quite sturdy. Nylon or polyester cords are more weather-resistant, making them suitable for outdoor plant hangers, but they can be a bit stiffer to work with. When choosing a cord, consider the desired aesthetic, the weight of the plant it will hold, and whether it will be used indoors or outdoors. Ensure the cord's thickness is appropriate for the knots you plan to use.
How do I ensure my macrame plant hanger is strong enough to hold a plant?
The strength of your macrame plant hanger relies on a few key factors. Firstly, using a sturdy ring (metal or strong wood) is essential. Secondly, the quality and thickness of your cord play a significant role; thicker cords generally offer more support. Most importantly, ensure your knots are tied tightly and securely. Pay close attention to the gathering knots at the top and bottom, as these bear the most weight. Double-check that all cords are evenly distributed and that the knotting pattern is consistent. Testing the hanger with a pot of similar weight before placing your actual plant is a wise precaution.
What Next?
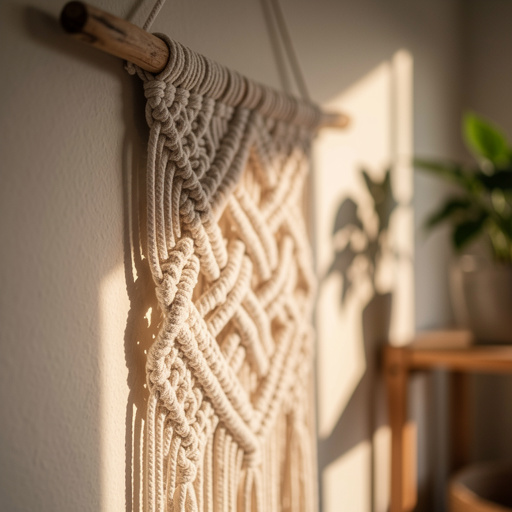
Congratulations on creating your beautiful macrame plant hanger! This versatile piece can be hung in windows, on walls, or from ceilings, instantly elevating your plant display. For variations, consider using different colored cords, adding wooden beads for extra flair, or even incorporating other macrame knots like the spiral knot for a unique texture. Once your creation is complete, gently fluff the fringe and find the perfect spot to showcase your new handmade treasure. Ready for your next project? Try a macrame wall hanging or a simple macrame keychain to further hone your skills!
Free: 10 Paper Crafts Anyone Can Make in 5 Minutes
Get our beginner guide + new craft ideas weekly.
No spam. Unsubscribe anytime.
Did you complete this activity?