How to Create Easy Watercolor Galaxy Art — Step-by-Step Guide
Discover how to paint a mesmerizing watercolor galaxy with just a few simple supplies. This beginner-friendly project is perfect for a relaxing afternoon of creativity. Explore the cosmos from your own art desk with this accessible and rewarding watercolor technique.
Quick answer
To make watercolor galaxy art, you need watercolor paper, paints, brushes, and water, taking about 30 minutes. Start by wetting your paper and layering colors. This easy activity has 7 steps and is perfect for families and beginners aged 6+.
What you need
Shop on Amazon · As an Amazon Associate we earn from qualifying purchases. Links above are affiliate links — we may earn a commission at no extra cost to you.
Embark on a celestial journey without leaving your home! Creating watercolor galaxy art is an incredibly rewarding and surprisingly simple project, perfect for unleashing your inner artist. Its beauty lies in the organic blending of colors, mimicking the vastness and mystery of space. This technique is ideal for anyone seeking a moment of calm, a fun family activity, or a way to add a touch of cosmic wonder to their decor. No prior painting experience is needed – just a willingness to play with color and water!
On this page
Step-by-Step Instructions
- 1
**Step 1: Prepare Your Workspace and Paper.** Gather all your materials and set them up in a well-lit area. If you wish to have a clean border around your galaxy, you can tape the edges of your watercolor paper to a sturdy board or your work surface using masking tape. This also helps prevent the paper from buckling too much when wet.
- 2
**Step 2: Lightly Dampen the Paper.** Using your larger round brush, lightly dampen a section of your watercolor paper with clean water. The goal is to create a moist surface, not a soaking wet one; think of it like a dewy morning rather than a puddle. This 'wet-on-wet' technique is crucial for achieving those soft, blended transitions characteristic of a galaxy.
- 3
**Step 3: Begin Layering Lighter Colors.** Dip your brush into your lighter watercolor paints, such as blues and purples, and begin applying them to the damp paper. Don't overthink the placement; let the colors flow and blend naturally into the wet surface. You can gently tilt your paper to encourage movement and create organic shapes.
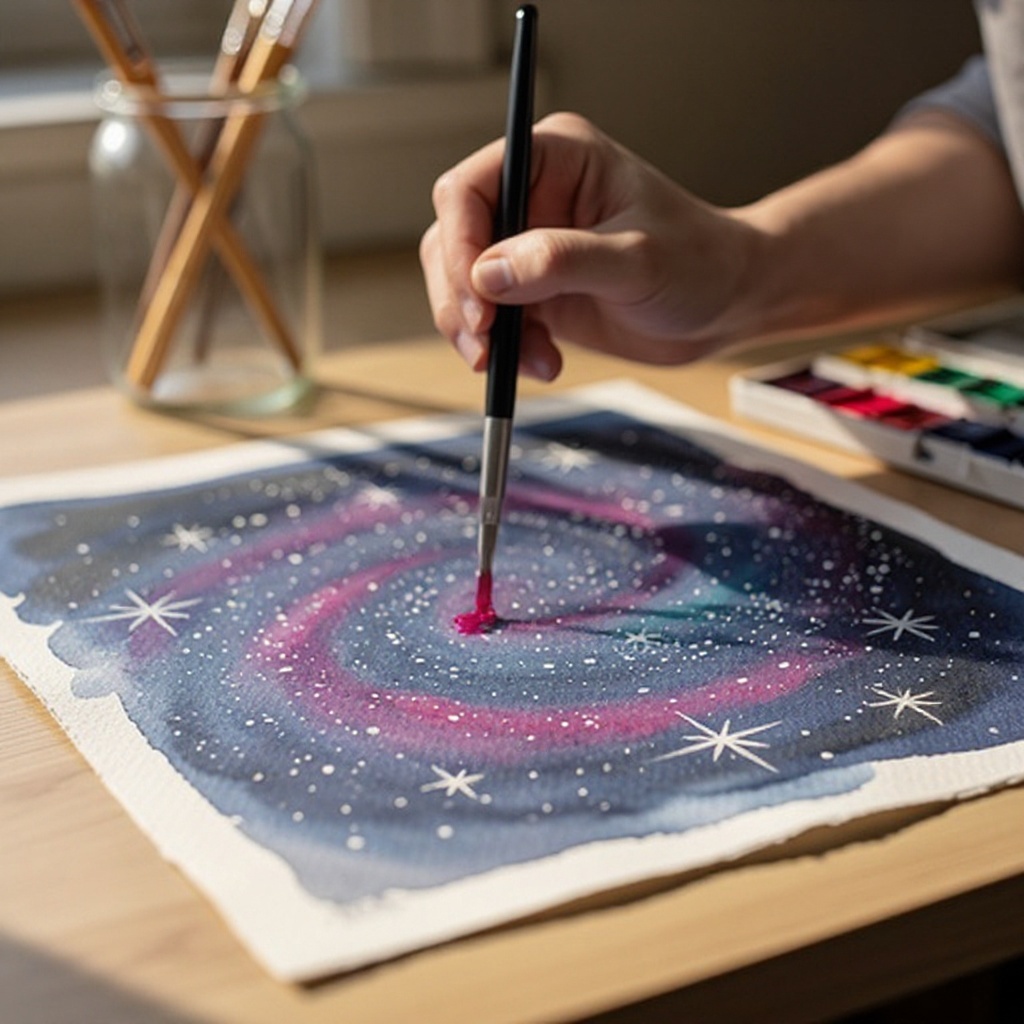
- 4
**Step 4: Introduce Mid-Tones and Blending.** Now, add touches of pink and magenta, allowing these colors to bleed into the blues and purples. Work relatively quickly while the paper is still damp, as this is when the magic of watercolor blending truly happens. Observe how the colors merge and create new hues on their own.
- 5
**Step 5: Deepen the Space with Darker Hues.** Introduce some black paint sparingly to create depth and the darker, more mysterious areas of space. Blend it gently with the surrounding colors, ensuring you don't create harsh lines unless that's a specific effect you're aiming for. A little black goes a long way in adding contrast and dimension.
- 6
**Step 6: Add Texture with Salt (Optional).** While the paint is still wet and glistening, sprinkle a small amount of salt over some areas of your galaxy. Different grain sizes of salt will create different textures. As the salt absorbs the moisture and pigment, it will create starburst-like patterns and interesting crystalline effects as it dries.
- 7
**Step 7: Allow the Watercolor Layer to Dry Completely.** Patience is key here! Let the watercolor layer dry completely. You can let it air dry naturally, which might take an hour or more depending on humidity, or you can use a hairdryer on a cool setting to speed up the process. Ensure it's fully dry before moving to the next step to avoid muddying your stars.
- 8
**Step 8: Prepare for Star Creation.** Once your watercolor base is completely dry, examine your galaxy. Identify the darker areas where you want to place your stars and nebulae. You might want to mix a small amount of white acrylic paint or gouache on your palette, adding a touch of water to achieve a fluid consistency suitable for flicking.
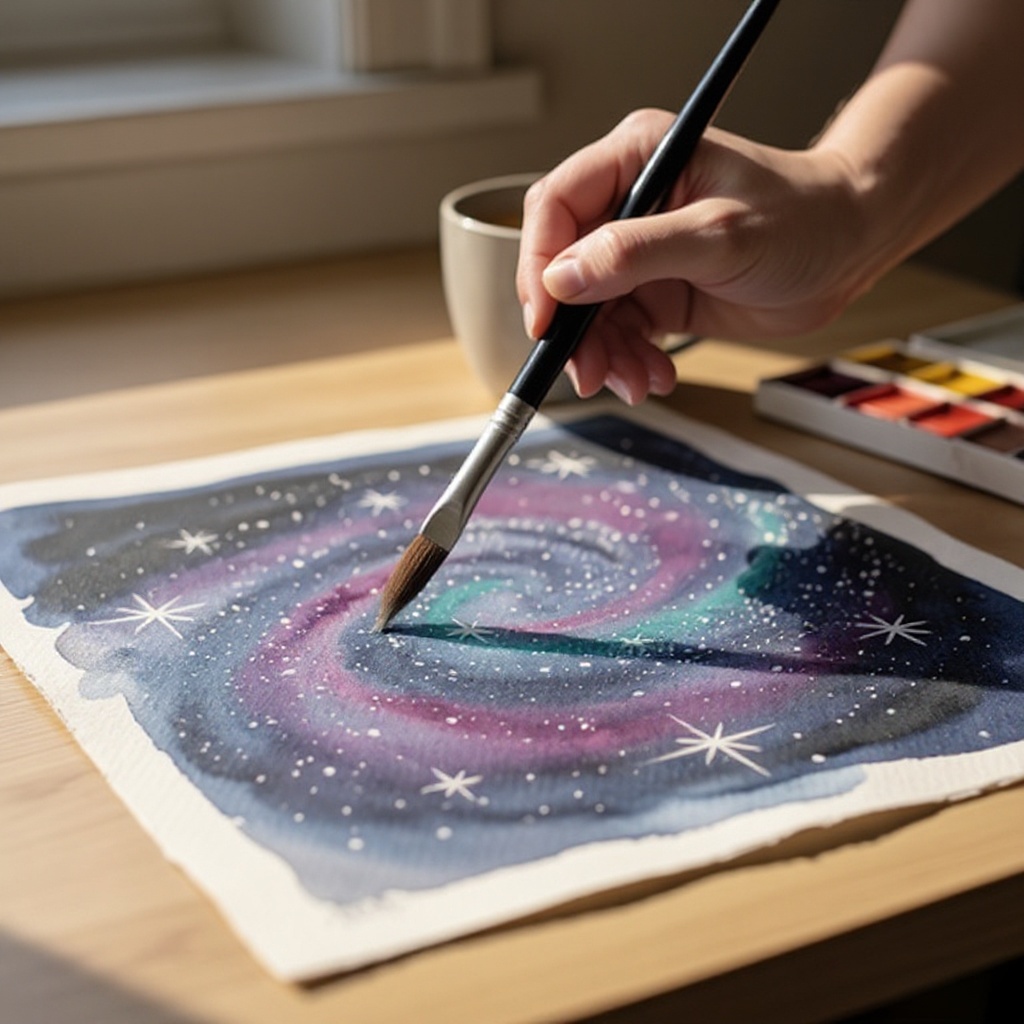
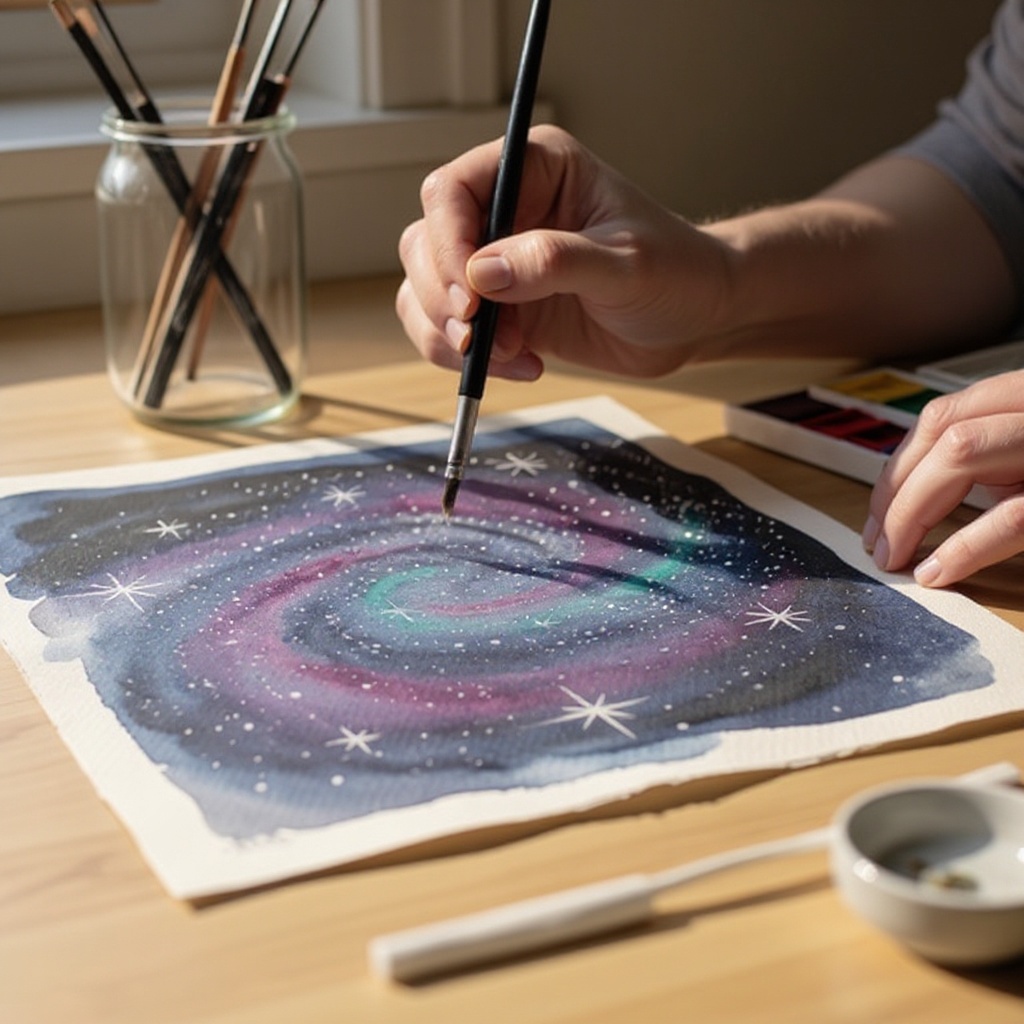
- 9
**Step 9: Create the Stars.** Using your small round brush and the white paint, create your stars. The most common technique is to load your brush with paint and then flick your wrist or tap the brush against another brush handle or your finger, sending tiny dots of white paint onto the dark areas of your galaxy. Practice this motion on scrap paper first to get the hang of it.
- 10
**Step 10: Add Larger Celestial Elements (Optional).** You can also use your white paint to add a few larger 'planets' or brighter nebulae. For planets, you might dab a small circle and then gently blend the edges with a damp brush while the white paint is still wet. For nebulae, you can use a slightly larger brush to create soft, glowing clouds.
- 11
**Step 11: Refine and Enhance.** Once the white paint is dry, take a step back and assess your galaxy. You can add more stars if needed, or even use a very fine brush to add subtle highlights to some of the colored areas to give them more depth and luminescence. Don't be afraid to add a few more touches to bring your cosmic scene to life.
- 12
**Step 12: Remove Masking Tape (If Used).** If you used masking tape to create a border, carefully peel it off once all the paint is completely dry. Pull the tape away slowly at an angle to ensure a clean, crisp edge.
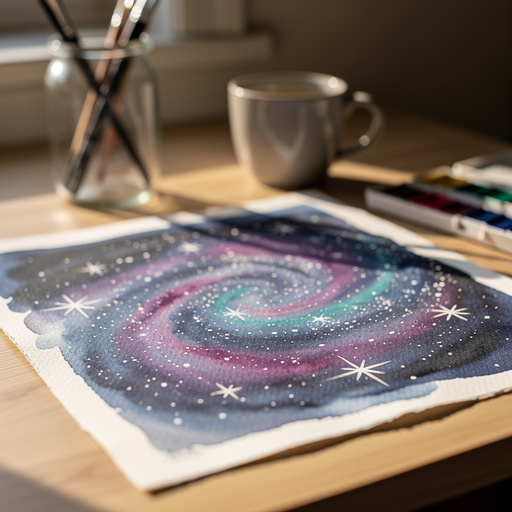
- 13
**Step 13: Final Touches and Drying.** Allow all the white paint to dry completely. You can gently touch up any areas if necessary, but try not to overwork it. Your watercolor galaxy is now complete and ready to be admired!
Tips & Troubleshooting
- 1Don't overwork the colors while the paper is wet; let the water do the blending for you. This is key for a smooth galaxy effect. Resist the urge to constantly stir or mix the colors; instead, allow the water to carry the pigment and create natural gradients.
- 2Experiment with different color combinations! Greens, teals, and even hints of yellow can add unique flair to your galaxy. Consider creating a more fiery nebula with reds and oranges, or a cool, icy galaxy with blues and silvers.
- 3If you don't have salt, you can achieve a similar textured effect by dabbing gently with a crumpled paper towel while the paint is still wet. This will lift some of the pigment and create interesting patterns, mimicking cosmic dust or distant star clusters.
- 4For a more vibrant galaxy, try using a darker base color and then layering lighter, more opaque colors on top once dry. This technique can create a sense of depth and make your brighter elements pop against the darker background.
- 5Practice the 'star flicking' technique on a separate piece of paper before applying it to your galaxy. This will help you control the density and distribution of your stars, ensuring a more realistic and aesthetically pleasing result.
- 6Consider using iridescent watercolors or adding a touch of iridescent medium to your white paint for an extra magical shimmer. This can make your stars and nebulae truly sparkle, adding an ethereal quality to your cosmic artwork.
- 7Don't be afraid to make mistakes! Watercolor is a forgiving medium, and often, 'happy accidents' can lead to the most beautiful and unexpected results. Embrace the fluidity and let your creativity guide you.
- 8If you find your colors are becoming muddy, it's often because the paper is too dry or you're overworking the paint. Ensure your paper is sufficiently damp for blending and try to apply colors in distinct layers rather than constantly scrubbing.
Related Activities You Might Enjoy
Frequently Asked Questions
What are the easiest painting ideas for beginners?
Easy painting ideas for beginners include watercolor galaxies, abstract color blending, simple landscape outlines, and dot art. These projects focus on basic techniques and allow for creative freedom without complex steps. Watercolor galaxies are particularly good because the wet-on-wet technique naturally creates beautiful blends, minimizing the need for precise control. Abstract color blending allows you to explore how colors interact, while simple landscapes can be achieved with basic shapes and washes. Dot art is excellent for developing fine motor skills and creating patterns with minimal pressure.
What materials do I need for beginner painting?
For beginner painting, you'll typically need watercolor paper, basic watercolor paints, a few different sized brushes, a cup of water, and paper towels. Acrylic paints and canvases are also good options for simple projects. For watercolor, ensure your paper is at least 140lb weight to prevent buckling. A medium and small round brush are versatile. For acrylics, a canvas or sturdy paper, a palette, and a few synthetic brushes will suffice. Don't forget a surface to protect your workspace!
How can I make my watercolor galaxy look good?
To make your watercolor galaxy look good, use a wet-on-wet technique for smooth color blending, layer colors strategically from light to dark, and add white 'stars' with a flicking motion. Don't be afraid to let the colors mingle and create their own unique patterns. Start with lighter, cooler colors and gradually introduce darker, warmer tones for depth. The salt technique can add interesting texture, and a final flick of white paint will bring your celestial scene to life. Practice makes perfect, so don't be discouraged if your first attempt isn't exactly as you envisioned.
Is watercolor difficult for beginners?
Watercolor can be surprisingly forgiving for beginners, especially with techniques like wet-on-wet. Focusing on simple projects like galaxies or abstract washes allows you to learn how the water and pigment interact without pressure. While mastering fine details and precise control can take time, the inherent fluidity of watercolor lends itself well to creating beautiful, organic effects from the start. The key is to embrace the medium's characteristics and experiment with its capabilities.
What are the best colors to use for a watercolor galaxy?
The best colors for a watercolor galaxy are those found in real nebulae and star fields. A good starting palette includes deep blues, vibrant purples, rich magentas, and soft pinks. Black is essential for creating the vastness of space and adding depth. White is crucial for stars and highlights. You can also experiment with hints of teal, turquoise, or even a touch of yellow or orange for fiery nebulae. The beauty of galaxy art is that you can interpret colors creatively, so don't be afraid to explore different combinations.
How long does it take to paint a watercolor galaxy?
A simple watercolor galaxy can take as little as 30 minutes to paint, not including drying time. The actual painting process, involving wetting the paper and layering colors, is quite quick. The drying time for the watercolor base can range from 30 minutes to a couple of hours, depending on how much water you used and the humidity. Adding stars with acrylic or gouache is also a fast process. So, while the active painting time is short, it's wise to allocate a few hours for the entire project, including drying and detailing.
What Next?
Congratulations on creating your own breathtaking watercolor galaxy! The beauty of this project is its versatility; you can frame it as a standalone piece, incorporate it into larger mixed-media works, or even use it as a unique background for greeting cards. Consider experimenting with different color palettes, perhaps a fiery nebula or a cool, icy expanse. For your next artistic adventure, try a similar wet-on-wet technique with landscapes or abstract floral designs. Store your finished artwork away from direct sunlight to preserve its vibrant colors, and enjoy the cosmic beauty you've brought to life!
Free: 10 Paper Crafts Anyone Can Make in 5 Minutes
Get our beginner guide + new craft ideas weekly.
No spam. Unsubscribe anytime.
Did you complete this activity?