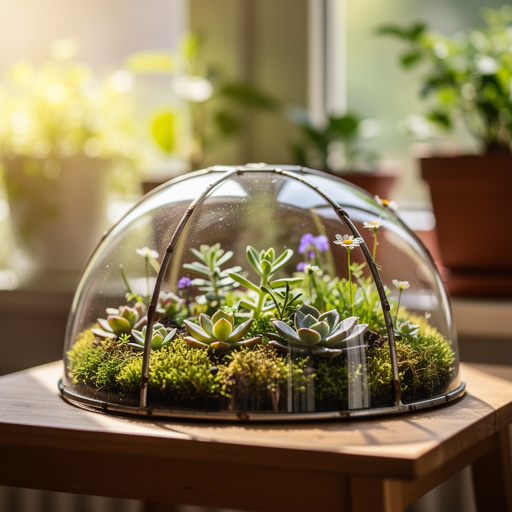
How to Create Glass Garden Domes — Easy Step-by-Step Guide
Discover how to build your own enchanting Glass Garden Domes, a perfect screen-free family activity. These miniature ecosystems bring a touch of nature indoors.
Quick answer
To make Glass Garden Domes, you need a clear glass container, drainage materials, potting soil, small plants, and decorative elements, taking about 45 minutes to an hour. Start by layering drainage material at the bottom. This beginner-friendly activity has 10 core steps and can be expanded to over 15 for more detail, making it perfect for families with children aged 6+.
What you need
Shop on Amazon · As an Amazon Associate we earn from qualifying purchases. Links above are affiliate links — we may earn a commission at no extra cost to you.
Escape the digital world and cultivate your own miniature oasis with our easy-to-follow guide to creating Glass Garden Domes. These captivating terrariums are more than just decorative pieces; they are self-contained ecosystems that bring a touch of vibrant nature into your home. Perfect for a screen-free family project, this activity fosters creativity, patience, and an appreciation for the natural world. Whether you're a seasoned plant enthusiast or a complete beginner, crafting a Glass Garden Dome is a rewarding and accessible endeavor that will leave you with a beautiful, living piece of art.
On this page
Step-by-Step Instructions
- 1
Begin by thoroughly cleaning your chosen glass container. Use warm water and mild dish soap to remove any dust, residue, or fingerprints, then rinse it completely and allow it to air dry or dry it with a lint-free cloth to prevent water spots.
- 2
Create the essential drainage layer by adding approximately 1/2 inch of small pebbles or gravel to the very bottom of your clean, dry container. This layer is crucial for preventing water from pooling around the plant roots, which can lead to rot and disease.

- 3
If you're using activated charcoal, sprinkle a thin, even layer (about 1/4 inch) over the pebbles. This layer acts as a natural filter, absorbing impurities and helping to keep the terrarium's environment fresh and odor-free, especially important in closed terrariums.
- 4
To prevent the soil from mixing with the drainage layer and becoming waterlogged, add a thin layer of sphagnum moss or a piece of landscape fabric cut to fit the bottom of your container. This acts as a permeable barrier, allowing water to pass through to the gravel while keeping the soil separate.
- 5
Gently add the potting soil, aiming for a layer that is about 2-3 inches deep, or deep enough to comfortably accommodate the root balls of your chosen plants. You can create gentle slopes or contours in the soil to add visual interest and mimic natural landscapes.
- 6
Before planting, arrange your selected plants on top of the soil to visualize their placement. Consider their mature size, growth habit, and how they will look together, ensuring there's enough space for each plant to thrive without overcrowding.
- 7
Carefully dig small holes in the soil where you've decided to place each plant, making sure the holes are slightly larger than the plant's root ball. Use your spoon or trowel for this, and be gentle to avoid damaging the roots.
- 8
Gently remove each plant from its nursery pot, loosening any tightly bound roots. Carefully place the plant into its prepared hole, ensuring the top of the root ball is level with the surrounding soil surface.
- 9
Once the plants are in place, gently pat the soil around their bases to secure them and eliminate any large air pockets. Use your fingers, the back of a spoon, or a small trowel to firm the soil without compacting it too much, which can hinder root growth.
- 10
Now for the fun part: adding your decorative elements! Use tweezers or chopsticks to carefully place figurines, polished stones, interesting twigs, or other miniature accessories to create your unique landscape and tell a story within your terrarium.
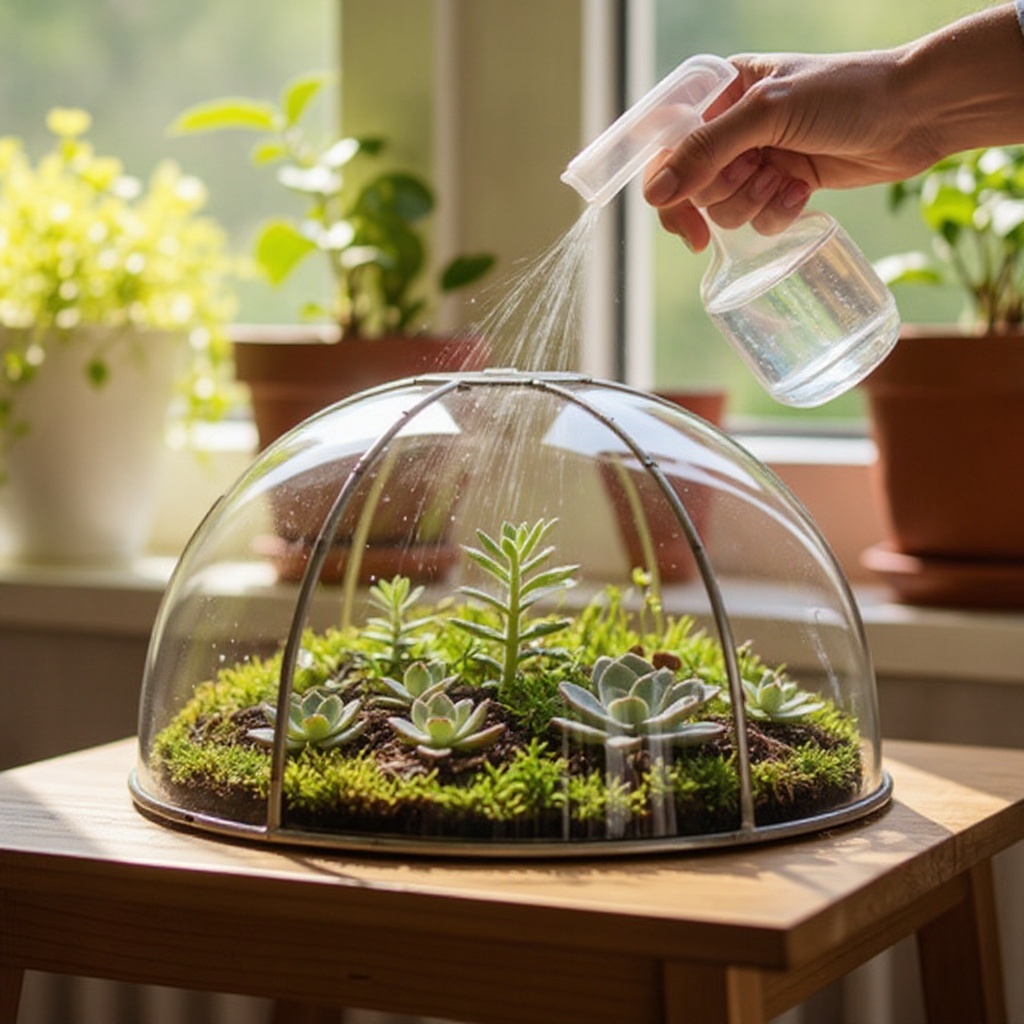
- 11
Lightly mist the plants and the surface of the soil with water using your spray bottle, aiming for a gentle, even coverage. The goal is to moisten the soil, not to saturate it; avoid creating puddles, as overwatering is a common mistake that can harm your plants.
- 12
Inspect the inside of the glass for any soil or water splashes. Use a clean paper towel or cloth to gently wipe the interior surfaces, ensuring a clear view of your beautiful miniature garden. A small brush can be useful for dusting off plant leaves.
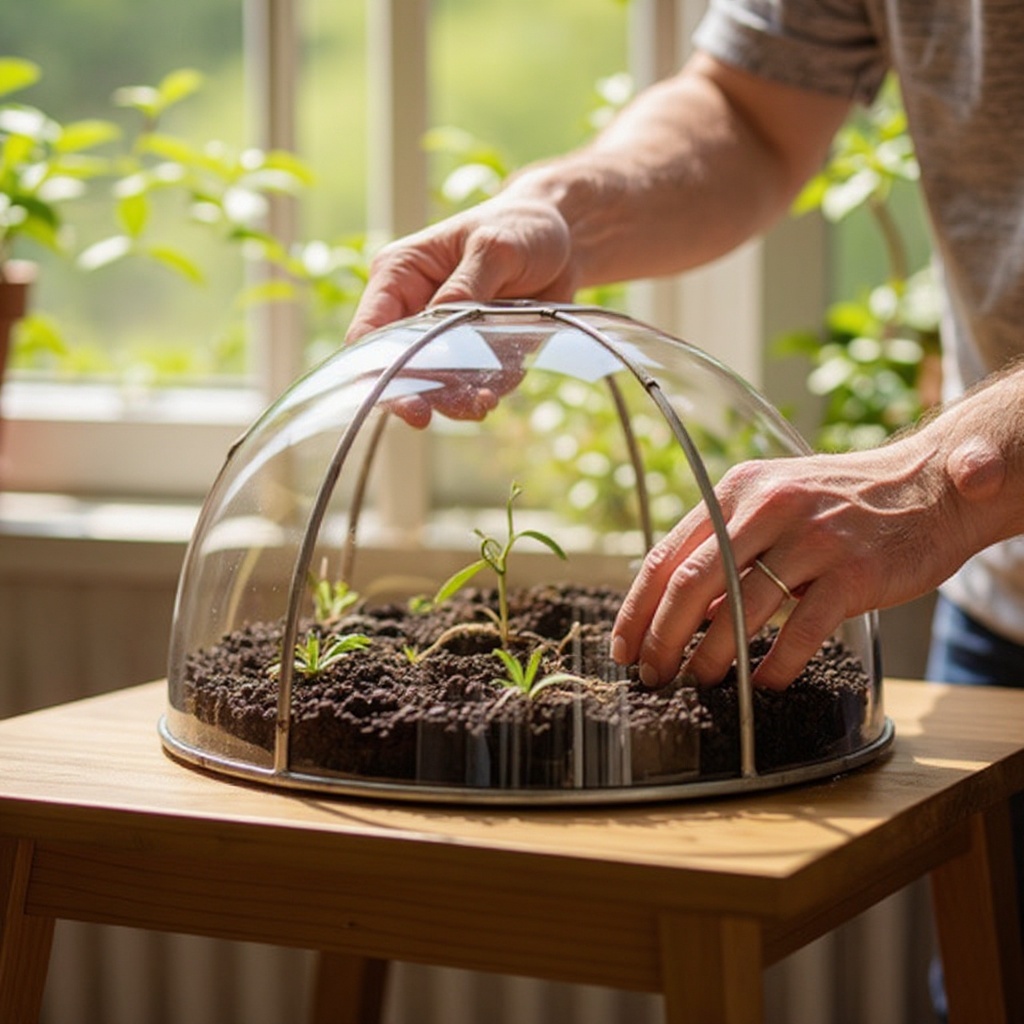
- 13
If your container has a lid, place it on top to create a humid environment suitable for many terrarium plants. If you are creating an open terrarium, this step is omitted.
- 14
Carefully select a location for your Glass Garden Dome that receives bright, indirect sunlight. Direct sunlight can scorch the plants and overheat the glass container, creating an unfavorable environment.
- 15
Observe your terrarium over the next few days. If you notice excessive condensation that obscures the view, remove the lid (if applicable) for a few hours to allow it to air out and reduce humidity. This helps regulate the moisture balance.
- 16
Rotate your terrarium every week or so to ensure that all sides of your plants receive adequate and even light exposure, promoting balanced growth and preventing them from leaning too heavily in one direction.
Tips & Troubleshooting
- 1When selecting plants, always choose varieties that have similar light and water requirements. This is the most crucial factor for ensuring all your plants thrive together harmoniously within the enclosed or semi-enclosed environment of the terrarium.
- 2If your Glass Garden Dome has a lid, opt for plants that appreciate higher humidity levels, such as small ferns, mosses, or fittonias. These plants will flourish in the moist atmosphere created by a closed container.
- 3Resist the urge to overcrowd your terrarium with too many plants or decorative elements. Give each plant ample space to grow and spread, and allow for air circulation to prevent fungal issues and ensure a visually appealing composition.
- 4Monitor the condensation levels inside your terrarium. If you see constant, heavy condensation that makes it difficult to see your plants, remove the lid (if applicable) for a few hours to allow excess moisture to evaporate and rebalance the humidity.
- 5Periodically rotate your terrarium to ensure that all sides of your plants receive an equal amount of light. This simple action prevents plants from becoming leggy or leaning excessively towards a single light source, promoting a more natural and balanced appearance.
- 6For open terrariums, especially those with succulents or cacti, water very sparingly. Allow the soil to dry out completely between waterings, and use a watering can with a narrow spout or a syringe to direct water precisely to the base of the plants.
- 7If you notice any yellowing leaves, wilting, or signs of pests, address the issue promptly. Remove affected leaves or plants, and research the specific needs of your plants to adjust care accordingly. Early intervention is key to a healthy terrarium.
- 8Consider adding a small layer of decorative moss on top of the soil after planting. This not only enhances the aesthetic appeal but also helps retain moisture and suppress weed growth, contributing to a tidier and more sustainable miniature ecosystem.
Related Activities You Might Enjoy
Frequently Asked Questions
What are the best plants for a DIY terrarium?
For beginner DIY terrarium enthusiasts, selecting small, slow-growing plants that thrive in humid environments is key. Excellent choices include miniature ferns like the Button Fern or Maidenhair Fern, various types of moss (sheet moss, mood moss), and small foliage plants such as Fittonia (nerve plant) or Peperomia. If you're creating an open terrarium, succulents and air plants are fantastic options, but ensure they have excellent drainage and are not exposed to prolonged high humidity. Always aim to choose plants that share similar light and water requirements to ensure they all flourish together within the terrarium's unique microclimate.
How often should I water my terrarium?
Watering frequency for your terrarium is highly dependent on whether it's an open or closed system, and the types of plants you've chosen. For closed terrariums, which create a self-sustaining water cycle, watering might only be needed a few times a year, or even less. You'll know it's time when you see minimal condensation on the glass and the soil appears dry. For open terrariums, especially those with succulents, water sparingly only when the soil is completely dry to the touch, typically every few weeks. Overwatering is the most common cause of terrarium failure, so it's always better to err on the side of underwatering.
Can I put any container in my DIY terrarium?
Yes, almost any clear glass container can be transformed into a beautiful DIY terrarium, provided it has an opening large enough to work with. Jars of all shapes and sizes, old fishbowls, decorative vases, apothecary jars, or even repurposed glass cloches are excellent choices. The key is that the container must be transparent to allow light to reach the plants. Ensure the opening is wide enough to easily add your drainage layers, soil, plants, and decorative elements, and to allow for occasional maintenance or pruning. Avoid containers with colored glass, as this can filter light and affect plant growth.
What is the purpose of the gravel and charcoal in a terrarium?
The gravel layer at the bottom of your terrarium serves a critical function: drainage. It creates a reservoir for excess water to collect, preventing the soil from becoming waterlogged and thus preventing root rot, which is a common problem for houseplants. Activated charcoal, often placed above the gravel, acts as a natural filter. It helps to purify the water and air within the terrarium, absorbing impurities, toxins, and odors, which is particularly beneficial in closed terrariums where air circulation is limited. This keeps the environment fresh and healthy for your plants.
How do I deal with mold or pests in my terrarium?
Mold and pests can occasionally appear in terrariums, but they are usually manageable. If you spot mold, it often indicates too much moisture or poor air circulation. Try removing the affected area with a clean tool, and if it's a closed terrarium, open the lid for a few hours to air it out. For pests like fungus gnats, which are attracted to damp soil, allow the soil to dry out more between waterings. You can also introduce beneficial insects like springtails, which feed on mold and decaying organic matter, helping to keep the terrarium clean. Regularly inspecting your plants before adding them to the terrarium can prevent pest introduction in the first place.
What kind of light do Glass Garden Domes need?
Glass Garden Domes generally thrive in bright, indirect sunlight. Avoid placing them in direct sunlight, as the glass can act like a magnifying glass, intensifying the sun's rays and quickly overheating the delicate plants inside, leading to scorching and wilting. An east-facing window that receives gentle morning sun or a spot a few feet away from a south or west-facing window is often ideal. If your home doesn't have adequate natural light, you can supplement with a grow light designed for indoor plants, ensuring it provides the appropriate spectrum and intensity for your chosen plant species.
What Next?
Congratulations on creating your beautiful Glass Garden Dome! You've successfully built a miniature world that will bring life and tranquility to your space. Consider experimenting with different container shapes and sizes for future projects, or even try a themed terrarium, like a desert landscape or a fairy garden. Display your creation proudly on a windowsill, desk, or shelf where it can receive indirect sunlight. Remember, these living art pieces are a testament to your creativity and a delightful reminder of nature's enduring beauty. Enjoy watching your tiny ecosystem flourish!
Free: 10 Paper Crafts Anyone Can Make in 5 Minutes
Get our beginner guide + new craft ideas weekly.
No spam. Unsubscribe anytime.
Did you complete this activity?
Related