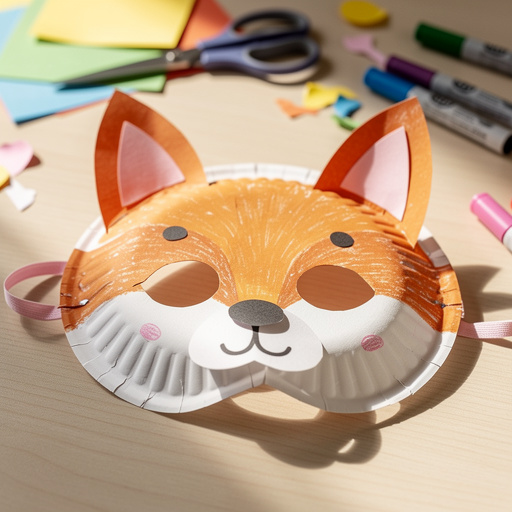
How to Make Adorable Paper Plate Woodland Creatures — Easy Step-by-Step Guide
Transform simple paper plates into a charming collection of woodland animals like foxes, owls, and bears. A delightful screen-free activity for young crafters.
Quick answer
To make paper plate woodland creatures, you need 10 white paper plates, assorted construction paper (brown, orange, white, black, yellow, grey), child-safe scissors, white craft glue or glue stick, and a black marker or crayon. This project involves cutting paper plates in half and then adding construction paper features like ears, noses, and eyes. It takes approximately 30 minutes to complete and is perfect for kids aged 4 and up. Start by preparing your materials, then cut and attach the animal's features to the paper plate halves. Finally, add details with a marker and allow everything to dry.
What you need
Shop on Amazon · As an Amazon Associate we earn from qualifying purchases. Links above are affiliate links — we may earn a commission at no extra cost to you.
Embark on a delightful crafting adventure that brings the magic of the forest right into your home! This paper plate woodland creatures project is an absolute gem for sparking creativity in young minds. It transforms everyday paper plates into a menagerie of adorable forest dwellers, from sly foxes to wise owls and cuddly bears. Not only is it a fantastic way to encourage fine motor skills and imaginative play, but it also offers a wonderful screen-free alternative for entertainment. Perfect for rainy days, classroom activities, or just a fun afternoon, this craft is designed for little hands and big imaginations, making it an ideal project for preschoolers and early elementary-aged children.
On this page
Step-by-Step Instructions
- 1
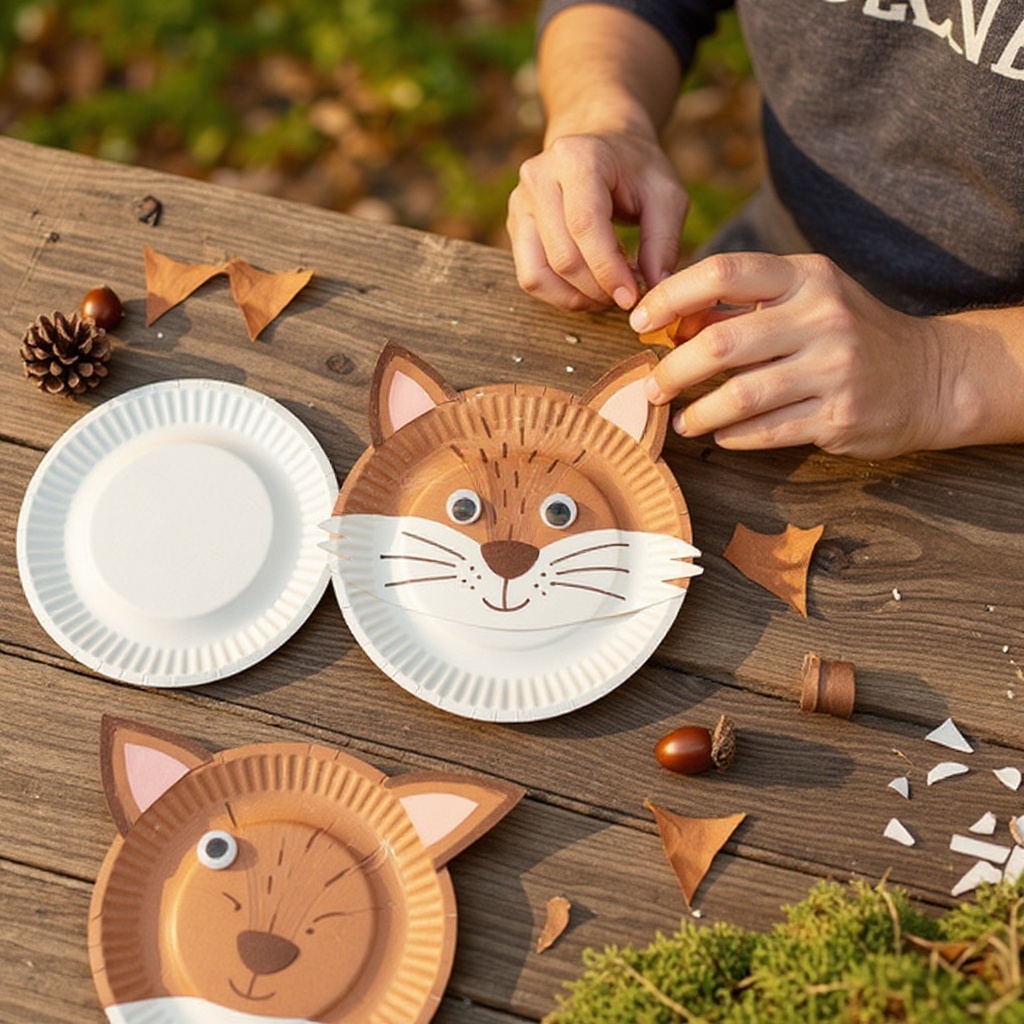
For each animal you wish to create, take one white paper plate and carefully cut it in half using your child-safe scissors. These halves will form the main body and face of your woodland creature.
- 2
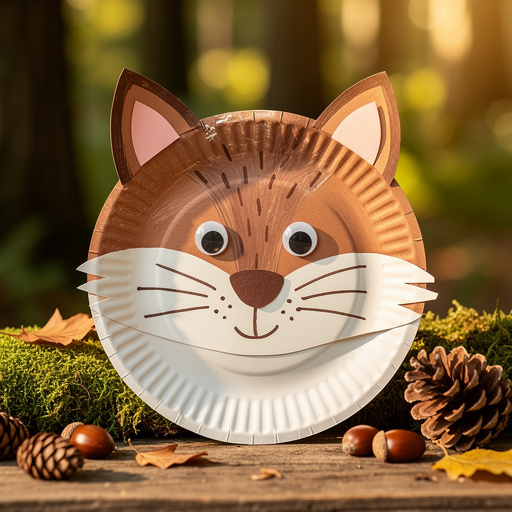
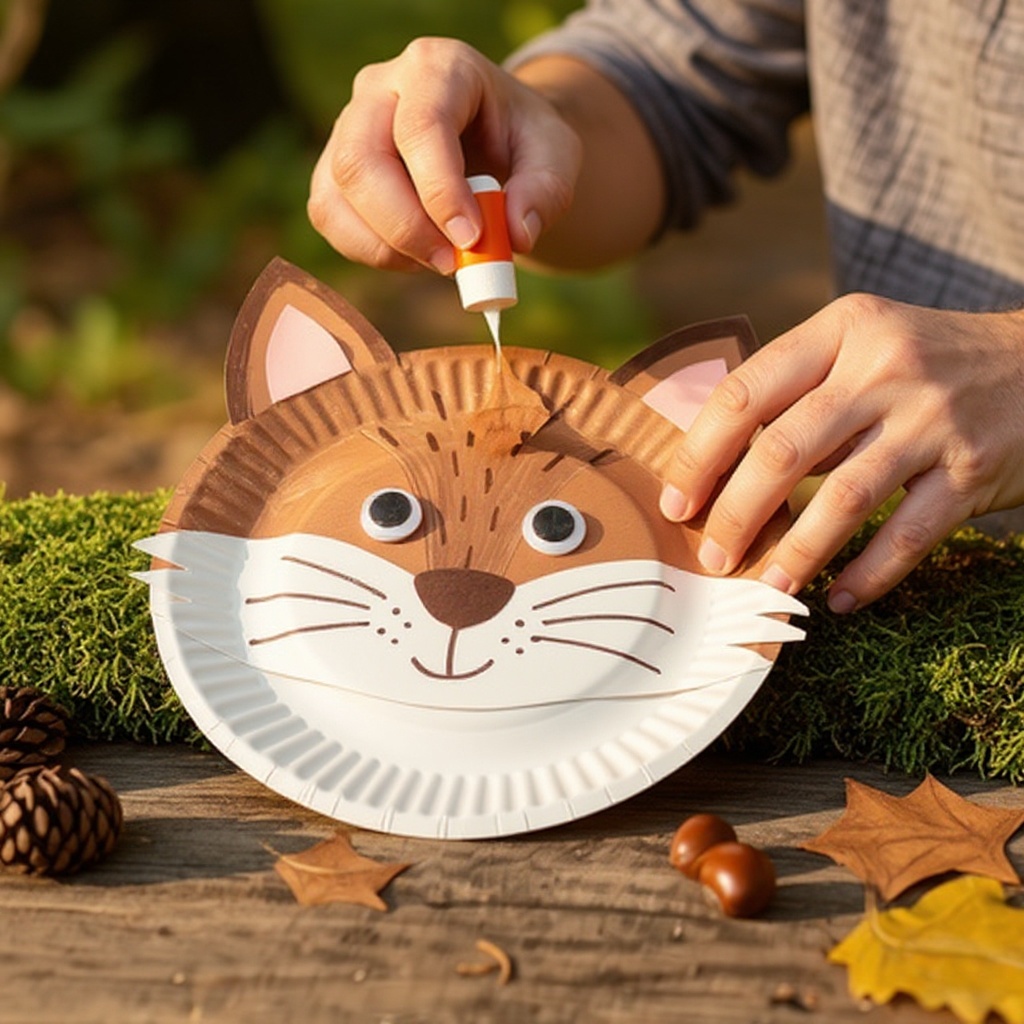
To begin crafting your fox, gather orange and white construction paper. Cut two small triangles from the orange paper to serve as the fox's pointy ears, ensuring they are roughly the same size. Next, cut a larger, slightly rounded triangle from orange paper for the fox's snout and nose area. Finally, cut a small circle from white construction paper to be the muzzle patch.
- 3
Take one of the paper plate halves and apply glue along the straight, cut edge. Carefully press the two orange ear triangles onto this glued edge, positioning them slightly apart to resemble a fox's ears. Ensure they are firmly attached and facing upwards.
- 4
On the other paper plate half, which will form the fox's face, begin by gluing the larger orange triangle in the lower half of the plate, with the point facing downwards. This forms the base of the snout. Then, center the white circle onto the orange triangle to create the muzzle patch, and glue it securely in place.
- 5
Now, let's create a wise owl! Using grey or brown construction paper, cut two small semi-circles from each color to form the owl's ear tufts. For the eyes, cut two larger circles from yellow construction paper, and then cut two smaller black circles to be the pupils.
- 6
Take one paper plate half and apply glue to the straight, cut edge. Attach the grey or brown ear tuft semi-circles to this edge, spacing them out to create the owl's distinctive head shape. Press them down firmly to ensure they adhere well.
- 7
On the second paper plate half, which will be the owl's face, arrange the two larger yellow circles where you envision the eyes. Once you are happy with their placement, apply glue and attach them. Then, center the smaller black pupil circles onto the yellow eye circles and glue them down, giving your owl a focused gaze.
- 8
For a cuddly bear, you'll need brown construction paper. Cut two small brown semi-circles to form the bear's rounded ears. Then, cut a larger, slightly flattened oval shape from brown paper for the muzzle and a small black circle for the bear's nose.
- 9
Apply glue to the straight, cut edge of one paper plate half and attach the two brown ear semi-circles. Position them so they are slightly rounded and facing outwards, giving your bear a friendly appearance.
- 10
On the other paper plate half, which will be the bear's face, glue the larger brown oval shape towards the bottom of the plate to create the muzzle. Once the muzzle is secure, center the small black circle onto the middle of the brown oval and glue it down to form the bear's nose.
- 11
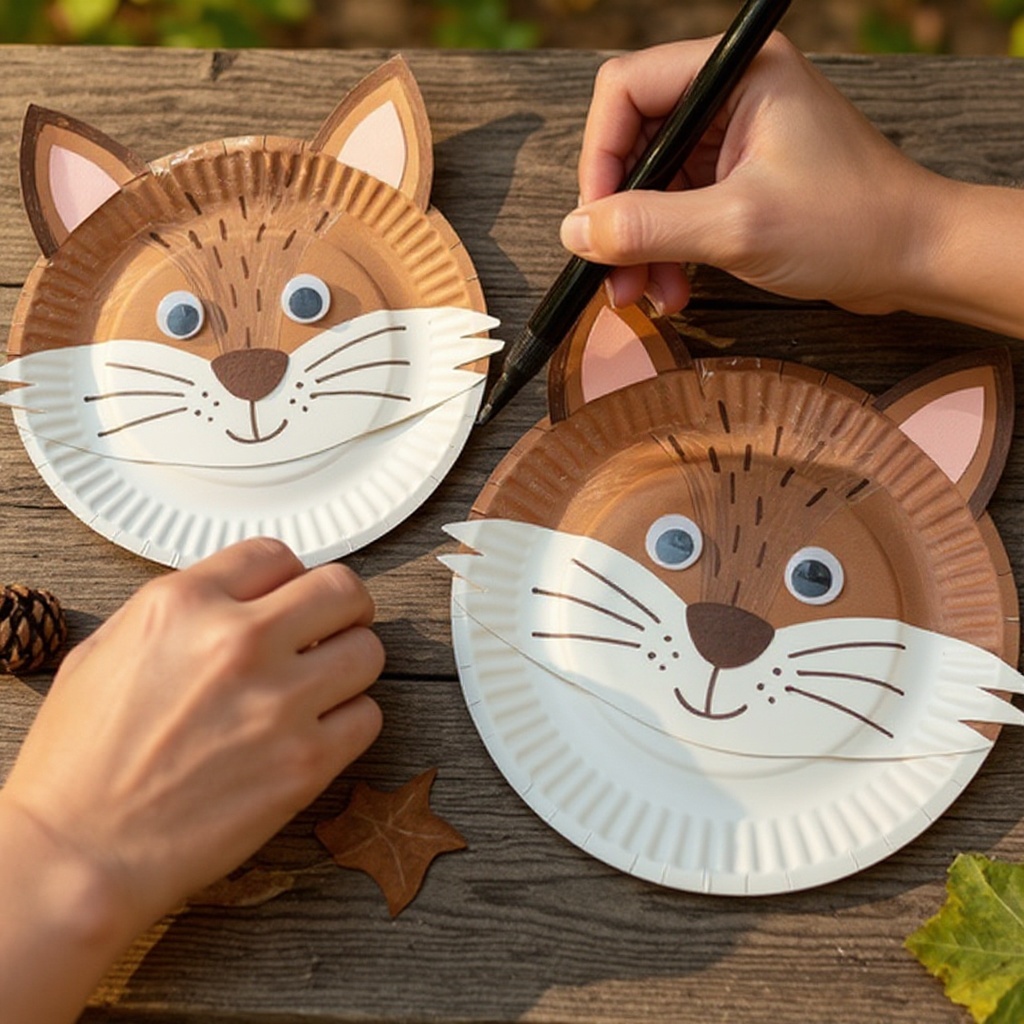
Now it's time to bring your creatures to life with details! Using a black marker or crayon, draw the eyes for any animals where you haven't used paper circles, such as the fox. You can also add eyebrows above the eyes to convey different expressions, and draw a simple mouth below the nose or muzzle for each animal.
- 12
For the fox, draw two small black dots for eyes above the white muzzle. You can also add a few thin black lines extending from the muzzle to suggest whiskers, and perhaps a small, curved line for a smile. For the bear, draw two small black dots for eyes above the muzzle, and a simple curved line for a mouth below the nose.
- 13
If you're making an owl and didn't use paper circles for eyes, draw two large circles with a black marker and fill them in, leaving a small white dot for a highlight to make them look more alive. You can also add some feathery lines around the eyes or on the body for extra texture.
- 14
Consider adding extra embellishments to personalize your animals. For the fox, you could cut a thin strip of white paper and glue it to the tip of its tail (which you'd need to cut separately from the paper plate half). For the owl, you could add small triangles of orange paper for a beak.
- 15
If you are using craft glue and find that pieces are sliding around before they dry, you can use small pieces of tape to temporarily hold them in place. This is especially helpful for smaller, lighter pieces like ears or eyes.
- 16
Encourage children to get creative with their designs. They can mix and match colors for different animals, perhaps creating a pink fox or a blue owl. Adding extra details like stripes on a bear's face, spots on a deer (if you decide to make one!), or even tiny paper cut-out flowers can make each creation unique.
- 17
Allow all the glue to dry completely before attempting to handle or play with your paper plate woodland creatures. This ensures that all the pieces are securely attached and won't fall off.
- 18
Once dry, you can further enhance your creations. For example, you could use a white crayon or marker to add highlights to the eyes or subtle shading on the fur. This step is optional but can add a professional touch to your handmade animals.
Tips & Troubleshooting
- 1If glue is taking too long to dry, use small pieces of tape to temporarily hold pieces in place while it sets. This is particularly useful for delicate attachments like ears or small facial features, ensuring they don't shift before the glue has a chance to bond.
- 2Encourage kids to mix and match colors or add extra details like whiskers for cats or spots for a deer. This fosters creativity and allows them to personalize their woodland friends, making each one truly unique and special.
- 3These paper plate animals can be hung up as decorations or used as simple puppets. For decorations, punch a small hole near the top and thread with yarn. For puppets, securely glue a craft stick or popsicle stick to the back of each animal.
- 4Supervise young children when using scissors to ensure they cut safely and accurately. Provide guidance on how to hold the scissors and paper, and offer assistance for more complex cuts if needed.
- 5Consider using googly eyes for an extra touch of fun and personality. They are easy to glue on and add a lively, animated look to your woodland creatures, often a big hit with younger crafters.
- 6Don't be afraid to experiment with different shapes and sizes for the features. A slightly larger nose or differently shaped ears can completely change the character of an animal, encouraging exploration and problem-solving.
- 7If you don't have construction paper in the exact colors needed, you can always color white paper with crayons or markers before cutting out the shapes. This is a great way to use up scrap materials and add even more color variety.
- 8For a more textured look, you could try gluing small pieces of yarn or felt onto the paper plates for fur or feathers. This adds a tactile element to the craft and can make the animals even more engaging.
Related Activities You Might Enjoy
Frequently Asked Questions
What are the easiest animal crafts for kids?
Paper plate crafts, like these woodland creatures, are exceptionally easy for kids to make. They require minimal materials, simple cutting and gluing techniques, and offer a high reward for little effort, making them perfect for beginners. Other easy options include toilet paper roll animals, which can be decorated with paint and paper scraps, or simple handprint or footprint animal art. The key to an easy craft is using readily available materials and straightforward steps that allow children to achieve a recognizable and satisfying result with minimal frustration.
How can I make animal crafts with recycled materials?
You can creatively transform everyday recycled materials into fantastic animal crafts. Cardboard tubes from paper towels or toilet paper are excellent for creating animals like binoculars for a bear, legs for a spider, or the body of a snake. Egg cartons can be cut and assembled into caterpillars, ladybugs, or even small birds. Old magazines or newspapers can be torn into strips for papier-mâché or cut into small pieces for mosaic-style animal collages. Even plastic bottles can be repurposed into various creatures with a bit of paint and imagination, offering a sustainable and budget-friendly crafting experience.
What age group is best for paper plate animal crafts?
Paper plate animal crafts are ideally suited for preschoolers and early elementary school children, typically ranging from ages 4 to 10. Younger children, around 4-5 years old, can actively participate by helping with gluing, coloring with markers, and sticking on pre-cut shapes. As children get older, around 6-10 years old, they can take on more responsibility, including cutting out the shapes themselves with supervision and designing their animals with more intricate details. The simplicity of the materials and steps makes it adaptable for a wide range of fine motor skills and cognitive abilities within this age bracket.
Can I make these animal crafts without construction paper?
Absolutely! You can certainly make these animal crafts without relying solely on construction paper. White paper plates themselves can be colored with crayons, markers, or even paint to create the base for your animals or their features. You can then cut out shapes from colored cardstock, scrap fabric, felt, or even old pieces of wrapping paper for added texture and visual interest. Googly eyes are a fantastic substitute for drawn eyes, and yarn or pipe cleaners can be used for whiskers or tails, offering a versatile approach to crafting.
How can I make the paper plate animals more durable for play?
To make your paper plate animals more durable for play, consider applying a layer of clear sealant or Mod Podge over the finished craft once all the glue has dried. This will protect the paper and decorations from moisture and wear. You can also reinforce the back of the paper plate with a piece of sturdy cardstock or even a thin piece of cardboard, especially if you plan to use them as puppets. For added structural integrity, ensure all glued pieces are pressed firmly and allowed to dry completely before extensive handling.
What other woodland animals can I create with paper plates?
The possibilities are endless! Beyond foxes, owls, and bears, you can easily adapt this technique to create a variety of other woodland inhabitants. Think about a deer with brown paper plate halves and cut-out antler shapes from brown or grey paper. A rabbit could have long, floppy ears cut from white or pink paper. A squirrel might have a bushy tail made from layered brown paper strips. Even a hedgehog with spiky paper strips for its back or a badger with its distinctive facial markings can be brought to life using the same basic principles of cutting and gluing.
What Next?
Once your charming paper plate woodland creatures have dried completely, they are ready to embark on their own adventures! You can string them together with yarn to create a whimsical woodland garland, or attach a craft stick to the back of each one to transform them into delightful puppets for storytelling. For a more permanent display, consider mounting them on a larger piece of cardstock or inside a shadow box. If you enjoyed this project, why not explore other paper plate crafts or try creating different animals from around the world? Store your creations carefully to preserve their charm for future play and display.
Free: 10 Paper Crafts Anyone Can Make in 5 Minutes
Get our beginner guide + new craft ideas weekly.
No spam. Unsubscribe anytime.
Did you complete this activity?