How to Create Thanksgiving Leaf Luminaries — Easy Step-by-Step Guide
Brighten your Thanksgiving table with these charming printable leaf luminaries. A simple and beautiful craft for the whole family to enjoy, these luminaries cast a warm, inviting glow, making your holiday gathering feel extra special. They are a fantastic way to incorporate the beauty of autumn into your home decor without a lot of fuss.


Quick answer
To make Thanksgiving Leaf Luminaries, you need printable leaf templates, cardstock, scissors, glue, and LED tea lights, taking about 30 minutes. Start by printing and cutting out the leaf shapes. This beginner-friendly activity has 10 steps and is perfect for families with kids aged 6+. The expanded guide includes more detailed steps, tips, and FAQs to ensure a beautiful result.
What you need
Shop on Amazon · As an Amazon Associate we earn from qualifying purchases. Links above are affiliate links — we may earn a commission at no extra cost to you.
As the crisp autumn air arrives and Thanksgiving approaches, there's a desire to bring the warmth and beauty of the season indoors. These printable leaf luminaries are the perfect way to do just that! They capture the essence of fall foliage in a delicate, glowing form, creating an enchanting ambiance for your holiday celebrations. This project is wonderfully accessible, making it an ideal activity for families looking to create meaningful decorations together. Children aged six and up can participate with a little supervision, fostering creativity and a sense of accomplishment as they craft something truly magical.
On this page
Step-by-Step Instructions
- 1
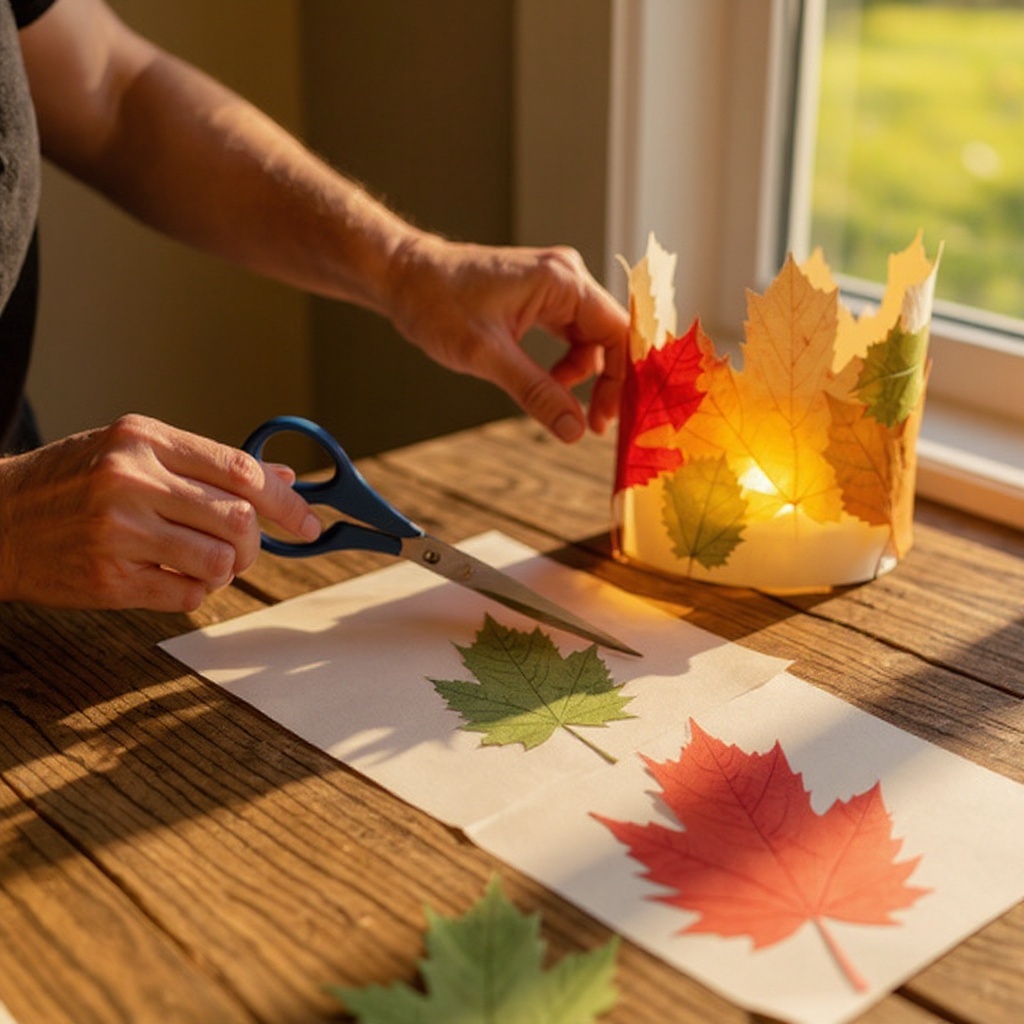
**Step 1: Select and Print Your Leaf Templates.** Begin by choosing a variety of fall leaf templates from your printable collection. Aim for different shapes and sizes to create a more natural and visually interesting luminary. Print these templates onto your white cardstock using your printer, ensuring the ink is dry before proceeding to the next step.
- 2
**Step 2: Prepare Your Workspace.** Clear a clean, flat surface for crafting. Gather all your materials, including the printed cardstock, scissors, glue, and LED tea lights, so everything is within easy reach. This will help streamline the process and prevent interruptions.
- 3
**Step 3: Cut Out Each Leaf Shape.** Carefully cut out each printed leaf shape, following the solid lines precisely. Use sharp scissors for clean edges, as this will make the gluing process easier and result in a more polished final product. Take your time with this step to ensure accuracy.

- 4
**Step 4: Score the Fold Lines (Optional but Recommended).** For a crisper fold and a more professional look, lightly score the center vein of each leaf. You can do this by placing a ruler along the center line and gently running a dull pencil or a scoring tool along it. This creates a guideline for folding and prevents the cardstock from creasing unevenly.
- 5
**Step 5: Fold Each Leaf in Half.** Fold each cut-out leaf in half lengthwise along the center vein. Press down firmly to create a crisp crease. Ensure the edges of the leaf align perfectly before making the fold, as this symmetry is important for building a well-formed luminary.
- 6
**Step 6: Apply Glue to One Half of a Folded Leaf.** Take one folded leaf and apply a thin, even layer of glue stick or craft glue along the entire outer edge of one of its folded halves. Be sure to cover the edge completely, but avoid applying too much glue, which can cause the paper to warp or seep through.
- 7
**Step 7: Attach the First Two Leaves.** Take a second folded leaf and carefully align its corresponding folded edge with the glued edge of the first leaf. Press the two edges together firmly, ensuring they are perfectly matched. This begins the layered structure of your luminary.
- 8
**Step 8: Continue Gluing Leaves Together.** Continue this process, one leaf at a time. Apply glue to the edge of the previously attached leaf and then attach the next folded leaf, aligning its edge. Work your way around, building out the luminary in a circular or fan-like pattern.
- 9
**Step 9: Ensure Overlapping for Cohesion.** As you glue the leaves together, make sure they overlap slightly. This slight overlap is crucial for creating a sturdy and cohesive luminary structure. The overlapping edges will provide support and prevent the luminary from falling apart.
- 10
**Step 10: Create a Stable Base.** Continue adding leaves until you have a structure that is stable and stands on its own. For a typical luminary, you'll likely use between 10 to 15 leaves, depending on their size and shape. The goal is to create a form that can hold its shape without collapsing.
- 11
**Step 11: Leave an Opening for the Light.** When you are nearing the completion of your luminary, ensure you leave a small opening at the bottom. This gap is essential for safely placing the LED tea light inside once the luminary is finished and dry.
- 12
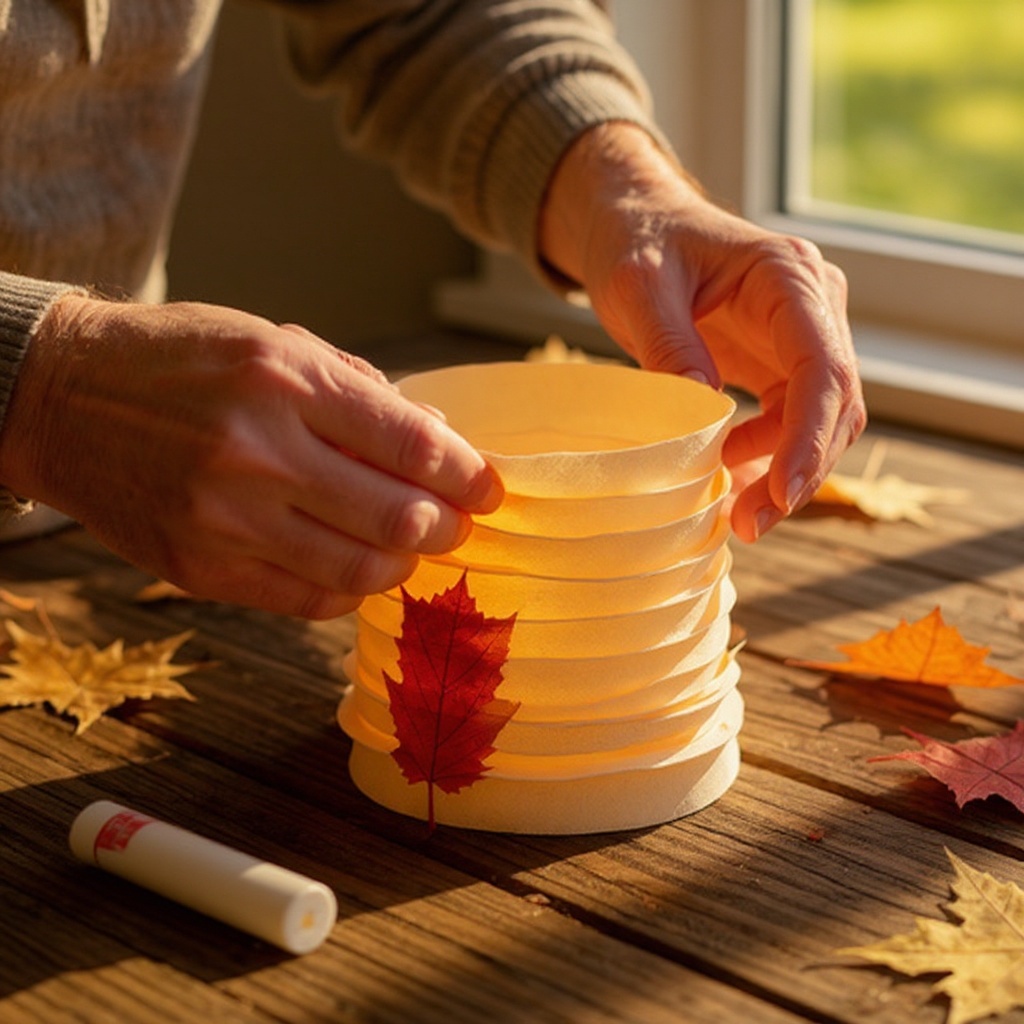
**Step 12: Allow Glue to Dry Completely.** Once all the leaves are glued together, set the luminary aside and allow the glue to dry completely. This may take a few hours, depending on the type of glue used and the humidity. Patience here is key to a durable final product.
- 13
**Step 13: Inspect for Stability.** Before placing the LED tea light, gently check the luminary for stability. Ensure all the glued seams are secure and that the structure stands upright without wobbling. If any areas seem loose, you can carefully add a tiny bit more glue and let it dry.
- 14
**Step 14: Insert the LED Tea Light.** Once the glue is fully dry and the luminary is stable, carefully place one battery-operated LED tea light inside the opening at the bottom. Ensure the light is centered for an even glow.
- 15
**Step 15: Admire Your Creation.** Turn on the LED tea light and watch your beautiful Thanksgiving leaf luminary come to life, casting a warm and inviting glow. Position it where you want to enjoy its festive ambiance.
Tips & Troubleshooting
- 1**Experiment with Leaf Variety.** Don't limit yourself to just one or two types of leaves. Mixing different shapes, sizes, and even subtle variations in printing density can create a more dynamic and visually appealing luminary. Consider printing some leaves slightly larger or smaller than others to mimic the natural diversity of a forest floor.
- 2**Score for Crisp Folds.** If you find your cardstock is resisting a clean fold, don't force it. Instead, use a ruler and a dull pencil or a dedicated scoring tool to create a shallow indentation along the center vein. This 'scores' the paper, making it much easier to fold precisely and achieve a professional finish without tearing.
- 3**Glitter for Extra Sparkle.** For a truly festive and enchanting touch, consider adding a bit of sparkle. Before gluing the leaves together, lightly dust the edges with fine gold, copper, or iridescent glitter. You can apply a thin line of craft glue along the edges and then sprinkle the glitter over it, tapping off any excess. This adds a magical shimmer that catches the light beautifully.
- 4**Use Only LED Lights.** It is critically important to use only battery-operated LED tea lights for these luminaries. Real candles, even small ones, generate heat and open flames, which pose a significant fire hazard when used with paper crafts. LED lights provide the same warm glow without any risk.
- 5**Consider Different Cardstock Weights.** While standard 8.5" x 11" cardstock is excellent, you might find that slightly heavier or lighter weights offer different results. Heavier cardstock will create a more robust luminary, while lighter cardstock might be easier to fold but could be less durable. Experiment to find your preference.
- 6**Build a Sturdy Base.** The stability of your luminary depends on how well the leaves are joined. Ensure you are applying glue to the entire edge and pressing firmly. If your luminary feels a bit wobbly, don't hesitate to add an extra leaf or two to reinforce the base and sides. A well-constructed base is key to its longevity.
- 7**Storage for Future Use.** Once the glue is completely dry, you can gently flatten your leaf luminaries for easy storage. Carefully press them down, being mindful not to crease the folded edges too sharply. Store them in a box or a large envelope, and they will be ready to bring autumnal charm to your home for many Thanksgivings to come.
Related Activities You Might Enjoy
Frequently Asked Questions
Where can I find Thanksgiving printable leaf templates?
You can find a vast array of Thanksgiving printable leaf templates on numerous craft and DIY websites, many of which are available for free download. A simple online search for terms like 'fall leaf templates printable,' 'Thanksgiving leaf shapes printable,' or 'autumn leaf outlines for crafts' will yield many excellent options. Websites dedicated to free printables, homeschooling resources, and general craft blogs are great places to start your search. Look for templates that offer a variety of leaf types and sizes to add depth and interest to your luminaries.
Can I use regular paper instead of cardstock for these luminaries?
While you can technically use regular printer paper, it is highly recommended to use cardstock for these luminaries. Cardstock provides the necessary rigidity and durability to help the luminary stand up on its own and maintain its shape. Regular paper is often too flimsy; it can easily bend, tear, or become misshapen during the cutting and gluing process, and the finished luminary might struggle to stand upright, diminishing its visual appeal and structural integrity. Cardstock ensures a more robust and aesthetically pleasing final product.
How do I make the leaf luminaries stand up on their own?
The folding and gluing technique naturally creates a structure that stands on its own, provided the leaves are properly prepared and assembled. Ensure you are folding each leaf precisely in half along the center vein and applying glue evenly along the edges. The key to stability is the overlapping of the leaves; this creates a strong, interconnected structure. Make sure each leaf is securely glued to the next, and that the base of the luminary is formed with enough leaves to provide a solid foundation. If your luminary seems wobbly, adding an extra leaf or two to the base or sides can significantly improve its stability.
Are these luminaries safe to use with children?
Yes, these leaf luminaries are wonderfully safe for children to make and use, especially when you adhere to using battery-operated LED tea lights. The craft involves cutting and gluing, which are activities well-suited for children aged six and up, though younger children may require more supervision. Always supervise young children closely during the cutting phase to ensure they use scissors safely, and assist them with the gluing process if needed. The use of LED lights eliminates any fire hazard associated with real candles, making the finished product safe to display and enjoy in any room.
How many leaves do I need to make one luminary?
The number of leaves required to make one luminary can vary depending on the size and shape of the leaf templates you choose, as well as how much you overlap them. Generally, you will need between 10 to 15 leaves to create a well-formed and stable luminary. It's always a good idea to print a few extra leaves than you think you might need, just in case of any mistakes during cutting or gluing, or if you decide to add more leaves for extra fullness and stability. Having a few spares ensures you can complete your luminary without interruption.
Can I color or decorate the leaves before assembling?
Absolutely! While the printable templates provide a beautiful base, you can certainly enhance them further. Before cutting out the leaves, you can use colored pencils, crayons, or even watercolors to add unique patterns, veins, or color variations to your cardstock. Once the leaves are cut and folded, you can also add decorative elements like glitter glue, small sequins, or even a light dusting of metallic spray paint for an extra touch of elegance. Just ensure any added decorations are dry before proceeding with the gluing process to avoid smudging.
What Next?
Once your Thanksgiving leaf luminaries are complete and dry, they are ready to illuminate your holiday space. You can arrange them as a centerpiece on your dining table, scatter them along a mantelpiece, or even place them on windowsills to catch the light. For a different look, try printing the templates on colored cardstock or adding a touch of shimmer with glitter glue before assembly. If you enjoyed this project, consider exploring other fall-themed crafts like pinecone turkeys or painted pumpkin decorations. To store your luminaries, gently flatten them once the glue is thoroughly dry, and they can be tucked away for next year's festivities.
Free: 10 Paper Crafts Anyone Can Make in 5 Minutes
Get our beginner guide + new craft ideas weekly.
No spam. Unsubscribe anytime.
Did you complete this activity?
Related