How to Create Giant Lawn Twister — Easy Step-by-Step Guide
Bring classic fun outdoors with a giant DIY Twister game made right on your lawn! Perfect for your next adult get-together.

Quick answer
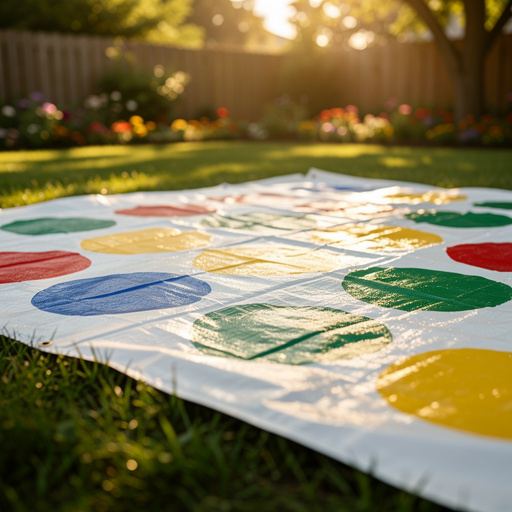
To make giant lawn Twister, you need spray paint, a large tarp, and about 30 minutes. Start by marking out your grid on the tarp. This beginner-friendly activity has 10 steps and is perfect for outdoor parties and family fun.
What you need
Shop on Amazon · As an Amazon Associate we earn from qualifying purchases. Links above are affiliate links — we may earn a commission at no extra cost to you.
Looking for a way to inject some vibrant energy and laughter into your next outdoor gathering? This DIY Giant Lawn Twister project is the perfect solution! It's an incredibly simple yet immensely rewarding craft that transforms a classic party game into an epic, life-sized adventure. Imagine the delight on your guests' faces as they navigate a colorful, oversized game board spread across your lawn. This project is ideal for summer barbecues, birthday parties, team-building events, or simply a fun afternoon with family and friends, promising hours of active entertainment for all ages.
On this page
Step-by-Step Instructions
- 1
Lay the large plastic tarp flat on a clean, dry outdoor surface like a patio, driveway, or a well-mowed lawn. Ensure the area is free of debris and sharp objects that could damage the tarp or affect the paint application.
- 2
Using the measuring tape and ruler, carefully mark out the boundaries for your 4x4 grid. You'll want to divide the tarp into 16 equal squares. Measure the total width and length of your tarp and divide each dimension by four to determine the size of each square, then use your ruler to draw faint lines or place temporary markers.
- 3
Create a stencil for your colored circles using a piece of cardboard. Trace a large circular object, like a dinner plate or bucket lid, aiming for a diameter of about 10-12 inches. This size ensures the circles are large enough to be easily seen and landed on comfortably within each grid square.
- 4
Cut out the traced circle from the cardboard using scissors or a craft knife, creating a clean stencil. Ensure the edges are smooth to prevent paint bleed. You can also create a larger square stencil if you prefer a different look for your colored spots.
- 5
Place the circle stencil precisely in the center of the first square of your grid. If needed, use a small piece of painter's tape to hold the stencil in place, ensuring it doesn't shift during painting. Carefully spray paint the inside of the stencil with red paint, using light, even coats to avoid drips.
- 6
Allow the first painted circle to dry to the touch before moving the stencil to the next designated square. This prevents smudging and ensures a clean, crisp edge for each colored spot. Check the spray paint can for specific drying times, which can vary.
- 7
Continue painting the colored circles, alternating colors according to the classic Twister pattern: red, blue, yellow, green, red, blue, and so on, until all 16 squares are filled with a colored circle. Ensure each square receives a distinct color, maintaining the visual appeal and playability of the game.
- 8
Once all the colored circles are dry to the touch, it's time to create the spinner board. This can be a separate section on the tarp or a completely separate piece of cardboard if you prefer. For this guide, we'll assume it's on the tarp, away from the main game grid.
- 9
On a separate piece of cardboard, draw the layout for your spinner. This should be divided into four main sections, each representing a body part: 'Left Hand', 'Right Hand', 'Left Foot', 'Right Foot'. Make these sections large enough to clearly accommodate the color names.
- 10
Within each of the four body part sections, list the four colors (red, blue, yellow, green) once each. You can arrange them randomly or in a specific order, but ensure each color appears once per section. This creates the 16 possible combinations for the spinner.
- 11
Carefully cut out your spinner board stencil from the cardboard. You can make it a simple square or a more decorative shape. Place your spinner board stencil on the tarp, ensuring it's positioned in a clear area away from the game grid, and spray paint the entire layout using black paint.
- 12
Allow all spray paint to dry completely according to the manufacturer's instructions before playing. This is a crucial step to ensure the paint adheres well to the tarp and doesn't easily transfer onto clothing or skin during gameplay. Proper drying prevents a sticky surface and preserves the game's appearance.
- 13
Once the paint is fully dry, carefully inspect your Giant Lawn Twister board for any missed spots or areas that need touch-ups. You can use the stencils again or freehand small corrections if necessary. Ensure the spinner board is also completely dry and legible.
- 14
To play, designate one person as the spinner. The spinner calls out the body part and color combination (e.g., 'Right Hand, Blue!'). Players then move their designated hand or foot to the nearest available circle of that color on the game grid. The last player standing without falling over wins!
Tips & Troubleshooting
- 1Use temporary spray paint specifically designed for outdoor use and lawns. These paints are formulated to be weather-resistant for a period but will eventually break down and wash away, making cleanup significantly easier and preventing permanent damage to your lawn or patio.
- 2If you don't have a single large tarp, you can easily tape together several smaller tarps or even use a large, clean bedsheet. However, be aware that spray paint may not adhere as well to fabric materials, and the surface might be less durable for active play.
- 3For a more durable and long-lasting game, consider using fabric paint and a canvas drop cloth instead of a plastic tarp. This will create a more robust game board, but be aware that fabric paint is much harder to remove and will be a more permanent addition to your chosen surface.
- 4Ensure good ventilation when using spray paint, especially if working on a patio or driveway. Avoid windy days, as this can cause the paint to blow onto unintended surfaces, creating a mess and wasting paint. Choose a calm, clear day for the best results.
- 5When creating your stencils, take your time to ensure clean cuts. Jagged edges on your stencils can lead to fuzzy lines and paint bleed, detracting from the crisp appearance of your game board. A sharp craft knife is ideal for precise stencil cutting.
- 6Before you begin painting, test your spray paint on a small, inconspicuous area of the tarp or a scrap piece of material. This allows you to check the color saturation, drying time, and how well it adheres, ensuring you're happy with the final look before committing to the entire game.
- 7Consider the size of your tarp and the space you have available. A larger tarp allows for more space between the colored circles, making it easier and more comfortable for players to move around, especially for larger groups or taller individuals.
Related Activities You Might Enjoy
Frequently Asked Questions
How do I clean up the giant lawn Twister game?
Cleaning up your Giant Lawn Twister is generally straightforward, especially if you've used temporary outdoor spray paint. Most temporary outdoor spray paints are designed to wash away with water. Start by hosing down the tarp with a garden hose, using a stiff brush to gently scrub away any remaining paint. For more stubborn spots, a mild detergent or dish soap can be effective. Allow the tarp to dry completely in the sun before rolling it up for storage to prevent mildew and ensure the paint residue doesn't stick to itself.
Can I make a different spinner layout?
Absolutely! The beauty of a DIY project is its customizability. You can easily modify the spinner board to include different directions or add more elements to make the game more challenging or unique. For instance, you could add sections like 'Spin Again,' 'Skip a Turn,' 'Switch Colors,' or even 'Opposite Foot.' If you have more colors available, you can expand the spinner sections to include them, creating a more complex game that keeps players on their toes and adds a fresh twist to the classic rules.
What if I don't have spray paint?
If spray paint isn't an option, you can still create a fun Giant Lawn Twister game! For a temporary and incredibly easy-to-clean option, use large chalk to draw the circles and spinner directly onto a concrete or asphalt surface like a driveway or patio. This method is perfect for a one-time event or if you want to avoid any potential mess. For a more durable, non-paint solution, consider using brightly colored duct tape to outline the circles and spinner sections on your tarp or directly on the ground.
How many people can play giant lawn Twister?
Giant Lawn Twister is best enjoyed with 4-6 players, as this allows for enough people to be actively engaged on the board without it becoming too crowded. However, you can certainly accommodate more players if you have a larger tarp and ample space. The key is ensuring there's enough room for everyone to move their limbs freely without tripping over each other. For very large groups, consider making two separate game boards or playing in heats.
How long will the spray paint last on the tarp?
The longevity of temporary outdoor spray paint on a tarp can vary depending on the specific brand, the type of tarp material, and environmental factors like sunlight exposure, rain, and foot traffic. Typically, these paints are designed to last for several weeks to a few months. They are meant to be temporary and will eventually fade or wash away, which is ideal for a game that you might not want to be permanent. If you want a more durable game, consider fabric paints or other more permanent marking methods.
Can I make the colored circles larger or smaller?
Yes, you can absolutely adjust the size of the colored circles to suit your preferences and the size of your tarp. If you have a very large tarp, you might want to make the circles larger to fill the space and make them more visible from a distance. Conversely, if you have a smaller tarp or want a more challenging game with less space to maneuver, you can create smaller circles. Just ensure the circles are large enough for a hand or foot to comfortably land on and that they fit well within your grid squares.
What Next?
You've now created your very own Giant Lawn Twister, ready for countless hours of laughter and friendly competition! Consider variations like adding a 'free space' or 'spin again' to your spinner for added challenge. For a more permanent fixture, you could explore fabric paints on a canvas drop cloth, though this will require more careful handling and storage. When not in use, simply allow the tarp to dry completely and roll it up for easy storage until your next party. This DIY game is a fantastic way to encourage outdoor play and create lasting memories.
Free: 10 Paper Crafts Anyone Can Make in 5 Minutes
Get our beginner guide + new craft ideas weekly.
No spam. Unsubscribe anytime.
Did you complete this activity?