How to Build a Cardboard Marble Run — Easy Step-by-Step Guide
Create an exciting, gravity-powered marble run using everyday cardboard! This DIY project provides hours of screen-free entertainment for the whole family. It's a fantastic way to encourage creativity, problem-solving, and fine motor skills while repurposing materials.
Quick answer
To make a cardboard marble run, you need cardboard boxes (2-3 medium), scissors or a craft knife, strong tape, marbles (5-10), a ruler, and a pencil. Start by cutting cardboard pieces for tracks and supports. This beginner-friendly activity has 12 detailed steps and is perfect for families with kids aged 6+. The entire process typically takes about 60-90 minutes, depending on complexity.
What you need
Shop on Amazon · As an Amazon Associate we earn from qualifying purchases. Links above are affiliate links — we may earn a commission at no extra cost to you.
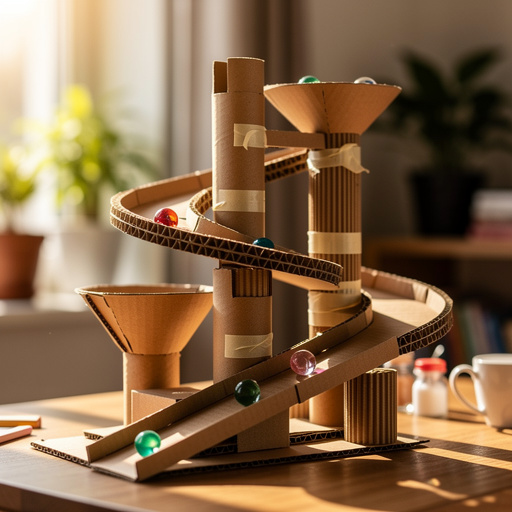
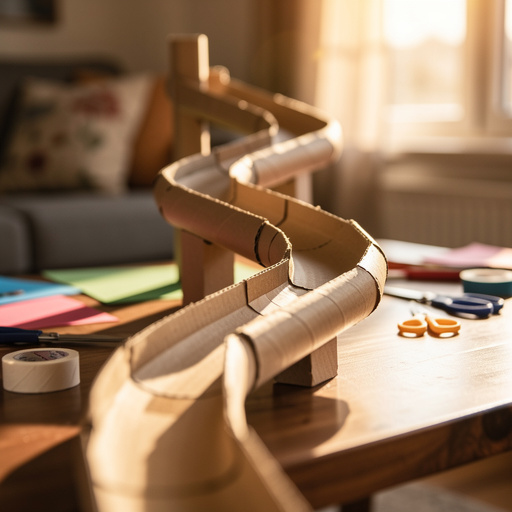
Embark on a creative adventure with this engaging DIY cardboard marble run project! In a world often dominated by screens, this hands-on activity offers a refreshing opportunity for families to connect and build something tangible together. It's a fantastic way to foster problem-solving skills, spatial reasoning, and fine motor development in children, all while having an absolute blast. Using simple, recycled materials, you can transform ordinary cardboard boxes into an exhilarating gravity-powered spectacle that will captivate imaginations and provide hours of screen-free entertainment for kids aged 6 and up, and even adults!
On this page
Step-by-Step Instructions
- 1
Gather your cardboard boxes and clear a spacious, well-lit workspace. Ensure you have enough room to spread out and assemble your marble run without feeling cramped.
- 2
Select one of your larger cardboard boxes and carefully cut off all the top and bottom flaps. This will create a large, flat rectangular piece of cardboard that will serve as the sturdy base for your marble run.
- 3
Take your remaining cardboard boxes and begin cutting them into long strips. These strips will form the tracks for your marbles. Aim for a variety of widths, generally between 2 to 4 inches wide, and ensure they are long enough to create interesting paths. You'll want at least 8-10 track pieces to start.
- 4
Before you start taping, take some time to visualize and plan the general layout of your marble run. Consider whether you want a simple, straight descent or a more intricate, winding path with multiple turns and drops. You can even sketch your design on a piece of paper first.
- 5
Using your ruler and pencil, mark the desired starting point on your cardboard base where the first track piece will attach. Think about the angle needed for gravity to work effectively; a gentle downward slope is essential for smooth marble movement.
- 6
If you plan to connect track pieces at angles or create turns, you'll need to cut small, angled notches into the ends of your track pieces. This allows the pieces to overlap and connect seamlessly, preventing marbles from getting stuck at the joints.
- 7
Securely tape the first track piece to your designated spot on the cardboard base. Ensure the tape is applied firmly and covers the entire connection point to prevent any gaps. Double-check that this first piece is angled slightly downwards towards its end.
- 8
Continue attaching subsequent track pieces, creating a continuous path for the marbles to travel. Overlap the ends of the track pieces slightly where they connect to ensure a smooth transition and prevent the marbles from catching or falling out.
- 9
To add height and create multiple levels for your marble run, cut smaller pieces of cardboard to act as vertical supports. Tape these supports securely to the base, ensuring they are stable enough to hold the weight of the tracks and the marbles.
- 10
Begin attaching your track pieces to these newly created vertical supports, again ensuring a slight downward angle for each section. Experiment with different heights and placements to create exciting drops and changes in direction.
- 11
Test your marble run by gently rolling a marble down the track from the starting point. Observe its journey carefully, noting any areas where it slows down, gets stuck, or falls off. Adjust the angles of the tracks or add more tape to smooth out any rough spots or gaps.
- 12
Once you are satisfied with the basic functionality and flow of your marble run, it's time to reinforce all the taped connections. Go back over every joint and seam, adding extra tape to ensure durability and prevent your creation from falling apart during play.
- 13
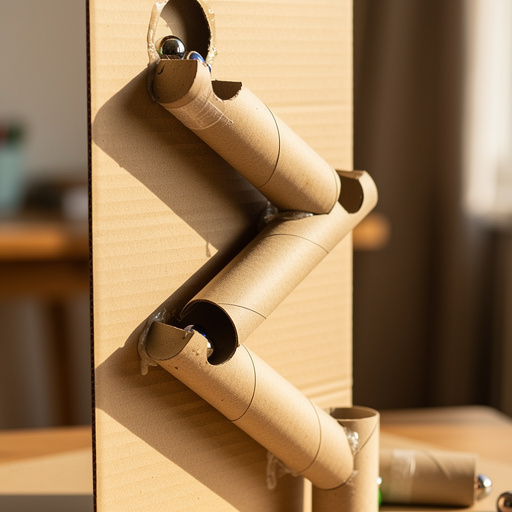
Now, let your creativity run wild! Add fun elements like cardboard tubes rolled into tunnels, small ramps made from folded cardboard, or even simple funnels created from cone-shaped cardboard pieces. These additions will increase the complexity and excitement of your marble run.
- 14
Consider adding a 'catch basin' at the bottom of your marble run to collect the marbles. This can be as simple as a small cardboard box or a slightly raised edge around the final track section.
- 15
If you're aiming for a more robust and permanent structure, consider using a hot glue gun (with adult supervision) in conjunction with tape for attaching cardboard pieces. This will provide a much stronger bond.
- 16
Once your marble run is complete and functioning beautifully, you can further enhance its appeal by decorating it. Use paints, markers, crayons, or stickers to add color, patterns, and even themed elements to your creation.
Tips & Troubleshooting
- 1If marbles frequently get stuck, meticulously inspect your tracks for any sharp edges, uneven surfaces, or small gaps where the marble might be catching. Gently trim away any protruding cardboard or reinforce the area with extra tape to create a smoother path.
- 2Experiment with different track widths to see how it affects the marble's speed and stability. Wider tracks can accommodate larger marbles and might be more forgiving, while narrower tracks can create more challenging runs and require more precision in construction.
- 3Personalize your marble run by decorating it with paints, markers, crayons, or stickers. You can create a themed run, add colorful patterns, or even draw little signs for different sections to make it truly unique.
- 4For a significantly more stable and durable structure, consider using a hot glue gun (with strict adult supervision) in addition to tape for attaching cardboard pieces. Hot glue provides a strong, rigid bond that can withstand more vigorous play.
- 5When creating your tracks, ensure a consistent downward slope. Even a slight upward angle in any section will cause the marbles to stop or roll backward, disrupting the flow of your marble run.
- 6Don't be afraid to iterate and adjust your design as you build. If a section isn't working as planned, take it apart and try a different angle or support structure. This problem-solving aspect is a key part of the fun!
- 7Consider using different types of marbles to add variety. Larger marbles might roll slower but are easier to keep on track, while smaller marbles can be faster and more unpredictable, adding an extra layer of challenge.
- 8To store your marble run, you can either carefully disassemble it by gently peeling off the tape, allowing you to rebuild it later, or find a safe, flat space where it won't be crushed or damaged, perhaps leaning it against a wall.
Related Activities You Might Enjoy
Frequently Asked Questions
What are the best materials for a DIY cardboard marble run?
The best materials for a DIY cardboard marble run are sturdy, clean cardboard boxes that are free from excessive creases or damage. For tracks, corrugated cardboard works wonderfully as it's rigid yet easy to cut. For assembly, strong tape like packing tape or duct tape is essential for durability, though masking tape can be useful for temporary holds or lighter connections. Scissors or a craft knife are needed for cutting, with a craft knife offering more precision but requiring adult supervision. A good selection of marbles, at least 10-15, is crucial for testing and play. Additionally, a ruler or straight edge and a pencil or marker are invaluable for planning and marking cuts accurately. Optional materials like cardboard tubes for tunnels and hot glue (with supervision) can enhance the project.
How long does it take to make a cardboard marble run?
The time it takes to build a cardboard marble run can vary significantly depending on the complexity of your design and the age and experience of the builders. For a basic, straightforward marble run with a few levels and turns, you can expect it to take around 60 to 90 minutes. This includes the time for planning, cutting the cardboard pieces, assembling the tracks and supports, and testing and making adjustments. More elaborate designs with multiple interconnected paths, intricate tunnels, or decorative elements could take several hours or even be a multi-day project, especially if you involve extensive decorating. It's a project that can be completed in one sitting for simpler versions or spread out over a weekend for more ambitious creations.
Is a cardboard marble run difficult to build?
Building a cardboard marble run is generally considered an intermediate difficulty craft, making it accessible to most families. The core skills involved are cutting cardboard and using tape to assemble pieces. While it requires some patience and attention to detail, especially when ensuring the tracks have the correct downward slope, it's not overly complex. Younger children (around 6 years old) can certainly participate and contribute significantly with adult supervision and assistance, particularly with the cutting steps. Older children and adults will find it a rewarding challenge that encourages problem-solving and spatial reasoning. The beauty of this project is its flexibility; you can start with a simple design and gradually increase complexity as your confidence grows.
What age is a cardboard marble run suitable for?
A cardboard marble run is suitable for children aged 6 and up. At this age, children typically have developed enough fine motor skills to assist with cutting (with supervision) and taping, and they can grasp the concept of gravity and cause-and-effect needed to understand how the marble run works. Younger children, such as preschoolers, can absolutely be involved in the fun, but they will require significant adult supervision and hands-on assistance, especially with any cutting tasks. Their role might focus more on decorating the finished product or testing the marbles. The project is also highly enjoyable for older children, teenagers, and even adults, making it a fantastic family activity that can be adapted to various skill levels.
How can I make my cardboard marble run more stable?
To enhance the stability of your cardboard marble run, several techniques can be employed. Firstly, ensure all your cardboard pieces are cut cleanly and fit together snugly before taping. When taping, use generous amounts of strong tape, like packing or duct tape, and ensure it adheres firmly to both surfaces. For critical joints and supports, consider using a hot glue gun (with adult supervision) in addition to tape; hot glue provides a much stronger and more rigid bond. When creating vertical supports, make sure they have a wide base or are securely attached to multiple points on the main base to prevent wobbling. If your marble run is quite tall, consider adding diagonal bracing pieces of cardboard to provide extra structural integrity, much like in real-world construction.
What are some ways to add complexity and fun to a cardboard marble run?
There are numerous ways to inject complexity and fun into your cardboard marble run. Incorporate cardboard tubes (from toilet paper or paper towel rolls) to create exciting tunnels that marbles can race through. You can also fold and tape cardboard scraps to create small ramps that launch marbles to a different track or level. Consider adding 'gates' or 'switches' made from movable cardboard pieces that can redirect the marble's path. Building multiple starting points that converge into a single track, or creating a split-track system where marbles can go down different paths, adds strategic fun. Even simple elements like a 'catch basin' with a small obstacle or a spinning element at the bottom can increase engagement and replayability.
What Next?
Congratulations on building your very own cardboard marble run! This project is a testament to the power of simple materials and creative thinking. Don't stop here; consider adding more complex elements like multiple starting points, elaborate drop zones, or even incorporating other recycled items like toilet paper tubes for tunnels. Once complete, your marble run can be a fantastic display piece in a playroom or a fun activity to bring out during gatherings. For storage, you can either carefully disassemble it for future rebuilding or find a sturdy spot where it won't be damaged, ready for its next thrilling run.
Free: 10 Paper Crafts Anyone Can Make in 5 Minutes
Get our beginner guide + new craft ideas weekly.
No spam. Unsubscribe anytime.
Did you complete this activity?
Related
You might also like
Cardboard Tube Gravity Chute
Cardboard Box Accordion
Cardboard Tube Gravity Track
Paper Plate Marble Maze
Cardboard Strummer Guitar