How to Make a DIY Rain Stick — Easy Step-by-Step Guide
Craft your own mesmerizing rain stick using simple household items. This DIY project creates a soothing sound that mimics rainfall, perfect for quiet time or sensory play.
Quick answer
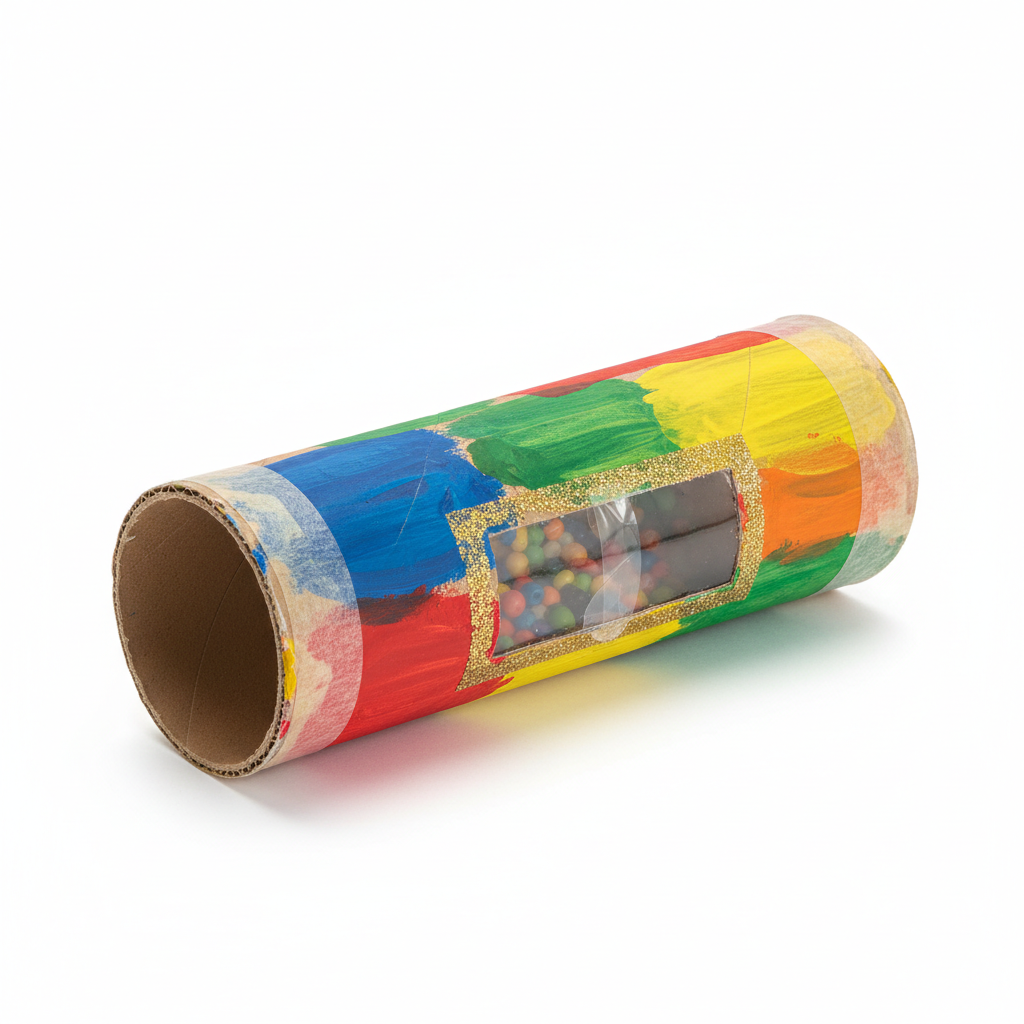
To make a DIY rain stick, you need a cardboard tube, nails, rice, and tape, taking about 45 minutes. Start by inserting nails into the tube. This beginner-friendly activity has 10 steps and is perfect for families with kids aged 6+.
What you need
Shop on Amazon · As an Amazon Associate we earn from qualifying purchases. Links above are affiliate links — we may earn a commission at no extra cost to you.
Discover the simple joy of creating your own sensory instrument with this DIY rain stick tutorial. Mimicking the gentle patter of rainfall, a handmade rain stick offers a wonderfully calming auditory experience, making it an ideal project for quiet time, mindfulness exercises, or engaging sensory play for children. It’s a fantastic way to connect with nature's sounds using everyday materials, fostering creativity and a sense of accomplishment for crafters of all ages. This accessible craft is perfect for families looking for a fun, screen-free activity that results in a beautiful, functional piece of art.
On this page
Step-by-Step Instructions
- 1
Gather all your materials in a well-lit, clear workspace. Ensure you have enough room to comfortably work with the cardboard tube and hammer.
- 2
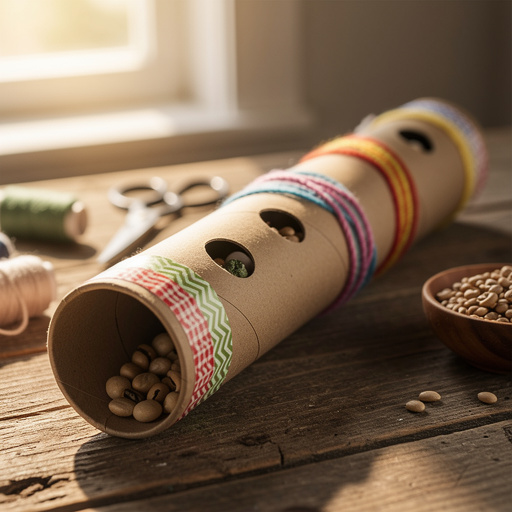
Inspect your cardboard tube. If it has open ends, you'll need to seal one end completely. Use a generous amount of duct tape or packing tape to cover one end securely, ensuring there are no gaps or openings where your filler material could escape.
- 3
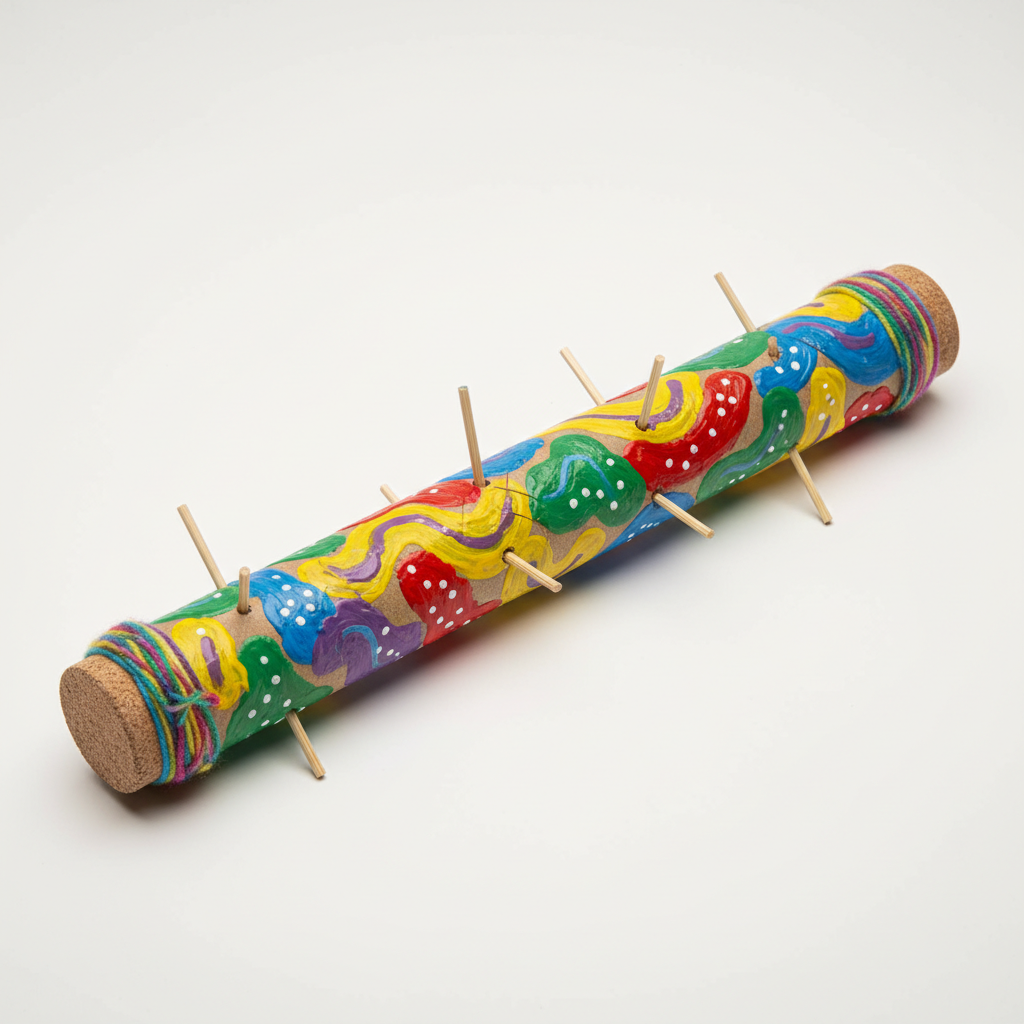
Begin the process of inserting the nails. Carefully hold the cardboard tube and, using the hammer, gently tap the first nail into the side of the tube. Aim to angle the nail slightly inward.
- 4
Continue tapping nails into the side of the cardboard tube, spacing them out evenly. A good starting point is about 1 inch apart, creating a spiral pattern that winds its way around the entire length of the tube. This spiraling effect is crucial for the sound of the rain stick.
- 5
Work your way around the tube, consistently tapping in nails. Ensure each nail is firmly embedded in the cardboard and doesn't feel loose or wobbly. The nails act as baffles, slowing down the falling filler and creating the rain sound.
- 6
Once you've spiraled nails all the way around the tube, take a moment to check your work. Gently shake the tube to ensure none of the nails are loose. If any feel precarious, tap them in a bit further for a secure fit.
- 7
Now it's time to add the sound-making filler. Carefully pour the 1/2 cup of uncooked rice (or your chosen filler material) into the open end of the tube.
- 8
Once the filler is inside, it's time to seal the second end. Just as you did with the first end, use duct tape or strong packing tape to securely close the remaining open end of the cardboard tube. Ensure this seal is just as robust as the first to prevent any leaks.
- 9
Test your rain stick! Gently tilt the tube and allow the filler to slowly cascade down. Listen to the sound it produces. If the sound is too loud or too quiet for your preference, you can adjust the amount of filler. Less filler generally results in a softer, more delicate sound, while more filler can create a louder, more pronounced rain effect.
- 10
If you wish to personalize and decorate your rain stick, now is the perfect opportunity. You can paint the tube with acrylic paints, draw designs with markers, wrap it with decorative paper using glue or Mod Podge, or adorn it with stickers.
- 11
Allow any paint, glue, or decorative elements to dry completely before you begin playing with your new DIY rain stick. This ensures a durable and polished finish.
- 12
Once everything is dry, your DIY rain stick is ready for use! Gently tilt it to enjoy the soothing, rain-like sounds you've created.
Tips & Troubleshooting
- 1If hammering nails directly into the cardboard tube proves challenging, consider pre-poking small pilot holes with a sharp object like a skewer or a thick needle. This requires adult supervision and care to avoid injury, but it can make the nail insertion process much smoother.
- 2Don't be afraid to experiment with different filler materials! Small beads, dried beans (like lentils or split peas), tiny pebbles, or even small pasta shapes will create unique sound variations. Each material will produce a distinct auditory texture, from a soft whisper to a more robust patter.
- 3For a more durable and long-lasting rain stick, especially if it will be handled frequently by children, consider using a stronger tube. A mailing tube or a thicker cardboard tube from a fabric store can offer more resilience. You can also reinforce the taped ends with extra layers of tape for added security.
- 4The amount and type of filler significantly impact the sound. If the rain sound is too loud, try adding a bit more rice or using smaller, lighter filler materials. Conversely, if the sound is too quiet, use less filler or opt for larger, heavier materials like small pebbles.
- 5Ensuring the tape on both ends is very secure is paramount. Double-check for any loose edges or gaps. A strong seal prevents the filler from escaping during play, which is essential for the longevity and enjoyment of your rain stick.
- 6When inserting nails, aim for a consistent angle. A slight inward tilt helps guide the filler material down the spiral path created by the nails, contributing to a more authentic rain sound. Avoid hammering nails in too deeply, as this can weaken the cardboard.
- 7Consider the diameter of your cardboard tube. A wider tube might require more nails to achieve the desired sound density, while a narrower tube might need fewer. Adjust the number of nails based on the tube's dimensions and your desired sound complexity.
- 8If you're using decorative paper, ensure it's applied smoothly without too many wrinkles. Wrinkles can sometimes interfere with the sound or create an uneven surface. Using a strong adhesive like craft glue or Mod Podge will help it adhere well and last longer.
Related Activities You Might Enjoy
Frequently Asked Questions
What materials do I need to make a rain stick?
To craft your very own DIY rain stick, you'll primarily need a sturdy cardboard tube, such as one from paper towels or wrapping paper, measuring about 12-18 inches in length. You'll also require a collection of small nails, typically finishing nails or brads, around 50-75 in number, along with a hammer for insertion. Strong adhesive tape, like duct tape or packing tape, is essential for sealing the ends securely. For the sound element, you'll need about half a cup of uncooked rice, though other small fillers like dried beans, small beads, or tiny pebbles can be used for varied sound effects. Scissors are needed for cutting tape, and optional decorative items like paint, markers, stickers, or decorative paper can be used to personalize your creation.
How long does it take to make a DIY rain stick?
The actual construction of the DIY rain stick, from gathering materials to sealing the ends, typically takes around 30-45 minutes. This timeframe assumes you have all your supplies readily available and are working efficiently. If you choose to decorate your rain stick, this will add extra time. Painting can take an additional 15-30 minutes, depending on the complexity of your design and the number of coats. Allowing paint or glue to dry completely can add anywhere from 1 to several hours, depending on the type of paint or adhesive used and environmental conditions. Therefore, while the hands-on crafting is relatively quick, the total project time, including drying, can extend to half a day or more.
Can kids make a rain stick by themselves?
This DIY rain stick project is an excellent activity for families, but the level of independence for children depends on their age and fine motor skills. Children aged 6 and up can certainly participate, especially in the decorating and filling stages. However, the step involving hammering nails into the cardboard tube requires close adult supervision and assistance due to the use of a hammer and sharp nails. Younger children might be able to help by holding the tube steady or by applying stickers and markers for decoration. It's a wonderful project to do together, fostering teamwork and creativity while ensuring safety.
What can I use instead of rice in a rain stick?
While uncooked rice is a popular and effective filler for DIY rain sticks, there's a world of other small items you can use to create unique sound profiles. Dried beans, such as lentils, split peas, or small kidney beans, offer a slightly different texture and sound. Small beads, like pony beads or seed beads, can produce a finer, more delicate rattling sound. Tiny pebbles or small gravel can create a more robust, earthy sound reminiscent of a heavier rainfall. Even small pasta shapes, like orzo or couscous, can be used. Experimenting with different fillers is key to discovering your favorite rain stick sound!
How do I ensure the nails are secure and don't fall out?
Ensuring the nails are secure is crucial for the longevity and sound quality of your rain stick. When hammering, aim to drive the nails in firmly so they are embedded well into the cardboard. A slight inward angle can help them grip the material better. Avoid hammering them in so deep that they pierce through the other side of the tube, which could create sharp edges or weaken the structure. After inserting all the nails, give the tube a gentle shake to test for any looseness. If a nail feels wobbly, carefully tap it in a bit further. For extra security, especially with softer cardboard, you can add a tiny dab of craft glue around the base of each nail once it's in place, though this is usually not necessary if hammered correctly.
What is the best type of cardboard tube to use?
The best type of cardboard tube for a DIY rain stick is one that is sturdy and not too flimsy. Tubes from paper towels or toilet paper rolls can work, but they might be a bit short and less durable. For a more substantial and longer-lasting rain stick, consider using a tube from wrapping paper, a poster tube, or even a mailing tube. These thicker-walled tubes provide better structural integrity, making it easier to hammer in the nails without crushing the cardboard and ensuring the rain stick can withstand repeated use. The length of the tube also influences the sound; longer tubes generally produce a more sustained and complex rain sound.
What Next?
Congratulations on crafting your very own DIY rain stick! This versatile instrument can be used for relaxation, storytelling, or simply as a unique decorative piece. For variations, consider using different lengths of tubes or experimenting with a wider array of filler materials to achieve distinct sound profiles. You could even create a set of rain sticks with varying sounds for a more complex auditory experience. Store your rain stick upright in a cool, dry place to protect it from moisture and damage. Display it proudly as a testament to your crafting skills, or gift it to someone special who would appreciate its soothing melody.
Free: 10 Paper Crafts Anyone Can Make in 5 Minutes
Get our beginner guide + new craft ideas weekly.
No spam. Unsubscribe anytime.
Did you complete this activity?
Related